


Learn through the super-clean Baeldung Pro experience:
>> Membership and Baeldung Pro.
No ads, dark-mode and 6 months free of IntelliJ Idea Ultimate to start with.
Learn through the super-clean Baeldung Pro experience:
>> Membership and Baeldung Pro.
No ads, dark-mode and 6 months free of IntelliJ Idea Ultimate to start with.
UEFI (Unified Extensible Firmware Interface) has become the standard for modern computer firmware. It has many advantages over the traditional BIOS:
Emulating UEFI on virtual machines can be helpful for development, testing, and learning purposes.
In this tutorial, we’ll see the steps to boot from UEFI in QEMU. Also, we cover the essentials, from using Open Virtual Machine Firmware (OVMF) to various ways of booting UEFI in QEMU.
Notably, we use a Ubuntu ISO file for the purposes of this tutorial.
To boot a disk image in UEFI mode, we require two main components:
The path of firmware files usually varies depending on the Linux distribution. In general, we can find these files at /usr/share/OVMF/OVMF_CODE.fd and /usr/share/OVMF/OVMF_VARS.fd.
OVMF is used to enable UEFI firmware support in QEMU and KVM-based VMs. It’s part of the Intel EFI Development Kit II (edk2) project.
Moreover, to use OVMF, we can install it with apt:
$ sudo apt install ovmfAs a matter of fact, we can also build it from the source.
Either way, we should have support for OVMF before continuing.
QEMU VMs can be controlled via the command-line interface (CLI). In this section, we check the virt-install and qemu-system-x86_64 tools as possible solutions to UEFI booting.
virt-install is a command-line tool for creating new virtual machines using the libvirt hypervisor. It provides a simple way to set up a VM with a UEFI setup.
Let’s create a UEFI-enabled virtual machine with the Ubuntu ISO file:
$ sudo virt-install
  --name Ubuntu_Uefi \
  --memory RAM_in_MB \
  --arch x86_64 \
  --boot loader=/usr/share/OVMF/OVMF_CODE.fd \
  --cdrom /path/to/the/iso/file \
  --disk /path/to/disk.img,size=DISK_SIZE \
  --virt-type=kvm \
  --network=default,model=virtio \
  --vcpu=1 \
  --check all=off
  --virt-type qemu
We replace the placeholders with pre-defined values:
In fact, we can just use –boot uefi to boot from UEFI. That means we can bypass the custom OVMF_CODE.fd file.
After that, we continue the VM installation inside the virt-viewer.
The QEMU emulator (qemu-system-x86_64) directly manages virtual machines with various options.
Let’s first create a disk image file to store the VM data:
$ qemu-img create -f qcow2 disk.img 15G
Formatting 'disk.img', fmt=qcow2 ...
As a result, we can see an image file, disk.img, in the current directory. Also, this file has a size of 15 GB and is formatted as qcow2.
In the next step, we launch the VM:
$ sudo qemu-system-x86_64 \
  -drive if=pflash,format=raw,readonly=on,file=/usr/share/OVMF/OVMF_CODE.fd \
  -drive if=pflash,format=raw,file=/usr/share/OVMF/OVMF_VARS.fd \
  -drive file=/path/to/the/file/disk.img/,format=qcow2 \
  -cdrom /path/to/the/iso/file \
  -m 4098
Here, we’re using the qemu-system-x86_64 command. Basically, this is the QEMU system emulator for the x86_64 architecture.
Moreover, we’ve got three drive options here.
Let’s break down the first drive option:
The second drive option is also the same as the last one but for the OVMF_VARS.fd file. In particular, this file contains the variable store for the UEFI firmware. Also, OVMF_VARS.fd should be read and write enabled, as it holds the UEFI settings and variables that may change.
Furthermore, we’ve got the third drive option with two sub-options:
The above values add the main storage image for the virtual machine.
Then, the -cdrom option sets the path to the installation media.
Finally, -m 2048 specifies that the virtual machine should have 2048 MB (or 2 GB) of RAM.
Thus, the above command starts a QEMU virtual machine with UEFI support using the OVMF firmware.
QEMU frontends come with a graphical interface for managing virtual machines. There are two popular options:
Let’s go through each method one by one.
AQEMU is a graphical user interface (GUI) for QEMU. It uses the Qt5 framework.
Let’s install AQEMU using apt:
$ sudo apt install aqemuNow, we start AQEMU from the application menu.
Further, we create a new virtual machine using the icon on the left panel:

In the New Virtual Machine Wizard, we select the typical configuration mode:

Next, we choose the template option and OS type as Linux 2.6:

Then, we use the KVM (Recommended) as the Machine Accelerator:

Further, we give the VM a name, say AQEMU-VM:

For the VM hard disk, we use a size of 20.0 GB:

In this case, we use the default options for the Network type:

Finally, we complete the setup process:

We can now see and change all VM details on the right panel of the main window.
Here, we select the VM tab and go to the Advanced option:

Now, we enter the custom QEMU command line arguments to use the UEFI firmware:

Next, we go to the Media tab and add a CD-ROM device under the Add Devices section:

In this case, we select the Ubuntu ISO image.
Finally, we apply the changes and start the VM. Thus, we can now boot the UEFI image in AQEMU.
Virtual Machine Manager (virt-manager) is another powerful GUI tool for managing virtual machines.
To install virt-manager, we again use apt:
$ sudo apt install virt-managerNext, we launch virt-manager and create a new virtual machine using the Local install media option:

Then, we point to the path containing the Ubuntu ISO file:

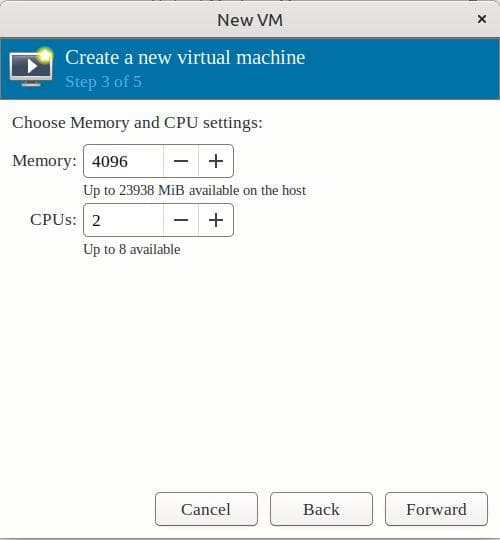
Moving on, we set the Memory and CPU options for the VM:
In the next step, we enable and set the storage options as before:

Then, we mark the option Customize configuration before installation:

In the Overview section, we set the firmware to UEFI and apply the changes:

As a result, we can now start the OS installation.
In this article, we learned about booting from UEFI in QEMU.
Initially, we covered the purpose of Open Virtual Machine Firmware (OVMF). Then, we used the QEMU command-line tools virt-install and the QEMU emulator. Finally, we used QEMU frontends such as AQEMU and Virtual Machine Manager.