

Yes, we're now running our only Summer Sale. All Courses are 30% off until 20th July, 2026:
Learn through the super-clean Baeldung Pro experience:
>> Membership and Baeldung Pro.
No ads, dark-mode and 6 months free of IntelliJ Idea Ultimate to start with.
1. Overview
In this tutorial, we’ll learn to enable MySQLi extension for PHP on a Linux machine.
The MySQLi extension helps us interact with the MySQL database using PHP. It has support for object-oriented programming and procedural programming styles. This allows developers to choose the approach that aligns with their coding preferences. Moreover, it supports prepared statements that significantly enhance the security of database operations by preventing SQL injection attacks.
Before proceeding, let’s look at the prerequisites for this tutorial.
2. Prerequisites
First, we need to have PHP and MySQL installed on the system. In general, we can install them using the package manager like apt-get and yum. For example, on a Debian-based system (like Ubuntu), we can use:
$ sudo apt-get update
$ sudo apt-get install php mysql-server php-mysql
On a Red Hat-based system (like CentOS), we can use:
$ sudo yum install php mysql-server php-mysqlThe MySQLi extension is often available by default with PHP. However, if not, then make sure to install it using the below commands explicitly:
$ sudo apt-get install php-mysqli  # On Debian-based systems
$ sudo yum install php-mysqli      # On Red Hat-based systems
Note that the package name can be something like php-mysqli or php7.4-mysqli.
3. Verify the Current Status
Let’s verify the current status of the MySQLi extension using the below command:
$ php -m | grep mysqliIf the MySQLi extension is enabled, we’ll see mysqli in the output. Otherwise, the output will be empty.
4. Enable the Extension
In order to enable the extension, we need to update the php.ini configuration file. Generally, the php.ini configuration file is located in one of the following common paths:
For the PHP CLI (Command Line Interface):
/etc/php/{PHP_VERSION}/cli/php.iniFor the PHP used by the web server (such as Apache or Nginx):
/etc/php/{PHP_VERSION}/apache2/php.ini (for Apache)
/etc/php/{PHP_VERSION}/fpm/php.ini (for PHP-FPM with Nginx)
Here, we should replace {PHP_VERSION} with the installed version of PHP, such as “7.4” or “8.0”.
Note that the actual location might vary depending on the Linux distribution and how PHP was installed. We can use the below command to find the exact location of the php.ini file:
$ php -i | grep "php.ini"
Configuration File (php.ini) Path => /etc
Loaded Configuration File => /etc/php.ini
Once we get the php.ini file path, we need to search for the line “extension=mysqli” or “extension=php_mysqli“. Remove the semicolon (semicolon denotes a comment) to uncomment the line and save the file.
We always need to make sure to back up any configuration files before making changes.
5. Restart the Web Server
So far, we have updated the configuration file. Finally, we need to restart the webserver to apply the changes. Depending on the web server type, we can use the below commands:
For Apache:
$ sudo service apache2 restartFor Nginx:
$ sudo systemctl restart nginx6. Verify Extension Enablement
Once the web server is restarted, we can verify the status of the MySQLi extension using the below command:
$ php -m | grep mysqliAlternatively, we can also verify the same using a PHP script that outputs the loaded extensions. Create a file called phpinfo.php in the web server’s document root (often /var/www/html) and add the following content:
<?php
phpinfo();
?>
We can then access this script from the web browser (e.g., http://localhost/phpinfo.php) and search for MySQLi on the page to confirm that the extension is enabled and loaded:
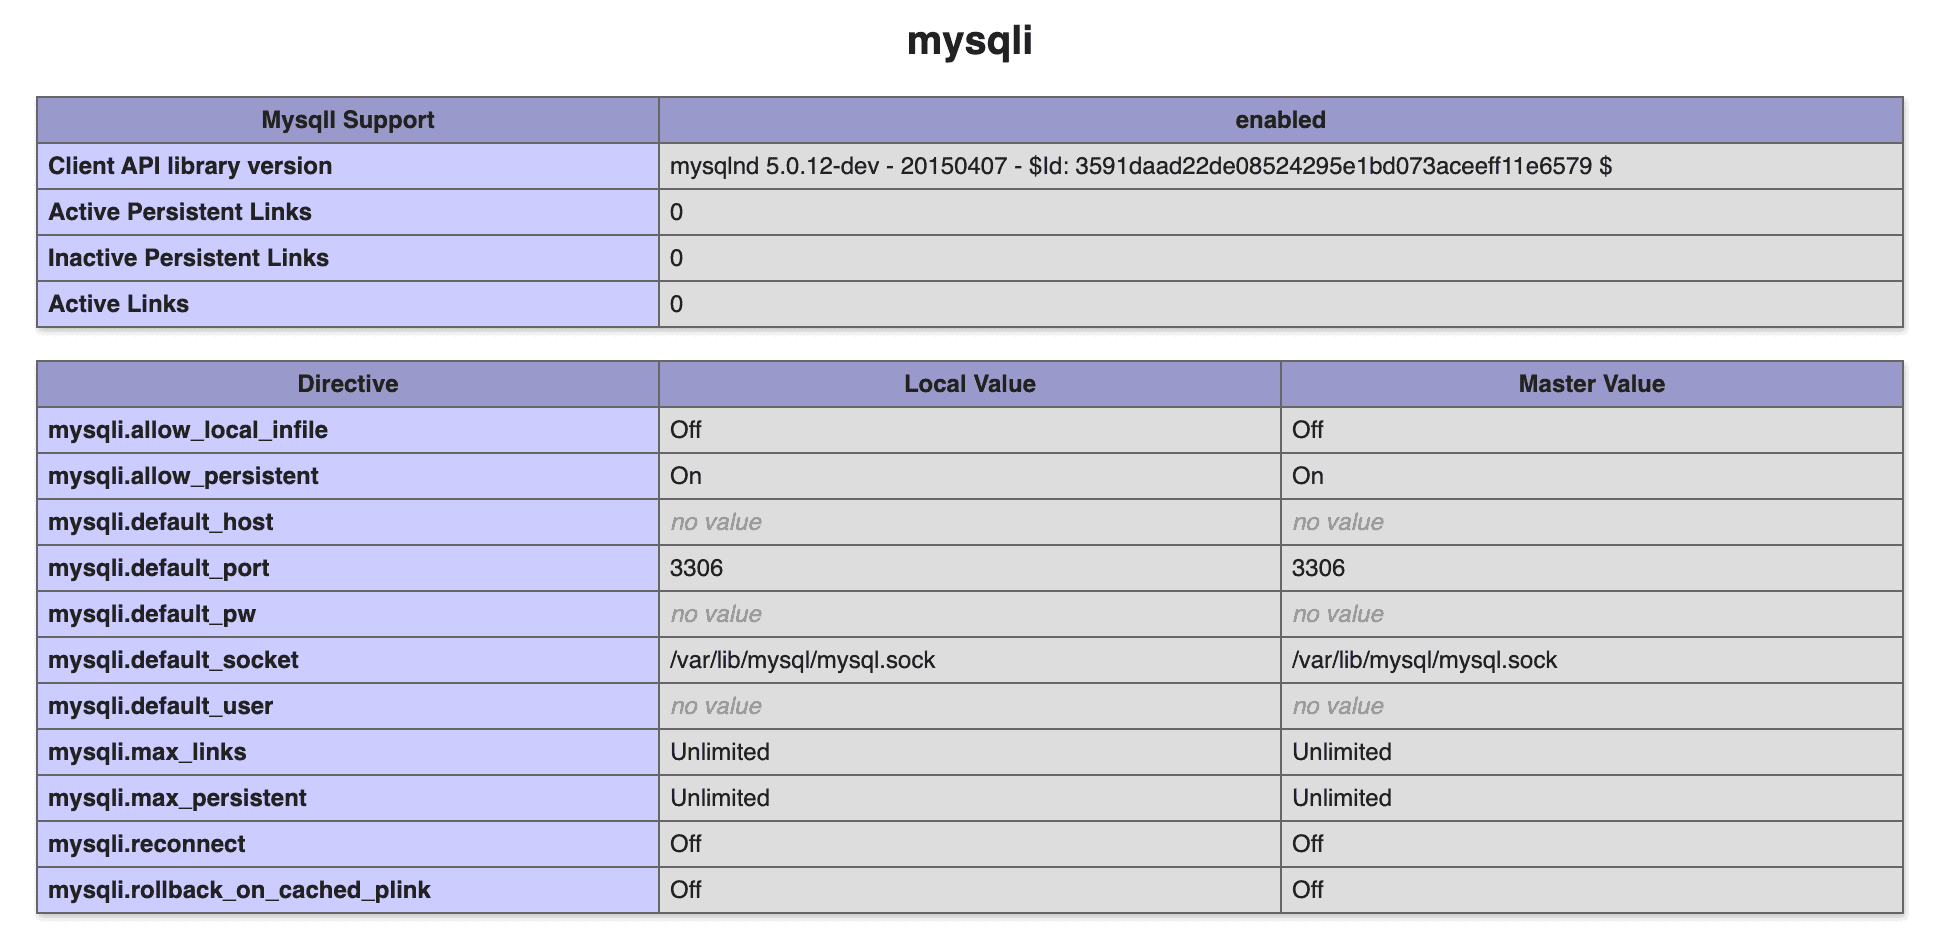
In the above image, we can find more details about the MySQLi extension loaded by PHP. In case the MySQLi extension is not loaded, this section will be missing on accessing the http://localhost/phpinfo.php page.
7. Conclusion
In this tutorial, we enabled the MySQLi extension on a Linux system. By enabling MySQLi, we gained access to improved database connectivity, security features, and performance enhancements.
We started by understanding the significance of the MySQLi extension in PHP programming and discussed the prerequisites. With a clear understanding of the current extension status, we proceeded to enable the MySQLi extension by modifying the php.ini configuration file. At last, we restarted the web server and verified the changes.