

Learn through the super-clean Baeldung Pro experience:
>> Membership and Baeldung Pro.
No ads, dark-mode and 6 months free of IntelliJ Idea Ultimate to start with.
Last updated: August 23, 2024
Learn through the super-clean Baeldung Pro experience:
>> Membership and Baeldung Pro.
No ads, dark-mode and 6 months free of IntelliJ Idea Ultimate to start with.
MySQL Workbench is a powerful visual application that’s popular for its usability in MySQL development, database administration, and data modeling. If we want to use it with a MySQL server on a Linux system, the primary step that we have to carry out is to establish a connection between this utility and the server. However, the method for establishing a connection between the two can be tricky.
In this tutorial, we’ll navigate through the step-by-step process of connecting MySQL Workbench to MySQL server on Linux. Notably, we’ll perform this operation on Ubuntu. However, the same process can apply to other distributions as well.
Before we begin, let’s make sure that we have access to a MySQL server.
Moreover, we make use of two main pieces of information:
Once ready with the above, we start the process.
To begin with, we download and install the MySQL Workbench application on the machine. For that, we go to the official MySQL Community Downloads page and download the utility from there as a .deb file.
Next, let’s navigate to the location where the downloaded .deb file is stored:
$ cd /usr/mysqlThen, let’s use the dpkg command with the -i option, short for –install, to install MySQL Workbench on the device via the .deb file:
$ sudo dpkg -i mysql-workbench-community_8.0.38-1ubuntu24.04_amd64.debOnce we hit Return, the installation process commences.
However, we usually encounter an error during the process stemming from the fact that we don’t have the required dependencies on the system.
To fix this error, we run another command:
$ sudo apt install -fThe apt command with the -f option, short for –fix-broken, installs all the missing dependencies and finishes the installation of MySQL Workbench on the machine.
In this section, we connect the MySQL Workbench application to the MySQL server that we have access to.
To start, we open the newly installed MySQL Workbench on the machine. On the home screen that appears, we click on the plus (+) icon to start setting up a new connection:

Upon clicking the icon, a new window appears. Here, we can fill in all the necessary details to connect this application to the MySQL server:
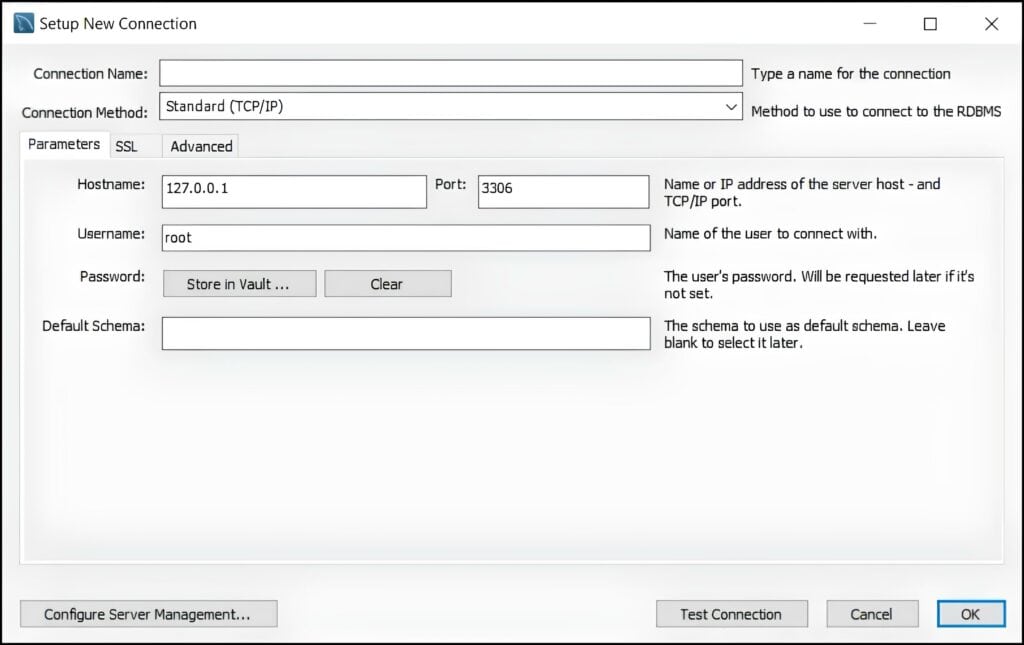
Visibly, there are quite a number of fields that we can fill up:
On top of the above, we leave the remaining field, i.e., Default Schema blank.
After making the changes, let’s click on the Test Connection button to test if the connection is established. Once the testing is complete, we get a message indicating the status of the connection:

As we can see above, the connection has been made successfully.
Next, let’s click on OK to finish setting up the connection between MySQL Workbench and the MySQL server.
Since the setup is now complete, the newly created connection is listed on the home screen. We just click on it to launch the MySQL editor for the connection.
Finally, let’s run a simple query in the editor that returns all the columns from the city table in the world database:

Evidently, the output lists all the columns from the specified table, indicating that everything is working correctly.
In this article, we had a detailed discussion on how to connect MySQL Workbench to MySQL server on Linux. The process can be a bit challenging, but following this guide should help create a connection between the two.