

Learn through the super-clean Baeldung Pro experience:
>> Membership and Baeldung Pro.
No ads, dark-mode and 6 months free of IntelliJ Idea Ultimate to start with.
Last updated: January 31, 2024
Learn through the super-clean Baeldung Pro experience:
>> Membership and Baeldung Pro.
No ads, dark-mode and 6 months free of IntelliJ Idea Ultimate to start with.
A motherboard is the central circuit board in a computer, connecting hardware components and facilitating power distribution and data communication. Understanding its specifications is crucial for compatibility, performance optimization, and informed component choices. Specifications include form factor, compatibility with CPUs and RAM, and connectivity options.
In this tutorial, we’ll explore various ways to find out the motherboard specifications of our system.
First, we’ll look at various command-line approaches such as dmi, dmidecode, sysf, lshw, lstopo, dmesg, and inxi. Lastly, we’ll discuss desktop-based applications like CPU-G and lshw-gtk to find out the motherboard specifications of the system.
To begin with, we focus on tools and options to get information about the motherboard through the CLI.
DMI stands for Desktop Management Interface. DMI is a standard for retrieving hardware information in computers.
Additionally, the dmidecode tool on Linux utilizes DMI to display detailed hardware information, aiding in system analysis, troubleshooting, and documentation.
Now, let’s use dmidecode and pipe its output to more to find out motherboard specifications:
$ sudo dmidecode | more
# dmidecode 3.4
Getting SMBIOS data from sysfs.
SMBIOS 2.4 present.
……
Base Board Information
    	Manufacturer: Intel Corporation
    	Product Name: 440BX Desktop Reference Platform
    	Version: None
    	Serial Number: None
    	Asset Tag: Not Specified
    	Features: None
    	Location In Chassis: Not Specified
    	Chassis Handle: 0x0000
    	Type: Unknown
    	Contained Object Handles: 0
……
Here, we use sudo with dmidecode to ensure we retrieve all available information from the DMI table. Moreover, the addition of the pipe symbol and more facilitates the management of the more extensive output.
Hence, the Base Board Information section in the dmidecode output reveals that the motherboard is manufactured by Intel and is identified as the 440BX Desktop Reference Platform model. The motherboard type is labeled as Unknown, with no specified physical location in the chassis.
Thus, this approach enhances navigation and readability, especially when dealing with comprehensive hardware details on a Linux system.
Similarly, we can use the dmidecode command with grep to find out the motherboard specifications of our system.
Let’s execute the command in the terminal:
$ sudo dmidecode | grep -A4 '^Base Board Information'
Base Board Information
        Manufacturer: Intel Corporation
        Product Name: 440BX Desktop Reference Platform
        Version: None
        Serial Number: None
This time, we pipe dmidecode to grep -A4 ‘^Base Board Information’. This way, we filter for lines starting with Base Board Information at the beginning of the line. Then, grep displays those lines along with the four lines that follow.
By filtering, we can narrow down the information further and even process it programmatically.
Another method we can use for finding out the motherboard specifications is the -t flag of dmidecode.
Let’s execute the command to get motherboard specification:
$ sudo dmidecode -t baseboard
# dmidecode 3.4
Getting SMBIOS data from sysfs.
SMBIOS 2.4 present.

Handle 0x0002, DMI type 2, 15 bytes
Base Board Information
        Manufacturer: Intel Corporation
        Product Name: 440BX Desktop Reference Platform
        Version: None
        Serial Number: None
        Asset Tag: Not Specified
        Features: None
        Location In Chassis: Not Specified
        Chassis Handle: 0x0000
        Type: Unknown
        Contained Object Handles: 0

Handle 0x007F, DMI type 10, 8 bytes
On Board Device 1 Information
        Type: Video
        Status: Disabled
        Description: VMware SVGA II
On Board Device 2 Information
        Type: Sound
        Status: Disabled
        Description: ES1371
In this case, -t baseboard specifies the hardware table type as baseboard, offering a more concise output, focusing only on that part of the motherboard data.
However, specific information like version and serial number is unavailable. Further, the on-board devices, a video device (VMware SVGA II), and a sound device (ES1371), are currently disabled.
Alternatively, we can use sysfs to retrieve information about motherboard specifications.
sysfs is a virtual filesystem in Linux, providing a standardized interface for user-space processes to access and manipulate kernel-related information.
Let’s use the cat command with sysfs to take a look at motherboard specification:
$ cat /sys/devices/virtual/dmi/id/board_{vendor,name,version}
Intel Corporation
440BX Desktop Reference Platform
None
By using brace parameter expansion, we get the vendor, name, and version from the relevant files at /sys/devices/virtual/dmi/id/board_* files.
Another alternative approach involves using lshw with the grep command to gather information about motherboard specifications.
lshw provides detailed hardware information about CPUs, memory, storage, and peripherals, aiding in system analysis and troubleshooting.
Now, let’s open the terminal and execute the command along with a filter:
$ sudo lshw | grep -A5 'Motherboard'
       description: Motherboard
       product: 440BX Desktop Reference Platform
       vendor: Intel Corporation
       physical id: 0
       version: None
       serial: None
Again, the use of sudo ensures elevated privileges for accessing comprehensive hardware information. Further, we again filter via a keyword and include several lines after the match.
This way, we highlight lines containing Motherboard along with specific information related to that.
The dmesg command displays kernel messages, aiding in troubleshooting hardware issues, analyzing the boot process, and monitoring real-time kernel events. Additionally, it provides insights into device detection, driver initialization, and potential errors.
Next, let’s open the terminal and run the command, filtering it through grep:
$ sudo dmesg | grep 'DMI'
[    0.000000] DMI: VMware, Inc. VMware Virtual Platform/440BX Desktop Reference Platform, BIOS 6.00 11/12/2020
Here, we use the DMI keyword to filter for lines specifically related to the DMI system.
Therefore, this command proves particularly useful for retrieving details and events about the motherboard, BIOS, and other hardware components directly from the kernel’s ring buffer.
Serving as a command-line utility in Linux, inxi provides a presentation of the system’s hardware and software configuration, encompassing CPU, memory, graphics, and network details. Alongside its user-friendly interface, inxi offers scriptable output options, enhancing its value for system analysis and monitoring.
Now, let’s utilize the inxi command in conjunction with the -M flag to extract motherboard specifications:
$ sudo inxi -M
Machine:
  Type: Vmware System: VMware product: VMware Virtual Platform v: N/A
    serial: VMware-56 4d c0 f4 41 5b 96-9d ed 57 1c b2 b1 86 5d
  Mobo: Intel model: 440BX Desktop Reference Platform serial: N/A
    BIOS: Phoenix v: 6.00 date: 11/12/2020
In this case, we employ the -M option to focus on presenting details such as the manufacturer and model of the motherboard. The elevated privileges ensure we don’t miss any available details.
As one of the most straightforward approaches, inxi is fairly concise in output that’s easy to process, even with scripts.
Desktop-based applications for motherboard specifications offer a user-friendly graphical interface. Moreover, they make hardware details accessible without requiring command-line knowledge. Additionally, they offer visual representation, comprehensive information, and additional features, enhancing the user experience and catering to a diverse audience.
In this section, we’ll discuss different desktop-based applications for finding out motherboard specifications.
The lstopo command from the HWLOC project visualizes and prints the hierarchical topology of a system’s architecture, including multi-core processors and NUMA systems. In addition, it provides insights crucial for optimizing software performance and resource management in diverse computing environments.
Let’s run lstopo:
$ lstopoAfter executing the command in the terminal, a GUI interface appears, showcasing the system’s architecture, and illustrating the hierarchical arrangement of processors, caches, memory nodes, and interconnects:
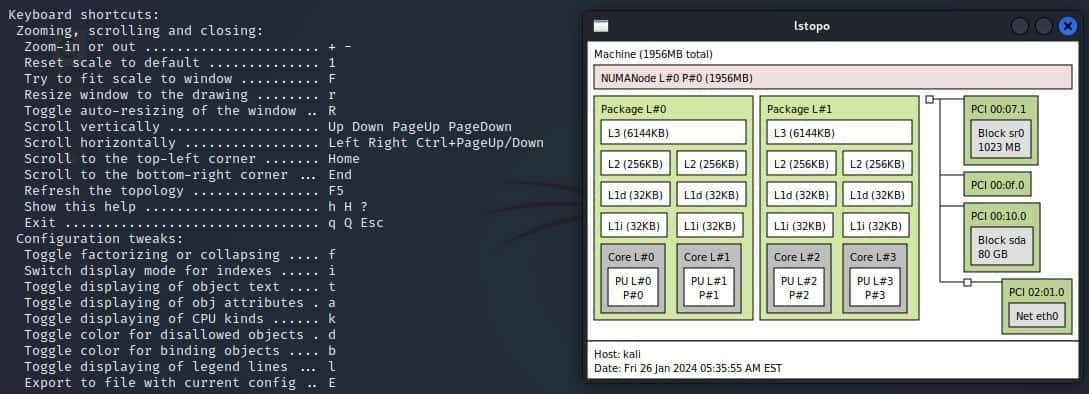
Thus, this output aids in understanding the physical layout of hardware components, facilitating optimization for performance, particularly in NUMA architectures.
Notably, the graphical depiction includes processors, caches, memory nodes, and interconnects, offering a comprehensive view of the system’s topology.
lshw-gtk is its graphical counterpart of lshw command-line tool. Moreover, it offers a user-friendly interface for those who prefer a visual representation of the hardware details.
Since lshw-gtk may not be installed by default in Linux, we can install it via the apt-get command:
$ sudo apt-get install lshw-gtkAfter the installation is complete, let’s open the application;
$ sudo lshw-gtkConsequently, we can see the graphical interface of lshw-gtk:

Here, the output indicates that the system is a VMware Virtual Platform with a 64-bit architecture. Furthermore, it provides details such as the product name, vendor (VMware, Inc.), version (None), and serial number. Next, the configuration section includes information about passwords, boot behavior, and a universally unique identifier (UUID) for the system.
CPU-G is an open-source utility for Linux that provides detailed information about hardware components, emphasizing CPU details such as architecture and cores. However, memory, motherboard, and other components are also part of the graphical interface output.
Since it may not be available by default on Linux, we install CPU-G using the apt utility.
First, we add the CPU-G repository:
$ sudo add-apt-repository ppa:atareao/atareaoAfter that, we update the repository information:
$ sudo apt updateLastly, we install the cpu-g package:
$ sudo apt install cpu-gOnce the installation is complete, we can open the CPU-G application by clicking the Activities panel. Next, we type CPU-G in the search bar and hit the Return key.
Following that, a GUI appears, where we can navigate to the menu bar and choose the Motherboard option:
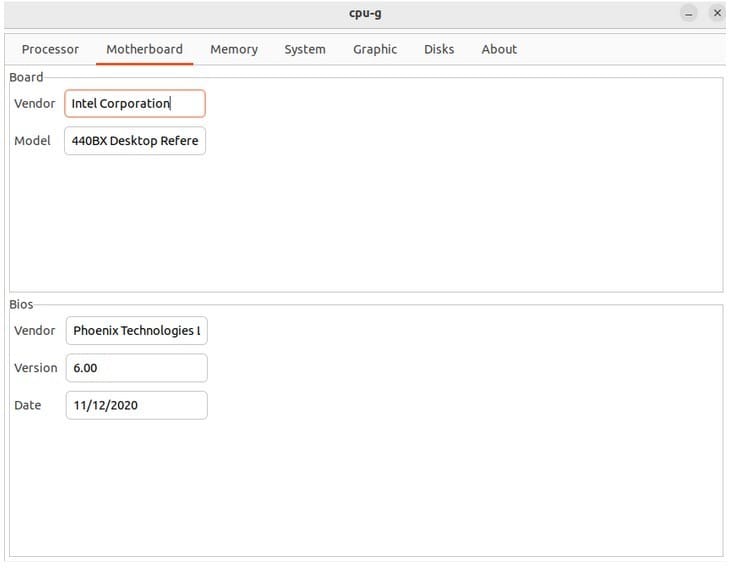
Upon selecting this option, we can then view detailed specifications for the motherboard.
In this article, we saw various ways to find out the motherboard specifications of our system.
Initially, we explored different command-line approaches, including dmi, dmidecode, sysf, lshw, lstopo, dmesg, and inxi. Finally, we discussed desktop-based applications like CPU-G and lshw-gtk to find out the motherboard specifications.