

Yes, we're now running our only Summer Sale. All Courses are 30% off until 20th July, 2026:
Learn through the super-clean Baeldung Pro experience:
>> Membership and Baeldung Pro.
No ads, dark-mode and 6 months free of IntelliJ Idea Ultimate to start with.
1. Introduction
Adjusting the brightness of the monitor on Linux is a way to greatly enhance the viewing experience. With a variety of methods available, including command-line tools and graphical interfaces, we can customize the brightness settings to suit our preferences.
In this tutorial, we’ll explore different ways to change monitor brightness in Linux.
Notably, the effectiveness and availability of the methods for adjusting monitor brightness on Linux may vary depending on factors such as display drivers, graphics hardware, X11 display server compatibility, and hardware support.
2. Using xrandr
xrandr is a command-line tool in Linux used for managing display settings. We can employ xrandr to adjust brightness by manipulating the gamma values of the display. Hence, by modifying the gamma values, we can effectively control the display’s brightness from a Linux command-line environment.
Notably, xrandr is designed to work on a graphical environment with an active X11 display session. Hence, it may not function as expected or be available in non-graphical environments, such as remote SSH sessions.
First, let’s install xrandr via apt-get:
$ sudo apt-get install x11-xserver-utilsxrandr is part of the x11-xserver-utils package.
Once it’s installed, we can start by checking the current display settings:
$ xrandr
Screen 0: minimum 16 x 16, current 1680 x 1050, maximum 32767 x 32767
XWAYLAND0 connected 1680x1050+0+0 (normal left inverted right x axis y axis) 0mm                                                                                                                                x 0mm
   1680x1050     59.95*+
   1400x1050     59.98
   1280x1024     59.89
...
   720x400       59.55
   640x350       59.77
As we can see, the output provides an overview of the available screen and resolution options for the current system.
Then, let’s list the available monitors:
$ xrandr --listmonitors
Monitors: 2
 0: +*XWAYLAND0 1472/389x894/237+0+0 XWAYLAND0
 1: +HDMI-1 1920/1920x1080/1080+1920+0 HDMI-1
The output shows two monitors available named XWAYLAND0 and HDMI-1 connected to the system, with supported pixel resolutions of each monitor.
Now, we can set the brightness level by modifying the gamma values:
$ xrandr --output OUTPUT_NAME --gamma BRIGHTNESS_VALUE:BRIGHTNESS_VALUE:BRIGHTNESS_VALUEWe’ll replace OUTPUT_NAME with the desired monitor name and BRIGHTNESS_VALUE with a number between 0.0 and 1.0:
$ xrandr --output XWAYLAND0 --gamma 0.8:0.8:0.8Here, we used the same value for each gamma value to ensure consistent color representation and to avoid skewing the colors.
In this example, we used –output to specify the output and set the gamma values for the red, green, and blue color channels respectively. Each value represents the brightness or intensity of the corresponding color channel. Here, all three gamma values are set to 0.8, indicating a decrease in brightness for the display.
3. Using xgamma
xgamma is a utility in Linux that enables us to adjust the gamma values of the display, indirectly affecting its brightness. xgamma is also included in the x11-xserver-utils package.
In this case, the gamma values are numbers between 0.100 and 10.000. Notably, the actual impact on brightness may vary depending on the specific display and graphics driver.
First, let’s get the current gamma values:
$ xgamma
-> Red  1.000, Green  1.000, Blue  1.000
Here, we can see the current gamma values for the red, green, and blue color channels of the display.
Then, we’ll set the gamma value:
$ xgamma -gamma 0.6Here, we used -gamma to specify the gamma value for all channels.
Of course, we can define each gamma channel separately:
$ xgamma -rgamma 0.8 -ggamma 0.8 -bgamma 0.8Here, we’ll use the same value for each gamma channel to maintain color balance and prevent color distortion.
In this example, we used -rgamma, -ggamma, and -bgamma to set the gamma values of red, blue, and green channels respectively.
4. Using brightnessctl
brightnessctl is a command-line utility in Linux for adjusting the brightness of displays and backlights. Moreover, brightnessctl provides a way to control the brightness level, query the current brightness value, and perform smooth transitions between brightness levels.
First, let’s install brightnessctl via apt-get:
$ sudo apt-get install brightnessctlThen, we’ll list the controllable devices:
$ brightnessctl -l
Available devices:
Device 'input2::numlock' of class 'leds':
	Current brightness: 0 (0%)
	Max brightness: 1

Device 'input2::capslock' of class 'leds':
	Current brightness: 1 (100%)
	Max brightness: 1

...

Device '0004:043e:4030.0004:global' of class 'leds':
Current brightness: 1 (100%)
Max brightness: 1
As we can see, all devices have a name or a unique identifier, Current brightness state, and Max brightness.
In this example, the device with ID 0004:043e:4030.0004:global is the current display. Hence, 0004 is a unique number assigned to the display, 043e is the vendor ID and 4030 is the product ID.
Now, we’ll change the display brightness:
$ brightnessctl -d "0004:043e:4030.0004:global" set 80%In this example, we used -d to specify the current display ID. Moreover, we decreased the brightness to 80% by using the set option.
5. Brightness Controller GUI
Brightness Controller is a third-party application for Linux that provides a graphical interface to adjust the display brightness. Moreover, Brightness Controller offers a slider or a step-based adjustment method to control the brightness level of the screen. Hence, it’s an alternative solution for users who prefer a dedicated brightness control tool with a user-friendly interface.
Notably, Brightness Controller is particularly useful for systems where the native display brightness controls aren’t readily available or functional.
5.1. Installing Brightness Controller
Firstly, let’s add a PPA repository:
$ sudo add-apt-repository ppa:apandada1/brightness-controllerAs we can see, we added apandada1/brightness-controller from the PPA repository to the system’s software sources which contain the Brightness Controller application.
Secondly, we’ll update the package:
$ sudo apt-get updateHere, we ensure that the system has the latest information about available packages and their versions.
Finally, we’ll install the Brightness Controller:
$ sudo apt-get install brightness-controllerOf course, we’ll find the Brightness Controller application in the applications menu.
5.2. Using Brightness Controller
Now, we’re able to adjust the display brightness:
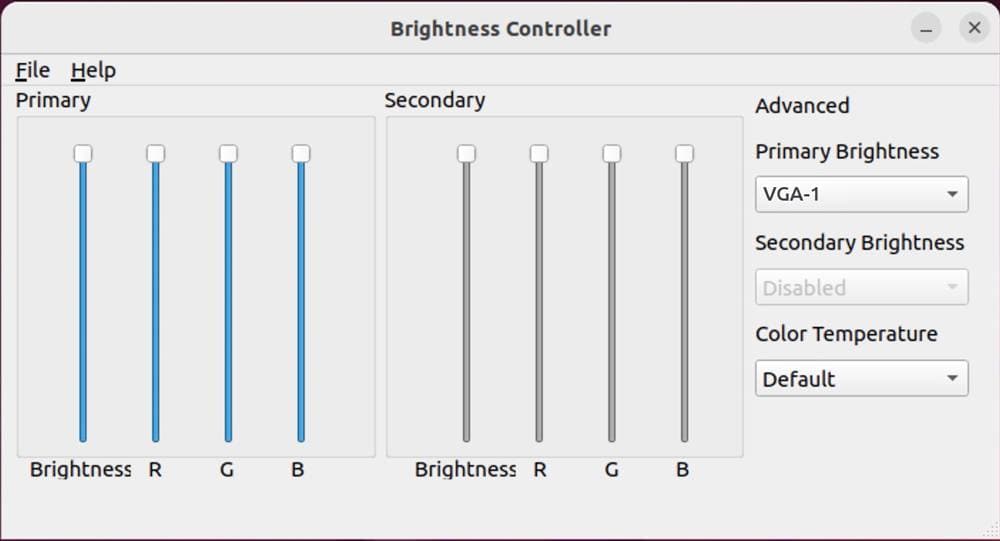
As we can see, the brightness bar allows us to control the overall brightness level of the display.
6. Conclusion
In this article, we’ve explored different methods to change monitor brightness on Linux, ranging from command-line tools like xrandr and xgamma to dedicated utilities like brightnessctl and Brightness Controller. Each approach offers its own advantages, allowing us to adjust the brightness level of the monitor.