

Yes, we're now running our only Summer Sale. All Courses are 30% off until 20th July, 2026:
Migrating a Linux Installation From HDD to SSD
Last updated: February 2, 2024
Learn through the super-clean Baeldung Pro experience:
>> Membership and Baeldung Pro.
No ads, dark-mode and 6 months free of IntelliJ Idea Ultimate to start with.
1. Introduction
Transitioning from a traditional Hard Disk Drive (HDD) to a Solid State Drive (SSD) can significantly improve the Linux system’s performance, reliability, and stability.
In this tutorial, we’ll walk through migrating a Linux installation from an HDD to an SSD. We’ll understand the benefits of the migration, go through the preparation and migration processes in detail, and conclude with post-migration activities.
Notably, we’ll use a Lubuntu 21.10. distribution as an example.
2. SSD Versus HDD Comparison
When considering the enhancement of computing experience, the transition from a traditional Hard Disk Drive (HDD) to a contemporary Solid State Drive (SSD) is a crucial upgrade.
To begin with, SSDs stand out due to their remarkable efficiency. An SSD facilitates rapid data access and substantially reduces boot times, providing the Linux system a remarkable degree of agility.
Furthermore, SSDs contribute to heightened system responsiveness, rendering tasks such as launching applications and multitasking a far more seamless process.
Moreover, their heightened durability, resilience to physical shock, and reduced power consumption translate into elongated battery life and economic efficiency.
In addition, SSDs function in a silent manner, generate less heat, and demonstrate a decreased susceptibility to mechanical failures. These attributes result in a compact, space-efficient solution, particularly well-suited for slim laptops. Let’s summarize our comparison:
| SSD Parameters | HDD Parameters | Feature |
| 0.1 ms | 5.5 to 8.0 ms | Access Times |
| 0.5% | 2% to 5% | Failure Rate |
| 2 to 5 watts | 6 to 15 watts | Power Consumption |
| 20 ms | 400 to 500 ms | I/O Request Times |
| Very high | Poor | Vibration and shock endurance |
| $0.08 to $0.10 per GB | $0.03 to $0.06 per GB | Cost |
In general, the transition from HDD to SSD is an important step, fostering enhanced performance and dependability, as well as efficiency within Linux computing.
3. Preparing for the Migration
Before migrating to a Solid State Drive (SSD), it’s crucial to assess the hardware compatibility and understand the system requirements thoroughly. This ensures a seamless transition and optimal performance gains from the new storage solution.
3.1. Hardware Compatibility
Different SSDs come with different interfaces:
- SATA
- NVMe
- PCIe
By checking interface compatibility, we ensure that the interface of the SSD we choose is compatible with the system we have.
Further, SSDs come in various form factors:
- 2.5-inch
- M.2
- PCIe cards
Thus, we might have to verify that the physical size and shape of the SSD align with the available space on the laptop or desktop we’re using. Some devices may only support specific form factors.
One of the simplest ways to check what types of hardware the PC supports is to check the motherboard version and then verify the specification on the producer’s website.
For example, we can check the motherboard by using the dmidecode command:
$ sudo dmidecode --type baseboard
[sudo] enter password for user:
# dmidecode 3.3 Getting SMBIOS data from sysfs.
SMBIOS 3.2 present.
Handle 0x0002, DMI type 2, 15 bytes
Base Board Information
Manufacturer: Oracle Corporation Product
Name: PowerMaster X99
Version: 4.2
Serial Number: MBX987654
Asset Tag: XYZ-123
Features:
Board is a hosting board
Board is replaceable
Location In Chassis: Slot 0
Chassis Handle: 0x0003
Type: Motherboard
Contained Object Handles: 0
Using the sudo command grants superuser privileges to the main part of the command.
In this case, we can note down the product name and check the compatibility accordingly.
3.2. Storage Requirements
Finally, we must evaluate current data storage requirements on the existing Hard Disk Drive (HDD). We should choose an SSD with adequate capacity to accommodate current files and applications, as well as future needs.
We can use the df command to display information about total space and available space on a file system:
$ sudo df -h
[sudo] enter password for user:
Filesystem      Size  Used Avail Use% Mounted on
tmpfs           2.3G  1.2M  2.3G   1% /run
/dev/sda1       227G  5.8G  210G   3% /
tmpfs            12G     0   12G   0% /dev/shm
tmpfs           5.0M  4.0K  5.0M   1% /run/lock
/dev/sda2       966M   91M  810M  11% /boot
/dev/sda4       253G  124M  240G   1% /home
tmpfs           2.3G   80K  2.3G   1% /run/user/1000
In this case, we have a medium-sized 500GB SSD.
3.3. Performance
Further, different SSD models offer varying read and write speeds. We should assess the performance needs and select an SSD that complements usage. Faster speeds contribute significantly to improved system responsiveness and overall efficiency.
3.4. Software Compatibility
Notably, we must verify that the Linux operating system that we’ll be migrating supports the chosen SSD. Most modern Linux distributions are SSD-friendly, but it’s always wise to check for specific considerations or updates related to the distribution.
We can check the system’s details using the cat command:
$ sudo cat /etc/os-release
[sudo] password for user:
PRETTY_NAME="Ubuntu 21.10"
NAME="Ubuntu"
VERSION_ID="21.10"
VERSION="21.10 (Impish Indri)"
VERSION_CODENAME=impish
ID=ubuntu
ID_LIKE=debian
HOME_URL="https://www.ubuntu.com/"
SUPPORT_URL="https://help.ubuntu.com/"
BUG_REPORT_URL="https://bugs.launchpad.net/ubuntu/"
PRIVACY_POLICY_URL="https://www.ubuntu.com/legal/terms-and-policies/privacy-policy"
UBUNTU_CODENAME=impish
By visiting the page under HOME_URL we can find details about the system’s details and if it supports the SDD disks.
3.5. Power Requirements
Finally, some high-performance SSDs may have additional power requirements. We should ensure that the device’s power supply can meet these needs to avoid any potential issues with stability.
This proactive approach helps prevent potential issues and ensures the new SSD operates seamlessly within the existing system.
4. Data Backup
Before starting the migration process we should make a backup of the whole Linux system that we want to migrate. Thus, we’ll have the possibility of restoring the system in case of any failure during migration.
To perform a backup, we can use Linux commands like dd or tar commands. Of course, there are other free and paid options:
- Timeshift
- Fwbackups
- BorgBackup
- Rsync
Finally, backup files can be large. Therefore, we might need to prepare some storage like cloud space or another memory device where we can store the backup file
4.1. Backup Using dd
The command-line tool dd is a powerful tool primarily employed for copying data between different locations. Its features extend to functions like disk cloning and data wiping.
Firstly, we should check which disk and partitions hold the Linux system. This is especially so if we have more than one disk on the machine. For that purpose, we can use cfdisk:
$ sudo cfdisk
[sudo] password for user:
Disk: /dev/sda
Size: 500 GiB, 536870912000 bytes, 1048576000 sectors
Label: dos, identifier: 0x44774ace
    Device     Boot      Start        End   Sectors   Size Id Type
>>  /dev/sda1             2048  485361663 485359616 231.4G 83 Linux
    /dev/sda2  *     485361664  487409663   2048000  1000M 83 Linux
    /dev/sda3        487409664  507889663  20480000   9.8G 82 Linux swap / So
    /dev/sda4        507889664 1048562549 540672886 257.8G 83 Linux
    Free space      1048563712 1048575999     12288     6M
We can see that the system is located on disk /dev/sda. The disk contains three partitions, namely sda1, sda2, sda3 and sda4.
Now, a single command can create the backup system image:
$ sudo dd if=/dev/sda2 of=/path/to/backup/backupfilename.img
[sudo] password for user:
2048000+0 records in
2048000+0 records out
1048576000 bytes (1.0 GB, 1000 MiB) copied, 20.6892 s, 50.7 MB/s
Here, if=/dev/sda2 points to the partition that we want to back up. On the other hand, of=/path/to/backup/backupfilename.img is the custom path where we want to hold the backup file.
While the examples above use .img extensions, the dd command itself doesn’t impose any specific requirement on file extensions. We can use any file name and extension based on the needs.
The backup process can take some time depending on the machine’s resources and disk size. After the process is finished the backup file appears in the custom location.
4.2. Restore Using dd
Restoring the system from a previously created image using the dd command is also a one-liner:
$ sudo dd if=/path/to/backup/backupfilename.img of=/path/to/destination bs=128k
[sudo] password for user:
8000+0 records in
8000+0 records out
1048576000 bytes (1.0 GB, 1000 MiB) copied, 4.32848 s, 242 MB/s
Again, we execute dd command with superuser rights. The if (input file) option specifies the path to the backup image created in a previous step. The of (output file) option specifies the disk path to which we want to restore the system.
The bs=128k specifies the block size, which the dd command uses to read and write bytes per block. It’s advisable to choose a moderate block size for a balance between efficiency and system resources.
5. Migrating From HDD to SSD
The migration of the Linux system from HDD to SSD is similar to the backup process. As previously, we can use dedicated software:
- Clonezilla
- GNOME Disks
- Rsync
- Parted
Further, we can also use dd command or an external, command line interface (CLI) like Partclone.
5.1. Creating the Migration Archive
Basically, creating a Linux backup image means copying the whole system and disk content to an image file. Likewise, migrating the system from one disk to another is also copying the whole system and disk content to another disk instead of a file.
Therefore, we can also utilize almost the same one-line dd command to make a migration:
$ sudo dd if=/hdd/source/path of=/path/to/destination status=progressWe already know this command. The only addition is status=progress which shows us the progress of the process.
Sometimes, such a simple solution could not work. Therefore we’ll elaborate on the more advanced dd-based migration process.
5.2. Mounting the New Disk
To avoid damage or corruption, we need to shut down the machine. For example, we can simply power off it using the GUI or the shutdown command:
$ shutdown nowThen, we can attach the new SSD disk to the PC and turn on the computer again.
5.3. Migrate Data
As mentioned, we can’t operate on the mounted disk with a Linux system. Moreover, we won’t be able to migrate the Linux system to another disk while the system is booted from that disk.
Usually, the easiest method is to run Linux in live mode from a CD or USB. Also, we can use GParted to verify the partition UUIDs. So, we use a Linux-based Gparted Live with Gparted preinstalled.
When in GParted live mode, we can run the already well-known dd command to migrate the system from the old HDD disk to the attached SSD disk.
5.4. Integrity Check
Further, it’s good practice to run a file system consistency check to verify the integrity of the data. The fsck command in Linux is used to check and repair file systems:
$ fsck /ssd/path
fsck from util-linux 2.36.1
e2fsck 1.46.3 (27-Jul-2021)
umount: /dev/sda: successfully unmounted
Now, in the GParted GUI tool, we can compare both disks and ensure the partitions are identical:
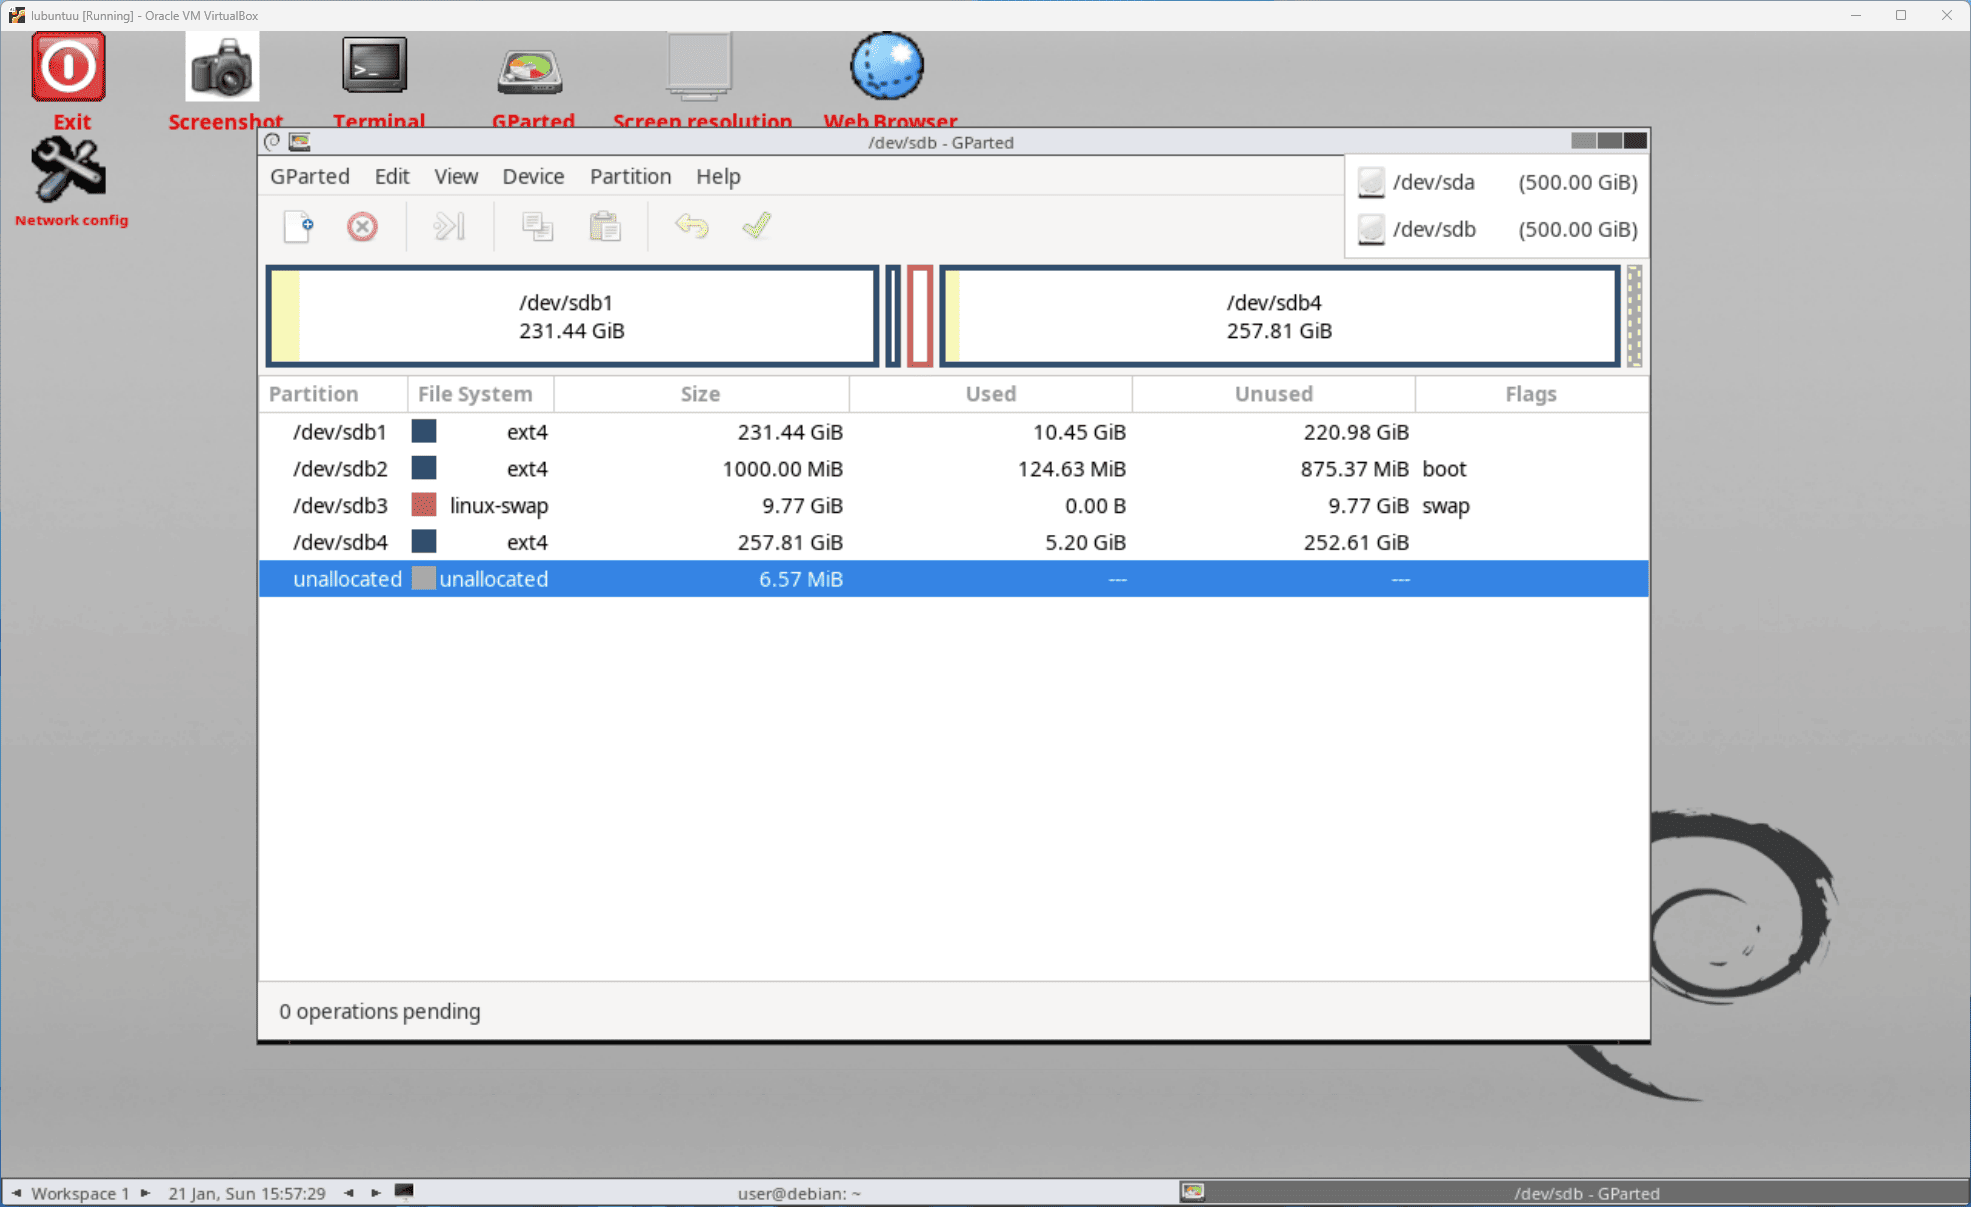
In the above screen, we can see a partition table of disk /dev/sda. In the right corner, we can switch to the disk that we’re migrating to. Hence, it’s called /dev/sdb.
5.5. Final Configuration
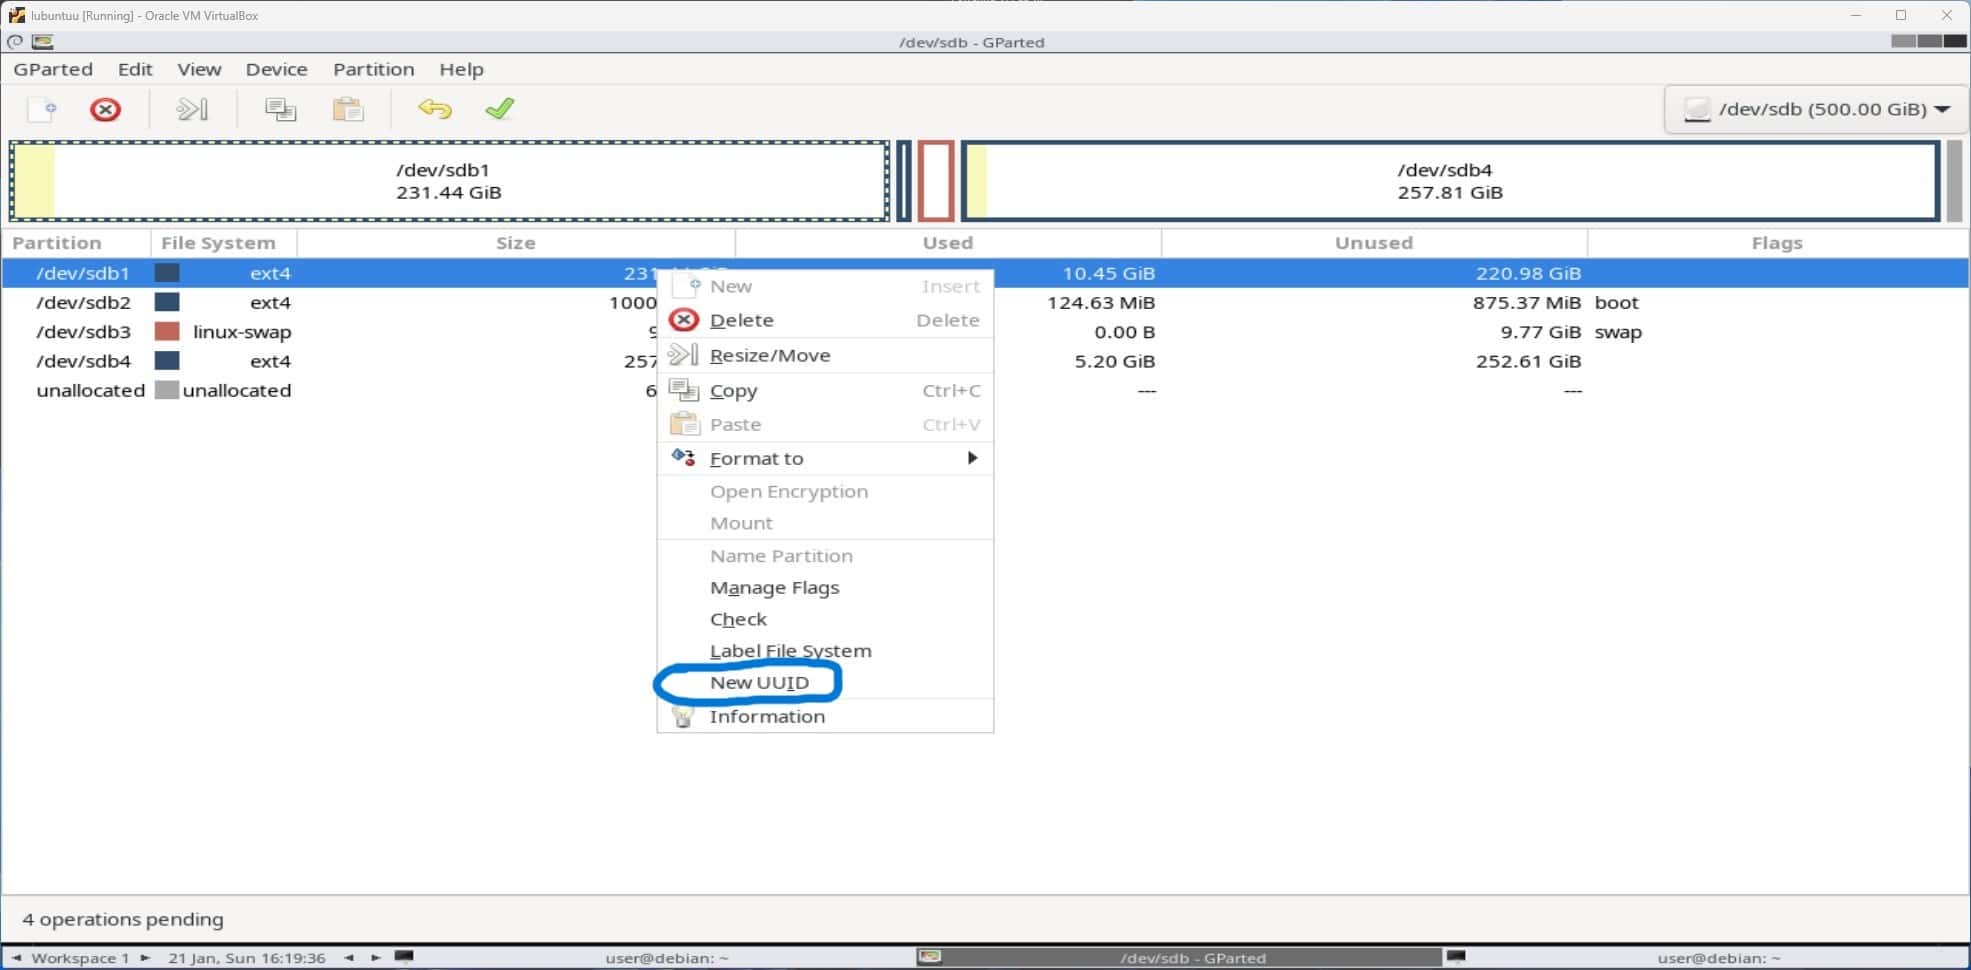
While still in live mode, we can configure the partition’s UUID stored in the /etc/fstab file. We can do it manually by clicking New UUID in GParted on each partition.
Another way to do this is to use the tune2fs command on each partition:
$ sudo tune2fs -U random /dev/sdb1
tune2fs 1.46.4 (18-Aug-2021)
Setting UUID to a1b2c3d4-5e6f-7890-abcdeffedcba

$ sudo tune2fs -U random /dev/sdb2
tune2fs 1.46.4 (18-Aug-2021)
Setting UUID to 12345678-9abc-def0-1234-56789abcdef0

$ sudo tune2fs -U random /dev/sdb3
tune2fs 1.46.4 (18-Aug-2021)
Setting UUID to eee6964f-8f2e-422c-9869-86cf4359f29f

$ sudo tune2fs -U random /dev/sdb4
tune2fs 1.46.4 (18-Aug-2021)
Setting UUID to bbc40354-fd0a-4772-82d8-a9ace5c2c1f0
After that, we can turn off the computer, unplug the HDD disk, and start the computer with the SSD plugged in. The Linux system should now run as if it were running from the old HDD, but much faster.
6. Conclusion
In this article, we learned how and why it’s beneficial to migrate from HDD to SDD.
Further, we listed the preparation steps that we should consider before the system’s migration. Additionally, we saw how to perform a system’s backup. Finally, we looked at all the steps for migrating the Linux system from HDD to SDD.
The process of migration using built-in or CLI tools isn’t complicated. However, for beginner users, the process may be simpler and more flawless when using dedicated, GUI-based software.