

Learn through the super-clean Baeldung Pro experience:
>> Membership and Baeldung Pro.
No ads, dark-mode and 6 months free of IntelliJ Idea Ultimate to start with.
Last updated: July 20, 2024
Learn through the super-clean Baeldung Pro experience:
>> Membership and Baeldung Pro.
No ads, dark-mode and 6 months free of IntelliJ Idea Ultimate to start with.
When text in the terminal is forced to the next line by the edge of the terminal itself, this is called line wrap. Further, this behavior can make some text harder to read or copy. Also, this is the default behavior of most terminals.
In this tutorial, we’ll understand how to disable line wrap in the terminal using different methods:
Each of these commands can manipulate terminal capabilities such as enabling or disabling line wrap.
One of the most common ways to disable line wrap is to use the setterm command.
Further, setterm can change various settings of the terminal:
To disable line wrap using setterm, we use the -linewrap off option:
$ setterm -linewrap offLet’s verify the results:
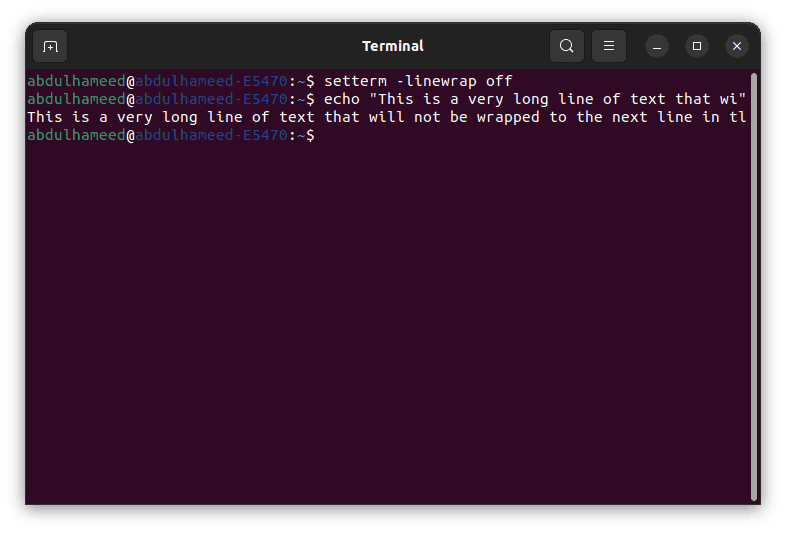
The -linewrap off option tells the terminal to stop moving the cursor to the next line when it reaches the right margin.
We can reenable line wrap via the -linewrap on option:
$ setterm -linewrap on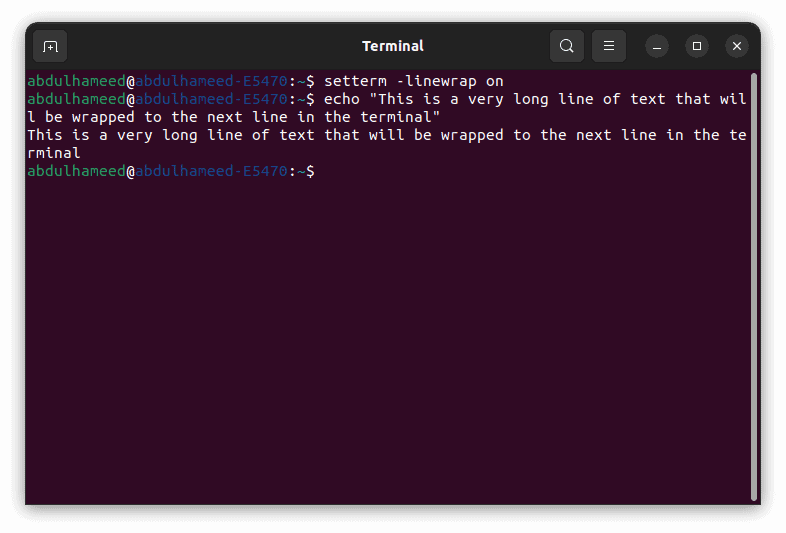
We can see from the output above that the long line of text wraps to the next line.
However, this change isn’t permanent and it might be reset when we close or reopen the terminal.
Another way to disable line wrap in the terminal is to use the tput command.
In addition, tput can manipulate various terminal capabilities:
To disable line wrap using tput, we can use the rmam option:
$ tput rmamThe rmam option is a terminal capability that stands for reset mode automatic margins. When we execute the command, it instructs the terminal to exit automatic margins mode effectively disabling automatic margin adjustments.
Basically, automatic margins mode is a feature for automatically adjusting the margins when the cursor reaches the right margin causing text to wrap to the next line. By disabling this mode, we can prevent line wrapping.
We can also enable line wrap back by using the smam option:
$ tput smamThus, we set mode automatic margins.
Similar to setterm, the change is reset when we close or reopen the terminal.
A third way to disable line wrap in the terminal is to use the printf command.
Further, printf can format and print text, including special escape sequences that can affect the terminal behavior.
To disable line wrap using printf, we can use the escape sequence \033[?7l:
$ printf '\033[?7l'Let’s break down this line:
Conversely, we can reenable line wrap using the escape sequence \033[?7h:
$ printf '\033[?7h'These changes are also reset when we close or reopen the terminal.
If we want to disable line wrap permanently, we can add the command to disable line wrap to a configuration file executed when we start a new terminal session.
One such common configuration file is the .bashrc file. Basically, .bashrc is a script that runs every time we open a new terminal using the bash shell. We can place this file in the user home directory and add the command that we use to disable line wrap at the end of the file. In this case, we add the setterm command.
Now, let’s see an example of the .bashrc file after we’ve added the respective command:
$ cat ~/.bashrc
...
setterm -linewrap off
Then, we reload the .bashrc file, so it takes effect immediately in the current session:
$ source ~/.bashrcAlternatively, we can close and reopen the terminal to apply the change.
This way, we’ve disabled line wrap permanently.
In this article, we’ve explored how to disable line wrap in the terminal using three different commands:
Since the methods for disabling line wrap in the terminal are often temporary solutions applied during a single session, we learned how to make the changes permanent by adding the command to disable the line wrap to the .bashrc configuration file.