

Yes, we're now running our only Summer Sale. All Courses are 30% off until 20th July, 2026:
Learn through the super-clean Baeldung Pro experience:
>> Membership and Baeldung Pro.
No ads, dark-mode and 6 months free of IntelliJ Idea Ultimate to start with.
1. Overview
Scanning IP addresses help us to identify accessible hosts on our network. Scanning the network also helps to maintain good network health and prevent unauthorized users from wasting valuable bandwidth or spying.
In this tutorial, we’ll see three approaches to scanning a LAN to get a list of all IP addresses on a LAN.
2. Subnet
Before we can scan the network, we need to determine the subnet. Subnetting is the process of dividing a large network into smaller networks, known as subnets. A subnet is a network fragment.
2.1. Linux
We use the ifconfig command in Linux:
$ifconfig
eth0: flags=4163<UP,BROADCAST,RUNNING,MULTICAST>  mtu 1500
        ether 00:0c:29:6f:57:2b  txqueuelen 1000  (Ethernet)
        RX packets 4116  bytes 256877 (250.8 KiB)
        RX errors 4  dropped 0  overruns 0  frame 0
        TX packets 162354  bytes 6822026 (6.5 MiB)
        TX errors 0  dropped 0 overruns 0  carrier 0  collisions 0
        device interrupt 19  base 0x2000

eth1: flags=4163<UP,BROADCAST,RUNNING,MULTICAST>  mtu 1500
        inet 192.168.1.136  netmask 255.255.255.0  broadcast 192.168.1.255
        inet6 fe80::20c:29ff:fe6f:5735  prefixlen 64  scopeid 0x20<link>
        ether 00:0c:29:6f:57:35  txqueuelen 1000  (Ethernet)
        RX packets 4944  bytes 411961 (402.3 KiB)
        RX errors 0  dropped 0  overruns 0  frame 0
        TX packets 6899  bytes 417025 (407.2 KiB)
        TX errors 0  dropped 0 overruns 0  carrier 0  collisions 0
        device interrupt 16  base 0x2080

lo: flags=73<UP,LOOPBACK,RUNNING>  mtu 65536
        inet 127.0.0.1  netmask 255.0.0.0
        inet6 ::1  prefixlen 128  scopeid 0x10<host>
        loop  txqueuelen 1000  (Local Loopback)
        RX packets 256  bytes 17984 (17.5 KiB)
        RX errors 0  dropped 0  overruns 0  frame 0
        TX packets 256  bytes 17984 (17.5 KiB)
        TX errors 0  dropped 0 overruns 0  carrier 0  collisions 0
On our machine, the network adapter that is connected to the Wi-Fi network is the eth1 adapter.
The output on the eth1 shows us the IP address that has been assigned to our machine, the netmask, and the broadcast IP address on the network. Since we know the netmask, we can then calculate that our subnet is 192.168.1.0/24.
Let’s now find the active IP addresses on our network.
3. Using netdiscover
netdiscover is a network scanning tool that is preinstalled in Kali Linux. It is used to get the IP address and MAC address of live hosts on a network:
$ netdiscover -r 192.168.1.0/24

 Currently scanning: Finished!   |   Screen View: Unique Hosts

 4 Captured ARP Req/Rep packets, from 2 hosts.   Total size: 240
 _____________________________________________________________________________
   IP            At MAC Address     Count     Len  MAC Vendor / Hostname
 -----------------------------------------------------------------------------
 192.168.1.1    00:50:56:c0:00:01      2     120  VMware, Inc.
 192.168.1.254  00:50:56:f6:62:49      2     120  VMware, Inc.
The -r option means range. In this case, we are scanning the whole network for live hosts.
We use netdiscover in both active and passive mode. In active mode, it sends requests to network hosts to get information, while in passive mode, it is silent. It doesn’t send data. It only sniffs the network for ARP requests.
4. Using nmap
nmap is short for Network Mapper. It is a free and open-source software for network discovery and security auditing. Using nmap, we can get a list of all active IP addresses on our LAN. This tool is able to run on Windows, Linux, and macOS:
$ nmap -sP --unprivileged 192.168.1.0/24
Starting Nmap 7.70 ( https://nmap.org ) at 2022-06-19 20:47 CAT
Nmap scan report for 192.168.1.1
Host is up (0.079s latency).
Nmap scan report for DESKTOP-17PF619 (192.168.1.198)
Host is up (0.0013s latency).
Nmap scan report for 192.168.1.255
Host is up (0.0025s latency).
Nmap done: 256 IP addresses (3 hosts up) scanned in 9.93 seconds
The commands only list the IP addresses of active IP addresses without the ports. The –unprivileged option means we are not able to create raw packets. Hence, we are using the TCP connect scan technique. This method is slow relative to a privileged user.
5. Using Angry IP Scanner
Angry IP Scanner is a free tool that can be installed on Windows, Linux, and macOS. It expects a range of IP addresses as parameters to search. It helps to find live hosts, open ports, and other relevant information for every IP address:
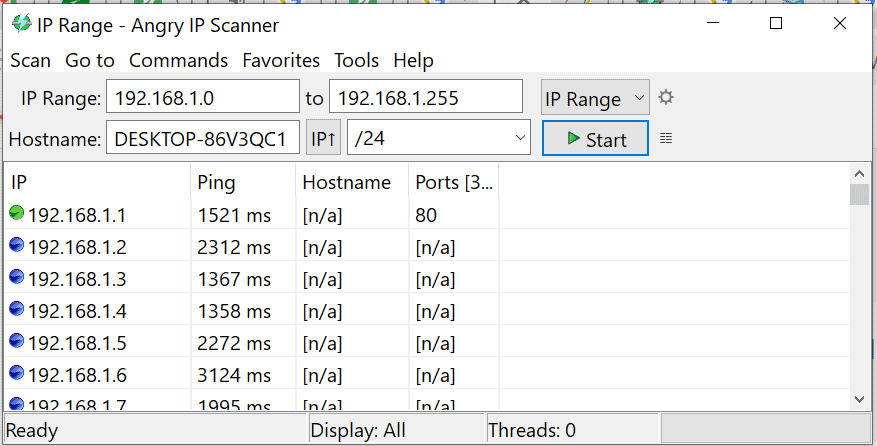
Angry IP Scanner showing status of IP addresses on LAN.
Here is what the colored dots next to each IP address mean:
- Green: The IP address is active, and the device on this address is responding to the requests made by the Angry IP Scanner
- Blue: The IP address is either active or busy and not responding to the requests made by the Angry IP Scanner.
- Red: The IP address is inactive, dead, or there is no device connected to this IP address.
6. Conclusion
In this tutorial, we saw how to determine the subnet of our network using ifconfig in Linux. We also learned how to use netdiscover, nmap, and Angry IP Scanner to get a list of all the IP addresses on a LAN.