

Yes, we're now running our only Summer Sale. All Courses are 30% off until 20th July, 2026:
How to Scale All Images to a Specific Size in Linux
Last updated: March 18, 2024
Learn through the super-clean Baeldung Pro experience:
>> Membership and Baeldung Pro.
No ads, dark-mode and 6 months free of IntelliJ Idea Ultimate to start with.
1. Overview
Batch image processing is a common task in the Linux world, whether for web development, graphic design, or organizing large photo collections.
In this tutorial, we’ll explore various techniques for resizing images using ImageMagick‘s robust convert tool. We’ll look at maintaining the aspect ratio, the crucial width-to-height proportion, while changing either dimension. In addition, we’ll examine cases where it may be necessary to ignore this ratio.
We’ll also introduce the concept of gravity. This key element helps preserve the focal point of an image during resizing and cropping, ensuring that the most important parts of our images remain in the foreground.
2. Sample Images and Starter Script
Here are five sample images with different resolutions and orientations:
- test_1.jpg → 1024 x 1024 px (1:1 aspect ratio, square image)
- test_2.jpg → 1024 x 1792 px (4:7 aspect ratio, portrait orientation)
- test_3.jpg → 1200 x 2100 px (4:7 aspect ratio, portrait orientation)
- test_4.jpg → 1575 x 900 px (7:4 aspect ratio, landscape orientation)
- test_5.jpg → 1792 x 1024 px (7:4 aspect ratio, landscape orientation)
We designed this Bash script as a starting point to find JPEG files in a specified input directory, run convert on them, and save the converted images in an output directory. Let’s save it as convert.sh and give it execute permissions:
#!/bin/bash

# Define directories
input_directory=~/img_original
output_directory=~/img_converted

# Get the home directory path
home_directory=$(echo $HOME)

# Check if the output directory exists, if not, create it
if [ ! -d "$output_directory" ]; then
    mkdir -p "$output_directory"
fi

# Find JPEG files and loop through each file found
find "$input_directory" -type f -name '*.jpg' | sort | while read -r file; do
    # Extract filename without extension
    filename=$(basename "$file" .jpg)

    # Define the output file path
    output_file="$output_directory/$filename.png"

    # Convert command
    convert "$file" "$output_file"

    # Get resolutions
    original_resolution=$(identify -format "%wx%h" "$file")
    converted_resolution=$(identify -format "%wx%h" "$output_file")

    # Output conversion details
    output_message="$file ($original_resolution) --> $output_file ($converted_resolution)"

    # Replace home directory path with ~
    output_message=$(echo $output_message | sed "s|$home_directory|~|g")

    echo "$output_message"
done
In this case, sort, sed, and basename just improve the output, while identify is necessary to log image resolutions:
$ ./convert.sh
~/img_original/test_1.jpg (1024x1024) --> ~/img_converted/test_1.png (1024x1024)
~/img_original/test_2.jpg (1024x1792) --> ~/img_converted/test_2.png (1024x1792)
~/img_original/test_3.jpg (1200x2100) --> ~/img_converted/test_3.png (1200x2100)
~/img_original/test_4.jpg (1575x900) --> ~/img_converted/test_4.png (1575x900)
~/img_original/test_5.jpg (1792x1024) --> ~/img_converted/test_5.png (1792x1024)
Our starter script does nothing interesting except convert images from JPEG to PNG. If we want, we can modify the output files by giving them a .jpg or other appropriate extension. In the following examples, we’ll only change the convert command within the script, leaving everything else as it is.
3. Scale to the Same Width
Here, we want to scale all images to the same width, with the height automatically selected to maintain the aspect ratio.
To know the syntax used by convert, we need to consult the table in the Image Geometry section. Our case corresponds to the third line highlighted in this partial screenshot:
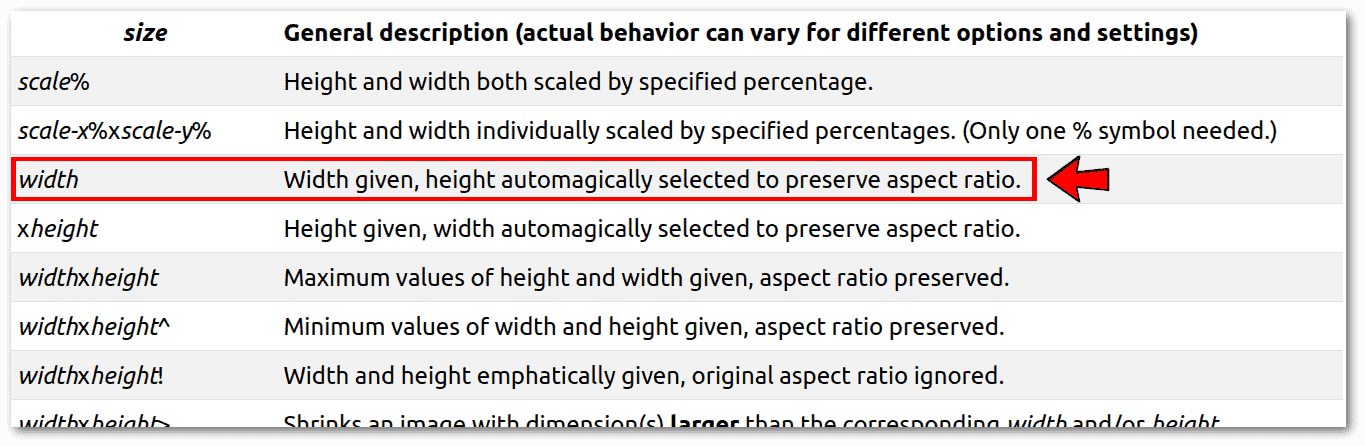 To understand the table, we must remember that scale, width, and height are numbers, while all other characters, such as %, x, ^, !, and >, must be inserted together with the numbers in the specified positions.
In our case, we only need to enter the desired width value without specifying anything else, and the height will be calculated automatically. So, let’s modify the convert command in our script so that it gets the desired width from the first parameter $1 passed to convert.sh:
# Convert command
convert "$file" -resize "$1" "$output_file"
Let’s try with a smaller width than all the current images and a larger one:
$ ./convert.sh 512
~/img_original/test_1.jpg (1024x1024) --> ~/img_converted/test_1.png (512x512)
~/img_original/test_2.jpg (1024x1792) --> ~/img_converted/test_2.png (512x896)
~/img_original/test_3.jpg (1200x2100) --> ~/img_converted/test_3.png (512x896)
~/img_original/test_4.jpg (1575x900) --> ~/img_converted/test_4.png (512x293)
~/img_original/test_5.jpg (1792x1024) --> ~/img_converted/test_5.png (512x293)

$ ./convert.sh 2048
~/img_original/test_1.jpg (1024x1024) --> ~/img_converted/test_1.png (2048x2048)
~/img_original/test_2.jpg (1024x1792) --> ~/img_converted/test_2.png (2048x3584)
~/img_original/test_3.jpg (1200x2100) --> ~/img_converted/test_3.png (2048x3584)
~/img_original/test_4.jpg (1575x900) --> ~/img_converted/test_4.png (2048x1170)
~/img_original/test_5.jpg (1792x1024) --> ~/img_converted/test_5.png (2048x1170)
The result is as expected.
4. Scale to the Same Height
Here, we want to scale all images to the same height, with the width automatically selected to maintain the aspect ratio.
This case is very similar to the previous one. By consulting the table in the Image Geometry section, we can see that all we need to do is add an x just before the height value:
# Convert command
convert "$file" -resize "x$1" "$output_file"
Let’s try a small and a large height value:
$ ./convert.sh 512
~/img_original/test_1.jpg (1024x1024) --> ~/img_converted/test_1.png (512x512)
~/img_original/test_2.jpg (1024x1792) --> ~/img_converted/test_2.png (293x512)
~/img_original/test_3.jpg (1200x2100) --> ~/img_converted/test_3.png (293x512)
~/img_original/test_4.jpg (1575x900) --> ~/img_converted/test_4.png (896x512)
~/img_original/test_5.jpg (1792x1024) --> ~/img_converted/test_5.png (896x512)

$ ./convert.sh 2048
~/img_original/test_1.jpg (1024x1024) --> ~/img_converted/test_1.png (2048x2048)
~/img_original/test_2.jpg (1024x1792) --> ~/img_converted/test_2.png (1170x2048)
~/img_original/test_3.jpg (1200x2100) --> ~/img_converted/test_3.png (1170x2048)
~/img_original/test_4.jpg (1575x900) --> ~/img_converted/test_4.png (3584x2048)
~/img_original/test_5.jpg (1792x1024) --> ~/img_converted/test_5.png (3584x2048)
The result is as expected.
5. Scale to the Same Width and Height
We can resize images of different sizes to fit a specific width and height, either by ignoring the final appearance or by using gravity-based cropping to ensure a visually pleasing result.
5.1. Scaling Without Cropping
Scaling without cropping refers to the process of resizing an image to fit a given width and height without removing any part of the image. This approach can result in some unintended and often undesirable visual effects, such as narrower or wider images.
Let’s modify the convert command with the syntax given in the Image Geometry section:
# Convert command
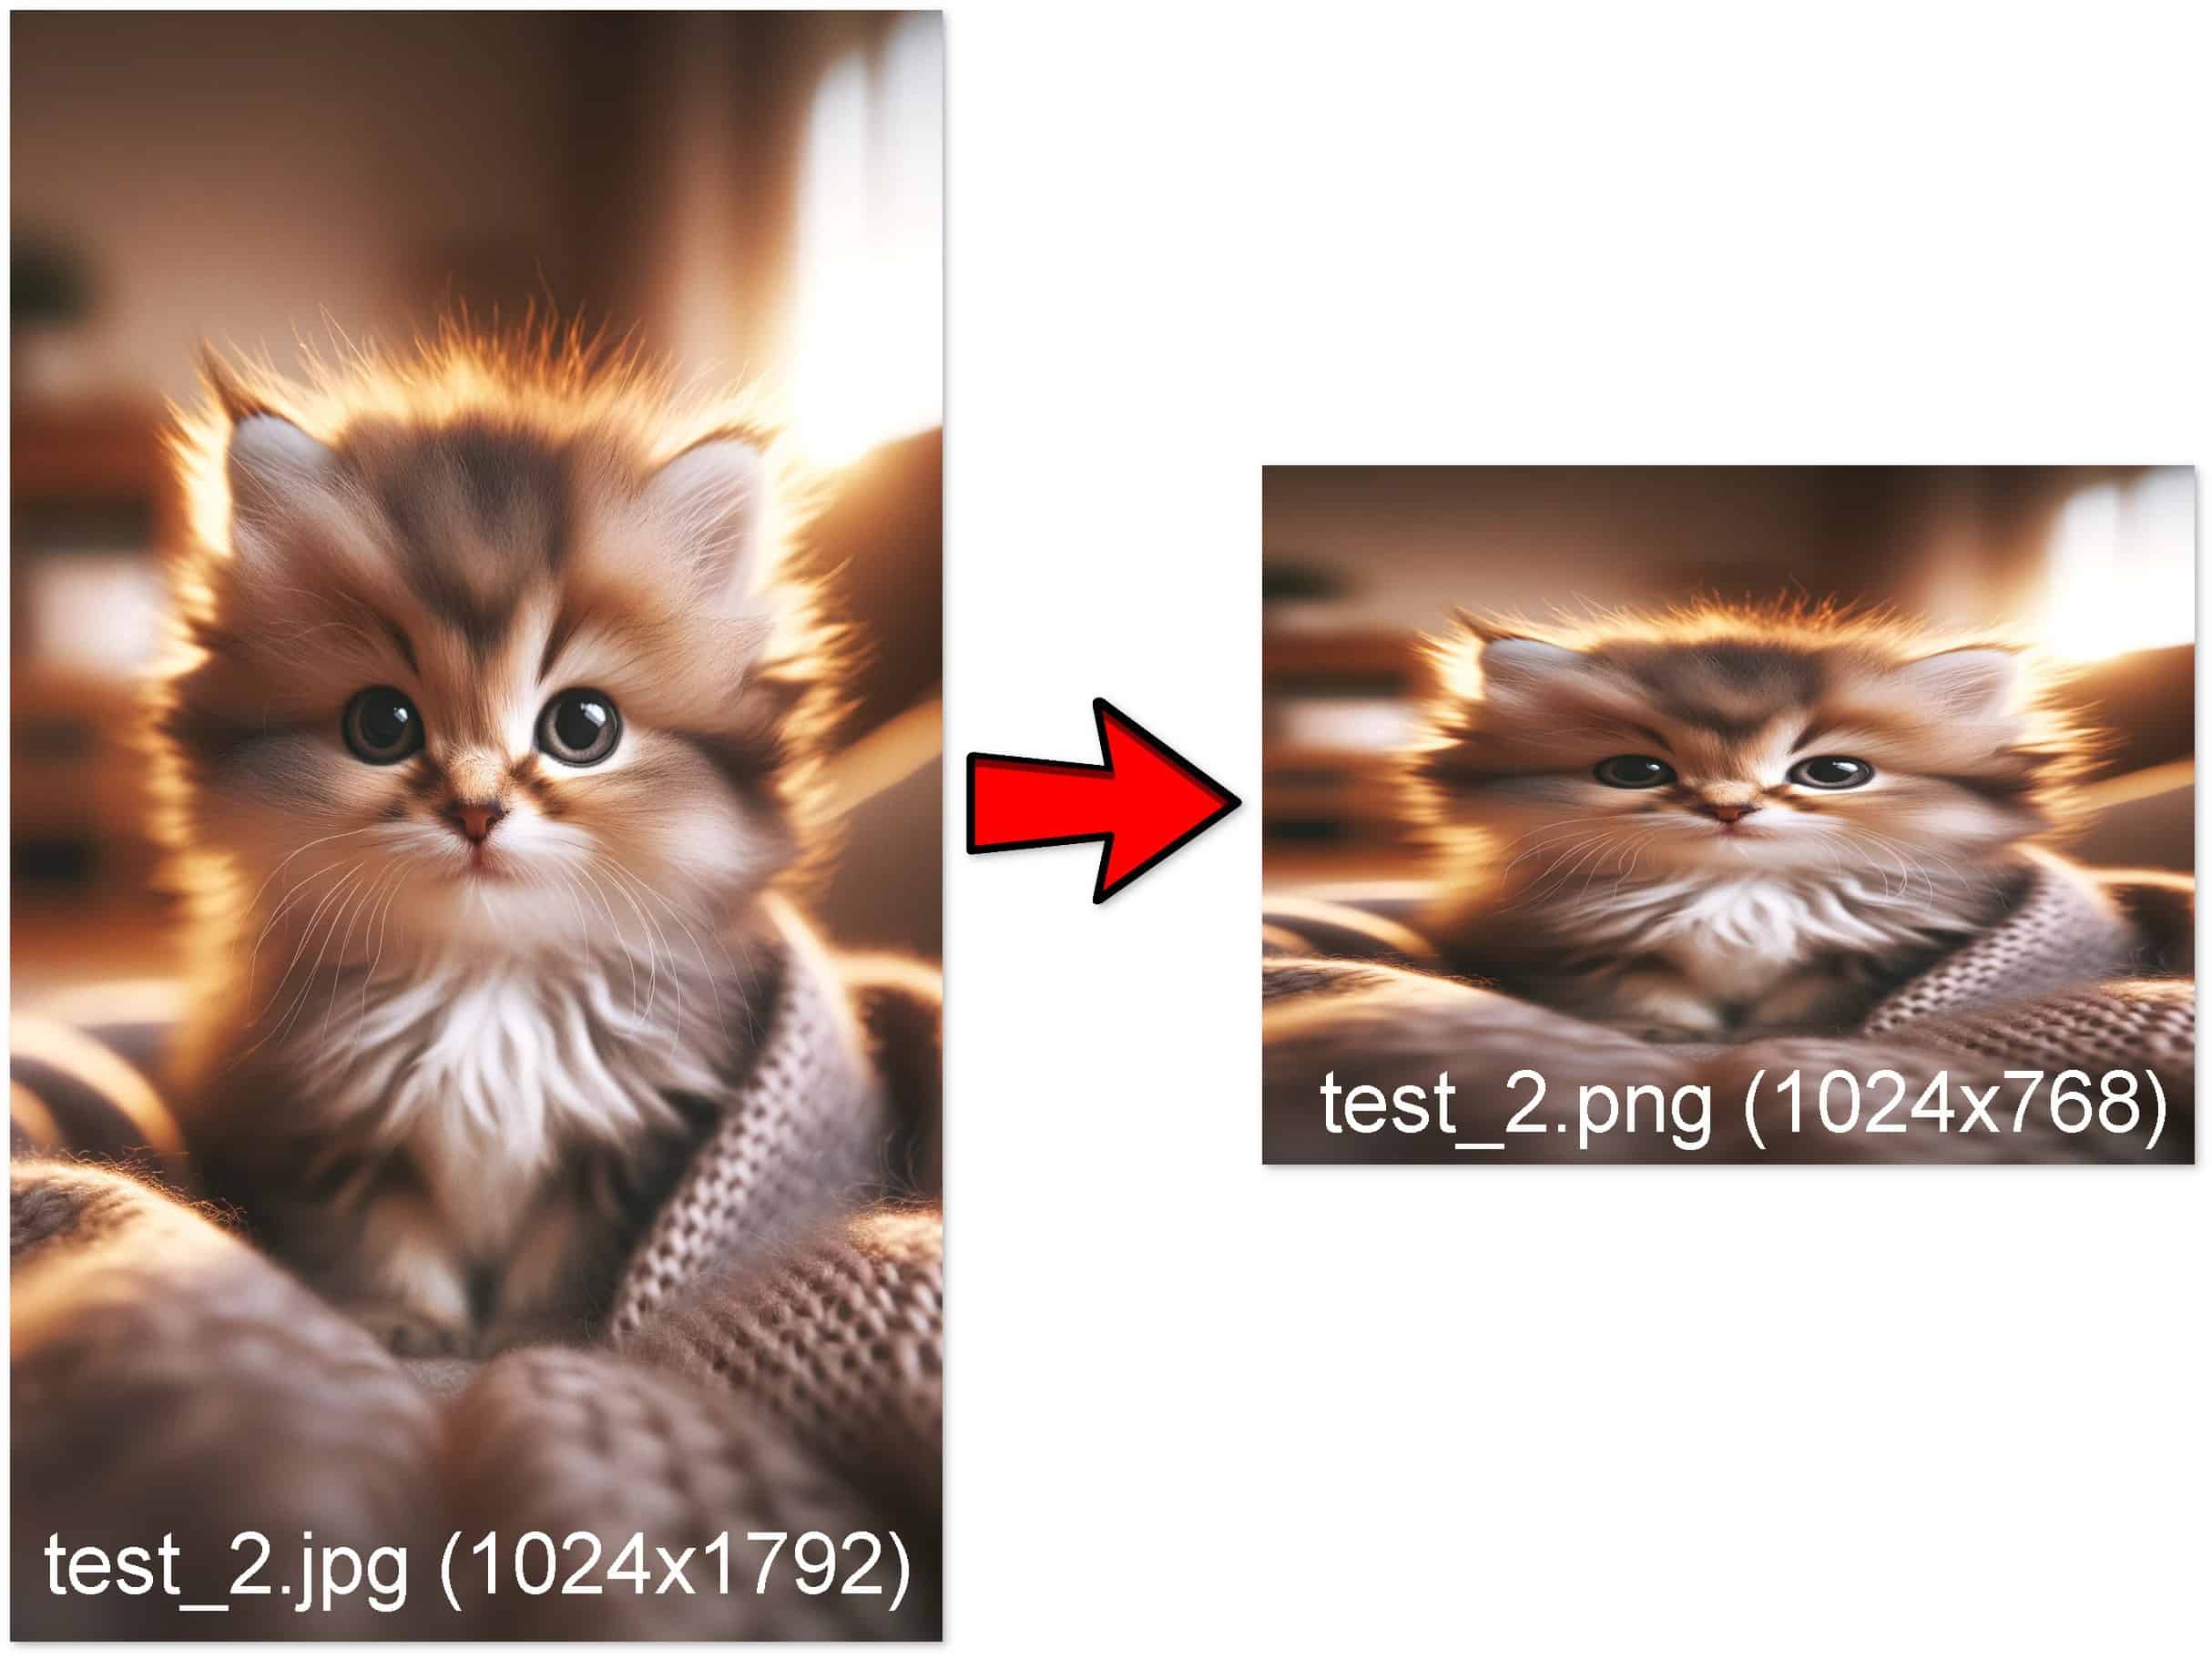
convert "$file" -resize "$1x$2!" "$output_file"This way, we can impose the same dimension on all images:
$ ./convert.sh 1024 768
~/img_original/test_1.jpg (1024x1024) --> ~/img_converted/test_1.png (1024x768)
~/img_original/test_2.jpg (1024x1792) --> ~/img_converted/test_2.png (1024x768)
~/img_original/test_3.jpg (1200x2100) --> ~/img_converted/test_3.png (1024x768)
~/img_original/test_4.jpg (1575x900) --> ~/img_converted/test_4.png (1024x768)
~/img_original/test_5.jpg (1792x1024) --> ~/img_converted/test_5.png (1024x768)
Although the resulting dimension of the images is as expected, all the images are distorted, especially test_2.png:
 In many cases, to avoid these problems, images are resized and then cropped to fit the desired space. This way, as we’ll see, the images look natural and well-composed in the new dimensions.
5.2. Scaling With Cropping and Gravity Suggestion
In the context of image scaling with cropping, gravity refers to the most important or focal part of an image. When we scale an image and need to crop it to fit a certain aspect ratio or size, the gravity determines which part of the image should remain visible.
For example, if the gravity is set to center, the scaling and cropping ensure that the center of the image remains visible, even if other parts of the image are cropped out. Gravity in the center is generally fine. However, convert has options to place gravity elsewhere in the image.
To modify the script so that it crops after scaling, with gravity set to the center, we need to modify the convert command:
# Convert command - Resize and then crop with gravity center
convert "$file" -resize "$1x$2^" -gravity center -crop "$1x$2+0+0" +repage "$output_file"
The modified command first resizes the image to ensure that at least one dimension matches the target size and then crops the image from the center to match the exact target dimensions. Let’s break it down:
- -resize “$1x$2^” → resizes the image so that its smallest dimension matches the target size while maintaining the aspect ratio
- -gravity center → sets the gravity to center for the cropping operation
- -crop “$1x$2+0+0” → crops the image to the desired dimensions from the center
- +repage → makes sure that the resulting image file contains only the cropped area and no additional canvas or offset data
Let’s try it:
$ ./convert.sh 1024 768
~/img_original/test_1.jpg (1024x1024) --> ~/img_converted/test_1.png (1024x768)
~/img_original/test_2.jpg (1024x1792) --> ~/img_converted/test_2.png (1024x768)
~/img_original/test_3.jpg (1200x2100) --> ~/img_converted/test_3.png (1024x768)
~/img_original/test_4.jpg (1575x900) --> ~/img_converted/test_4.png (1024x768)
~/img_original/test_5.jpg (1792x1024) --> ~/img_converted/test_5.png (1024x768)
The result is as expected and, this time, visually pleasing for all images:
 In general, this gravity-based scaling technique is widely used in web services, applications, and wherever an image needs to be resized to a different aspect ratio than the original.
6. Conclusion
In this article, we’ve seen how to batch resize images in Linux using ImageMagick’s convert tool. We discussed different scenarios:
- Same width for all images, preserving aspect ratio
- Same height for all images, preserving aspect ratio
- Same width and height for all images, with and without cropping
Our exploration included practical examples, starting with a versatile Bash script and modifying it to meet different resizing needs.
We emphasized the importance of maintaining the aspect ratio to preserve the visual appearance of images when resizing. We also explored the concept of gravity, an essential factor in maintaining the focal point of an image during resizing and cropping.