

Learn through the super-clean Baeldung Pro experience:
>> Membership and Baeldung Pro.
No ads, dark-mode and 6 months free of IntelliJ Idea Ultimate to start with.
Last updated: March 18, 2024
Learn through the super-clean Baeldung Pro experience:
>> Membership and Baeldung Pro.
No ads, dark-mode and 6 months free of IntelliJ Idea Ultimate to start with.
In this tutorial, we’ll learn about the meaning of the different colours displayed on the htop interactive screen status bar.
The htop command-line tool is a process monitor tool in Linux. Similar to the top command, it shows a list of processes currently running in the system, along with their resource consumption. However, the htop command display information in a more intuitive way. For example, htop represents the resource usage in a bar gauge format that fills up when all the resources are occupied.
To obtain the htop command binary, we can use the package manager of our Linux distro to install the htop package:
$ apt-get install -y htop
We can verify the installation by running the htop –version command:
$ htop --version
htop 2.2.0 - (C) 2004-2019 Hisham Muhammad
Released under the GNU GPL.
If it prints the version information, it means the installation is successful.
Running the htop command without any arguments shows us an interactive screen with two main panes:
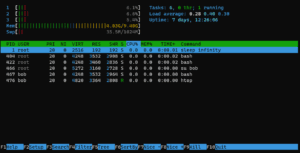
The bottom pane displays the list of processes that are currently running in the system. The meaning of each of the columns is similar to the one in the top command.
On the other hand, the top pane displays the current compute resource utilization. Specifically, it shows the current usage of CPU cores on the system with an integer value label. In the screenshot above, there are three different bar gauges with the label 1, 2, and 3 respectively. Each bar gauge represents the status of each of the CPU cores on the system.
Besides that, there are also two more bar gauges with the Mem and Swp labels that show the RAM and swapfile utilization of our system respectively.
Besides telling us the utilization of our computing resources on the system, the htop command paints the bars with different colours to show a finer granularity of utilization information.
To see what each colour represents for the different bar gauges, we can open up the Help page on htop by pressing the F1 key on the keyboard:
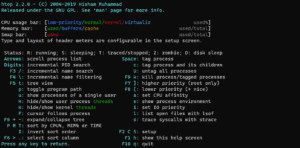
At the top of the Help page, we can see a reference to the colour of the gauge bars that the htop command display. For example, the blue colour stands for low-priority, whereas the green colour is normal. Besides that, we can also see that the colour has different meanings depending on the bar gauge we’re looking at.
While it’s good for serving as a good reference, the Help page doesn’t tell us exactly what low-priority means in the context of CPU usage. In the subsequent sections, let’s look into the meaning of each of the colours on the different bars.
Before we proceed, it’s important to know that there are different colour schemes for displaying the output using htop. For the sake of brevity, we’ll discuss the meaning of the colours using the default colour scheme.
To change the colour scheme, we can go to the Setup screen using the F2 command, then move the cursor to the Colors section and select the Default option:
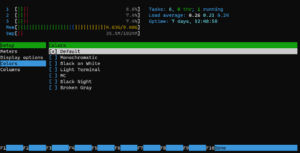
Finally, we press the F10 key on our keyboard to finish the setup.
The CPU core status bars show us how the CPU cores are spending their time in a specific time window. When the bar is 0%, it means the CPU core is idling. On the other hand, when the value is non-zero, such as 50%, it means that our CPU is spending 50% of its execution time on some task.
To provide more details about the CPU usage, htop uses different colours to represent the different CPU usage as per the information available in the /proc/stat file.
There are two different modes we can choose to display our CPU usage, the basic and the detailed modes. By default, htop displays the CPU usage in the basic mode. We can change the display mode to the detailed display mode, which offers a finer granularity of information about CPU usage.
To do that, we can enter the Setup screen by pressing the F2 key. Then, we move the cursor down to the Display Options section. Then, we can move our cursor to the Detailed CPU time option and select it using the Enter key:
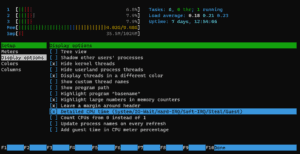
Once we are done, we can save the configuration using the F10 key.
The blue colour indicates time spent executing low-priority threads. Specifically, it means that the CPU core is executing threads that have a nice value greater than 0. The nice value is a value for the scheduler to decide how prioritized a process is. In general, the negative end of a nice value makes a thread a higher priority. On the other hand, a higher positive nice value makes the thread a lower priority.
Then, htop use the green colour to represent the CPU core time that we spend running normal user-level processes. In a system that runs a fair amount of active running applications, we’ll be seeing a relatively large portion of green bars on the CPU bar gauge.
htop uses the red colour to group all the time spent executing code on the kernel space. Specifically, all the time spent on executing system calls add up to the red colour bar in a specific time window. Since most of the processes invoke system calls in some way, the red colour bar also shows up frequently in the usage bar.
Besides that, in basic display mode, the red colour bar also includes the time the CPU core spends on IO waits and handling interrupt requests (IRQ). However, in detailed display mode, htop excludes the IO wait and IRQs from the red colour grouping. Instead, it displays the time spent on IO waits and IRQs separately using the grey colour and orange-magenta colour pair respectively.
The light blue colour represents the time spent on virtualization-related tasks. For example, it includes the steal time and guest time.
The steal time is the amount of CPU time that got “stolen” on this CPU core by the hypervisor process. Specifically, when we are running our Linux instance as a virtualized operating system on top of a hypervisor process, the Linux instance might contend with the hypervisor on a specific physical CPU core. When that happens, from the perspective of the virtualized Linux instance, we consider the portion of CPU core time that is utilized by the hypervisor as the steal time.
On the other hand, the guest time refers to the time that the CPU core spends on running the guest operating system. In Linux, a guest operating system is a virtualized operating system running on the Linux host. This metric is only relevant for Linux instances hosting any guest operating system.
The orange and magenta colours are used for representing the time handling the IRQs. Specifically, the orange represents the irq time, whereas the magenta portion of the bar shows the softirq time.
The grey colour represents the time the CPU cores spend waiting for IO resources. This is the time that the CPU core is blocked waiting for access to the filesystem.
The colour on the memory bar is relatively straightforward. It has three different colours: green, blue, and orange.
The green shows the portion of memory that is used by the processes. Specifically, these are the memory requested and used by the processes that are currently running. Then, the blue colour and the orange colour show the buffer and cache memory usage respectively.
In general, the system always caches frequently accessed files in the memory. Therefore, in a busy system, we’ll usually observe that the cache usage is relatively high. But the memory occupied by the cache is considered available. Specifically, whenever other processes request memory, the cache is evicted and memory occupied previously by the cache is made available.
In this article, we learned about the htop command which functions as a process monitor. Then, we have seen how htop uses different colours to communicate more information about resource usage in the system.
For the CPU usage bar, we learned that there are two different display modes: the basic and the detailed version. In each display mode, we understood how the colours are used to indicate the different categories of tasks that the CPU core spends time in. Finally, we also looked at the three categories of memory usage on the system RAM and how htop uses different colours to represent them.