

Yes, we're now running our only Summer Sale. All Courses are 30% off until 20th July, 2026:
How to Create a Linux Live USB With Persistence Using Easy2boot
Last updated: March 18, 2024
Learn through the super-clean Baeldung Pro experience:
>> Membership and Baeldung Pro.
No ads, dark-mode and 6 months free of IntelliJ Idea Ultimate to start with.
1. Overview
All live Linux distributions are volatile by default, meaning that the entire OS is loaded into RAM only, without leaving a trace after a reboot. However, this feature is sometimes undesirable.
Conversely, a persistent Linux live USB distribution automatically saves data changes to the USB storage device. This way, it keeps all modifications between reboots, including bookmarks, system preferences, downloads, new software, and more.
In this tutorial, we’ll look at Easy2Boot, which can make our favorite live Linux distributions persistent.
2. Usage and Restrictions
On a persistent live distribution, we can install most applications and update them, create and modify files and folders, download anything and apply customization. Moreover, we can perform the usual activities that don’t require persistence, such as launching the Linux distribution installer or surfing the ‘net. However, there are some limitations.
The first restriction is that only some live distributions support persistence, as further detailed below. In general, Ubuntu and derivatives have the simplest ways to achieve persistence.
The second issue is that we can’t update the kernel, install hardware drivers, or perform significant system upgrades. The reason is that a persistent live distribution is composed of a core read-only system on which there is a writable overlay. Consequently, the core files (like the kernel) are read-only, while all other files are writable.
In addition, the maximum persistence storage space size is 4 GB by default due to the limitations of FAT32. In some cases, there are tricks to get around this limitation, but we’ll not delve into that.
Finally, it’s crucial to shut down the live system properly. Otherwise, the persistence file (usually a raw file containing an ext2/3/4 file system) will be corrupted, preventing the next reboot.
3. Easy2Boot
Easy2Boot is primarily a Windows tool, but we can also use it with Linux. It allows booting many Linux ISOs in the same USB drive, and each ISO can have a separate persistence file.
Easy2Boot can add persistence to a wide range of distributions, including:
- antiX
- ArchBang
- Debian
- Elementary OS
- Fedora
- GeeXboX
- Gentoo
- Kali Linux
- Linux Lite
- Linux Mint
- Lubuntu
- LXLE Linux
- Netrunner
- Parrot OS
- Pentoo
- Peppermint OS
- Porteus
- Slackware
- Slax,
- Tails
- Ubuntu
- Zorin OS
We omitted little-known or discontinued distributions from the list.
3.1. Our Goal
Let’s see, step by step, how to use Easy2Boot 2.18 to make persistent Ubuntu Live 22.04 and Fedora Workstation Live 64.
We tested our procedure with a Linux Mint 21 installation, and it requires a minimum 16GB USB stick.
There are alternative methods, such as the one specifically for Ubuntu and its derivatives. However, we’ll focus on a generic way that’s similar across different distributions.
3.2. Preparing the USB Stick
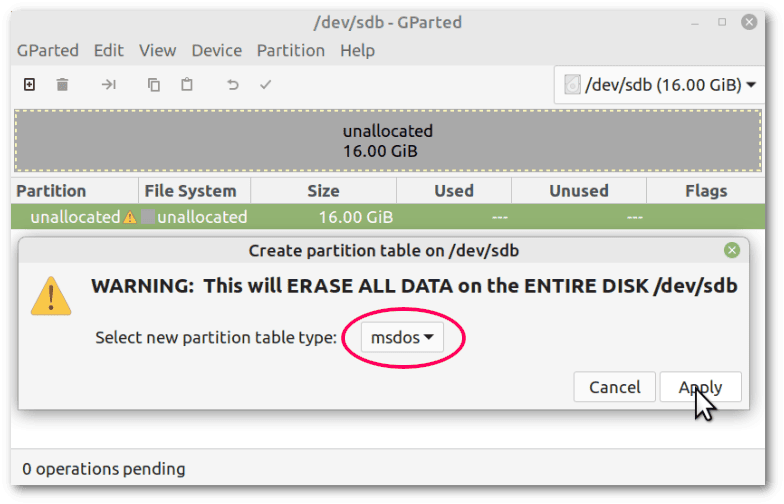
First, let’s use GParted to create a new MBR partition table. GParted labels it as msdos:
 Then, let’s create two primary FAT32 partitions. Let’s assign the first partition all the space minus an amount between 600MB and 1GB, and the second partition the remaining space:
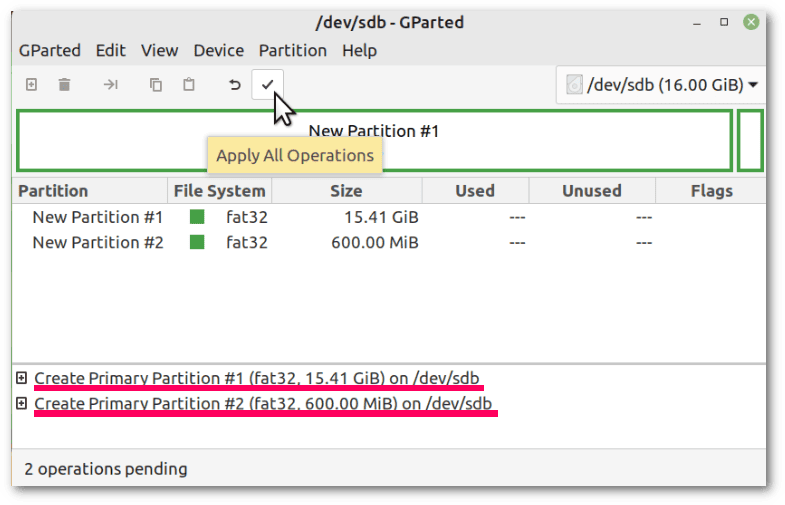 Anyway, we’ll not use the second partition, as it only ensures compatibility with certain types of BIOS, as suggested in the Easy2Boot guidelines for Linux.
3.3. Installing Easy2Boot on the USB Stick
The next step is to download and extract the zipped archive of Easy2Boot for Linux, which is encrypted with the password “e2b“:
$ unzip -P e2b Easy2Boot_v2.18_password_is_e2b.zip -d Easy2BootLet’s then run the installation script, ensuring that the USB stick is mounted and that its first partition (in our case /dev/sdb1) is recognized correctly by the script. It’s worth noting that the bash command in sudo bash ./fmt.sh is required. In fact, running either sudo bash ./fmt.sh or sudo ./fmt.sh produces two different results, with errors in the second case:
$ cd Easy2Boot/_ISO/docs/linux_utils/
$ chmod +x ./fmt.sh
$ sudo bash ./fmt.sh
[...]
/dev/sda3         25106692  10352472  13453536  44% /
/dev/sda2           524252      5364    518888   2% /boot/efi
/dev/sdb1         16146000         8  16145992   1% /media/francesco/C43B-67F4

Is target device (/dev/sdb1) correct (y/n) : y
[...]
Proceed with formatting (y/n): y
[...]
Note: For best boot compatibilty, ensure a second Primary partition exists on the E2B USB drive.
[...]
Use [...] to defrag this volume.
The script is self-explanatory and warns us that having a second primary partition is a good idea, as we had previously noted.
Finally, the script prompts us to defragment the volume but indicates a wrong command. We must again mount the volume (fmt.sh unmounted that) and take note of the mount point, which is /media/francesco/EASY2BOOT in our case. Then, the correct command, assuming to replace our example mount point with the actual one, would be:
$ sudo perl ./defragfs /media/francesco/EASY2BOOT -f
[...]
Analysis in progress...
[...]
You do not need a defragmentation!
Making sure the files are fully defragmented, meaning contiguous, prevents possible booting problems.
3.4. Testing Easy2Boot Booting
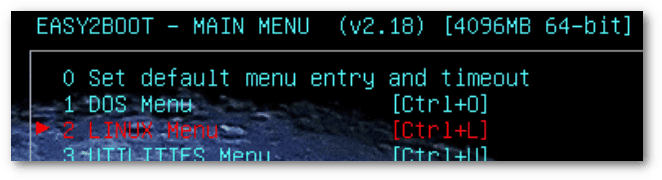
Let’s restart our machine and boot from our USB stick:
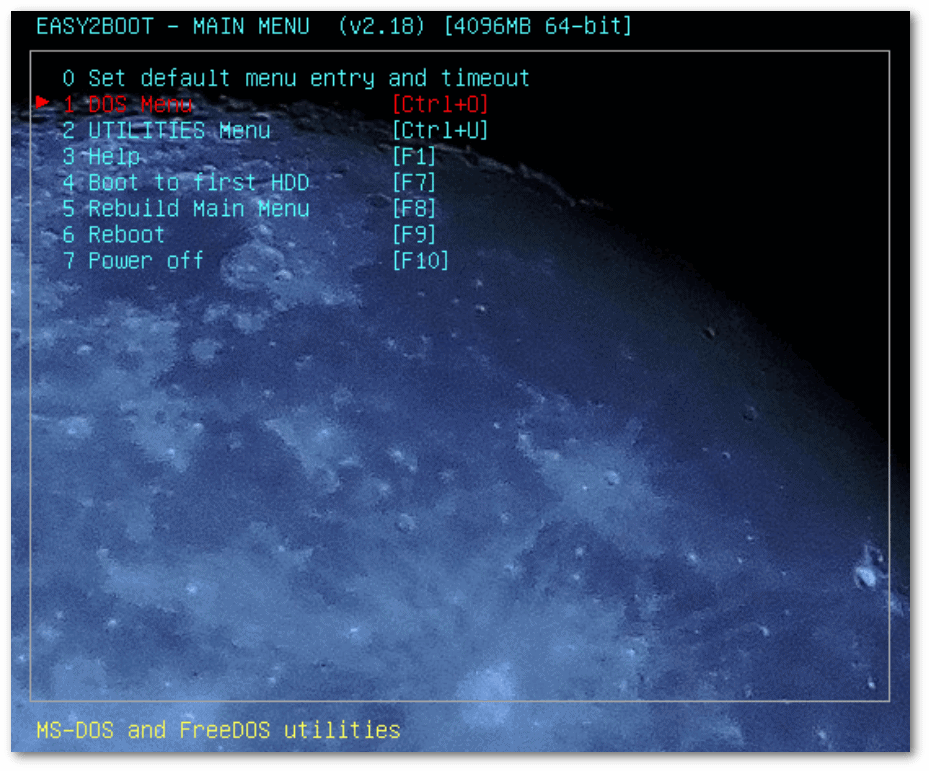 This generic multiboot menu automatically adds a Linux entry and related sub-entries when we add one or more Linux ISOs.
3.5. Copying ISO Files and Testing ISOs Booting
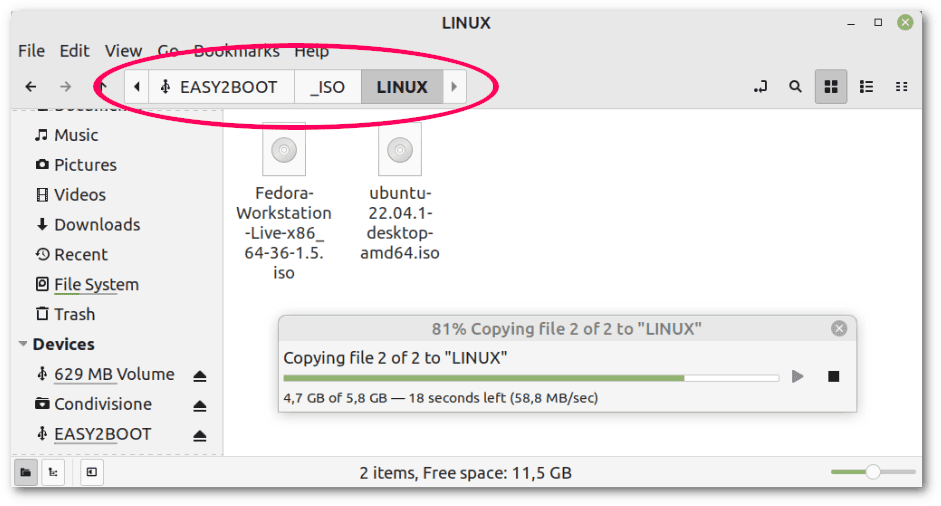
Let’s copy the ISOs to the /_ISO/LINUX folder of the USB stick:
 Before proceeding further, let’s make sure that the files have been entirely copied, running sync, and perform defragmentation again:
$ sync
$ cd Easy2Boot/_ISO/docs/linux_utils/
$ sudo perl ./defragfs /media/francesco/EASY2BOOT -f
[...]
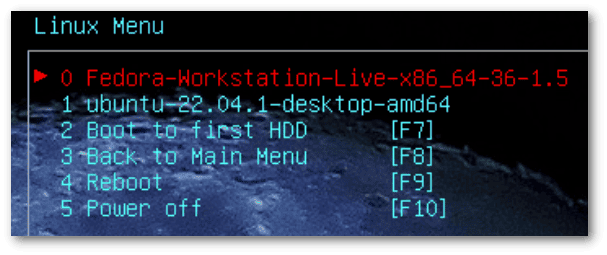
You do not need a defragmentation!Let’s change the extension of both files from .iso to .isodefault. This is for testing booting without persistence. After that, let’s reboot and verify that we have the Linux choices in the boot menu:
 Let’s boot both live distributions to give them a try:
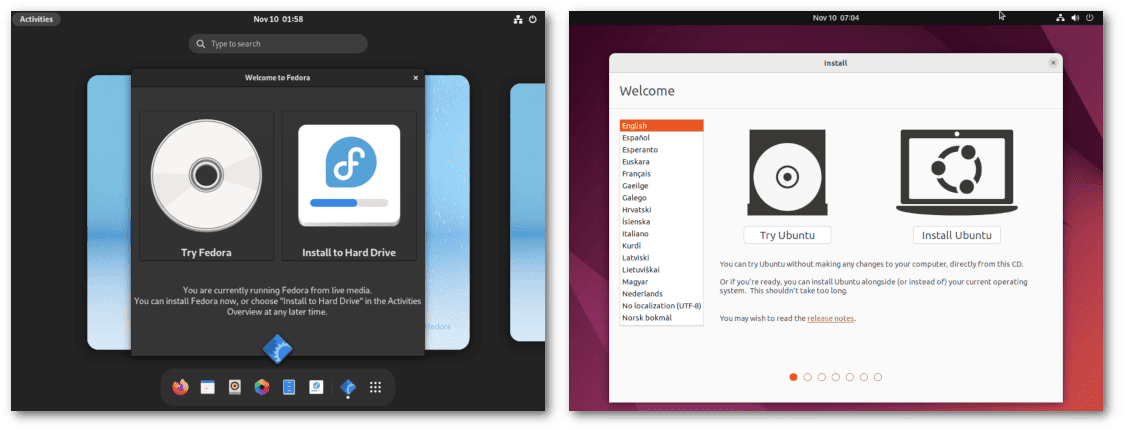
 The result is as expected. We can boot each live distribution from a single USB stick. From this point of view, Easy2Boot is particularly convenient since, under normal conditions, we’d need a USB stick for each distribution:
 The upcoming steps are to enable persistence. First, however, let’s restore the extensions from .isodefault to .iso.
3.6. Extracting Fedora Files
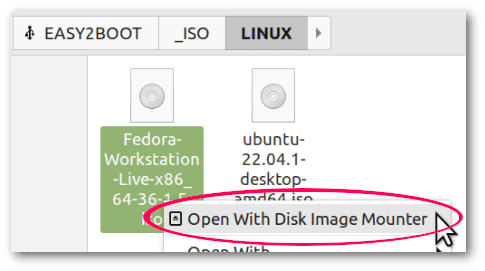
The official Easy2Boot documentation for getting persistence with Fedora 36 refers to MPI Tool Kit, a software that runs exclusively on Windows. Luckily, there’s an alternative, undocumented approach for Linux users, which involves extracting some files from the Fedora ISO.
We can use Disk Image Mounter, an option included by default in Linux Mint, to mount the ISO automatically, or alternatively, we can manually mount the ISO:
 Let’s proceed to copy the files in a manner that prevents fragmentation. For the sake of clarity, we make explicit in two Bash variables the mounting points of the USB stick and of the ISO. Of course, we have to change our example mount points to the actual ones:
$ USBSTICK=/media/francesco/EASY2BOOT
$ FEDORAISO=/media/francesco/Fedora-WS-Live-36-1-5
$ mkdir $USBSTICK/LiveOS
$ cp $FEDORAISO/LiveOS/squashfs.img $USBSTICK/LiveOS/
$ sync
$ cp $FEDORAISO/isolinux/initrd.img $USBSTICK/LiveOS/
$ sync
$ cp $FEDORAISO/isolinux/vmlinuz $USBSTICK/LiveOS/
$ sync
$ sudo perl $USBSTICK/_ISO/docs/linux_utils/defragfs $USBSTICK -f
[...]
You do not need a defragmentation!
This way, we’re sure that only one file is copied at a time and that its writing is completed before copying the next file. In fact, sync flushes the buffers. The last step is to confirm that there’s no fragmentation.
3.7. Editing .mnu Files
This is the most challenging and error-prone part. A .mnu file is a UTF-8 or ASCII text containing grub4dos case-sensitive commands that we need in order to have persistence. Its name must be identical to the ISO it refers to, except for the extension, with the addition of the suffix _Persistent.
Therefore, let’s create the .mnu files:
$ cd /media/francesco/EASY2BOOT/_ISO/LINUX
$ touch Fedora-Workstation-Live-x86_64-36-1.5_Persistent.mnu
$ touch ubuntu-22.04.1-desktop-amd64_Persistent.mnu
The EASY2BOOT/_ISO/docs/Sample mnu files/Linux folder contains sample .mnu files for the various supported distributions:
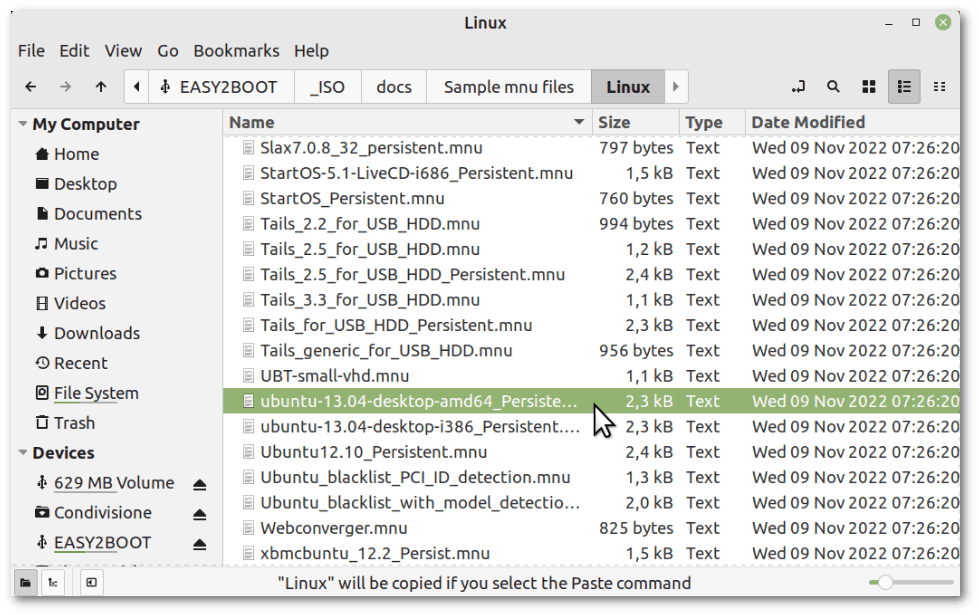 However, we need to find the files that most closely match what we’re looking for and tailor their content to our specific use cases. In general, some basic directions or links with more information are in the comments (prefixed with a #). We should also search the Easy2Boot site for more recent information.
That said, let’s write the content we need to use for the Fedora-Workstation-Live-x86_64-36-1.5_Persistent.mnu file. Our reference file was Fedora_Persistent.mnu, and we had to make several changes to adapt it for our use. We also strip out comments for conciseness:
title FEDORA 36 PERSISTENT\nBoot to Fedora with persistence
uuid () > nul
set UUID=%?%
echo UUID=%UUID%
if not exist /fedora.img echo WARNING: Changes will not be remembered unless a /fedora.img ext file is created! && pause
kernel /LiveOS/vmlinuz root=live:UUID=%UUID% rd.live.overlay=/dev/disk/by-uuid/%UUID%:/fedora.img rd.live.dir=/LiveOS rootfstype=auto rw rd.live.image quiet splash rhgb rd.luks=0 rd.md=0 rd.dm=0 xdriver=vesa nomodeset selinux=0 vga=791
initrd /LiveOS/initrd.img
boot
And let’s also create the content of our ubuntu-22.04.1-desktop-amd64_Persistent.mnu. Our reference file was ubuntu-13.04-desktop-amd64_Persistent.mnu. For brevity, we removed comments and other code that isn’t strictly necessary:
title Ubuntu 22.04.1 PERSISTENT\nBoot to Ubuntu with persistence
set ISO=$HOME$/ubuntu-22.04.1-desktop-amd64.iso
set PER=/ubuntu2204-rw
if "%E2BDEV%"=="" set E2BDEV=hd0 && pause E2BDEV forced to hd0!
if exist CD echo WARNING: Cannot use partnew command! && pause && configfile (bd)/menu.lst
debug 1
parttype (%E2BDEV%,2) | set check=
debug off
set check=%check:~-5,4%
if "%check%"=="0x00" partnew (%E2BDEV%,2) 0 0 0
if not "%check%"=="0x00" echo WARNING: PTN TABLE 3 IS ALREADY IN USE - PERSISTENCE MAY NOT WORK! && pause
debug 1
if not exist %PER% echo WARNING: %PER% persistence file not found! && pause
errorcheck off
if "%check%"=="0x00" partnew (%E2BDEV%,2) 0x0 %PER%
errorcheck on
partnew (%E2BDEV%,3) 0x0 %ISO%
map %ISO% (0xff)
map --hook
root (0xff)
set kernel=/casper/vmlinuz
set initrd=/casper/initrd
set seed=file=/cdrom/preseed/ubuntu.seed
echo loading %kernel%...
kernel %kernel% boot=casper persistent noeject noprompt quiet splash --
echo loading %initrd%...
initrd %initrd%
Let’s check the encoding of the .mnu files:
$ cd /media/francesco/EASY2BOOT/_ISO/LINUX
$ file Fedora-Workstation-Live-x86_64-36-1.5_Persistent.mnu
Fedora-Workstation-Live-x86_64-36-1.5_Persistent.mnu: ASCII text
$ file ubuntu-22.04.1-desktop-amd64_Persistent.mnu
ubuntu-22.04.1-desktop-amd64_Persistent.mnu: ASCII text
Both are ASCII texts. That’s fine.
3.8. Moving the .mnu and ISO Files to the MNU Folder
In Easy2Boot/_ISO/_LINUX, let’s create the MNU subfolder and move the .mnu and ISO files there:
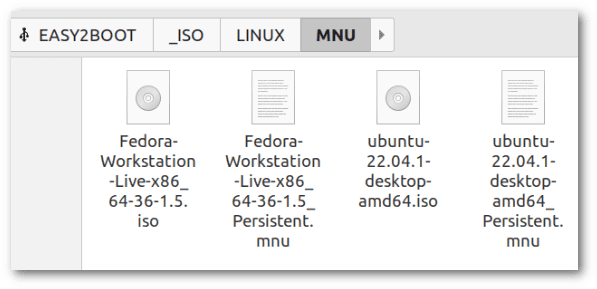 This way, Easy2Boot understands that it doesn’t have to boot the ISOs directly but must read the .mnu files to perform the boot.
3.9. Creating Persistence Files
Fedora’s .mnu file refers to the fedora.img persistence file, and Ubuntu’s refers to the ubuntu2204-rw persistence file, both located in the root of the USB stick. Let’s create them with the help of CreatePersistenceFile.sh, included in the Linux utilities of Easy2Boot.
First, let’s check which options we have and how much free space there is:
$ cd /media/francesco/EASY2BOOT
$ sh ./_ISO/docs/linux_utils/CreatePersistenceFile.sh -h
Usage:  CreatePersistenceFile.sh [ -s size ] [ -t fstype ] [ -l LABEL ] [ -c CFG ]
Creates new file named persistence.dat

  OPTIONS: (optional)
   -s size, in MB, default is 1024
   -t filesystem_type, default is ext4,  ext2/ext3/ext4/xfs are supported
   -l label, default is casper-rw
   -c configfile, creates new file inside the persistence file. File content is "/ union"
[...]
$ df -h
Filesystem        Size  Used Avail Use% Mounted on
[...]
/dev/sdb1          16G  7,9G  7,6G  51% /media/francesco/EASY2BOOT
[...]
The default options of CreatePersistenceFile.sh are fine, except for size. In fact, the default ext4 file system type is a good choice because it’s resistant to corruption. Moreover, Ubuntu requires the default casper-rw label. Fedora, on the other hand, is indifferent to the label.
On the USB stick, we still have 7.6GiB free. Let’s make the persistence files 3.5GiB (3584MiB) each so that we leave some free space. Again, we must be careful not to create fragmentation:
$ sudo sh ./_ISO/docs/linux_utils/CreatePersistenceFile.sh -s 3584
[...]
3758096384 bytes (3,8 GB, 3,5 GiB) copied, 45,83 s, 82,0 MB/s
[...]
Creating filesystem with 917504 4k blocks and 229376 inodes
[...]
$ sync
$ mv persistence.dat ubuntu2204-rw
$ sudo perl ./_ISO/docs/linux_utils/defragfs ./ -f
[...]
You need a defragmentation or Your are using -f parameter!
Please specify the percentage of files should be defrag (1-100) [0.0803858520900322] or hit Enter.
[...]
You need AT LEAST 3584.000 Megabytes temporarily used for defragmentation [...], continue (Y/N)? [Y] y
[...]
Done!
Analysis in progress...
[...]
You do not need a defragmentation!
$ cp ubuntu2204-rw fedora.img
$ sync
$ sudo perl ./_ISO/docs/linux_utils/defragfs ./ -f
[...]
You do not need a defragmentation!
Ubuntu’s persistence file is ready. Fedora’s, which is a copy of Ubuntu’s for now, instead requires two folders inside it to be recognized as a persistence file. For this purpose, we can mount it as a loop device:
$ sudo mkdir /mnt/fedorapersistence
$ sudo mount -o loop,rw ./fedora.img /mnt/fedorapersistence
$ sudo mkdir /mnt/fedorapersistence/overlayfs
$ sudo mkdir /mnt/fedorapersistence/ovlwork
$ sudo umount /mnt/fedorapersistence
$ sudo rm -R /mnt/fedorapersistence
We just added the overlayfs and ovlwork folders. Everything is finally ready. Let’s restart and boot from the USB stick.
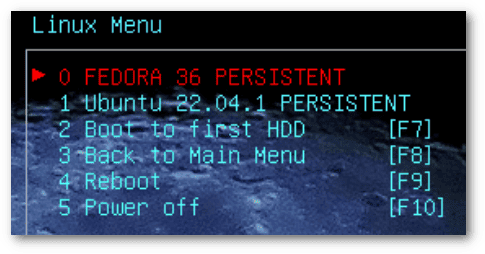
3.10. Testing Persistence
Easy2Boot now gives us the ability to boot our live distributions with persistence:
 Let’s start Fedora and Ubuntu with persistence, change the default background, and create a test text file:
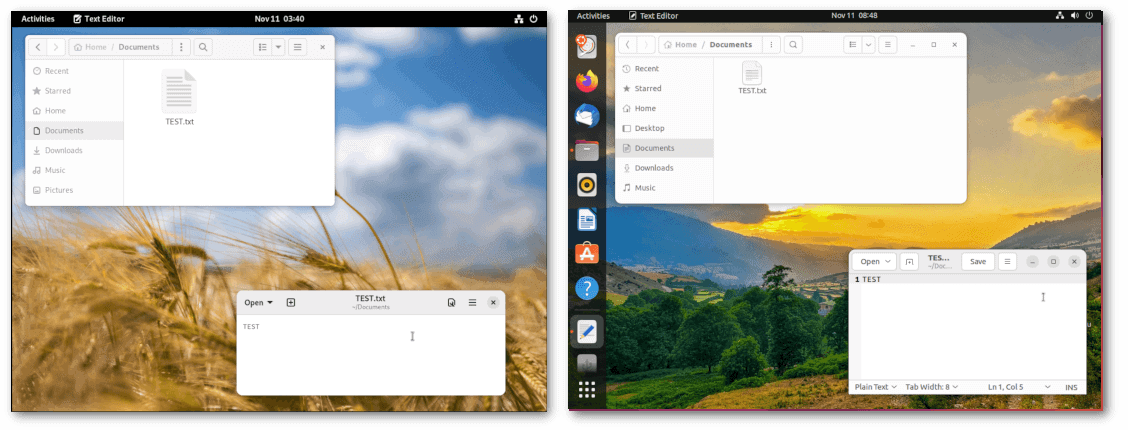 When we restart, we verify that the background changes and the test files are retained.
4. Conclusion
Easy2Boot undoubtedly has unique features, but at first, it’s not a walk in the park.
In this article, we looked at how to use Easy2Boot to make a couple of live Linux distributions persistent. The steps we followed can be a valuable outline for other live distributions. Still, we need to study the documentation to understand the differences. A first look at the .mnu files may already point us in the right direction.