

Yes, we're now running our only Summer Sale. All Courses are 30% off until 20th July, 2026:
How Do I Find if There Is a Rogue DHCP Server on My Network?
Last updated: July 31, 2024
Learn through the super-clean Baeldung Pro experience:
>> Membership and Baeldung Pro.
No ads, dark-mode and 6 months free of IntelliJ Idea Ultimate to start with.
1. Overview
In this article, we’ll discuss how to detect DHCP servers. But before we dive into it, we’ll first look into the signs of a rogue DHCP server and how it affects the network, secondly we’ll talk about how to detect it, and finally, we’ll discuss what measures we can take to mitigate it.
2. Sign and Dangers of a Rogue DHCP Server
The DHCP server is responsible for assigning our PC’s IP addresses. In most instances, either our home/office routers or ISP providers automatically assign us this address. In cases where we receive an IP address, which isn’t within the IP address range we’ve defined, then it should raise an alert. If we trace the source of such an IP address and map it to a router that isn’t within our reach or under the administrative control of any network staff, we consider such an illegitimate DHCP server. This poses a great security issue that can corrupt and disable the entire network. In most network setups (for example home and small offices), it is common to find only a single DHCP server in use. In larger organizations, there are multiple DHCP servers which sometimes is configured per departmental level. As we can see in both of these scenarios, we should ensure that the IP addresses being assigned are well-defined and that their ranges don’t overlap. We should also make sure these IP addresses come from the designated DHCP server/servers. However, even in a well-configured network environment, it is still possible to have an illegitimate DHCP server/servers. This might be a result of the increasing number of IoT devices that are continually added to our networks where some of them might have DHCP capabilities. For those that have this built-in DHCP feature, the feature can either be knowingly or unknowingly enabled. Not only wouldn’t it be by accident to find a rogue DHCP server on the network, but someone with malicious intentions can also add it. Whenever we experience the following issues in our network environment, we should definitely suspect the presence of an unauthorized DHCP server:
- When PCs occasionally lose their IP addresses and pick new non-standard ones in our network (those outside the specified IP range).
- IP address conflict resulting from overlapping IP addresses being handed out
- An abnormally large amount of DHCP traffic on UDP ports 67 and 68 flowing through the network.
- Wrong network information e.g. unspecified DNS address and unknown default gateway
Unauthorized DHCP server/servers can expose to network insecurities of great magnitude. A less impact-full attack from a rogue DHCP server can result in low internet speeds and a lack of access to other resources like network printers. Otherwise, more serious attacks, like MIMT (Man in The Middle Attack), can cause crippling effects on us (individuals or organizations targeted). Also, through a rogue DHCP server, the malicious attacker is able to access and scan both outbound and inbound traffic depending on where this illegitimate DHCP server is positioned. This even poses a greater danger.
3. How to Detect a Rogue DHCP Server
A common rule of thumb for any network is to only use one DHCP server. Though this is not applicable to larger organizations, with more network requirements and specifications. In such institutions, the network staff should document the network information adequately. There are a variety of ways available to us to detect a rogue DHCP server. Let’s look at some of them as we start our troubleshooting.
3.1. Temporarily Disabling the DHCP Server
One of the most commonly used ways to identify a rogue DHCP server is to turn off the legitimate server. Upon turning it off, our computers are still able to connect to the rogue DHCP server and get an address. We can then run the following commands to trace and find the illegitimate DHCP server. For Linux we run:
$ sudo dhclient -v
$ ifconfig | grep "inet"
Whereas for windows, we run ipconfig /release to free the IP, and then we follow it with ipconfig /renew. We then proceed to check the IP address obtained by ipconfig. This helps us identify which devices are on the network. What addresses do they have and where the addresses are coming from? Undeniably, this isn’t applicable in an office/production environment or in setups where there are multiple DHCP servers. Therefore, let’s look at other means which will be even more efficient.
3.2. Using nmap
nmap is an open-source network utility for network discovery, scrutiny, and auditing. Thanks to its service and version detection capabilities, among others, we can perform a complete network inventory and both host and device discovery. nmap connects to and interrogates each open port using detection probes. Let’s start by identifying all the devices present on the network:
$ nmap -sV --allports -T4 192.x.x.xNext, let’s use nmap to perform a DHCP discovery. Here we will use a default script that comes with nmap. The broadcast-dhcp-discover script sends a DHCP request to the broadcast address using the MAC address and reports the results. In this example let’s run the script and see the results:
$ sudo nmap --script broadcast-dhcp-discover -e eth0
Pre-scan script results:
| broadcast-dhcp-discover:
|   Response 1 of 1:
|     Interface: eth0
|     IP Offered: 192.168.x.x
|     DHCP Message Type: DHCPOFFER
|     Server Identifier: 192.168.64.92
|     IP Address Lease Time: 59m59s
|     Renewal Time Value: 29m59s
|     Rebinding Time Value: 52m29s
|     Subnet Mask: 255.255.255.0
|     Broadcast Address: 192.168.64.255
|     Router: 192.168.64.92
|     Domain Name Server: 192.168.64.92
|_    Vendor Specific Information: ANDROID_METERED
Lastly on nmap, we can run another script to identify universal plug-and-play (UPnP) devices. Just like IoT, these devices can also host multiple protocols some might have the potential to possess DHCP server-like features. To discover these devices, we run the following script:
$ sudo nmap -sV --allports -T4 192.168.x.x
Nmap scan report for 192.168.64.92
Host is up (0.00047s latency).
Not shown: 999 closed tcp ports (reset)
PORT   STATE SERVICE VERSION
53/tcp open  domain  dnsmasq 2.51
MAC Address: CG:D8:N2:39:GF:7A (Unknown)
Nmap done: 1 IP address (1 host up) scanned in 7.24 seconds
3.3. Using Wireshark
Apart from nmap, we can also use another network tool, a protocol analyzer called Wireshark. For Linux distros that don’t come with it, we can install it by:
$ sudo apt-get -y install wireshark
For windows and Mac, we can download it at the Wireshark Foundation website. Let’s open and run Wireshark. We then select the interface we would want to analyze. Another option is to leave it to any: 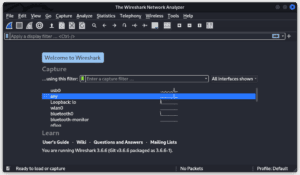 We then select start capturing. Next, let us release the current IP address our computer is having. For Linux let’s run :
$ sudo dhclient -v
Listening on LPF/usb0/8a:8e:06:ba:b1:38
Sending on   LPF/usb0/8a:8e:06:ba:b1:38
Listening on LPF/wlan0/60:67:20:7a:a6:8c
Sending on   LPF/wlan0/60:67:20:7a:a6:8c
Sending on   Socket/fallback
DHCPDISCOVER on eth0 to 255.255.255.255 port 67 interval 3
DHCPDISCOVER on wlan0 to 255.255.255.255 port 67 interval 3
DHCPOFFER of 192.168.x.x from 192.168.x.x
DHCPREQUEST for 192.168.x.x on eth0 to 255.255.255.255 port 67
DHCPACK of 192.168.x.x from 192.168.x.x
bound to 192.168.x.x -- renewal in 1725 seconds.
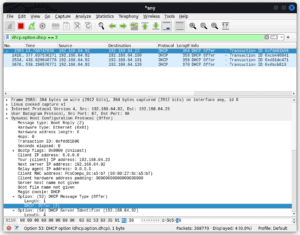
For windows let’s run ipconfig release /all followed by ipconfig renew /all. At this point, Wireshark is concurrently capturing and analyzing each packet passing through the interface we selected. Next, on the “Apply a display filter” bar, let’s enter “bootp”, the keyword to filter DHCP offer messages:

This filters the packets and only displays those that contain the offer message Let’s right-click on one of the packets and dissect it further. The details pane found in the middle presents the “protocols and protocol fields” of the selected packet. Let’s find it and then click on the DHCP (offer) to expand it and then let’s find the row that starts with “options: DHCP Message Type (Offer)”. Next, we right-click on it and check selected to apply it as a filter (this only filters and displays the DHCP offer packets):
Next, we click on the statistics tab followed by endpoints. We then select the IP tab. In the lower section of this window, we should make sure to check “limit to display filter”. This makes it possible for us to view the IP addresses that correlate with our display filter:
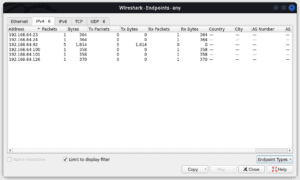
From the IPs displayed, we can find out further, which IP address belongs to what device. We can also compare the addresses to our valid IP address range and identify which ones are invalid.
4. How to Mitigate a Rogue DHCP Server
To emphasize, we can keep ourselves safe from rogue DHCP servers by implementing techniques that protect our network. It is of great urgency to ensure that illegitimate DHCP servers are taken out of the network as quickly as possible. In the event it stays longer, it poses a great danger to the entire network infrastructure.
4.1. Blocking the Rogue DHCP Server
Upon detecting and identifying the unauthorized DHCP server, we should configure our switches to block it straightaway. DHCP snooping is a layer 2 security feature incorporated within a capable network switch. We configure this aspect on the port where the valid DHCP server connects. This turns this port into a trusted port. All the other remaining ports are untrusted ports and they can’t respond to a DHCP discover packet. Moreover, it only allows DCHP OFFER and DHCPACK messages from the trusted port. DHCP snooping also performs the following functions:
- It filters out DHCP messages from untrusted ports
- DHCP snooping builds and maintains the DHCP binding database that contains information about untrusted hosts with their MAC addresses and leased IP addresses.
- It uses DHCP binding database to validate subsequent requests from untrusted hosts
4.2. Use of Intrusion Detection Systems (IDS) and Intrusion Prevention Systems (IPS)
An intrusion detection system (IDS) monitors abnormal activities and traffic patterns. Upon discovering a strange pattern or that which is deemed dangerous, it alerts of such activity. We can also configure these systems to take action when they detect certain patterns. Apart from IDS, we also have the intrusion Prevention System (IPS). This works by scanning the network and packets at the traffic entry point. It detects malicious activity on the network, reports the information about that activity, and takes the steps to block the activity from occurring. A network intrusion prevention system is the most preferred. Other types of IPS are a Host-based Intrusion Prevention System and a Wireless Intrusion detection system. After we have these reports we can go further to identify from which devices the traffic is coming.
4.3. Other Ways of Protecting From Rogue DHCP Servers
Lastly, we can also use other technologies to discover rogue DHCP servers. We can download and install dhcp_probe which identifies DHCP and “bootp” servers. This software is only good for periodic checks; It has to be run once in a while. For windows, we can download and install dhcploc.exe (also known as the Microsoft rogue check tool). It detects and displays all the active DHCP servers. From the display, it gives we are then able to determine which DHCP server is valid and also identify those that aren’t.
5. Conclusion
In this tutorial, we’ve talked about the various ways we can detect and mitigate the presence of rogue DHCP servers. We should always keep in mind that the company of a rogue DHCP server can be used negatively. So we should make sure we remove it urgently.