


Learn through the super-clean Baeldung Pro experience:
>> Membership and Baeldung Pro.
No ads, dark-mode and 6 months free of IntelliJ Idea Ultimate to start with.
Last updated: September 17, 2024
Learn through the super-clean Baeldung Pro experience:
>> Membership and Baeldung Pro.
No ads, dark-mode and 6 months free of IntelliJ Idea Ultimate to start with.
A .264 file typically contains raw H.264-encoded video data without any associated metadata, audio tracks, and subtitles. The .264 files are often created by video recording devices, such as CCTV systems or digital video recorders (DVRs). Unlike MP4 files, .264 files don’t use a common container format, making them difficult to play or edit using regular media players or editing software. Therefore, to work with these files, they often need to be converted into a more widely supported format like mp4.
In this tutorial, we’ll learn how to convert a video from the .264 format to the .mp4 format in Linux.
The code in this tutorial underwent testing on a Debian 12 system using GNU Bash 5.1.16.
Before we dive into the details, let’s ensure the necessary prerequisites are ready. They include a sample file in the .264 format and the MediaInfo tool.
First, we create a new directory and download the .264 file to it using wget:
$ mkdir video && cd video
$ wget -q -O sample_video.264 https://www.fastvdo.com/264codec/streams/4cif/FVDO_Freeway_4cif.264
The mkdir command creates the video directory, while the cd command changes the current directory to the newly created video directory.
Next, the -q flag of the wget command suppresses the output, while -O specifies the output filename.
Thus, we have a .264 file (sample_video.264) inside the newly created video directory.
MediaInfo is a command-line utility that extracts and displays media file metadata. This utility isn’t pre-installed on most Linux distributions.
So, let’s proceed with the installation:
$ sudo apt install mediainfoSubsequently, we can check the installed version of MediaInfo:
$ mediainfo --version
MediaInfo Command line,
MediaInfoLib - v21.09
As we can see, the installed version of MediaInfo is v21.09.
At this point, we are ready with the basic setup.
FFmpeg is a popular multimedia framework commonly used for audio and video editing, retrieving information about multimedia files, screen recording, and streaming.
To begin with, we verify that FFmpeg is installed on the system:
$ ffmpeg -version
ffmpeg version 4.4.2-0ubuntu0.22.04.1 Copyright (c) 2000-2021 the FFmpeg developers
built with gcc 11 (Ubuntu 11.2.0-19ubuntu1)
...
In case it’s not already available, we can usually install FFmpeg via a local package manager such as apt:
$ sudo apt install ffmpegThis command installs the FFmpeg framework including tools like ffplay and ffprobe.
The default behavior of FFmpeg to re-encode processed input media files makes it quite straightforward to convert between file formats. The FFmpeg auto-detects the input and output formats based on the file extensions.
So, we can change the output file’s extension to change the format:
$ ffmpeg -i sample_video.264 ffmpeg_output1.mp4This command converts the input (-i) file, sample_video.264, and re-encodes it with the supported codec for the specified output file, i.e., ffmpeg_output1.mp4.
Alternatively, we can avoid re-encoding the input file by copying the video stream:
$ ffmpeg -i sample_video.264 -vcodec copy ffmpeg_output2.mp4The -vcodec copy option copies the video stream without re-encoding it. Additionally, we can use the shorthand -c:v instead of -vcodec to specify the video codec, achieving the same result with a more concise command.
Let’s play one of the output files using ffplay:
$ ffplay -autoexit ffmpeg_output2.mp4This command plays the ffmpeg_output2.mp4 video and exits automatically (-autoexit) once the track is finished.
To ensure the conversion produces valid output, we can verify the format of one of the resulting files:
$ mediainfo ffmpeg_output2.mp4
General
Complete name                            : ffmpeg_output2.mp4
Format                                   : MPEG-4
Format profile                           : Base Media
Codec ID                                 : isom (isom/iso2/avc1/mp41)
File size                                : 2.09 MiB
Duration                                 : 9 s 280 ms
Overall bit rate                         : 1 892 kb/s
Writing application                      : Lavf58.76.100

Video
ID                                       : 1
Format                                   : AVC
Format/Info                              : Advanced Video Codec
Format profile                           : High@L4
Format settings                          : CABAC / 2 Ref Frames
Format settings, CABAC                   : Yes
Format settings, Reference frames        : 2 frames
Codec ID                                 : avc1
Codec ID/Info                            : Advanced Video Coding
Duration                                 : 9 s 280 ms
Bit rate                                 : 1 890 kb/s
...
The output confirms the MEPG-4 (mp4) format.
Similarly, we can verify the format of other output files. Generally, the output of the mediainfo command for a video file is divided into three parts:
Since the .264 file lacks an audio track, the converted file lacks any audio. Thus, the output of mediainfo is divided into only two parts for the converted files, i.e., General and Audio.
VLC (VideoLAN Client) is an open-source multimedia player supporting most multimedia file formats. Additionally, with its user-friendly interface, VLC is a versatile tool for playing and converting multimedia files.
Let’s install VLC with the APT package manager:
$ sudo apt install vlcNow, we can check the installed version of VLC:
$ vlc --version
VLC media player 3.0.16 Vetinari (revision 3.0.13-8-g41878ff4f2)
VLC version 3.0.16 Vetinari (3.0.13-8-g41878ff4f2)
Compiled by buildd on lcy02-amd64-108.buildd (Mar 13 2022 08:00:10)
Compiler: gcc version 11.2.0 (Ubuntu 11.2.0-18ubuntu1)
...
This verifies a working installation of VLC on the system.
First, let’s use the command line interface for the format conversion:
$ vlc sample_video.264 --sout='#transcode{vcodec=h264}:std{access=file,mux=mp4,dst=vlc_output1.mp4' vlc://quitThis command launches the VLC media player from the command line that reads the input media file (sample_video.264) and packages it into the MP4 container format.
Let’s take a closer look at the options used in this command:
Without the vlc://quit, VLC might stay open after processing the input file.
Alternatively, we can use the VLC interface to convert the .264 file to the .mp4 format.
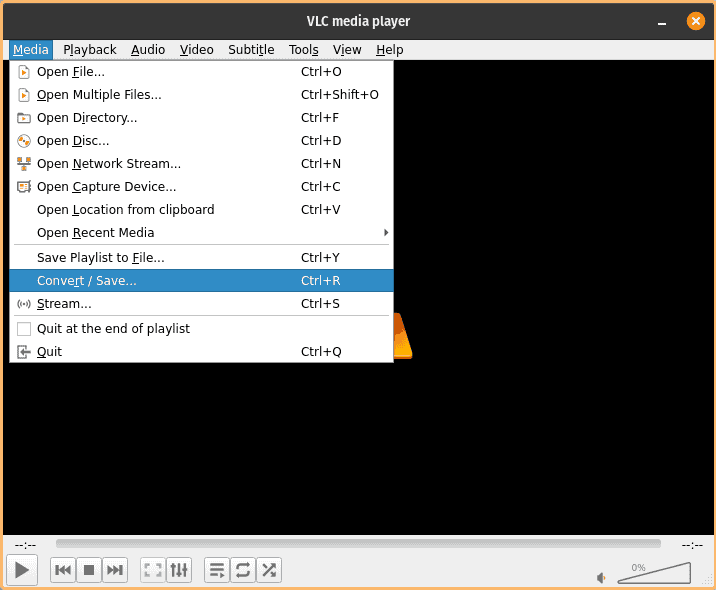
Let’s open VLC from the Applications menu. Then, we click on the Media menu from the VLC application window followed by a click on the Convert/Save button:
In the new window, we select the input file:
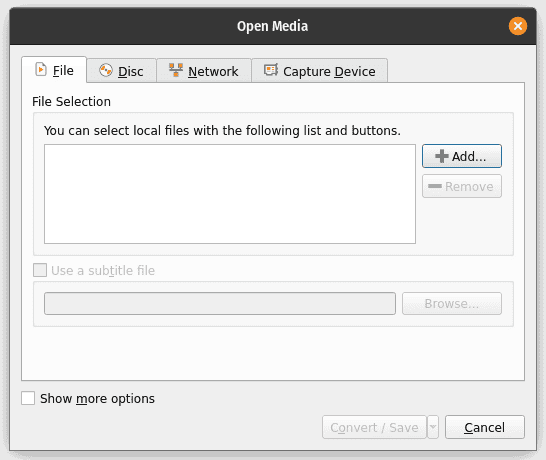
Next, we click on the Add button and select the input media file, in this case, sample_video.264. Then, let’s click on the Convert/Save button to specify the output details including format and filename:
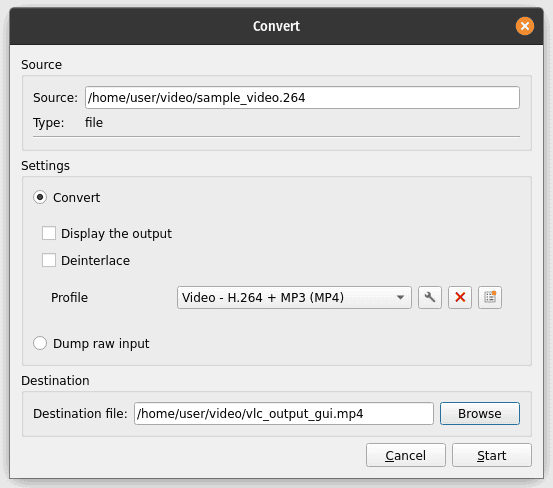
Finally, we click on the Start button to start the format conversion process.
Again, the output format can be verified with the mediainfo command.
x264 encoder program provides the functions used to encode video streams into the H.264/MPEG-4 AVC format.
Here, we again use the apt utility to install the x264 encoder:
$ sudo apt install x264Let’s verify the installation:
$ x264 --version
x264 0.164.x
built on Sep 14 2024, gcc: 11.4.0
x264 configuration: --chroma-format=all
libx264 configuration: --chroma-format=all
x264 license: GPL version 2 or later
Thus, we see the shell environment provides access to the x264 encoder program.
x264 selects the output file type from the specified output filename:
$ x264 -o x264_output1.mp4 sample_video.264This command takes a raw .264 video file (sample_video.264), encodes it using the H.264 codec, and outputs (-o) it into an MP4 container.
Moreover, we can use the –fps option to specify the frame rate in the output video file. This is especially useful when the input file doesn’t have frame rate information, i.e., when dealing with raw .264 files. Additionally, the x264 encoder program provides several video filters including crop and resize.
FF Multi Converter is a simple graphical application for converting audio, video, image, and document files between all popular formats. It uses other tools like FFmpeg for audio and video conversion, ImageMagick for image files, and unoconv (Universal Office Converter) for converting between document files.
Let’s start by cloning the official repository of FF Multi Converter using git:
$ git clone https://github.com/ilstam/FF-Multi-Converter.gitWe can also use the FF Multi Converter without installing it, by running the launcher script from the downloaded archive:
$ cd FF-Multi-Converter
$ ./launcher
The cd command changes the current directory to the cloned repository, while the launcher script launches the FF Multi Converter application, irrespective of the installation process.
Alternatively, we can install the FF Multi Converter program from within the cloned Git repository, which requires python3 with the PyQt5 library:
$ sudo python3 setup.py installThe python3 command installs the FF Multi Converter program.
Let’s open the FF Multi Converter either from the Applications menu or from the command line:
$ ./launcher ../sample_video.264This command opens up a graphical interface with the sample_video.264 file as an input:

We can select the output format from the drop-down menu of the Convert to: option, in this case, mp4. Then, we select the checkbox at the bottom left side to save the file in the same folder as the input file or provide the path for the output folder. Finally, we click on the Convert button at the bottom right corner of the window to convert the file format.
FF Multi Converter supports the conversion of multiple .264 files to a destination format in batch mode, such as mp4, mkv, ogg, and others.
In this article, we learned several ways to convert .264 files to mp4 format in Linux.
To begin with, we installed and tested MediaInfo to verify the format for both the sample input and output files. After that, we used FFmpeg to convert the .264 file to mp4 format. Next, we installed and discussed the usage of VLC to convert .264 files to mp4 format. Then, we used the x264 library to demonstrate the conversion of a .264 file to mp4 format. Finally, we employed the graphical interface of the FF Multi Converter tool and converted the .264 file to the mp4 format.