

Yes, we're now running our only Summer Sale. All Courses are 30% off until 20th July, 2026:
Installing the Cisco AnyConnect VPN Client on Linux
Last updated: January 22, 2024
Learn through the super-clean Baeldung Pro experience:
>> Membership and Baeldung Pro.
No ads, dark-mode and 6 months free of IntelliJ Idea Ultimate to start with.
1. Overview
The Cisco AnyConnect VPN Client provides a secure connection by encrypting the user’s data and hiding their IP location. Additionally, it ensures reliable data transmission, which is crucial when using public networks to transfer sensitive data. Furthermore, the Cisco AnyConnect VPN Client enables network administrators to enforce access controls to enhance the security of organizations.
In this tutorial, we’ll explore two ways to install the Cisco AnyConnect VPN Client on Linux.
2. Installation Using Terminal
As with most activities, using the terminal or shell is a common way to install an application. In this case, we employ the apt package manager.
2.1. Installation
We can install the Cisco AnyConnect VPN Client, also known as the OpenConnect tool, on Debian-based systems using the apt command from the Linux terminal:
$ sudo apt-get install openconnectFurthermore, let’s verify the installation status of the OpenConnect tool:
$ openconnect --version
OpenConnect version v8.20-1
Using GnuTLS 3.7.3. Features present: TPMv2, PKCS#11, RSA software token, HOTP software token, TOTP software token, Yubikey OATH, System keys, DTLS, ESP
Supported protocols: anyconnect (default), nc, gp, pulse, f5, fortinet, array
Default vpnc-script (override with --script): /usr/share/vpnc-scripts/vpnc-script
Thus, we have successfully installed the utility.
2.2. Integration
Now, we can utilize the Network Manager to manage the Cisco AnyConnect VPN Client tool on Linux. Furthermore, it provides a graphical user interface for handling various networks, including VPN connections.
Moreover, to enable the integration between Network Manager and the OpenConnect tool, we need to install a plugin:
$ sudo apt-get install network-manager-openconnect-gnomeAfter the installation of the plugin, it’s crucial to restart the Network Manager to ensure that the changes we’ve made are saved:
$ sudo systemctl restart NetworkManagerFurthermore, let’s configure the OpenConnect tool.
2.3. Configuration
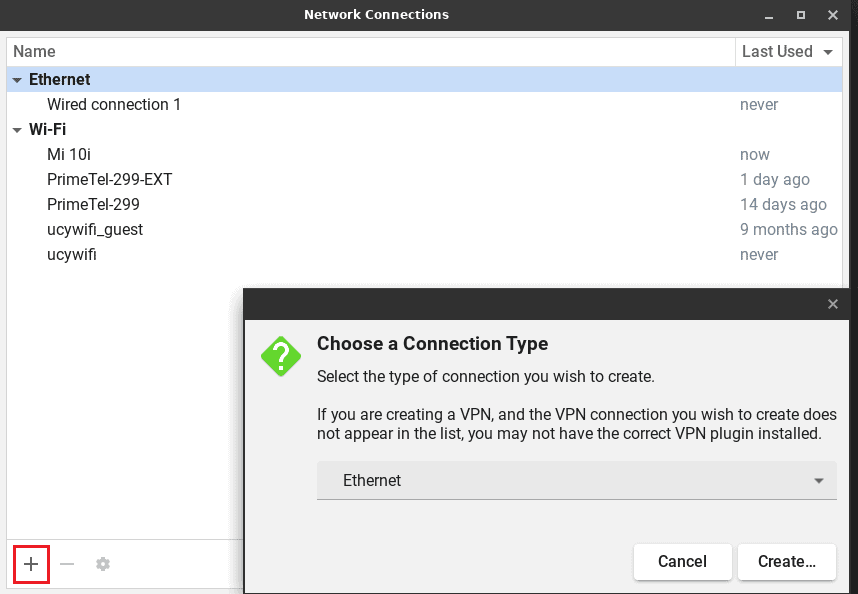
First, we open the Network Connections application:

As we can see, all the wired and wireless connections are listed. From here, we add a new connection:
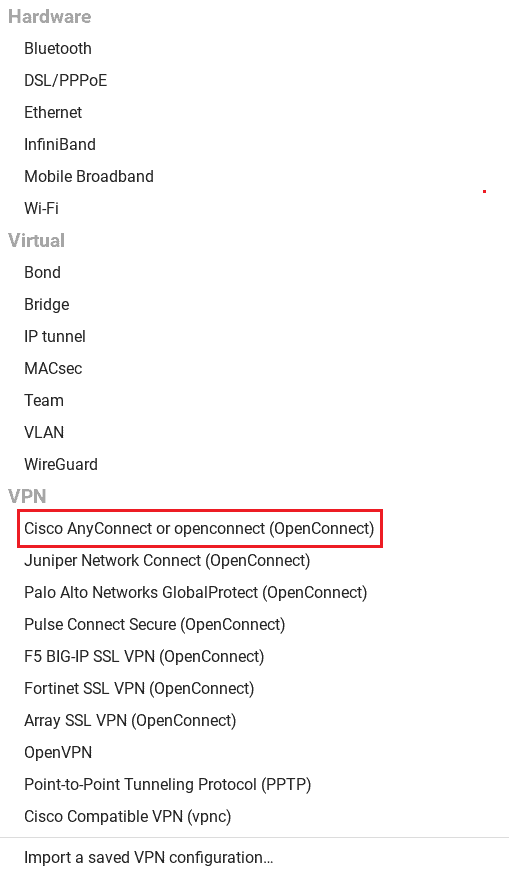
Furthermore, from the drop-down menu, we select the Cisco AnyConnect VPN:
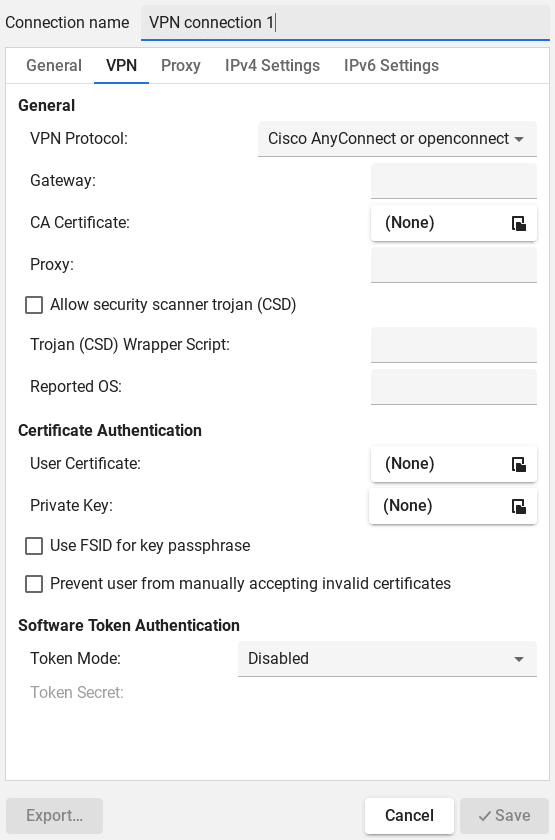
After choosing the Cisco AnyConnect VPN, we can configure it based on our requirements:
Finally, after configuring the VPN connection, we can use Network Manager to connect to the VPN we configured.
3. Manual Installation
Like other applications, Cisco AnyConnect VPN offers a stand-alone installer.
3.1. Installation
To begin with, we visit the Cisco AnyConnect VPN website and download the installation file. It’s essential to download a file compatible with the Linux OS.
Next, we extract the downloaded .tar.gz archive via the tar command:
$ tar -xzvf anyconnect-linux64-4.9.01095-predeploy-k9.tar.gz
anyconnect-linux64-4.9.01095/
anyconnect-linux64-4.9.01095/nvm/
anyconnect-linux64-4.9.01095/nvm/libboost_filesystem.so
anyconnect-linux64-4.9.01095/nvm/manifesttool_nvm
anyconnect-linux64-4.9.01095/nvm/libboost_thread.so
anyconnect-linux64-4.9.01095/nvm/libacciscocrypto.so
anyconnect-linux64-4.9.01095/nvm/lib/
anyconnect-linux64-4.9.01095/nvm/libboost_system.so
...output truncated...
After completing the extraction process, we go to the VPN directory and run the installer script:
$ cd anyconnect-linux64-4.9.01095/vpn
$ sudo ./vpn_install.sh
[sudo] password for sam:
Installing Cisco AnyConnect Secure Mobility Client...
Supplemental End User License Agreement for AnyConnect(R) Secure Mobility Client v4.x and other VPN-related Software
...output truncated...
Do you accept the terms in the license agreement? [y/n] y
You have accepted the license agreement.
Please wait while Cisco AnyConnect Secure Mobility Client is being installed...
Starting Cisco AnyConnect Secure Mobility Client Agent...
Done!
As we can see, the installation process has completed successfully.
3.2. Configuration
As soon as the installation is done, we can check the status of Cisco AnyConnect VPN Client:
$ sudo ./vpn
Cisco AnyConnect Secure Mobility Client (version 4.9.01095).

Copyright (c) 2004 - 2020 Cisco Systems, Inc.  All Rights Reserved.

  >> state: Disconnected
  >> state: Disconnected
  >> notice: Ready to connect.
  >> registered with local VPN subsystem.
Now, let’s open and configure the Cisco AnyConnect VPN Client tool:
$ sudo ./vpnui
Let’s take a look at the landing page:

Thus, we can enter the VPN server address to establish a secure connection. Additionally, we can get various information about the VPN connection, including connection history, authentication protocols, server details, and routing configuration from the Statistics tab.
4. Conclusion
In this article, we discussed two ways to install the Cisco AnyConnect VPN Client tool on Debian-based Linux systems.
Installing the Cisco AnyConnect VPN Client from the Linux terminal is ideal for remote deployment and management. On the other hand, manual installation is a good choice when we prefer to install a specific version of the tool or want to more easily make some changes in the default configuration during the installation.