

Learn through the super-clean Baeldung Pro experience:
>> Membership and Baeldung Pro.
No ads, dark-mode and 6 months free of IntelliJ Idea Ultimate to start with.
Last updated: March 18, 2024
Learn through the super-clean Baeldung Pro experience:
>> Membership and Baeldung Pro.
No ads, dark-mode and 6 months free of IntelliJ Idea Ultimate to start with.
To install software on our Linux systems, we can either build it from source or install it using the package manager of our distribution. In this tutorial, we’ll discuss the difference between these two methods, as well as their advantages and disadvantages. We’ll also look at two concrete examples, GIMP and Firefox.
Compiling source code or building software from source code are similar concepts, but they’re not the same thing.
Building software from source is a general term that refers to the process of creating executable binaries and other non-source files from the program’s source files.
Compiling the source is a specific step in this process, which involves converting the source files into object code files using a compiler. This object code typically contains machine code instructions.
Building from source usually requires the installation of some tools and dependencies.
In order to build software from source, we usually need some tools to help us automate and simplify the process.
Some of the most common Linux build tools are the following:
Let’s note that a build tool may rely on other tools and files to do its job. For example, make requires a file called Makefile, which specifies the dependencies and commands for each target.
We can’t explore the use of all these tools, so we’ll focus on just a few examples.
Here are the typical steps for building from source with make:
These steps apply perfectly to gzip, a popular compression utility. So, let’s replace gzip 1.10, which is the default preinstalled version in our test distribution, with the latest version 1.12:
$ gzip --version
gzip 1.10
[...]
$ mkdir myGzip
$ cd myGzip
$ wget https://ftp.gnu.org/gnu/gzip/gzip-1.12.zip
$ unzip gzip-1.12.zip
$ cd gzip-1.12
$ ./configure
[...]
config.status: creating Makefile
config.status: creating doc/Makefile
config.status: creating lib/Makefile
config.status: creating tests/Makefile
[...]
$ make
$ sudo make install
$ cd
$ gzip --version
gzip 1.12
[...]
This workflow is simple and common to many software. However, some programs may have different or additional steps when built with make, so we always need to check the documentation.
A popular program we can build with meson and ninja is GIMP. In this case, the build process is complex, so let’s follow the official instructions, adapting them to our Linux Mint 21 testing machine.
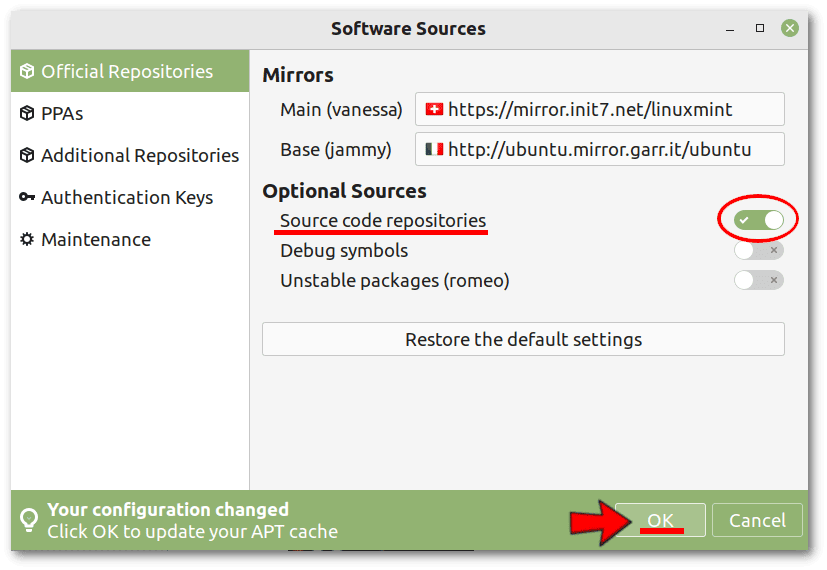
First, we need to enable the source code repositories:
 Then, let’s install the dependencies required by the GIMP sources:
$ sudo apt build-dep gimp
[...]
The following NEW packages will be installed:
  autoconf automake autopoint autotools-dev debhelper debugedit dh-autoreconf [...]
0 upgraded, 140 newly installed, 0 to remove and 12 not upgraded.
Need to get 43,1 MB of archives.
After this operation, 244 MB of additional disk space will be used.
[...]
The previous step simplified a lot of work by automatically selecting and installing 152 dependencies. However, these aren’t all. We also need the following ones:
$ sudo apt install meson ninja-build cmake libgirepository1.0-dev libgtk-3-dev libappstream-glib-devNow we need to set some environment variables:
$ mkdir myGimp
$ export GIMP_PREFIX=${HOME}/myGimp
$ export PATH="${GIMP_PREFIX}/bin:$PATH"
$ export PKG_CONFIG_PATH="${GIMP_PREFIX}/share/pkgconfig:${GIMP_PREFIX}/lib/pkgconfig${PKG_CONFIG_PATH:+:$PKG_CONFIG_PATH}"
$ export PKG_CONFIG_PATH="${GIMP_PREFIX}/lib64/pkgconfig:$PKG_CONFIG_PATH"
$ export XDG_DATA_DIRS="${XDG_DATA_DIRS:+$XDG_DATA_DIRS:}${GIMP_PREFIX}/share:/usr/local/share:/usr/share"
$ export LD_LIBRARY_PATH="${GIMP_PREFIX}/lib:${LD_LIBRARY_PATH:+:$LD_LIBRARY_PATH}"
$ export ACLOCAL_FLAGS="-I $INSTALL_PREFIX/share/aclocal $ACLOCAL_FLAGS"
$ GI_TYPELIB_PATH="${GIMP_PREFIX}/lib/girepository-1.0:${GI_TYPELIB_PATH:+:$GI_TYPELIB_PATH}"
$ arch="$(dpkg-architecture -qDEB_HOST_MULTIARCH 2> /dev/null)"
$ export PKG_CONFIG_PATH="${GIMP_PREFIX}/lib/${arch}/pkgconfig:$PKG_CONFIG_PATH"
$ export LD_LIBRARY_PATH="${GIMP_PREFIX}/lib/${arch}:${LD_LIBRARY_PATH:+:$LD_LIBRARY_PATH}"
$ export GI_TYPELIB_PATH="${GIMP_PREFIX}/lib/${arch}/girepository-1.0:${GI_TYPELIB_PATH:+:$GI_TYPELIB_PATH}"
The environment variables are all explained in the GIMP documentation.
Finally, we’re ready to download and build the sources:
$ git clone https://gitlab.gnome.org/GNOME/babl.git # it creates the "babl" folder in the home
$ git clone https://gitlab.gnome.org/GNOME/gegl.git # it creates the "gegl" folder in the home
$ git clone https://gitlab.gnome.org/GNOME/gimp.git # it creates the "gimp" folder in the home
$ cd babl
$ meson _build --prefix=${GIMP_PREFIX} --buildtype=release -Db_lto=true
$ cd _build
$ ninja
$ ninja install
$ cd
$ cd gegl
$ meson _build --prefix=${GIMP_PREFIX} --buildtype=release -Db_lto=true
$ cd _build
$ ninja
$ ninja install
$ cd
$ cd gimp
$ meson _build --prefix=${GIMP_PREFIX} --buildtype=release -Dpython=enabled
$ cd _build
$ ninja
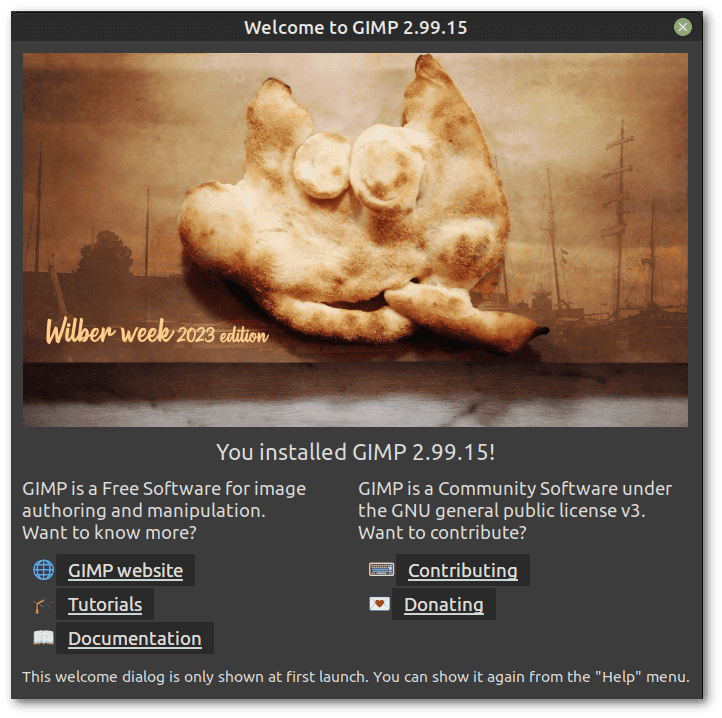
$ ninja installThat’s all. Let’s keep the same terminal open to launch the development version of GIMP we just built:
$ cd
$ ./myGimp/bin/gimp-2.99
This is the welcome screen:
 By closing the terminal, we’ll lose the long list of previously declared environment variables needed to start the development version of GIMP. A possible workaround is to declare these variables in a launcher script.
Let’s take the Python build script of Firefox as an example, following the official instructions. Again, our test distribution is Linux Mint 21. In this case, we don’t have to worry about dependencies or environment variables as in the previous case, because the Python bootstrap.py script takes care of them automatically:
$ mkdir myFirefox
$ sudo apt-get install curl python3 python3-pip
$ python3 -m pip install --user mercurial
$ hg version
Mercurial Distributed SCM (version 6.4.5)
[...]
$ curl https://hg.mozilla.org/mozilla-central/raw-file/default/python/mozboot/bin/bootstrap.py -O
$ python3 bootstrap.py
Cloning into mozilla-unified using Mercurial...
Destination directory for clone (leave empty to use default destination of mozilla-unified): myFirefox
Cloning Firefox Mercurial repository to /home/francesco/myFirefox
[...]
Clone complete.
[...]
Unless you are going to have more local copies of Firefox source code, this 'bootstrap.py' file is no longer needed and can be deleted.
Clean up the bootstrap.py file? (Y/n) Y
[...]
Note on Artifact Mode:

Artifact builds download prebuilt C++ components rather than building
them locally. Artifact builds are faster!
[...]
Please choose the version of Firefox you want to build (see note above):
  1. Firefox for Desktop Artifact Mode [default]
  2. Firefox for Desktop
  3. GeckoView/Firefox for Android Artifact Mode
  4. GeckoView/Firefox for Android
  5. SpiderMonkey JavaScript engine
Your choice: 1
[...]
Executing as root: sudo apt-get install bash findutils gzip libxml2 m4 make perl tar unzip watchman
[sudo] password for francesco:
[...]
Would you like to run a configuration wizard to ensure Mercurial is
optimally configured? (This will also ensure 'version-control-tools' is up-to-date) (Yn): n
[...]
Will you be submitting commits to Mozilla? (Yn): n
[...]
Would you like to enable build system telemetry? (Yn): n
Your system should be ready to build Firefox for Desktop Artifact Mode!
To build Firefox for Desktop Artifact Mode, please restart the shell (Start a new terminal window)
Now we’re ready to build Firefox in a new terminal:
$ cd myFirefox
$ hg up -C central
$ ./mach build
[...]
3:40.36 Your build was successful!
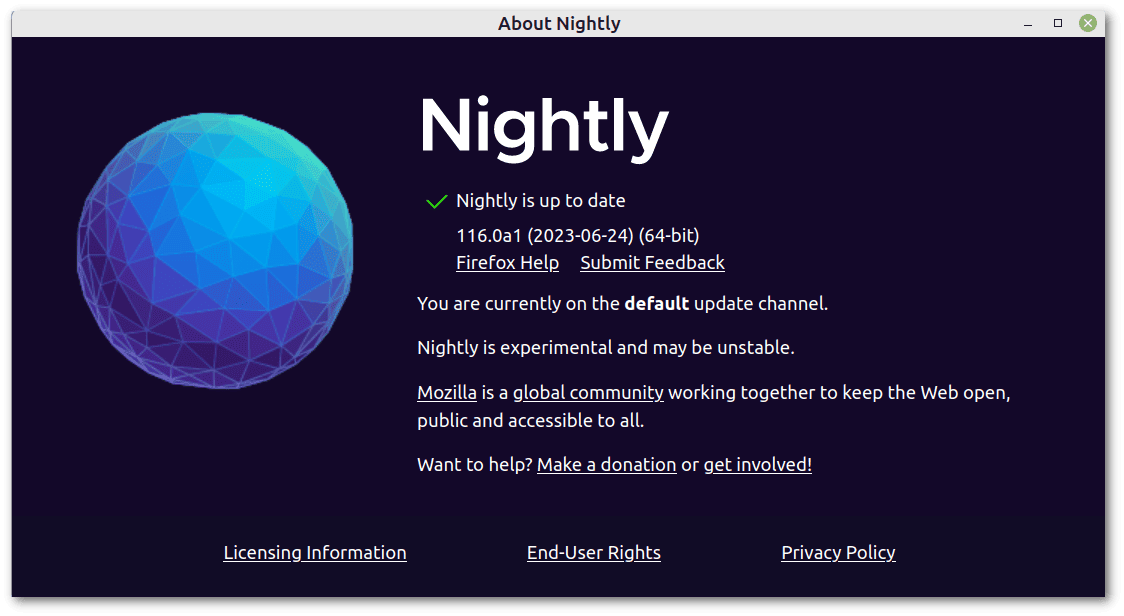
To take your build for a test drive, run: |mach run|Let’s start our homegrown version of Firefox:
$ ./mach runThis is the About window:
 In this case, the build steps were simple and allowed for customization, but they were also time-consuming, taking more than an hour.
Building from source gives us more control over the features and options of the program, as well as the ability to install the latest version and optimize the compilation for our architecture. However, it also takes more time and effort and may introduce compatibility or stability issues.
It’s not always well documented which dependencies to install and these may not be available or compatible with our distribution. The build steps can be many, and an ordinary user might get stuck at the first error.
In addition, there’s no automated update management, so we’re responsible for downloading new updates and rebuilding them from source.
Installing programs using a package manager means using a tool that downloads and installs packages from a software repository provided by our Linux distribution maintainers or from a third-party source. In this sense, packages on Linux are conceptually similar to application installers on macOS and Windows, and package managers are similar to application stores.
There are several types of Linux packages, depending on the distribution and the package management system we use. In general, packages are designed to handle all dependencies and mutual compatibility automatically. As a result, installing, removing, or upgrading a package won’t break programs that are included in other packages.
Each Linux distribution has default support for a certain type of package, such as DEB, RPM, pacman, and others. In the following examples, we’ll see how to use these different formats to install neofetch. Let’s note that we always need root privileges to install a package.
The DEB package format is primarily associated with Debian-based distributions, including Debian itself, Ubuntu, Linux Mint, Knoppix, Kali Linux, and others. The apt command simplifies the management of DEBs by resolving dependencies, checking for updates, and performing full system upgrades:
# apt install neofetch
[...]
0 upgraded, 87 newly installed, 0 to remove and 0 not upgraded.
Need to get 40,7 MB of archives.
After this operation, 135 MB of additional disk space will be used.
Do you want to continue? [Y/n] Y
[...]
$ neofetch --stdout | grep OS:
OS: Debian GNU/Linux 12 (bookworm) x86_64
The RPM package format is primarily used on Fedora-based distributions, such as Fedora itself, CentOS, Red Hat Enterprise Linux (RHEL), and OpenSuse-based distributions, such as OpenSuse itself and SUSE Linux Enterprise. The dnf command is a high-level package management tool used in such distributions:
# dnf install neofetch
[...]
Install  38 Packages

Total download size: 9.4 M
Installed size: 32 M
Is this ok [y/N]: y
[...]
$ neofetch --stdout | grep OS:
OS: Fedora Linux 38 (Server Edition) x86_64
The pacman package format is a key component of Arch Linux and its derivatives, such as Manjaro Linux:
# pacman -Sy neofetch
:: Synchronizing package databases...
[...]
Packages (1) neofetch-7.1.0-2
[...]

:: Proceed with installation? [Y/n] Y
[...]
$ neofetch --stdout | grep OS:
OS: Arch Linux x86_64
While these packaging formats and their associated package managers are widely used and efficient within their respective ecosystems, they aren’t universally compatible. The problem is that a package built for one format won’t work on a distribution that uses a different package format. There are also compatibility issues between different versions of the same distribution.
To overcome the compatibility limitations of the previous package formats, there are more universal approaches such as Snap, Flatpak, and AppImage packages. These formats are designed to work across Linux distributions by bundling the software and its dependencies into a single package that can be used consistently across distributions. Only Snap requires root privileges.
In the following two examples, we’ll see how to install emacs. Let’s start with the Snap format:
$ neofetch --stdout | grep OS:
OS: Ubuntu 23.04 x86_64
$ sudo snap install emacs --classic
[...]
$ emacs --version
GNU Emacs 28.2
[...]
Then, let’s try the Flatpak format. It’s less intuitive to use, but is well documented in the official documentation:
$ neofetch --stdout | grep OS:
OS: AlmaLinux 9.2 (Turquoise Kodkod) x86_64
$ flatpak remote-add --if-not-exists flathub https://flathub.org/repo/flathub.flatpakrepo
$ flatpak update
[...]
$ flatpak install flathub org.gnu.emacs
Looking for matches…
Required runtime for org.gnu.emacs/x86_64/stable (runtime/org.freedesktop.Sdk/x86_64/22.08) found in remote flathub
Do you want to install it? [Y/n]: Y
[...]
Proceed with these changes to the system installation? [Y/n]: Y
[...]
$ flatpak run org.gnu.emacs --version
[...]
GNU Emacs 28.2
[...]
Finally, let’s try the AppImage format to launch the latest continuous build for Firefox ESR. All we need to do is download the file, make it executable, and run it:
$ neofetch --stdout | grep OS:
OS: Linux Mint 21.1 x86_64
$ wget -O "latestFirefoxESR" https://github.com/srevinsaju/Firefox-Appimage/releases/download/firefox-esr/firefox-esr-102.12.r20230529170948-x86_64.AppImage
[...]
$ chmod +x latestFirefoxESR
$ ./latestFirefoxESR --version
[...]
Mozilla Firefox 102.12.0esr
This last example is an interesting alternative way to get the latest version of an application without building it from source. However, the AppImage format also has some limitations, such as compatibility issues with operating system libraries. For example, Emacs’ AppImage didn’t work with any of the distributions we tried.
Gentoo’s ebuild packages use the Portage package manager designed for Gentoo Linux and its derivatives. These packages don’t contain precompiled binaries. Instead, they contain scripts that download the source code of the application and build it on the system according to the user’s preferences and settings. This allows for more customization and optimization of the software, but also requires more time and resources to install.
First, let’s synchronize the local Portage tree, i.e., the local collection of ebuilds, with the remote repository, and update Portage if necessary:
$ sudo emerge --sync
[...]
 * An update to portage is available [...]
 * To update portage, run 'emerge --oneshot sys-apps/portage' now.
[...]
$ sudo emerge --oneshot sys-apps/portage
[...]
Then, let’s install neofetch:
$ sudo emerge neofetch
[...]
$ neofetch --stdout | grep OS:
OS: Gentoo Linux x86_64
This installation was just as easy as the other types of packages because Portage does a lot of the heavy lifting when it comes to building software from source. In this case, it did it all by itself.
Installing packages is usually faster and easier than building from source, as we only need to specify the name of the program we want to install and let the package manager do the rest.
Installing from a package manager also ensures that the program is compatible with our system and will receive security updates and bug fixes from our distribution maintainers. However, we may not have access to the latest version of the program or some features.
It’s important to note that packages may contain security updates, optimizations, and patches that aren’t available in the original source code. For example, some older versions of PHP that are no longer officially supported continue to receive security updates from package maintainers. Some distributions also offer paid subscriptions for companies to receive security updates for outdated but still used software.
In this article, we saw many examples of how to install software on Linux. Each solution has its own peculiarities, complexities, advantages and disadvantages.
We learned how to build from sources three common applications:
Then, we discussed how to use the different types of packages to install other applications:
As a final note, it’s worth noting that all of these choices result from the use of libre software.