

Learn through the super-clean Baeldung Pro experience:
>> Membership and Baeldung Pro.
No ads, dark-mode and 6 months free of IntelliJ Idea Ultimate to start with.
Learn through the super-clean Baeldung Pro experience:
>> Membership and Baeldung Pro.
No ads, dark-mode and 6 months free of IntelliJ Idea Ultimate to start with.
In this tutorial, we’ll explore the use of 7z on Linux, a powerful file compression tool known for its high efficiency and versatility. 7z, or 7-Zip, stands out among Linux archiving and compression tools for its superior compression ratios, which often exceed those of other popular tools such as gzip or bzip2.
At its core, the native 7z format offers one of the highest compression ratios using the default LZMA2 algorithm. This is especially beneficial when dealing with text files, binary files, mixed data archives, source code, large data sets, and backup files. It supports AES-256 encryption, Unicode filenames, and files up to 16,000,000,000 GB in size.
We can adjust advanced compression settings to optimize the balance between compression ratio, RAM usage, multi-core CPU usage, and speed. However, options such as changing the dictionary size, word size, or number of CPU threads require a detailed understanding of the data we want to compress and how different parameters change the compression and hardware requirements. In almost all cases, we can use -mx9 without specifying any other options to get the highest LZMA2 compression level with a good balance between time and resource usage.
In addition, 7z is compatible with almost every type of archived file we encounter on Linux. It supports the compression and decompression of XZ, BZIP2, GZIP, TAR, ZIP, and WIM archives. For formats such as RAR, ISO, CAB, and others, 7z provides decompression support only. It can also open virtual machine disk images such as VDI, VHD, VHDX, VMDK, and QCOW2. Its extensive support also includes Linux DEB and RPM packaging formats. We can find the list of all supported formats in the description of the Debian 7zip package or in the corresponding package of our Linux distribution.
However, as noted in the backup and limitations section of the man page, 7z doesn’t store the owner and group of the files. We need to take this limitation into account, especially if we’re doing a backup. In this case, the workaround is to use tar and 7z together, as we’ll see later.
Let’s see how to install the full version of 7z, with all supported compression formats, on three popular Linux distributions and their derivatives. As for the RAR format, it raises licensing issues, so it’s not always available:
# Debian 12 (we must enable the non-free repository to get p7zip-rar)
$ sudo apt update
$ sudo apt install p7zip p7zip-full p7zip-rar

# Fedora 40 (Fedora/CentOS have removed 7z's RAR code as non-free code)
$ sudo dnf install p7zip p7zip-plugins

# openSUSE Tumbleweed (there is no official package to get 7z's RAR support)
> sudo zypper refresh
> sudo zypper install p7zip p7zip-full
In general, however, 7z is often preinstalled. If we need unofficial packages for Gentoo, FreeBSD, Solaris, and other Unix/Linux systems, or if we want to compile the sources manually, we can refer to the P7ZIP site.
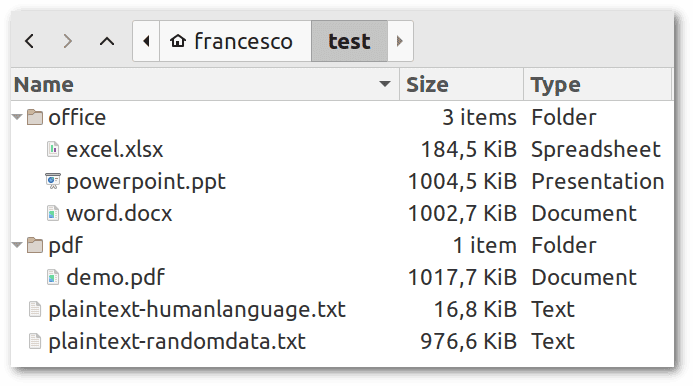
Let’s use this Bash script to create a test folder with files in various formats:
#!/bin/bash
mkdir -p test/office test/pdf
wget "https://loripsum.net/api/10/verylong/plaintext" -O test/plaintext-humanlanguage.txt
base64 /dev/urandom | head -c 1000000 > test/plaintext-randomdata.txt
wget "https://file-examples.com/storage/fe121d443b662e6a8a224ff/2017/02/file-sample_1MB.docx" -O test/office/word.docx
wget "https://file-examples.com/storage/fe121d443b662e6a8a224ff/2017/02/file_example_XLSX_5000.xlsx" -O test/office/excel.xlsx
wget "https://file-examples.com/storage/fe121d443b662e6a8a224ff/2017/08/file_example_PPT_1MB.ppt" -O test/office/powerpoint.ppt
wget "https://file-examples.com/storage/fe121d443b662e6a8a224ff/2017/10/file-example_PDF_1MB.pdf" -O test/pdf/demo.pdf
We’ll end up with the following directory hierarchy with our test files to compress:
 Before we start experimenting with 7z, we can open each file to get an idea of its contents.
In all examples, we’ll use the native 7z format with the LZMA2 algorithm. Let’s start by compressing the 5000-row Excel file, which is a 185 KiB data set.
To add a file to an archive, we need to use the a option followed by the archive name. Let’s be aware that 7z overwrites existing files in the given archive without warning. If we don’t specify any parameters, the default compression level is 5, equivalent to the -mx5 option:
$ 7z a dataset-mx5.7z test/office/excel.xlsx
[...]
Archive size: 79089 bytes (78 KiB)
In this case, the compression ratio is 58%, a value we obtain by (185-78)÷185×100. Let’s try to specify ultra compression with -mx9:
$ 7z a -mx9 dataset-mx9.7z test/office/excel.xlsx
[...]
Archive size: 79070 bytes (78 KiB)
The benefit of saving 19 more bytes is really negligible. However, we should keep in mind that the XLSX format is already compressed.
Let’s try to increase the 7z compression by also setting an advanced option, the bt2 (Binary Tree 2) Match Finder for LZMA. This option can improve compression because it allows the algorithm to find repetitive data sequences more effectively:
$ 7z a -mx9 -mmf=bt2 dataset-mx9-custom.7z test/office/excel.xlsx
[...]
Archive size: 78783 bytes (77 KiB)
The extra 287 bytes saved are still negligible, but this is just an example with a very small file. The choice of options becomes important for large files, and the increased compression can justify higher resource usage.
To compress multiple items from our test structure, such as the office and pdf directories, we can use a single command:
$ 7z a -mx9 combined-docs.7z test/office/ test/pdf/Similarly, we can recursively compress the entire archive by simply specifying the test folder:
$ 7z a -mx9 whole-archive.7z testUsing the l option, which means list, let’s check the contents of whole-archive.7z:
$ 7z l -mx9 whole-archive.7z test
[...]
   Date      Time    Attr         Size   Compressed  Name
------------------- ----- ------------ ------------  ------------------------
2024-04-29 14:19:38 D....            0            0  test
2024-04-29 15:32:40 D....            0            0  test/office
2024-04-29 22:32:23 D....            0            0  test/pdf
2022-03-22 14:47:30 ....A       188887      3734406  test/office/excel.xlsx
2022-03-22 14:46:57 ....A      1028608               test/office/powerpoint.ppt
2022-03-22 14:47:41 ....A      1026736               test/office/word.docx
2022-03-22 14:48:58 ....A      1042157               test/pdf/demo.pdf
2024-04-29 14:19:38 ....A        17158               test/plaintext-humanlanguage.txt
2024-04-29 14:19:38 ....A      1000000               test/plaintext-randomdata.txt
------------------- ----- ------------ ------------  ------------------------
2024-04-29 22:32:23            4303546      3734406  6 files, 3 folders
This example shows that 7z uses recursion by default. The recurse subdirectories -r option, which we must avoid and which isn’t necessary to enable recursion, is misleading. The problem is that -r can have unintended consequences, as it expands the search scope beyond the intended directories, inadvertently adding extraneous files to our archive. The man page warns that -r works differently than we expect, i.e., differently from the Unix/Linux standards used by other terminal commands.
The limitation of 7z in not preserving certain file metadata, such as owner and group information, can be problematic, especially for backups and system migrations. To overcome this, we can use a combination of tar and 7z, taking advantage of the strengths of each. tar handles metadata preservation effectively, while 7z provides compression:
$ tar cf - test | 7z a -mx9 -si whole-archive.tar.7zHere, tar cf – test creates a tarball of the test directory, outputting directly to stdout. This output is then piped via | to 7z, which compresses it into whole-archive.tar.7z using the -si option to read from stdin.
Decompressing files and directories with 7z involves simple commands. Let’s start by extracting a specific file, assuming we know its path within the archive. For example, let’s extract the file plaintext-humanlanguage.txt from whole-archive.7z:
$ 7z e whole-archive.7z test/plaintext-humanlanguage.txt -o./extracted/This command extracts the file to the extracted directory that 7z automatically creates. Let’s note that the e option extracts files without their original directory structure.
If we want to extract several specific files, we need to list them all in the command. For example, this extracts word.docx and demo.pdf to the multiple_files folder.
$ 7z e whole-archive.7z test/office/word.docx test/pdf/demo.pdf -o./multiple_files/On the other hand, if we want to decompress the entire contents of whole-archive.7z, we need the x option, which ensures that the directory structure is preserved:
$ 7z x whole-archive.7z -o./full_extraction/Finally, decompressing the tarball wrapped in whole-archive.tar.7z is a two-step process:
$ mkdir -p ./tar_extraction
$ 7z x whole-archive.tar.7z -so | tar -xvf - -C ./tar_extraction/
In this case, we have to use mkdir because tar doesn’t have the option to create the destination directory, which 7z automatically created in the other examples. We then extract the whole-archive.tar file to stdout, which we then pipe to tar for decompression in the tar_extraction directory.
In this article, we explored the extensive capabilities of the 7z tool on Linux platforms. We demonstrated its high compression ratios, its versatility in handling various file formats, and its integration with the tar tool to preserve file metadata during backups.
We saw installation, usage, and various practical examples. However, we didn’t delve into the advanced options because they’re complex, and their misuse can lead to too much CPU and RAM load. Instead, we found that the default options are fine for everyday use.