

Mocking is an essential part of unit testing, and the Mockito library makes it easy to write clean and intuitive unit tests for your Java code.
Get started with mocking and improve your application tests using our Mockito guide:
Handling concurrency in an application can be a tricky process with many potential pitfalls. A solid grasp of the fundamentals will go a long way to help minimize these issues.
Get started with understanding multi-threaded applications with our Java Concurrency guide:
Spring 5 added support for reactive programming with the Spring WebFlux module, which has been improved upon ever since. Get started with the Reactor project basics and reactive programming in Spring Boot:
Since its introduction in Java 8, the Stream API has become a staple of Java development. The basic operations like iterating, filtering, mapping sequences of elements are deceptively simple to use.
But these can also be overused and fall into some common pitfalls.
To get a better understanding on how Streams work and how to combine them with other language features, check out our guide to Java Streams:
Explore Spring Boot 3 and Spring 6 in-depth through building a full REST API with the framework:
Yes, Spring Security can be complex, from the more advanced functionality within the Core to the deep OAuth support in the framework.
I built the security material as two full courses - Core and OAuth, to get practical with these more complex scenarios. We explore when and how to use each feature and code through it on the backing project.
You can explore the course here:
Spring Data JPA is a great way to handle the complexity of JPA with the powerful simplicity of Spring Boot.
Get started with Spring Data JPA through the guided reference course:
Refactor Java code safely — and automatically — with OpenRewrite.
Refactoring big codebases by hand is slow, risky, and easy to put off. That’s where OpenRewrite comes in. The open-source framework for large-scale, automated code transformations helps teams modernize safely and consistently.
Each month, the creators and maintainers of OpenRewrite at Moderne run live, hands-on training sessions — one for newcomers and one for experienced users. You’ll see how recipes work, how to apply them across projects, and how to modernize code with confidence.
Join the next session, bring your questions, and learn how to automate the kind of work that usually eats your sprint time.
1. Overview
LinkRest is an open-source framework for building data-driven REST web services. It’s built on top of JAX-RS and Apache Cayenne ORM, and uses an HTTP/JSON-based message protocol.
Basically, this framework is meant to provide an easy way of exposing our data store on the web.
In the following sections, we’ll take a look at how we can build a REST web service to access a data model using LinkRest.
2. Maven Dependencies
To start working with the library, first we need to add the link-rest dependency:
<dependency>
    <groupId>com.nhl.link.rest</groupId>
    <artifactId>link-rest</artifactId>
    <version>2.9</version>
</dependency>
This also brings in the cayenne-server artifact.
Additionally, we’ll use Jersey as the JAX-RS implementation, so we need to add the jersey-container-servlet dependency, as well as jersey-media-moxy for serializing JSON responses:
<dependency>
    <groupId>org.glassfish.jersey.containers</groupId>
    <artifactId>jersey-container-servlet</artifactId>
    <version>2.25.1</version>
</dependency>
<dependency>
    <groupId>org.glassfish.jersey.media</groupId>
    <artifactId>jersey-media-moxy</artifactId>
    <version>2.25.1</version>
</dependency>
For our example, we’ll be working with an in-memory H2 database as it’s easier to set up; as a consequence, we’ll also add h2 :
<dependency>
    <groupId>com.h2database</groupId>
    <artifactId>h2</artifactId>
    <version>1.4.196</version>
</dependency>
3. Cayenne Data Model
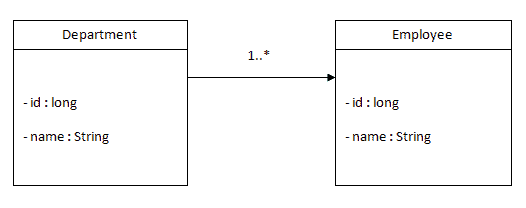
The data model we’ll be working with contains a Department and an Employee entity that represents a one-to-many relationship:
As mentioned, LinkRest works with data objects generated using Apache Cayenne ORM. Working with Cayenne is not the main subject of this article, so for more information check out the Apache Cayenne documentation.
We’ll save the Cayenne project in a cayenne-linkrest-project.xml file.
After running the cayenne-maven-plugin, this will generate two _Department and _Employee abstract classes – which will extend the CayenneDataObject class, as well as two concrete classes derived from them, Department and Employee.
These latter classes are the ones that we can customize and use with LinkRest.
4. LinkRest Application Startup
In the next section, we’re going to be writing and testing REST endpoints, so to be able to run them we need to setup our runtime.
Since we’re using Jersey as the JAX-RS implementation, let’s add a class that extends ResourceConfig and specifies the package that will hold the classes in which we define the REST endpoints:
@ApplicationPath("/linkrest")
public class LinkRestApplication extends ResourceConfig {

    public LinkRestApplication() {
        packages("com.baeldung.linkrest.apis");

        // load linkrest runtime
    }
}
In the same constructor, we need to build and register the LinkRestRuntime to the Jersey container. This class is based on first loading the CayenneRuntime:
ServerRuntime cayenneRuntime = ServerRuntime.builder()
  .addConfig("cayenne-linkrest-project.xml")
  .build();
LinkRestRuntime lrRuntime = LinkRestBuilder.build(cayenneRuntime);
super.register(lrRuntime);
Finally, we need to add the class to the web.xml:
<servlet>
    <servlet-name>linkrest</servlet-name>
    <servlet-class>org.glassfish.jersey.servlet.ServletContainer</servlet-class>
        <init-param>
            <param-name>javax.ws.rs.Application</param-name>
            <param-value>com.baeldung.LinkRestApplication</param-value>
        </init-param>
    <load-on-startup>1</load-on-startup>
</servlet>
<servlet-mapping>
    <servlet-name>linkrest</servlet-name>
    <url-pattern>/*</url-pattern>
</servlet-mapping>
5. REST Resources
Now that we’ve got our model classes, we can start writing REST resources.
The REST endpoints are created using standard JAX-RS annotations, while the response is built using the LinkRest class.
Our example will consist of writing a series of CRUD endpoints that access the /department URL using different HTTP methods.
First, let’s create the DepartmentResource class, which is mapped to /department:
@Path("department")
@Produces(MediaType.APPLICATION_JSON)
public class DepartmentResource {

    @Context
    private Configuration config;

    // ...
}
The LinkRest class needs an instance of the JAX-RS Configuration class, which is injected using the Context annotation, also provided by JAX-RS.
Next, let’s continue writing each of the endpoints that access Department objects.
5.1. Creating Entities Using POST
To create an entity, the LinkRest class provides the create() method which returns an UpdateBuilder object:
@POST
public SimpleResponse create(String data) {
    return LinkRest.create(Department.class, config).sync(data);
}
The data parameter can be either a single JSON object representing a Department or an array of objects. This parameter is sent to the UpdateBuilder using the sync() method to create one or more objects and insert the records into the database, after which the method returns a SimpleResponse.
The library defines 3 additional formats for responses:
- DataResponse<T> – a response that represents a collection of T
- MetadataResponse<T> – contains metadata information about the type
- SimpleResponse – an object that contains two success and message attributes
Next, let’s use curl to add a Department record to the database:
curl -i -X POST -H "Content-Type:application/json"
  -d "{"name":"IT"}" http://localhost:8080/linkrest/department
As a result, the command returns the status 201 Created and a success attribute:
{"success":true}We can also create multiple objects by sending a JSON array:
curl -i -X POST -H "Content-Type:application/json"
  -d "[{"name":"HR"},{"name":"Marketing"}]"
  http://localhost:8080/linkrest/department
5.2. Reading Entities Using GET
The main method for querying objects is the select() method from the LinkRest class. This returns a SelectBuilder object which we can use to chain additional querying or filtering methods.
Let’s create an endpoint in the DepartmentResource class that returns all the Department objects in the database:
@GET
public DataResponse<Department> getAll(@Context UriInfo uriInfo) {
    return LinkRest.select(Department.class, config).uri(uriInfo).get();
}
The uri() call sets the request information for the SelectBuilder, while get() returns a collection of Departments wrapped as a DataResponse<Department> object.
Let’s take a look at the departments we added before using this endpoint:
curl -i -X GET http://localhost:8080/linkrest/departmentThe response takes the form of a JSON object with a data array and a total property:
{"data":[
  {"id":200,"name":"IT"},
  {"id":201,"name":"Marketing"},
  {"id":202,"name":"HR"}
],
"total":3}
Alternatively, to retrieve a collection of objects, we can also get back a single object by using the getOne() instead of get().
Let’s add an endpoint mapped to /department/{departmentId} that returns an object with a given id. For this purpose, we’ll filter the records using the byId() method:
@GET
@Path("{id}")
public DataResponse<Department> getOne(@PathParam("id") int id,
  @Context UriInfo uriInfo) {
    return LinkRest.select(Department.class, config)
      .byId(id).uri(uriInfo).getOne();
}
Then, we can send a GET request to this URL:
curl -i -X GET http://localhost:8080/linkrest/department/200The result is a data array with one element:
{"data":[{"id":200,"name":"IT"}],"total":1}5.3. Updating Entities Using PUT
To update records, we can use the update() or createOrUpdate() method. The latter will update records if they exist, or create them if they do not:
@PUT
public SimpleResponse createOrUpdate(String data) {
    return LinkRest.createOrUpdate(Department.class, config).sync(data);
}
Similarly to the previous sections, the data argument can be a single object or an array of objects.
Let’s update one of the previously added departments:
curl -i -X PUT -H "Content-Type:application/json"
  -d "{"id":202,"name":"Human Resources"}"
  http://localhost:8080/linkrest/department
This returns a JSON object with a success or error message. Afterwards, we can verify if the name of the department with ID 202 was changed:
curl -i -X GET http://localhost:8080/linkrest/department/202Sure enough, this command returns the object with the new name:
{"data":[
  {"id":202,"name":"Human Resources"}
],
"total":1}
5.4. Removing Entities Using DELETE
And, to remove an object, we can call the delete() method which creates a DeleteBuilder, then specify the primary key of the object we want to delete by using the id() method:
@DELETE
@Path("{id}")
public SimpleResponse delete(@PathParam("id") int id) {
    return LinkRest.delete(Department.class, config).id(id).delete();
}
Then we can call this endpoint using curl:
curl -i -X DELETE http://localhost:8080/linkrest/department/2025.5. Working With Relationships Between Entities
LinkRest also contains methods that make working with relationships between objects easier.
Since Department has a one-to-many relationship to Employee, let’s add a /department/{departmentId}/employees endpoint that accesses an EmployeeSubResource class:
@Path("{id}/employees")
public EmployeeSubResource getEmployees(
  @PathParam("id") int id, @Context UriInfo uriInfo) {
    return new EmployeeSubResource(id);
}
The EmployeeSubResource class corresponds to a department so it’ll have a constructor that sets a department id, as well as the Configuration instance:
@Produces(MediaType.APPLICATION_JSON)
public class EmployeeSubResource {
    private Configuration config;

    private int departmentId;

    public EmployeeSubResource(int departmentId, Configuration configuration) {
        this.departmentId = departmentId;
        this.config = config;
    }

    public EmployeeSubResource() {
    }
}
Do note that a default constructor is necessary for the object to be serialized as a JSON object.
Next, let’s define an endpoint that retrieves all the employees from a department:
@GET
public DataResponse<Employee> getAll(@Context UriInfo uriInfo) {
    return LinkRest.select(Employee.class, config)
      .toManyParent(Department.class, departmentId, Department.EMPLOYEES)
      .uri(uriInfo).get();
}
In this example, we’ve used the toManyParent() method of the SelectBuilder to query only the objects with a given parent.
The endpoints for the POST, PUT, DELETE methods can be created in a similar manner.
To add employees to a department, we can call the departments/{departmentId}/employees endpoint with POST method:
curl -i -X POST -H "Content-Type:application/json"
  -d "{"name":"John"}" http://localhost:8080/linkrest/department/200/employees
Then, let’s send a GET request to view the employees of the department:
curl -i -X GET "http://localhost:8080/linkrest/department/200/employeesThis returns a JSON object with a data array::
{"data":[{"id":200,"name":"John"}],"total":1}6. Customizing the Response With Request Parameters
LinkRest provides an easy way to customize the response by adding specific parameters to the request. These can be used to filter, sort, paginate or restrict the set of attributes of the result set.
6.1. Filtering
We can filter the results based on the values of attributes by using the cayenneExp parameter. As the name suggests, this follows the format of Cayenne expressions.
Let’s send a request that only returns departments with the name “IT”:
curl -i -X GET http://localhost:8080/linkrest/department?cayenneExp=name='IT'6.2. Sorting
The parameters to add for sorting a set of results are sort and dir. The first of these specifies the attribute to sort by, and the second the direction of sorting.
Let’s see all the departments sorted by name:
curl -i -X GET "http://localhost:8080/linkrest/department?sort=name&dir=ASC"6.3. Pagination
The library supports pagination by adding the start and limit parameters:
curl -i -X GET "http://localhost:8080/linkrest/department?start=0&limit=26.4. Selecting Attributes
Using the include and exclude parameters, we can control which attributes or relationships are returned in the result.
For example, let’s send a request that only displays the names of the departments:
curl -i -X GET "http://localhost:8080/linkrest/department?include=nameTo show the names as well as the employees of a department with only their name we can use the include attribute twice:
curl -i -X GET "http://localhost:8080/linkrest/department?include=name&include=employees.name7. Conclusion
In the article, we have shown how we can quickly expose a data model through REST endpoints by using the LinkRest framework.


