

Mocking is an essential part of unit testing, and the Mockito library makes it easy to write clean and intuitive unit tests for your Java code.
Get started with mocking and improve your application tests using our Mockito guide:
Handling concurrency in an application can be a tricky process with many potential pitfalls. A solid grasp of the fundamentals will go a long way to help minimize these issues.
Get started with understanding multi-threaded applications with our Java Concurrency guide:
Spring 5 added support for reactive programming with the Spring WebFlux module, which has been improved upon ever since. Get started with the Reactor project basics and reactive programming in Spring Boot:
Since its introduction in Java 8, the Stream API has become a staple of Java development. The basic operations like iterating, filtering, mapping sequences of elements are deceptively simple to use.
But these can also be overused and fall into some common pitfalls.
To get a better understanding on how Streams work and how to combine them with other language features, check out our guide to Java Streams:
Explore Spring Boot 3 and Spring 6 in-depth through building a full REST API with the framework:
Yes, Spring Security can be complex, from the more advanced functionality within the Core to the deep OAuth support in the framework.
I built the security material as two full courses - Core and OAuth, to get practical with these more complex scenarios. We explore when and how to use each feature and code through it on the backing project.
You can explore the course here:
Spring Data JPA is a great way to handle the complexity of JPA with the powerful simplicity of Spring Boot.
Get started with Spring Data JPA through the guided reference course:
Refactor Java code safely — and automatically — with OpenRewrite.
Refactoring big codebases by hand is slow, risky, and easy to put off. That’s where OpenRewrite comes in. The open-source framework for large-scale, automated code transformations helps teams modernize safely and consistently.
Each month, the creators and maintainers of OpenRewrite at Moderne run live, hands-on training sessions — one for newcomers and one for experienced users. You’ll see how recipes work, how to apply them across projects, and how to modernize code with confidence.
Join the next session, bring your questions, and learn how to automate the kind of work that usually eats your sprint time.
Yes, we're now running our only Summer Sale. All Courses are 30% off until 20th July, 2026:
Yes, we're now running our only Summer Sale. All Courses are 30% off until 20th July, 2026:
1. Introduction
Kong is an open-source API gateway and microservice management layer.
Based on Nginx and the lua-nginx-module (specifically OpenResty), Kong’s pluggable architecture makes it flexible and powerful.
2. Key Concepts
Before we dive into code samples, let’s take a look at the key concepts in Kong:
- API Object – wraps properties of any HTTP(s) endpoint that accomplishes a specific task or delivers some service. Configurations include HTTP methods, endpoint URIs, upstream URL which points to our API servers and will be used for proxying requests, maximum retires, rate limits, timeouts, etc.
- Consumer Object – wraps properties of anyone using our API endpoints. It will be used for tracking, access control and more
- Upstream Object – describes how incoming requests will be proxied or load balanced, represented by a virtual hostname
- Target Object – represents the services are implemented and served, identified by a hostname (or an IP address) and a port. Note that targets of every upstream can only be added or disabled. A history of target changes is maintained by the upstream
- Plugin Object – pluggable features to enrich functionalities of our application during the request and response lifecycle. For example, API authentication and rate limiting features can be added by enabling relevant plugins. Kong provides very powerful plugins in its plugins gallery
- Admin API – RESTful API endpoints used to manage Kong configurations, endpoints, consumers, plugins, and so on
The picture below depicts how Kong differs from a legacy architecture, which could help us understand why it introduced these concepts:
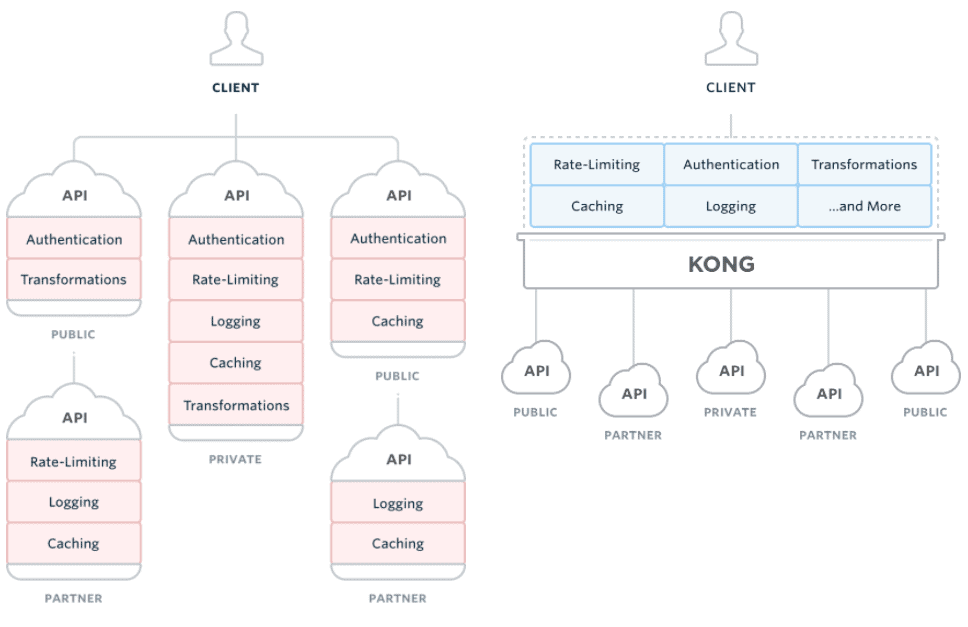
(source: https://getkong.org/)
3. Setup
The official documentation provides detailed instructions for various environments.
4. API Management
After setting up Kong locally, let’s take a bite of Kong’s powerful features by proxying our simple stock query endpoint:
@RestController
@RequestMapping("/stock")
public class QueryController {

    @GetMapping("/{code}")
    public String getStockPrice(@PathVariable String code){
        return "BTC".equalsIgnoreCase(code) ? "10000" : "0";
    }
}
4.1. Adding an API
Next, let’s add our query API into Kong.
The admin APIs is accessible via http://localhost:8001, so all our API management operations will be done with this base URI:
APIObject stockAPI = new APIObject(
  "stock-api", "stock.api", "http://localhost:8080", "/");
HttpEntity<APIObject> apiEntity = new HttpEntity<>(stockAPI);
ResponseEntity<String> addAPIResp = restTemplate.postForEntity(
  "http://localhost:8001", apiEntity, String.class);

assertEquals(HttpStatus.CREATED, addAPIResp.getStatusCode());
Here, we added an API with the following configuration:
{
    "name": "stock-api",
    "hosts": "stock.api",
    "upstream_url": "http://localhost:8080",
    "uris": "/"
}- “name” is an identifier for the API, used when manipulating its behaviour
- “hosts” will be used to route incoming requests to given “upstream_url” by matching the “Host” header
- Relative paths will be matched to the configured “uris”
In case we want to deprecate an API or the configuration is wrong, we can simply remove it:
restTemplate.delete("http://localhost:8001/stock-api");After APIs are added, they will be available for consumption through http://localhost:8000:
String apiListResp = restTemplate.getForObject(
  "http://localhost:8001/", String.class);

assertTrue(apiListResp.contains("stock-api"));

HttpHeaders headers = new HttpHeaders();
headers.set("Host", "stock.api");
RequestEntity<String> requestEntity = new RequestEntity<>(
  headers, HttpMethod.GET, new URI("http://localhost:8000/stock/btc"));
ResponseEntity<String> stockPriceResp
  = restTemplate.exchange(requestEntity, String.class);

assertEquals("10000", stockPriceResp.getBody());
In the code sample above, we try to query stock price via the API we just added to Kong.
By requesting http://localhost:8000/stock/btc, we get the same service as querying directly from http://localhost:8080/stock/btc.
4.2. Adding an API Consumer
Let’s now talk about security – more specifically authentication for the users accessing our API.
Let’s add a consumer to our stock query API so that we can enable the authentication feature later.
To add a consumer for an API is just as simple as adding an API. The consumer’s name (or id) is the only required field of all consumer’s properties:
ConsumerObject consumer = new ConsumerObject("eugenp");
HttpEntity<ConsumerObject> addConsumerEntity = new HttpEntity<>(consumer);
ResponseEntity<String> addConsumerResp = restTemplate.postForEntity(
  "http://localhost:8001/consumers/", addConsumerEntity, String.class);

assertEquals(HttpStatus.CREATED, addConsumerResp.getStatusCode());
Here we added “eugenp” as a new consumer:
{
    "username": "eugenp"
}
4.3. Enabling Authentication
Here comes the most powerful feature of Kong, plugins.
Now we’re going to apply an auth plugin to our proxied stock query API:
PluginObject authPlugin = new PluginObject("key-auth");
ResponseEntity<String> enableAuthResp = restTemplate.postForEntity(
  "http://localhost:8001/stock-api/plugins",
  new HttpEntity<>(authPlugin),
  String.class);
assertEquals(HttpStatus.CREATED, enableAuthResp.getStatusCode());
If we try to query a stock’s price through the proxy URI, the request will be rejected:
HttpHeaders headers = new HttpHeaders();
headers.set("Host", "stock.api");
RequestEntity<String> requestEntity = new RequestEntity<>(
  headers, HttpMethod.GET, new URI("http://localhost:8000/stock/btc"));
ResponseEntity<String> stockPriceResp = restTemplate
  .exchange(requestEntity, String.class);

assertEquals(HttpStatus.UNAUTHORIZED, stockPriceResp.getStatusCode());
Remember that Eugen is one of our API consumers, so we should allow him to use this API by adding an authentication key:
String consumerKey = "eugenp.pass";
KeyAuthObject keyAuth = new KeyAuthObject(consumerKey);
ResponseEntity<String> keyAuthResp = restTemplate.postForEntity(
  "http://localhost:8001/consumers/eugenp/key-auth",
  new HttpEntity<>(keyAuth),
  String.class);
assertTrue(HttpStatus.CREATED == keyAuthResp.getStatusCode());
Then Eugen can use this API as before:
HttpHeaders headers = new HttpHeaders();
headers.set("Host", "stock.api");
headers.set("apikey", consumerKey);
RequestEntity<String> requestEntity = new RequestEntity<>(
  headers,
  HttpMethod.GET,
  new URI("http://localhost:8000/stock/btc"));
ResponseEntity<String> stockPriceResp = restTemplate
  .exchange(requestEntity, String.class);

assertEquals("10000", stockPriceResp.getBody());
5. Advanced Features
Aside from basic API proxy and management, Kong also supports API load-balancing, clustering, health checking, and monitoring, etc.
In this section, we’re going to take a look at how to load balance requests with Kong, and how to secure admin APIs.
5.1. Load Balancing
Kong provides two strategies of load balancing requests to backend services: a dynamic ring-balancer, and a straightforward DNS-based method. For the sake of simplicity, we’ll be using the ring-balancer.
As we mentioned earlier, upstreams are used for load-balancing, and each upstream can have multiple targets.
Kong supports both weighted-round-robin and hash-based balancing algorithms. By default, the weighted-round-robin scheme is used – where requests are delivered to each target according to their weight.
First, let’s prepare the upstream:
UpstreamObject upstream = new UpstreamObject("stock.api.service");
ResponseEntity<String> addUpstreamResp = restTemplate.postForEntity(
  "http://localhost:8001/upstreams",
  new HttpEntity<>(upstream),
  String.class);

assertEquals(HttpStatus.CREATED, addUpstreamResp.getStatusCode());
Then, add two targets for the upstream, a test version with weight=10, and a release version with weight=40:
TargetObject testTarget = new TargetObject("localhost:8080", 10);
ResponseEntity<String> addTargetResp = restTemplate.postForEntity(
  "http://localhost:8001/upstreams/stock.api.service/targets",
  new HttpEntity<>(testTarget),
  String.class);

assertEquals(HttpStatus.CREATED, ddTargetResp.getStatusCode());

TargetObject releaseTarget = new TargetObject("localhost:9090",40);
addTargetResp = restTemplate.postForEntity(
  "http://localhost:8001/upstreams/stock.api.service/targets",
  new HttpEntity<>(releaseTarget),
  String.class);

assertEquals(HttpStatus.CREATED, addTargetResp.getStatusCode());
With the configuration above, we can assume that 1/5 of the requests will go to test version and 4/5 will go to release version:
APIObject stockAPI = new APIObject(
  "balanced-stock-api",
  "balanced.stock.api",
  "http://stock.api.service",
  "/");
HttpEntity<APIObject> apiEntity = new HttpEntity<>(stockAPI);
ResponseEntity<String> addAPIResp = restTemplate.postForEntity(
  "http://localhost:8001", apiEntity, String.class);

assertEquals(HttpStatus.CREATED, addAPIResp.getStatusCode());

HttpHeaders headers = new HttpHeaders();
headers.set("Host", "balanced.stock.api");
for(int i = 0; i < 1000; i++) {
    RequestEntity<String> requestEntity = new RequestEntity<>(
      headers, HttpMethod.GET, new URI("http://localhost:8000/stock/btc"));
    ResponseEntity<String> stockPriceResp
     = restTemplate.exchange(requestEntity, String.class);

    assertEquals("10000", stockPriceResp.getBody());
}

int releaseCount = restTemplate.getForObject(
  "http://localhost:9090/stock/reqcount", Integer.class);
int testCount = restTemplate.getForObject(
  "http://localhost:8080/stock/reqcount", Integer.class);

assertTrue(Math.round(releaseCount * 1.0 / testCount) == 4);
Note that weighted-round-robin scheme balances requests to backend services approximately to the weight ratio, so only an approximation of the ratio can be verified, reflected in the last line of above code.
5.2. Securing the Admin API
By default, Kong only accepts admin requests from the local interface, which is a good enough restriction in most cases. But if we want to manage it via other network interfaces, we can change the admin_listen value in kong.conf, and configure firewall rules.
Or, we can make Kong serve as a proxy for the Admin API itself. Say we want to manage APIs with path “/admin-api”, we can add an API like this:
APIObject stockAPI = new APIObject(
  "admin-api",
  "admin.api",
  "http://localhost:8001",
  "/admin-api");
HttpEntity<APIObject> apiEntity = new HttpEntity<>(stockAPI);
ResponseEntity<String> addAPIResp = restTemplate.postForEntity(
  "http://localhost:8001",
  apiEntity,
  String.class);

assertEquals(HttpStatus.CREATED, addAPIResp.getStatusCode());
Now we can use the proxied admin API to manage APIs:
HttpHeaders headers = new HttpHeaders();
headers.set("Host", "admin.api");
APIObject baeldungAPI = new APIObject(
  "baeldung-api",
  "baeldung.com",
  "http://ww.baeldung.com",
  "/");
RequestEntity<APIObject> requestEntity = new RequestEntity<>(
  baeldungAPI,
  headers,
  HttpMethod.POST,
  new URI("http://localhost:8000/admin-api"));
ResponseEntity<String> addAPIResp = restTemplate
  .exchange(requestEntity, String.class);

assertEquals(HttpStatus.CREATED, addAPIResp.getStatusCode());
Surely, we want the proxied API secured. This can be easily achieved by enabling authentication plugin for the proxied admin API.
6. Summary
In this article, we introduced Kong – a platform for microservice API gateway and focused on its core functionality – managing APIs and routing requests to upstream servers, as well as on some more advanced features such as load balancing.
Yet, there’re many more solid features for us to explore, and we can develop our own plugins if we need to – you can continue exploring the official documentation here.


