

Mocking is an essential part of unit testing, and the Mockito library makes it easy to write clean and intuitive unit tests for your Java code.
Get started with mocking and improve your application tests using our Mockito guide:
Handling concurrency in an application can be a tricky process with many potential pitfalls. A solid grasp of the fundamentals will go a long way to help minimize these issues.
Get started with understanding multi-threaded applications with our Java Concurrency guide:
Spring 5 added support for reactive programming with the Spring WebFlux module, which has been improved upon ever since. Get started with the Reactor project basics and reactive programming in Spring Boot:
Since its introduction in Java 8, the Stream API has become a staple of Java development. The basic operations like iterating, filtering, mapping sequences of elements are deceptively simple to use.
But these can also be overused and fall into some common pitfalls.
To get a better understanding on how Streams work and how to combine them with other language features, check out our guide to Java Streams:
Explore Spring Boot 3 and Spring 6 in-depth through building a full REST API with the framework:
Yes, Spring Security can be complex, from the more advanced functionality within the Core to the deep OAuth support in the framework.
I built the security material as two full courses - Core and OAuth, to get practical with these more complex scenarios. We explore when and how to use each feature and code through it on the backing project.
You can explore the course here:
Spring Data JPA is a great way to handle the complexity of JPA with the powerful simplicity of Spring Boot.
Get started with Spring Data JPA through the guided reference course:
Refactor Java code safely — and automatically — with OpenRewrite.
Refactoring big codebases by hand is slow, risky, and easy to put off. That’s where OpenRewrite comes in. The open-source framework for large-scale, automated code transformations helps teams modernize safely and consistently.
Each month, the creators and maintainers of OpenRewrite at Moderne run live, hands-on training sessions — one for newcomers and one for experienced users. You’ll see how recipes work, how to apply them across projects, and how to modernize code with confidence.
Join the next session, bring your questions, and learn how to automate the kind of work that usually eats your sprint time.
1. Introduction
During the transmission of messages in Apache Kafka, the client and server agree on the use of a common syntactic format. Apache Kafka brings default converters (such as String and Long) but also supports custom serializers for specific use cases. In this tutorial, we’ll see how to implement them.
2. Serializers in Apache Kafka
Serialization is the process of converting objects into bytes. Deserialization is the inverse process — converting a stream of bytes into an object. In a nutshell, it transforms the content into readable and interpretable information.
As we mentioned, Apache Kafka provides default serializers for several basic types, and it allows us to implement custom serializers:
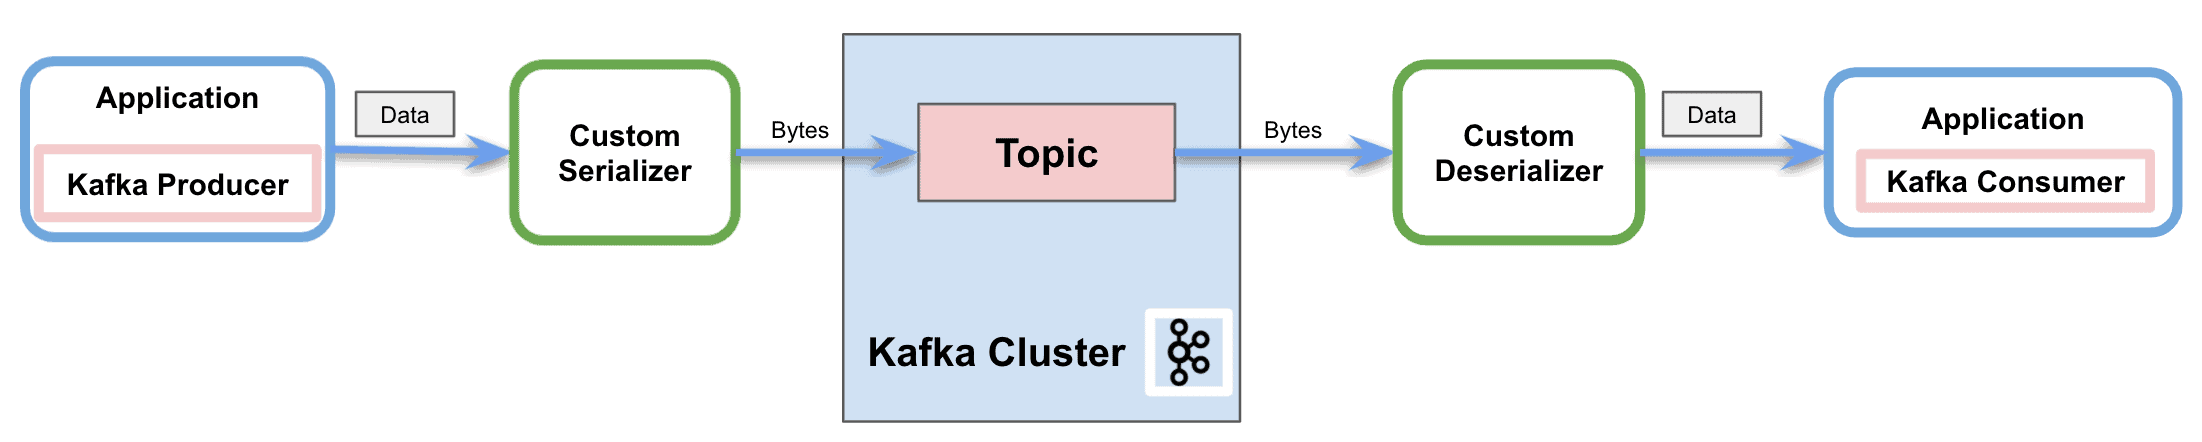
The figure above shows the process of sending messages to a Kafka topic through the network. In this process, the custom serializer converts the object into bytes before the producer sends the message to the topic. Similarly, it also shows how the deserializer transforms back the bytes into the object for the consumer to properly process it.
2.1. Custom Serializers
Apache Kafka provides a pre-built serializer and deserializer for several basic types:
But it also offers the capability to implement custom (de)serializers. In order to serialize our own objects, we’ll implement the Serializer interface. Similarly, to create a custom deserializer, we’ll implement the Deserializer interface.
There are there methods available to override for both interfaces:
- configure: used to implement configuration details
- serialize/deserialize: These methods include the actual implementation of our custom serialization and deserialization.
- close: use this method to close the Kafka session
3. Implementing Custom Serializers in Apache Kafka
Apache Kafka provides the capability of customizing the serializers. It’s possible to implement specific converters not only for the message value but also for the key.
3.1. Dependencies
To implement the examples, we’ll simply add the Kafka Consumer API dependency to our pom.xml:
<dependency>
    <groupId>org.apache.kafka</groupId>
    <artifactId>kafka-clients</artifactId>
    <version>3.4.0</version>
</dependency>
3.2. Custom Serializer
First, we’ll use Lombok to specify the custom object to send through Kafka:
@Data
@AllArgsConstructor
@NoArgsConstructor
@Builder
public class MessageDto {
    private String message;
    private String version;
}
Next, we’ll implement the Serializer interface provided by Kafka for the producer to send the messages:
public class CustomSerializer implements Serializer<MessageDto> {
    private final ObjectMapper objectMapper = new ObjectMapper();

    @Override
    public void configure(Map<String, ?> configs, boolean isKey) {
    }

    @Override
    public byte[] serialize(String topic, MessageDto data) {
        try {
            if (data == null){
                System.out.println("Null received at serializing");
                return null;
            }
            System.out.println("Serializing...");
            return objectMapper.writeValueAsBytes(data);
        } catch (Exception e) {
            throw new SerializationException("Error when serializing MessageDto to byte[]");
        }
    }

    @Override
    public void close() {
    }
}
We’ll override the serialize method of the interface. Therefore, in our implementation, we’ll transform the custom object using a Jackson ObjectMapper. Then we’ll return the stream of bytes to properly send the message to the network.
3.3. Custom Deserializer
In the same way, we’ll implement the Deserializer interface for the consumer:
@Slf4j
public class CustomDeserializer implements Deserializer<MessageDto> {
    private ObjectMapper objectMapper = new ObjectMapper();

    @Override
    public void configure(Map<String, ?> configs, boolean isKey) {
    }

    @Override
    public MessageDto deserialize(String topic, byte[] data) {
        try {
            if (data == null){
                System.out.println("Null received at deserializing");
                return null;
            }
            System.out.println("Deserializing...");
            return objectMapper.readValue(new String(data, "UTF-8"), MessageDto.class);
        } catch (Exception e) {
            throw new SerializationException("Error when deserializing byte[] to MessageDto");
        }
    }

    @Override
    public void close() {
    }
}
As in the previous section, we’ll override the deserialize method of the interface. Consequently, we’ll convert the stream of bytes into the custom object using the same Jackson ObjectMapper.
3.4. Consuming an Example Message
Let’s see a working example sending and receiving an example message with the custom serializer and deserializer.
Firstly, we’ll create and configure the Kafka Producer:
private static KafkaProducer<String, MessageDto> createKafkaProducer() {
    Properties props = new Properties();
    props.put(ProducerConfig.BOOTSTRAP_SERVERS_CONFIG, kafka.getBootstrapServers());
    props.put(ProducerConfig.CLIENT_ID_CONFIG, CONSUMER_APP_ID);
    props.put(ProducerConfig.KEY_SERIALIZER_CLASS_CONFIG, "org.apache.kafka.common.serialization.StringSerializer");
    props.put(ProducerConfig.VALUE_SERIALIZER_CLASS_CONFIG, "com.baeldung.kafka.serdes.CustomSerializer");

    return new KafkaProducer(props);
}
We’ll configure the value serializer property with our custom class and the key serializer with the default StringSerializer.
Secondly, we’ll create the Kafka Consumer:
private static KafkaConsumer<String, MessageDto> createKafkaConsumer() {
    Properties props = new Properties();
    props.put(ConsumerConfig.BOOTSTRAP_SERVERS_CONFIG, kafka.getBootstrapServers());
    props.put(ConsumerConfig.CLIENT_ID_CONFIG, CONSUMER_APP_ID);
    props.put(ConsumerConfig.GROUP_ID_CONFIG, CONSUMER_GROUP_ID);
    props.put(ConsumerConfig.AUTO_OFFSET_RESET_CONFIG, "earliest");
    props.put(ConsumerConfig.KEY_DESERIALIZER_CLASS_CONFIG, "org.apache.kafka.common.serialization.StringDeserializer");
    props.put(ConsumerConfig.VALUE_DESERIALIZER_CLASS_CONFIG, "com.baeldung.kafka.serdes.CustomDeserializer");

    return new KafkaConsumer<>(props);
}
Besides the key and value deserializers with our custom class, it is mandatory to include the group id. Apart from that, we put the auto offset reset config to earliest in order to make sure the producer sent all messages before the consumer starts.
Once we’ve created the producer and consumer clients, it’s time to send an example message:
MessageDto msgProd = MessageDto.builder().message("test").version("1.0").build();

KafkaProducer<String, MessageDto> producer = createKafkaProducer();
producer.send(new ProducerRecord<String, MessageDto>(TOPIC, "1", msgProd));
System.out.println("Message sent " + msgProd);
producer.close();
And we can receive the message with the consumer by subscribing to the topic:
AtomicReference<MessageDto> msgCons = new AtomicReference<>();

KafkaConsumer<String, MessageDto> consumer = createKafkaConsumer();
consumer.subscribe(Arrays.asList(TOPIC));

ConsumerRecords<String, MessageDto> records = consumer.poll(Duration.ofSeconds(1));
records.forEach(record -> {
    msgCons.set(record.value());
    System.out.println("Message received " + record.value());
});

consumer.close();
The result in the console is:
Serializing...
Message sent MessageDto(message=test, version=1.0)
Deserializing...
Message received MessageDto(message=test, version=1.0)
4. Conclusion
In this tutorial, we showed how producers use serializers in Apache Kafka to send messages through the network. In the same way, we also showed how consumers use deserializers to interpret the message received.
Furthermore, we learned the default serializers available and, most importantly, the capability of implementing custom serializers and deserializers.


