Inserting Delays Between Requests in Apache JMeter
Last updated: January 8, 2024


Mocking is an essential part of unit testing, and the Mockito library makes it easy to write clean and intuitive unit tests for your Java code.
Get started with mocking and improve your application tests using our Mockito guide:
Handling concurrency in an application can be a tricky process with many potential pitfalls. A solid grasp of the fundamentals will go a long way to help minimize these issues.
Get started with understanding multi-threaded applications with our Java Concurrency guide:
Spring 5 added support for reactive programming with the Spring WebFlux module, which has been improved upon ever since. Get started with the Reactor project basics and reactive programming in Spring Boot:
Since its introduction in Java 8, the Stream API has become a staple of Java development. The basic operations like iterating, filtering, mapping sequences of elements are deceptively simple to use.
But these can also be overused and fall into some common pitfalls.
To get a better understanding on how Streams work and how to combine them with other language features, check out our guide to Java Streams:
Explore Spring Boot 3 and Spring 6 in-depth through building a full REST API with the framework:
Yes, Spring Security can be complex, from the more advanced functionality within the Core to the deep OAuth support in the framework.
I built the security material as two full courses - Core and OAuth, to get practical with these more complex scenarios. We explore when and how to use each feature and code through it on the backing project.
You can explore the course here:
Spring Data JPA is a great way to handle the complexity of JPA with the powerful simplicity of Spring Boot.
Get started with Spring Data JPA through the guided reference course:
Refactor Java code safely — and automatically — with OpenRewrite.
Refactoring big codebases by hand is slow, risky, and easy to put off. That’s where OpenRewrite comes in. The open-source framework for large-scale, automated code transformations helps teams modernize safely and consistently.
Each month, the creators and maintainers of OpenRewrite at Moderne run live, hands-on training sessions — one for newcomers and one for experienced users. You’ll see how recipes work, how to apply them across projects, and how to modernize code with confidence.
Join the next session, bring your questions, and learn how to automate the kind of work that usually eats your sprint time.
1. Overview
When we’re testing with Apache JMeter, we may wish to add a delay between the requests to make a better model of our user behavior.
In this tutorial, we’ll create a simple test plan. We’ll look at the available parameters for tuning the generated workload, and then configure timers to add delays.
2. Use Case
Sometimes we may wish to add a delay between requests:
- Avoid errors connected with too many requests sent in a given amount of time
- Emulate real user actions with natural gaps for performed actions
- Tune the number of requests per minute to have a finer controlled configuration of workload
3. Using Delays
Firstly, we need to define the loading profile. We can have various aims here:
- See how the system behaves under a growing workload to find performance limits
- Check how the application recovers after peak load
There are two JMeter options for simulating these use cases:
- Thread group – how many parallel users
- Timer – the delays between requests for each user
4. Test Plan
4.1. A Basic Plan
Let’s create a basic test plan with one Thread Group. We’ll set the number of parallel requests, the ramp-up period, and the number of times to execute the test. We should note that one thread in JMeter notation means one concurrent user.
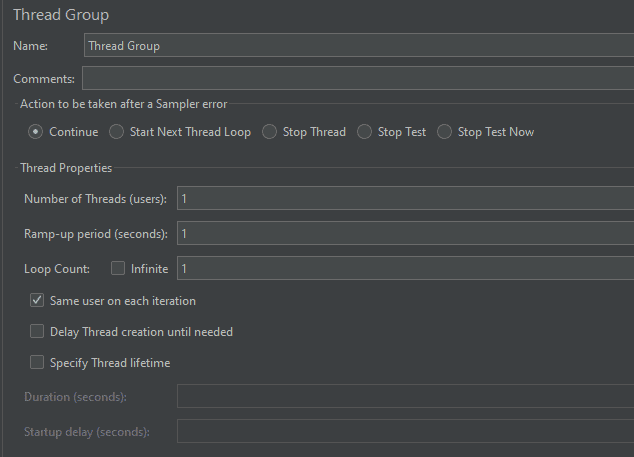
We can use the ramp-up period to create increases in workload. Here we need to set the period to reach the defined Number of Threads starting from 1 thread.
To create a more sophisticated loading profile, we can also specify the thread lifetime. This setting means 2 things:
- Startup delay – how much time JMeter waits to start a thread
- Duration – how long it runs for
The Loop Count is also a useful setting to specify the amount of repetition of specified HTTP requests.
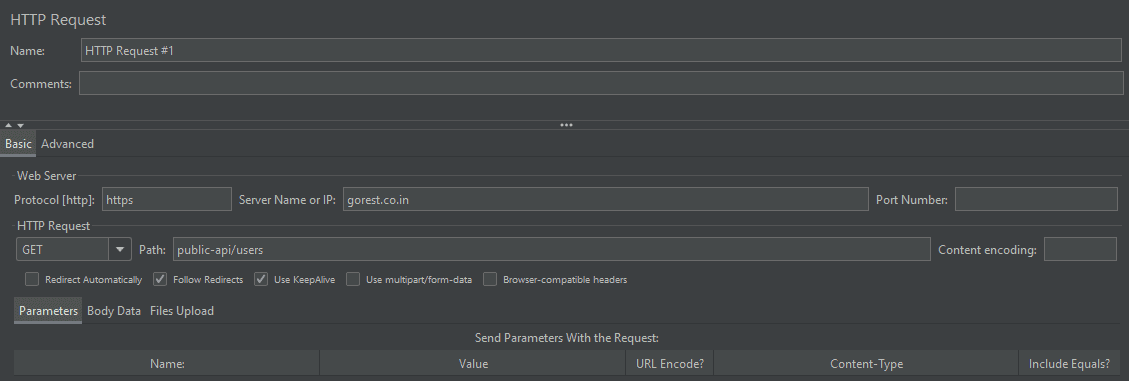
4.2. Adding Requests
Next, we’ll add two HTTP Requests. We’ll use the Online REST API at https://gorest.co.in/ to test our script. HTTP Request settings are configured in the user interface:
Let’s also add two assertions, just to check that requests return some data.
We need to check that our test works without errors. For this reason, let’s add the View Results Tree element and then run our test plan.
The result of running the first request is shown in the View Results Tree panel.
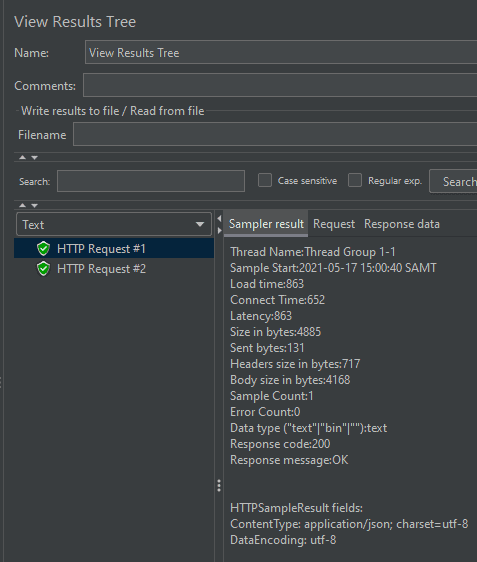
Let’s look at the Sampler result output for our second request. Here, Sample Start is 2021-05-17 15:00:40, the same time as the first request. It means that by default, we don’t have any delays between the requests.
Thread Name:Thread Group 1-1
Sample Start:2021-05-17 15:00:40 SAMT
With this in mind, let’s see how we can increase this gap between the requests.
5. Adding Timers
5.1. Constant Timer
To add a timer element, we need to right-click on the Thread Group element and select Add, Timer, Constant Timer.
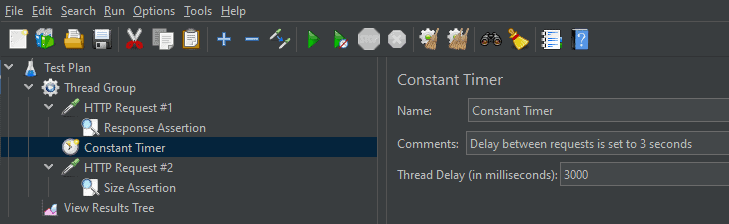
Here, we’ve added a Constant Timer with a Thread Delay of three seconds to our thread group. This timer adds a delay between each request.
Let’s now re-run our test plan and check the View Results Tree. We should see that requests were run with the delay that we set in the timer element.
Thread Name:Thread Group 1-1
Sample Start:2021-05-17 15:18:17 SAMT
And we can see that the next HTTP Request was run three seconds after the first.
Thread Name:Thread Group 1-1
Sample Start:2021-05-17 15:18:20 SAMT
5.2. Alternative to Constant Timer
As an alternative to Constant Timer, we can use Uniform Random Timer. This type of timer can be added in the same way as Constant Timer.
In the dropdown menu, it’s right after Constant Timer.
As we can see from the timer name, we should use it when we want this delay to vary in some specified range. Let’s add this timer to our sample and see how it works:
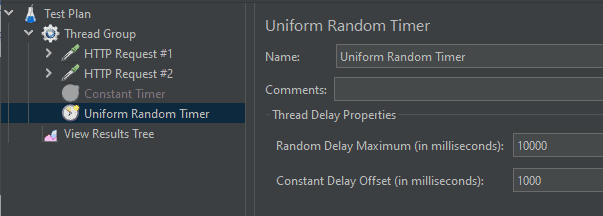
Constant Delay Offset adds a permanent part for each delay. Random Delay Maximum helps us to define an additional random part that will be added to Constant Delay Offset. These settings allow us to provide a random factor without the delay becoming too small.
Let’s run this test and take a look at the View Results Tree element:

If we take a closer look at Sample Start points, we’ll see that random delays were added in according to the defined Timer parameters.
Thread Name:Thread Group 1-1
Sample Start:2021-07-15 09:43:45 SAMT

Thread Name:Thread Group 1-1
Sample Start:2021-07-15 09:43:49 SAMT

Thread Name:Thread Group 1-1
Sample Start:2021-07-15 09:43:55 SAMT
Here we’ve looked at a couple of timer options, though there are other timers configurations available.
6. Conclusion
In this tutorial, we’ve seen how we can insert a custom delay between two requests in Apache JMeter and use Thread Group settings to add more flexibility for the created workload model.


