Jetty Configuration in Eclipse
Last updated: January 24, 2024


Mocking is an essential part of unit testing, and the Mockito library makes it easy to write clean and intuitive unit tests for your Java code.
Get started with mocking and improve your application tests using our Mockito guide:
Handling concurrency in an application can be a tricky process with many potential pitfalls. A solid grasp of the fundamentals will go a long way to help minimize these issues.
Get started with understanding multi-threaded applications with our Java Concurrency guide:
Spring 5 added support for reactive programming with the Spring WebFlux module, which has been improved upon ever since. Get started with the Reactor project basics and reactive programming in Spring Boot:
Since its introduction in Java 8, the Stream API has become a staple of Java development. The basic operations like iterating, filtering, mapping sequences of elements are deceptively simple to use.
But these can also be overused and fall into some common pitfalls.
To get a better understanding on how Streams work and how to combine them with other language features, check out our guide to Java Streams:
Explore Spring Boot 3 and Spring 6 in-depth through building a full REST API with the framework:
Yes, Spring Security can be complex, from the more advanced functionality within the Core to the deep OAuth support in the framework.
I built the security material as two full courses - Core and OAuth, to get practical with these more complex scenarios. We explore when and how to use each feature and code through it on the backing project.
You can explore the course here:
Spring Data JPA is a great way to handle the complexity of JPA with the powerful simplicity of Spring Boot.
Get started with Spring Data JPA through the guided reference course:
Refactor Java code safely — and automatically — with OpenRewrite.
Refactoring big codebases by hand is slow, risky, and easy to put off. That’s where OpenRewrite comes in. The open-source framework for large-scale, automated code transformations helps teams modernize safely and consistently.
Each month, the creators and maintainers of OpenRewrite at Moderne run live, hands-on training sessions — one for newcomers and one for experienced users. You’ll see how recipes work, how to apply them across projects, and how to modernize code with confidence.
Join the next session, bring your questions, and learn how to automate the kind of work that usually eats your sprint time.
1. Overview
Web Applications are one of the most popular use cases of Java. Web Servers and Servlet Containers provide the runtime for deploying applications.
Unfortunately, deploying and troubleshooting web applications on Web Servers is at times complicated. Luckily, IDEs have good debugging support for most applications. However, to debug web applications, we need to embed a Web Server in the IDE.
In this tutorial, we’ll embed Jetty in Eclipse and run and debug an application on it.
2. Eclipse Jetty Plugin
The simplest way of connecting Jetty to Eclipse is using the Eclipse Jetty Plugin.
The plugin adds a managed Jetty server into Eclipse. Hence, it allows us to deploy and test or debug applications seamlessly. Also, the plugin provides an interface for easily configuring the server.
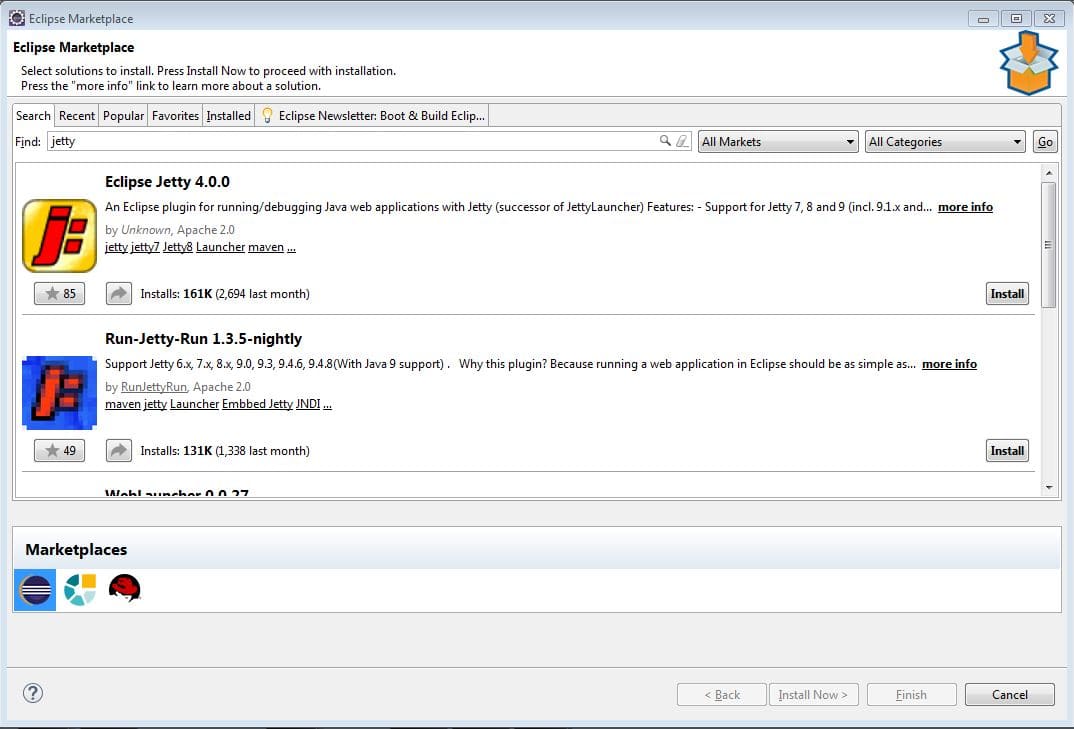
The quickest way to install the plugin is through the Marketplace. In eclipse, the Marketplace enables us to install plugins with a few clicks:
3. Sample Application
Let’s now develop a simple web application.
First, let’s add the web.xml in the /src/main/webapp/WEB-INF folder of our project:
<web-app xmlns="http://xmlns.jcp.org/xml/ns/javaee"
	xmlns:xsi="http://www.w3.org/2001/XMLSchema-instance"
	xsi:schemaLocation="http://xmlns.jcp.org/xml/ns/javaee/webapp_4_0.xsd"
	version="4.0">

	<welcome-file-list>
		<welcome-file>helloworld.html</welcome-file>
	</welcome-file-list>

</web-app>
Let’s add a simple static file. In our case, the helloworld.html looks like this:
<!DOCTYPE html>
<html>
   <head>
      <meta charset="ISO-8859-1">
      <title>Hello World</title>
   </head>
   <body>Hello World!</body>
</html>
Note that we haven’t added any servlet mapping to our web.xml.
Instead, we are going to use Servlet 3 annotations for our servlet:
@WebServlet("/helloworld")
public class HelloWorldServlet extends HttpServlet
WebServlet annotation enables our servlet class to be scanned and deployed on the container.
We should keep in mind that Jetty doesn’t support annotations with the basic HTTP module. Hence we’ll need to add the annotation support module for this to work.
We’ll see how to do this in the following sections.
4. Running the Application on Jetty
Deploying web application on servers varies from vendor to vendor. The Eclipse Jetty plugin takes care of this process for us. Likewise, it integrates with our IDE debugger, improving the development experience.
Sometimes we need to run the application with some configuration. Eclipse allows us to do that using the Launch Configuration.
This is how it looks for running applications on Jetty:
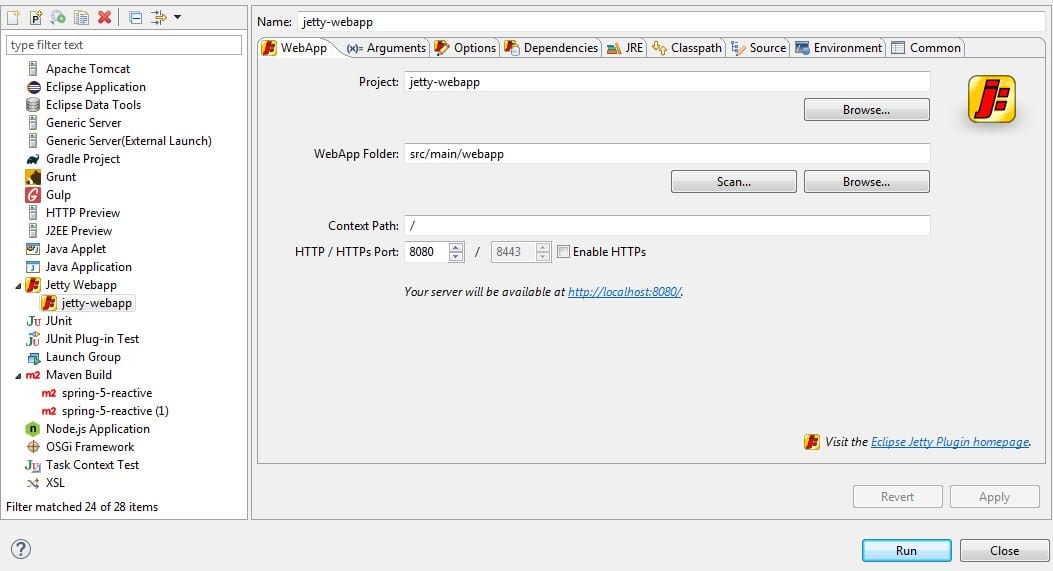
We can configure the following parameters for our application:
- Context Path – prefix for our application URL
- HTTP Port – port on which the application is deployed, the default is 8080
- Enable HTTPS – for deploying on HTTPS along with HTTP
- HTTPS Port – default is 8443
As with regular Jetty, Eclipse Jetty plugin allows us to manage dependencies for an application before deploying. For a maven application, we could select the dependency scope as classpath if we wish to provide those from the server.
5. Jetty Server Options
Jetty is a highly configurable Servlet Container. There are various parameters we can specify like Thread Pool Size, Shutdown Interval etc.
Besides that, Jetty allows us to add various Modules on top of the basic HTTP Module. These are some of the common modules we can add:
- Annotations Support – enables support for Servlet specific annotations
- JNDI Support – allows JNDI resource management by Jetty
- Websocket Support – enables Websocket server and client implementations
- JMX Support – allows monitoring of Jetty using any MBeans browser
- JSP Support – enables JSP compiling and deployment in Jetty
These configurations are possible in Eclipse Jetty as well. Hence, we can configure the server parameters and modules from the launch configuration.
Lastly, Eclipse Jetty 4.0 plugin comes with an embedded Jetty 9.3 server. However, we can configure an external jetty server for our application from the launch configuration.
6. Eclipse Jetty Console
Eclipse Jetty provides a console with some useful control commands. This console comes in handy to manage the server or gather some metrics from the server.
The console needs to be enabled in the launch configuration. When enabled, we can execute the control commands from Eclipse Console.
Here is a list of some common commands we can use:
- Memory – memory information of the current application
- Threads – thread dump of the running application
- Restart – restarts the running application
- Stop – gracefully stops the server and all the apps running on it
7. Conclusion
Eclipse Jetty plugin is a great way of quickly running or debugging an application by embedding the Jetty server. It also allows us to configure our application and the underlying Jetty server.
In this tutorial, we installed the Eclipse Jetty plugin and deployed our application. We also created a launch configuration and provided application and server parameters.


