

Mocking is an essential part of unit testing, and the Mockito library makes it easy to write clean and intuitive unit tests for your Java code.
Get started with mocking and improve your application tests using our Mockito guide:
Handling concurrency in an application can be a tricky process with many potential pitfalls. A solid grasp of the fundamentals will go a long way to help minimize these issues.
Get started with understanding multi-threaded applications with our Java Concurrency guide:
Spring 5 added support for reactive programming with the Spring WebFlux module, which has been improved upon ever since. Get started with the Reactor project basics and reactive programming in Spring Boot:
Since its introduction in Java 8, the Stream API has become a staple of Java development. The basic operations like iterating, filtering, mapping sequences of elements are deceptively simple to use.
But these can also be overused and fall into some common pitfalls.
To get a better understanding on how Streams work and how to combine them with other language features, check out our guide to Java Streams:
Explore Spring Boot 3 and Spring 6 in-depth through building a full REST API with the framework:
Yes, Spring Security can be complex, from the more advanced functionality within the Core to the deep OAuth support in the framework.
I built the security material as two full courses - Core and OAuth, to get practical with these more complex scenarios. We explore when and how to use each feature and code through it on the backing project.
You can explore the course here:
Spring Data JPA is a great way to handle the complexity of JPA with the powerful simplicity of Spring Boot.
Get started with Spring Data JPA through the guided reference course:
Refactor Java code safely — and automatically — with OpenRewrite.
Refactoring big codebases by hand is slow, risky, and easy to put off. That’s where OpenRewrite comes in. The open-source framework for large-scale, automated code transformations helps teams modernize safely and consistently.
Each month, the creators and maintainers of OpenRewrite at Moderne run live, hands-on training sessions — one for newcomers and one for experienced users. You’ll see how recipes work, how to apply them across projects, and how to modernize code with confidence.
Join the next session, bring your questions, and learn how to automate the kind of work that usually eats your sprint time.
1. Overview
In this tutorial, we’ll build a small Swing component that draws a quality circle, and layer in improvements for various requirements, such as centering, stroking, and accuracy for small sizes.
We’ll be relying on the official Java2D APIs and painting guidelines.
2. Project Structure
Let’s start by writing a class that extends JPanel to access the paintComponent() method. This integrates with the framework’s double buffering and ensures the background gets cleared before drawing:
public final class CirclePanel extends JPanel {
    @Override
    protected void paintComponent(Graphics g) {
        super.paintComponent(g);

        Graphics2D g2 = (Graphics2D) g.create();
        try {

        } finally {
            g2.dispose();
        }
    }
}
Based on the recommended pattern, we created a Graphics2D variable to handle the incoming Graphics, then we disposed of it to prevent leaks.
3. Drawing a Circle
While we can draw a circle with drawOval(x, y, w, h), Java2D’s shape APIs yield more predictable composable results. Therefore, let’s use Ellipse2D with equal width and height to represent a circle and pass it to the draw() and fill() methods:
double diameter = 160;
double x = 40;
double y = 40;
Shape circle = new Ellipse2D.Double(x, y, diameter, diameter);

g2.setPaint(new Color(0xB3E5FC));
g2.fill(circle);

g2.setPaint(new Color(0x01579B));
g2.setStroke(new BasicStroke(2f, BasicStroke.CAP_ROUND, BasicStroke.JOIN_ROUND));
g2.draw(circle);
To add some color to the circle, we can use setPaint() and pass a color, as well as setStroke() to see the outline better.
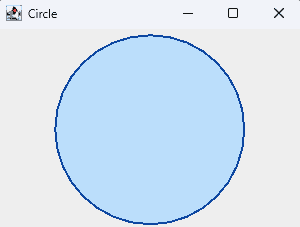
Running our code now will result in a decent circle, but far from what we want:

Let’s enhance our circle by adding a few improvements. Specifically, we’ll adjust its size dynamically based on the window dimensions and center it:
float stroke = 2f;
int pad = 12;

double diameter = Math.min(getWidth(), getHeight()) - pad - stroke;
double cx = getWidth()  / 2.0;
double cy = getHeight() / 2.0;

double x = cx - diameter / 2.0;
double y = cy - diameter / 2.0;

Shape circle = new Ellipse2D.Double(x, y, diameter, diameter);
g2.setStroke(new BasicStroke(stroke, BasicStroke.CAP_ROUND, BasicStroke.JOIN_ROUND));
By taking the smaller window dimension and subtracting padding, the code dynamically resizes the circle; then, it centers it by calculating the midpoint and positioning it accordingly.
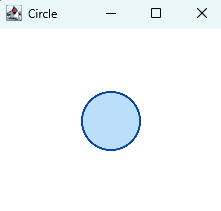
As a result, the strokes extend halfway inside and halfway outside the shape’s bounds. By accounting for this, we prevent the outline from clipping in tight layouts:
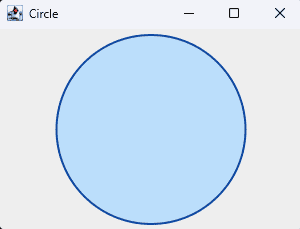
While this looks a bit better, we’re still far from having a crisp-looking circle.
4. Quality Rendering Hints
Graphics2D gives us access to certain hints by using setRenderingHint().
First, we enable antialiasing to smooth the edges and remove the staircase effect on diagonals and curves:
g2.setRenderingHint(RenderingHints.KEY_ANTIALIASING, RenderingHints.VALUE_ANTIALIAS_ON);Antialiasing alone already improves the quality a lot. However, when we draw very small circles or care about sub-pixel accuracy, we also enable pure stroke control:
g2.setRenderingHint(RenderingHints.KEY_STROKE_CONTROL, RenderingHints.VALUE_STROKE_PURE);This hint tells Java2D to calculate stroke geometry in a device-independent way, which helps small, thin circles look more uniform at different positions and sizes.
We can further increase quality by adding a rendering hint:
g2.setRenderingHint(RenderingHints.KEY_RENDERING, RenderingHints.VALUE_RENDER_QUALITY);With the hints added, we can now see noticeable improvements to the circle, even at smaller window sizes:

As we iterate, we can try different diameters, stroke widths, and placements. Because we’re using shapes, we can also apply transforms:
g2.translate(10, 10);
g2.scale(1.25, 1.25);
This way, we can test our circle in different circumstances.
5. Small Circles and Icons
At small icon sizes, 12 – 24 pixels, tiny rounding differences become more visible. We’ll often notice an outline that looks a bit thicker on one side. Even with antialiasing, pixels can’t represent perfect geometry at that scale.
To counter this, we can render the circle into a BufferedImage offscreen, apply high-quality hints, and then draw that image wherever we need it. This provides consistent results and saves CPU time when we reuse the same circle repeatedly.
There are two common ways to do this, depending on whether we want the highest possible smoothness or maximum runtime efficiency.
5.1. Supersampled Offscreen Rendering
In this approach, we draw the circle at a larger resolution, typically 2× or 3× the final size, and then scale it down when painting:
BufferedImage makeSupersampledCircle(int finalSize, int scale, float stroke) {
    int hi = finalSize * scale;
    BufferedImage img = new BufferedImage(hi, hi, BufferedImage.TYPE_INT_ARGB);
    Graphics2D g2 = img.createGraphics();
    try {
        g2.setRenderingHint(RenderingHints.KEY_ANTIALIASING, RenderingHints.VALUE_ANTIALIAS_ON);
        g2.setRenderingHint(RenderingHints.KEY_STROKE_CONTROL, RenderingHints.VALUE_STROKE_PURE);

        double d = hi - stroke;
        Shape circle = new Ellipse2D.Double(stroke / 2.0, stroke / 2.0, d, d);

        g2.setPaint(new Color(0xBBDEFB));
        g2.fill(circle);
        g2.setPaint(new Color(0x0D47A1));
        g2.setStroke(new BasicStroke(stroke, BasicStroke.CAP_ROUND, BasicStroke.JOIN_ROUND));
        g2.draw(circle);
    } finally {
        g2.dispose();
    }
    return img;
}
This technique, called supersampling, effectively performs an extra level of antialiasing during the image resampling, producing smooth edges.
To use it, we draw the large image scaled down inside paintComponent():
g2.setRenderingHint(RenderingHints.KEY_INTERPOLATION, RenderingHints.VALUE_INTERPOLATION_BICUBIC);
g2.drawImage(hiResImage, x, y, finalSize, finalSize, null);
This extra resampling pass hides pixel jaggies that even Java2D’s antialiasing can’t smooth out on tiny circles:
The trade-off is slightly higher memory and CPU usage, but it’s the technique for producing crisp badge icons, status lights, or toolbar dots.
5.2. Hardware Compatible BufferedImage
For speed and simplicity, we render the circle directly at its final size using a hardware-compatible transparent image:
BufferedImage makeCircleBadge(int size, float stroke) {
    GraphicsConfiguration gc = GraphicsEnvironment
      .getLocalGraphicsEnvironment()
      .getDefaultScreenDevice()
      .getDefaultConfiguration();

    BufferedImage img = gc.createCompatibleImage(size, size, Transparency.TRANSLUCENT);
    Graphics2D g2 = img.createGraphics();
    try {
        g2.setRenderingHint(RenderingHints.KEY_ANTIALIASING, RenderingHints.VALUE_ANTIALIAS_ON);
        g2.setRenderingHint(RenderingHints.KEY_STROKE_CONTROL, RenderingHints.VALUE_STROKE_PURE);

        double d = size - stroke;
        Shape circle = new Ellipse2D.Double(stroke / 2.0, stroke / 2.0, d, d);

        g2.setPaint(new Color(0xBBDEFB));
        g2.fill(circle);

        g2.setPaint(new Color(0x0D47A1));
        g2.setStroke(new BasicStroke(stroke, BasicStroke.CAP_ROUND, BasicStroke.JOIN_ROUND));
        g2.draw(circle);
    } finally {
        g2.dispose();
    }
    return img;
}
This approach uses createCompatibleImage() so the resulting bitmap matches our display’s color model and can be drawn very efficiently.
This method produces a clean icon with a transparent background. Because the image format is optimized for the GPU, drawing it repeatedly in tables, buttons, or dashboards is very fast:
If we cache the image and reuse it, the UI stays responsive even when we have hundreds of small circular indicators.
We can even combine the two methods, render supersampled images once at startup and reuse the downscaled bitmaps throughout the UI for the best of both worlds.
6. Conclusion
In this article, we explored several ways to draw a decent-looking circle in Java.
We saw how proper use of Graphics2D, antialiasing, and rendering hints can produce smooth, symmetric results. We learned how offscreen rendering with BufferedImage, either supersampled or hardware-compatible, helps create crisp, small icons. With these techniques, it’s easy to render circles that look clean and consistent across all Java applications.


