Compiling and Executing Code From a String in Java
Last updated: May 23, 2025


Mocking is an essential part of unit testing, and the Mockito library makes it easy to write clean and intuitive unit tests for your Java code.
Get started with mocking and improve your application tests using our Mockito guide:
Handling concurrency in an application can be a tricky process with many potential pitfalls. A solid grasp of the fundamentals will go a long way to help minimize these issues.
Get started with understanding multi-threaded applications with our Java Concurrency guide:
Spring 5 added support for reactive programming with the Spring WebFlux module, which has been improved upon ever since. Get started with the Reactor project basics and reactive programming in Spring Boot:
Since its introduction in Java 8, the Stream API has become a staple of Java development. The basic operations like iterating, filtering, mapping sequences of elements are deceptively simple to use.
But these can also be overused and fall into some common pitfalls.
To get a better understanding on how Streams work and how to combine them with other language features, check out our guide to Java Streams:
Explore Spring Boot 3 and Spring 6 in-depth through building a full REST API with the framework:
Yes, Spring Security can be complex, from the more advanced functionality within the Core to the deep OAuth support in the framework.
I built the security material as two full courses - Core and OAuth, to get practical with these more complex scenarios. We explore when and how to use each feature and code through it on the backing project.
You can explore the course here:
Spring Data JPA is a great way to handle the complexity of JPA with the powerful simplicity of Spring Boot.
Get started with Spring Data JPA through the guided reference course:
Refactor Java code safely — and automatically — with OpenRewrite.
Refactoring big codebases by hand is slow, risky, and easy to put off. That’s where OpenRewrite comes in. The open-source framework for large-scale, automated code transformations helps teams modernize safely and consistently.
Each month, the creators and maintainers of OpenRewrite at Moderne run live, hands-on training sessions — one for newcomers and one for experienced users. You’ll see how recipes work, how to apply them across projects, and how to modernize code with confidence.
Join the next session, bring your questions, and learn how to automate the kind of work that usually eats your sprint time.
Yes, we're now running our only Summer Sale. All Courses are 30% off until 20th July, 2026:
Yes, we're now running our only Summer Sale. All Courses are 30% off until 20th July, 2026:
1. Overview
In this tutorial, we’ll learn how to turn a String containing Java source code into a compiled class and execute it. There are many potential applications for compiling code at runtime:
- Generated code – dynamic code from information that’s not available pre-runtime or that changes often
- Hot-swapping – replacing code without cycling our application
- Code storage/injection – storing application logic in a database to be retrieved and executed ad-hoc. With care, custom classes can be unloaded when not in use.
Although there are several ways to compile a class, today, we’ll be focusing on the JavaCompiler API.
2. Tools and Strategy
The javax.tools package contains the majority of the abstractions we’ll need to compile our String. Let’s take a look at some of them, along with the general flow we’ll be following:
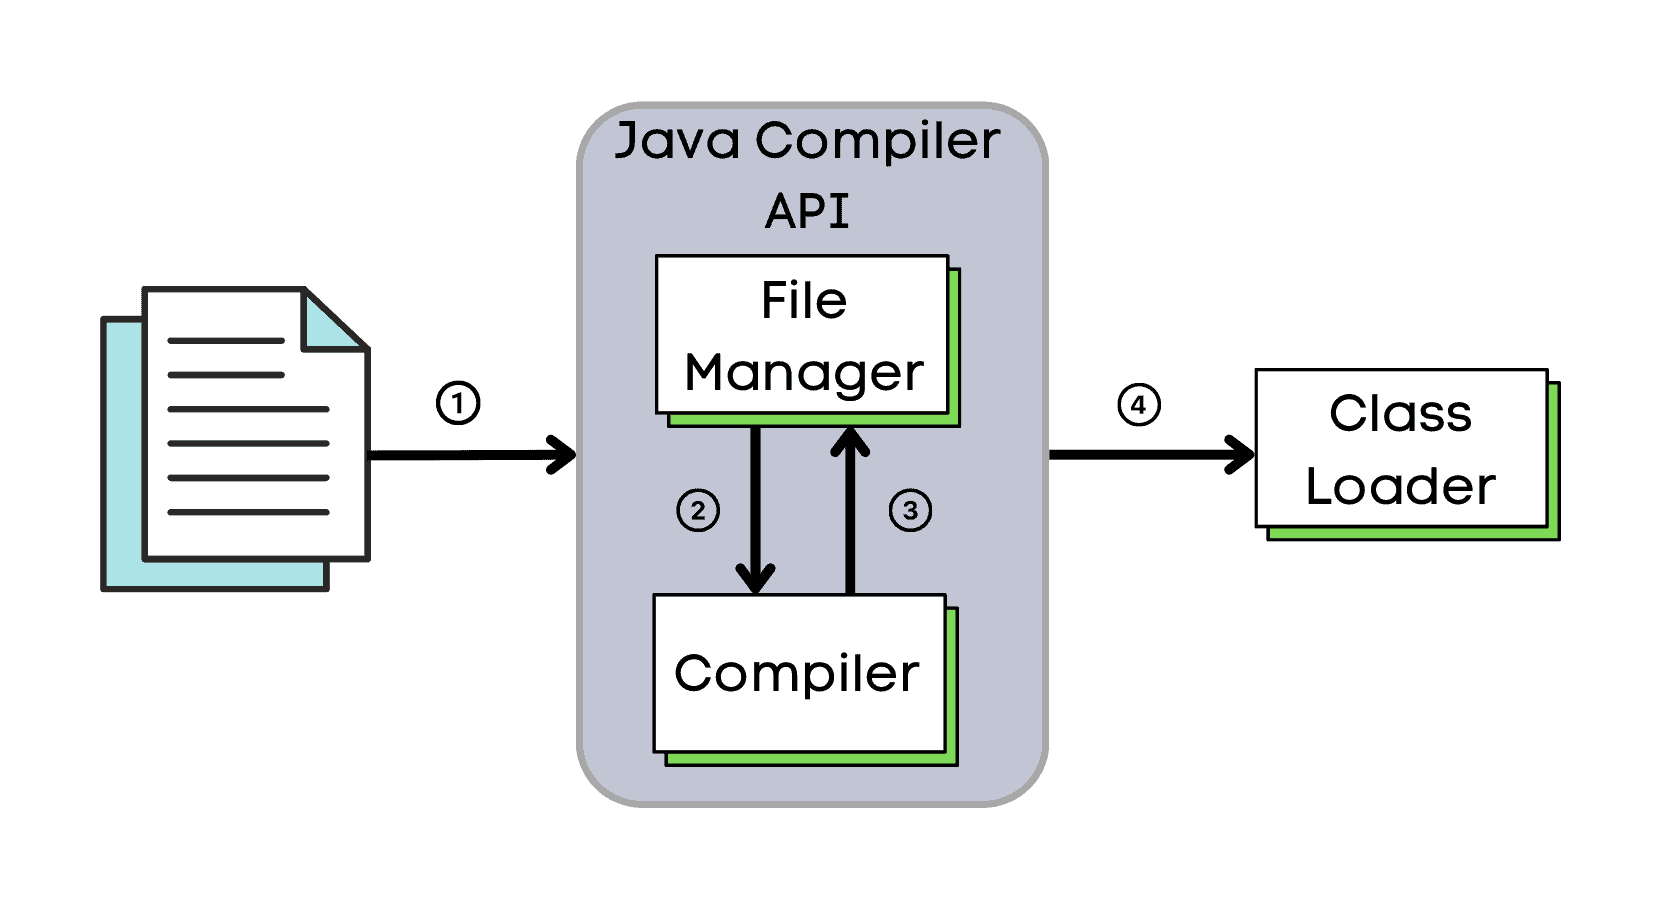
- Firstly, we pass our code into the JavaCompiler API.
- Next, FileManager extracts our source code for JavaCompiler.
- Then. JavaCompiler compiles it and returns the bytecode.
- Finally, a custom ClassLoader loads the class into memory.
How exactly we generate source code in a String format is not the focus of this tutorial. Today, we’ll be using a simple hard-coded literal value:
final static String sourceCode =
  "package com.baeldung.inmemorycompilation;\n"
    + "public class TestClass {\n"
    + "@Override\n"
    + "    public void runCode() {\n"
    + "        System.out.println(\"code is running...\");\n"
    + "    }\n"
    + "}\n";
3. Representing Our Code (Source and Compiled)
The first item on our checklist is to represent our code in a format that FileManager is familiar with.
The top-level abstraction for Java source and class files is FileObject. While a full implementation that suits our needs isn’t provided, we can take advantage of the partial implementation SimpleJavaFileObject and override only the methods we care about.
3.1. Source Code
For our source code, we must define how exactly the FileManager should read it. That means overriding getCharContent(). This method expects a CharSequence. Since our code is already contained in a String, we can simply return it as-is:
public class JavaSourceFromString extends SimpleJavaFileObject {

    private String sourceCode;

    public JavaSourceFromString(String name, String sourceCode) {
        super(URI.create("string:///" + name.replace('.', '/') + Kind.SOURCE.extension),
            Kind.SOURCE);
        this.sourceCode = requireNonNull(sourceCode, "sourceCode must not be null");
    }

    @Override
    public CharSequence getCharContent(boolean ignoreEncodingErrors) {
        return sourceCode;
    }
}
3.2. Compiled Code
For our compiled code, we do the exact opposite. We need to define how the FileManager should write to our object. That simply means overriding openOutputStream() and providing an implementation of OutputStream.
We’ll store our code in a ByteArrayOutputStream, as well as create a convenience method for extracting the bytes later during class loading:
public class JavaClassAsBytes extends SimpleJavaFileObject {

    protected ByteArrayOutputStream bos =
        new ByteArrayOutputStream();

    public JavaClassAsBytes(String name, Kind kind) {
        super(URI.create("string:///" + name.replace('.', '/')
            + kind.extension), kind);
    }

    public byte[] getBytes() {
        return bos.toByteArray();
    }

    @Override
    public OutputStream openOutputStream() {
        return bos;
    }
}
3.3. Top-Level Interface
Although not strictly necessary, it can be helpful when working with in-memory compilation to create a top-level interface for our compiled classes. There are two main benefits of this extra step:
- We know what type of objects to expect from ClassLoader, so we can cast more safely/easily.
- We can maintain object equality across class loaders. Otherwise-identical objects can have equality issues if created from classes loaded by different class loaders. A shared interface loaded by the same ClassLoader bridges that gap.
Many of the predefined functional interfaces lend themselves to this coding pattern, such as Function, Runnable, and Callable. For this guide, however, we’ll create our own:
public interface InMemoryClass {
    void runCode();
}
Now, we just need to go back and adjust our source code slightly to implement our new interface:
static String sourceCode =
  "package com.baeldung.inmemorycompilation;\n"
    + "public class TestClass implements InMemoryClass {\n"
    + "@Override\n"
    + "    public void runCode() {\n"
    + "        System.out.println(\"code is running...\");\n"
    + "    }\n"
    + "}\n";
4. Managing Our In-Memory Code
Now that we’ve got our code in the right format for the JavaCompiler API, we need a FileManager that can operate on it. The standard FileManager won’t suffice for our purposes, and like most of the other abstractions in the JavaCompiler API, there’s no default implementation for us to use.
Fortunately, the tools package does include ForwardingJavaFileManager, which simply forwards all method calls to an underlying FileManager. We can take advantage of this behavior by extending ForwardingJavaFileManager and overriding only the behaviors we’d like to handle ourselves, similar to what we did with SimpleJavaFileObject.
First, we need to override getJavaFileForOutput(). This method will be called on our FileManager by the JavaCompiler to obtain a JavaFileObject for the compiled bytecode. We need to provide it an instance of our new custom class, JavaClassAsBytes:
public class InMemoryFileManager extends ForwardingJavaFileManager<JavaFileManager> {

    // standard constructor

    @Override
    public JavaFileObject getJavaFileForOutput(Location location, String className, Kind kind,
      FileObject sibling) {
        return new JavaClassAsBytes(className, kind);
    }
}
We also need somewhere to store the compiled classes, so that they can be retrieved later by our custom ClassLoader. We’ll insert the classes into a Map and provide a convenience method for accessing it:
public class InMemoryFileManager extends ForwardingJavaFileManager<JavaFileManager> {

    private Map<String, JavaClassAsBytes> compiledClasses;

    public InMemoryFileManager(StandardJavaFileManager standardManager) {
        super(standardManager);
        this.compiledClasses = new Hashtable<>();
    }

    @Override
    public JavaFileObject getJavaFileForOutput(Location location,
        String className, Kind kind, FileObject sibling) {

        JavaClassAsBytes classAsBytes = new JavaClassAsBytes(className, kind);
        compiledClasses.put(className, classAsBytes);

        return classAsBytes;
    }

    public Map<String, JavaClassAsBytes> getBytesMap() {
        return compiledClasses;
    }
}
5. Loading Our In-Memory Code
The final step is creating something to load our classes once they’re compiled. We’ll be building a complementary ClassLoader for our InMemoryFileManager.
Class loading is a fairly in-depth topic on its own, and it’s outside the scope of this article. The short and dirty of it is that we’re going to hook our custom ClassLoader into the bottom of the existing delegation hierarchy and use it to load classes directly from our FileManager:
First, we need to create a custom class extending ClassLoader. We’ll modify the constructor slightly to accept our InMemoryFileManager as a parameter. This will allow our ClassLoader to do a lookup inside the manager later:
public class InMemoryClassLoader extends ClassLoader {

    private InMemoryFileManager manager;

    public InMemoryClassLoader(ClassLoader parent, InMemoryFileManager manager) {
        super(parent);
        this.manager = requireNonNull(manager, "manager must not be null");
    }
}
Next, we need to override the findClass() method of ClassLoader to define where to look for our compiled classes. Luckily for us, that’s simply checking the map stored inside our InMemoryFileManager:
@Override
protected Class<?> findClass(String name) throws ClassNotFoundException {

    Map<String, JavaClassAsBytes> compiledClasses = manager.getBytesMap();

    if (compiledClasses.containsKey(name)) {
        byte[] bytes = compiledClasses.get(name).getBytes();
        return defineClass(name, bytes, 0, bytes.length);
    } else {
        throw new ClassNotFoundException();
    }
}
We should note that we throw a ClassNotFoundException if the class cannot be located. Since we’re at the bottom of the hierarchy, if it hasn’t been found by now, it isn’t going to be found anywhere.
Now that we’ve completed our InMemoryClassLoader, we need to go back and make a couple of small modifications to our InMemoryFileManager to complete their bi-directional relationship. First, we’ll create a ClassLoader member variable and modify the constructor to accept our new InMemoryClassLoader:
private ClassLoader loader;

public InMemoryFileManager(StandardJavaFileManager standardManager) {
    super(standardManager);
    this.compiledClasses = new Hashtable<>();
    this.loader = new InMemoryClassLoader(this.getClass().getClassLoader(), this);
}
Next, we need to override getClassLoader() to return our new InMemoryClassLoader instance:
@Override
public ClassLoader getClassLoader(Location location) {
    return loader;
}
Now, we can re-use the same FileManager and ClassLoader together for multiple in-memory compilations if we wish to.
6. Putting It All Together
The only thing left to do is put all of our disparate pieces together. Let’s take a look at how we might do that with a simple unit test:
@Test
public void whenStringIsCompiled_ThenCodeShouldExecute() throws ClassNotFoundException, InstantiationException, IllegalAccessException {
    JavaCompiler compiler = ToolProvider.getSystemJavaCompiler();
    DiagnosticCollector<JavaFileObject> diagnostics = new DiagnosticCollector<>();
    InMemoryFileManager manager = new InMemoryFileManager(compiler.getStandardFileManager(null, null, null));

    List<JavaFileObject> sourceFiles = Collections.singletonList(new JavaSourceFromString(qualifiedClassName, sourceCode));

    JavaCompiler.CompilationTask task = compiler.getTask(null, manager, diagnostics, null, null, sourceFiles);

    boolean result = task.call();

    if (!result) {
        diagnostics.getDiagnostics()
          .forEach(d -> LOGGER.error(String.valueOf(d)));
    } else {
        ClassLoader classLoader = manager.getClassLoader(null);
        Class<?> clazz = classLoader.loadClass(qualifiedClassName);
        InMemoryClass instanceOfClass = (InMemoryClass) clazz.newInstance();

        Assertions.assertInstanceOf(InMemoryClass.class, instanceOfClass);

        instanceOfClass.runCode();
    }
}
And we observe the console output when we execute the test:
code is running...We can see that the method from our String source code has been executed successfully!
7. Conclusion
In this article, we learned how to turn a String containing Java source code into a compiled class and then execute it.
As a general warning, we should note that extra care should be taken when working with class loaders. The bi-directional relationship between Class and ClassLoader makes custom class loading prone to memory leaks. This is especially so when using third-party libraries, which may hold onto class references behind the scenes.


