How to Solve 403 Error in Spring Boot POST Request
Last updated: January 8, 2024


Mocking is an essential part of unit testing, and the Mockito library makes it easy to write clean and intuitive unit tests for your Java code.
Get started with mocking and improve your application tests using our Mockito guide:
Handling concurrency in an application can be a tricky process with many potential pitfalls. A solid grasp of the fundamentals will go a long way to help minimize these issues.
Get started with understanding multi-threaded applications with our Java Concurrency guide:
Spring 5 added support for reactive programming with the Spring WebFlux module, which has been improved upon ever since. Get started with the Reactor project basics and reactive programming in Spring Boot:
Since its introduction in Java 8, the Stream API has become a staple of Java development. The basic operations like iterating, filtering, mapping sequences of elements are deceptively simple to use.
But these can also be overused and fall into some common pitfalls.
To get a better understanding on how Streams work and how to combine them with other language features, check out our guide to Java Streams:
Explore Spring Boot 3 and Spring 6 in-depth through building a full REST API with the framework:
Yes, Spring Security can be complex, from the more advanced functionality within the Core to the deep OAuth support in the framework.
I built the security material as two full courses - Core and OAuth, to get practical with these more complex scenarios. We explore when and how to use each feature and code through it on the backing project.
You can explore the course here:
Spring Data JPA is a great way to handle the complexity of JPA with the powerful simplicity of Spring Boot.
Get started with Spring Data JPA through the guided reference course:
Refactor Java code safely — and automatically — with OpenRewrite.
Refactoring big codebases by hand is slow, risky, and easy to put off. That’s where OpenRewrite comes in. The open-source framework for large-scale, automated code transformations helps teams modernize safely and consistently.
Each month, the creators and maintainers of OpenRewrite at Moderne run live, hands-on training sessions — one for newcomers and one for experienced users. You’ll see how recipes work, how to apply them across projects, and how to modernize code with confidence.
Join the next session, bring your questions, and learn how to automate the kind of work that usually eats your sprint time.
1. Overview
Encountering errors is a common occurrence in Web Development. One such error is the HTTP 403 forbidden error.
In this tutorial, we’ll learn how to solve the 403 error in a Spring Boot POST request. We’ll start by understanding what the 403 error means, and then explore the steps to resolve it in a Spring Boot application.
2. What’s Error 403?
The HTTP 403 error, often referred to as the “Forbidden” error, is a status code that indicates the server understood the request, but has chosen not to authorize it. This typically implies that the client lacks permission to access the requested resources.
It’s important to note that this error is different from a 401 error, which indicates that the server needs to authenticate the client, but hasn’t received the valid credentials.
3. Causes of Error 403
There are several factors that can trigger a 403 error in a Spring Boot application. One of them is when the client fails to provide the authentication credentials. In such cases, the server, unable to verify the client’s privileges, rejects the request, resulting in a 403 error.
Another possible cause lies in the server configuration. For instance, the server may be configured to deny requests from certain IP addresses or user agents as a security measure. If a request originates from these blocked entities, the server responds with a 403 error.
Moreover, Spring Security enables Cross-Site Request Forgery (CSRF) protection by default. CSRF is an attack that tricks the victim into submitting a malicious request, and uses the identity of the victim to perform an undesired function on their behalf. If the CSRF token, which is used to protect against this type of attack, is missing or incorrect, the server may also respond with error 403.
4. Project Setup
To demonstrate how to solve the 403 error, we’ll create a Spring Boot project with the spring-boot-starter-web and spring-boot-starter-security dependencies:
<dependency>
    <groupId>org.springframework.boot</groupId>
    <artifactId>spring-boot-starter-security</artifactId>
</dependency>
<dependency>
    <groupId>org.springframework.boot</groupId>
    <artifactId>spring-boot-starter-web</artifactId>
</dependency>
Then we’ll create a controller class to handle a POST request:
@PostMapping("/test-request")
 public ResponseEntity<String> testPostRequest() {
    return ResponseEntity.ok("POST request successful");
}
The method above has the @PostMapping annotation, which means it can handle a POST request to the server. A successful POST request returns “POST request successful” as the response.
Next, we’ll configure Spring Security by adding an in-memory user:
@Bean
public InMemoryUserDetailsManager userDetailsService() {
    UserDetails user = User.withUsername("user")
      .password(encoder().encode("userPass"))
      .roles("USER")
      .build();
    return new InMemoryUserDetailsManager(user);
}

@Bean
public PasswordEncoder encoder() {
    return new BCryptPasswordEncoder();
}
In the above code, we configure the application to use an in-memory user for request authentication. The password for the user is encoded using BCryptPasswordEncoder to enhance security.
Finally, we’ll configure SecurityFilterChain to accept all incoming requests:
@Bean
public SecurityFilterChain securityFilterChain(HttpSecurity http) throws Exception {
    http.authorizeRequests(authorizeRequests -> authorizeRequests.anyRequest()
      .permitAll());
    return http.build();
}
In this segment of code, we configure the application to permit all incoming requests without requiring any form of authentication.
5. Solving Error 403 in Spring Boot POST Request
In this section, we’ll explore several factors that can cause error 403, and discuss the possible solutions.
5.1. Cross-Site Request Forgery (CSRF) Protection
By default, Spring Security enables CSRF protection. If the CRSF token is missing from the request header, the server responds with a 403 error. This behavior isn’t specific to any server environment, including localhost, staging, or production.
Let’s try to make a POST request:
$ curl -X POST -H "Content-Type: application/json" http://localhost:8080/test-requestThe request above results in a forbidden error:
{"timestamp":"2023-06-24T16:52:05.397+00:00","status":403,"error":"Forbidden","path":"/test-request"}We can solve this error by disabling CSRF protection:
@Bean
public SecurityFilterChain securityFilterChain(HttpSecurity http) throws Exception {
    http.authorizeRequests(authorizeRequests -> authorizeRequests.anyRequest()
      .permitAll())
      .csrf(AbstractHttpConfigurer::disable);
    return http.build();
}
In the code above, we disabled the CSRF protection by invoking the disable() method.
Let’s make a POST request to the “/test-request” endpoint:
$ curl -X POST -H "Content-Type: application/json" http://localhost:8080/test-requestAfter disabling CRSF, we make a POST request, and the server responds with the expected HTTP response “POST request successful.”
However, it’s important to note that disabling CRSF protection isn’t generally recommended in an application in production. CRSF protection is a crucial security measure to prevent Cross-Site Forgery attacks. Therefore, it’s advisable to include the CRSF token in the request header of state-changing operations.
5.2. Authentication Credentials
Providing incorrect authentication credentials, or not providing authentication credentials, to a secure end-point could lead to a 403 error in a Spring Boot application.
Let’s modify SecurityFilterChain to authenticate all requests to the server:
@Bean
public SecurityFilterChain securityFilterChain(HttpSecurity http) throws Exception {
    http.authorizeRequests(authorizeRequests -> authorizeRequests.anyRequest()
      .authenticated())
      .httpBasic(withDefaults())
      .formLogin(withDefaults())
      .csrf(AbstractHttpConfigurer::disable);
    return http.build();
}
In the code above, we configured the application to authenticate every request before granting access. If we make a POST request to the end-point without providing the correct authentication credentials, the server responds with a 403 error.
Let’s use the credentials of the in-memory user we created to make a POST request to the “/test-request” end-point:
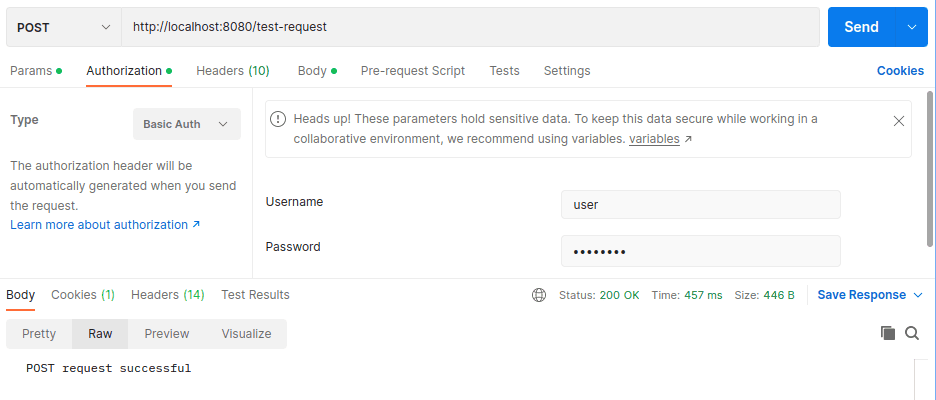
The image above shows that the server responds with a 200 OK status code when we provide the correct authentication.
6. Conclusion
In this article, we learned how to solve the 403 error in Spring Boot by disabling CRSF protection, and providing correct authentication credentials. We also demonstrated how to configure Spring Security to accept both authenticated and non-authenticated requests. Additionally, we highlighted different causes of the 403 error Spring Boot application.


