

Mocking is an essential part of unit testing, and the Mockito library makes it easy to write clean and intuitive unit tests for your Java code.
Get started with mocking and improve your application tests using our Mockito guide:
Handling concurrency in an application can be a tricky process with many potential pitfalls. A solid grasp of the fundamentals will go a long way to help minimize these issues.
Get started with understanding multi-threaded applications with our Java Concurrency guide:
Spring 5 added support for reactive programming with the Spring WebFlux module, which has been improved upon ever since. Get started with the Reactor project basics and reactive programming in Spring Boot:
Since its introduction in Java 8, the Stream API has become a staple of Java development. The basic operations like iterating, filtering, mapping sequences of elements are deceptively simple to use.
But these can also be overused and fall into some common pitfalls.
To get a better understanding on how Streams work and how to combine them with other language features, check out our guide to Java Streams:
Explore Spring Boot 3 and Spring 6 in-depth through building a full REST API with the framework:
Yes, Spring Security can be complex, from the more advanced functionality within the Core to the deep OAuth support in the framework.
I built the security material as two full courses - Core and OAuth, to get practical with these more complex scenarios. We explore when and how to use each feature and code through it on the backing project.
You can explore the course here:
Spring Data JPA is a great way to handle the complexity of JPA with the powerful simplicity of Spring Boot.
Get started with Spring Data JPA through the guided reference course:
Refactor Java code safely — and automatically — with OpenRewrite.
Refactoring big codebases by hand is slow, risky, and easy to put off. That’s where OpenRewrite comes in. The open-source framework for large-scale, automated code transformations helps teams modernize safely and consistently.
Each month, the creators and maintainers of OpenRewrite at Moderne run live, hands-on training sessions — one for newcomers and one for experienced users. You’ll see how recipes work, how to apply them across projects, and how to modernize code with confidence.
Join the next session, bring your questions, and learn how to automate the kind of work that usually eats your sprint time.
Yes, we're now running our only Summer Sale. All Courses are 30% off until 20th July, 2026:
Yes, we're now running our only Summer Sale. All Courses are 30% off until 20th July, 2026:
1. Overview
In this tutorial, we’ll learn how to build a RESTful microservice using RestExpress.
RestExpress is an open-source Java framework that enables us to build RESTful microservices quickly and easily. Based on the Netty framework, it aims for less boilerplate code and quicker development of RESTful microservices.
Additionally, it uses a plugin architecture to allow us to add functionality to our microservices. It supports plugins for common functionalities like caching, security, and persistence.
2. RestExpress Archetypes
RestExpress Archetypes is a supporting project that provides a set of Maven archetypes for creating a RestExpress project.
At the time of writing, there are three archetypes available:
- minimal – contains the bare minimum code required to create a RESTful project. It contains the main class, a properties file, and a sample API.
- mongodb – creates a RESTful project with MongoDB support. In addition to the minimal archetype, it includes a MongoDB layer.
- cassandra – similar to the mongodb archetype, adds a Cassandra layer to the minimal archetype
Each archetype comes with a set of plugins to add functionality to our microservice:
- CacheControlPlugin – adds support for the Cache-Control header
- CORSPlugin – adds support for CORS
- MetricsPlugin – adds support for Metrics
- SwaggerPlugin – adds support for Swagger
- HyperExpressPlugin – adds support for HATEOAS
By default, only the MetricsPlugin is enabled, and it uses Dropwizard Metrics. We can enable other plugins by adding a dependency to one of their implementations. We may also need to add properties to configure and enable certain plugins.
In the next section, we’ll explore how to create a project using the mongodb archetype. We’ll go on to learn how the application is configured, and then we’ll look at certain aspects of the generated code.
2.1. Creating a Project Using an Archetype
Let’s create a project using the mongodb archetype.
On a terminal, let’s navigate to the directory where we want to create the project. We’ll use the mvn archetype:generate command:
$ mvn archetype:generate -DarchetypeGroupId=com.strategicgains.archetype -DarchetypeArtifactId=restexpress-mongodb -DarchetypeVersion=1.18 -DgroupId=com.baeldung -DartifactId=rest-express -Dversion=1.0-SNAPSHOTThis creates a project with some sample code and configuration:
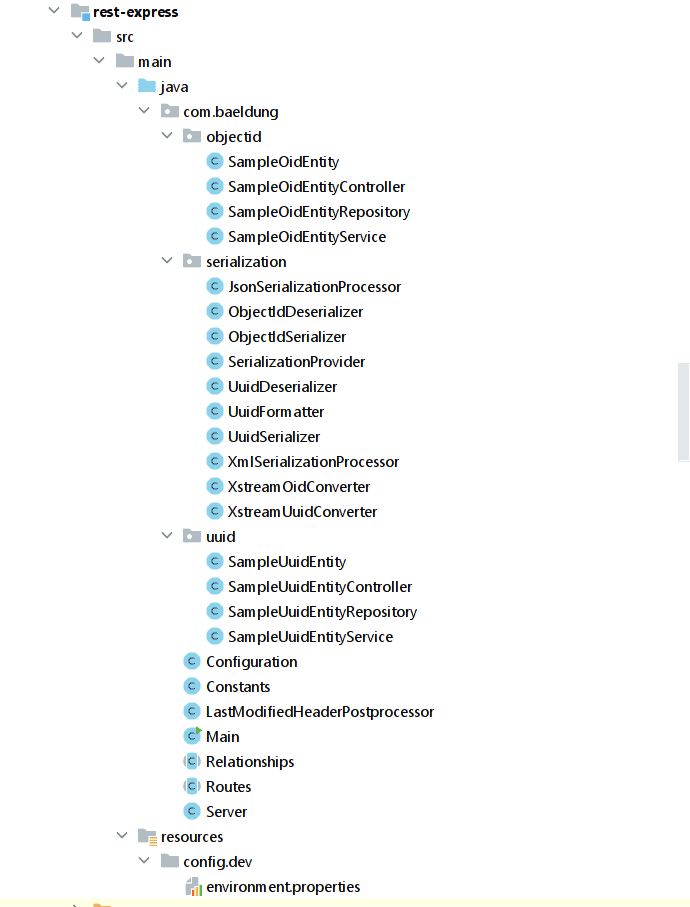
The archetype automatically creates for us a few components. It creates a server using the default configuration. These configurations are present in the environment.properties file.
There are two sets of CRUD APIs in the objectid and uuid packages. Each of these packages includes an entity, a controller, a service, and a repository class.
The Configuration, Server, Main, and Routes classes help in configuring the server during startup.
We’ll explore these generated classes in the next sections.
3. Generated Code
Let’s explore the generated code. We’ll focus on the main class, the API methods, and the DB layer. This will give us an idea of how to create a simple CRUD application using RestExpress.
3.1. Main Class
The main class is the entry point for our application. It’s responsible for starting the server and configuring the application.
Let’s look at the main() method of the Main class:
public static void main(String[] args) throws Exception {
    Configuration config = Environment.load(args, Configuration.class);
    Server server = new Server(config);
    server.start().awaitShutdown();
}
Let’s understand the code in detail:
- The Environment.load() method loads the configuration from the environment.properties file and creates a Configuration object.
- The Server class is responsible for starting the server. It needs a Configuration object to set up the server. We’ll look at the Configuration and Server classes in the next sections.
- The start() method starts the server, and the awaitShutdown() method waits for the server to shut down.
3.2. Reading Properties
The environment.properties file contains the configuration for our application. To read the properties, the Configuration class is automatically created.
Let’s look at different parts of the Configuration class.
The Configuration class extends the Environment class. This allows us to read properties from the environment. It overrides the fillValues() method of the Environment class for this purpose:
@Override
protected void fillValues(Properties p) {
    this.port = Integer.parseInt(p.getProperty(PORT_PROPERTY, String.valueOf(RestExpress.DEFAULT_PORT)));
    this.baseUrl = p.getProperty(BASE_URL_PROPERTY, "http://localhost:" + String.valueOf(port));
    this.executorThreadPoolSize = Integer.parseInt(p.getProperty(EXECUTOR_THREAD_POOL_SIZE, DEFAULT_EXECUTOR_THREAD_POOL_SIZE));
    this.metricsSettings = new MetricsConfig(p);
    MongoConfig mongo = new MongoConfig(p);
    initialize(mongo);
}
The above code reads the port, base URL, and executor thread pool size from the environment and sets these values to fields. It also creates a MetricsConfig object and a MongoConfig object.
We’ll look at the initialize() method in the next section.
3.3. Initializing Controllers and Repositories
The initialize() method is responsible for initializing the controllers and repositories:
private void initialize(MongoConfig mongo) {
    SampleUuidEntityRepository samplesUuidRepository = new SampleUuidEntityRepository(mongo.getClient(), mongo.getDbName());
    SampleUuidEntityService sampleUuidService = new SampleUuidEntityService(samplesUuidRepository);
    sampleUuidController = new SampleUuidEntityController(sampleUuidService);

    SampleOidEntityRepository samplesOidRepository = new SampleOidEntityRepository(mongo.getClient(), mongo.getDbName());
    SampleOidEntityService sampleOidService = new SampleOidEntityService(samplesOidRepository);
    sampleOidController = new SampleOidEntityController(sampleOidService);
}
The above code creates a SampleUuidEntityRepository object using the Mongo client and database name. It then creates a SampleUuidEntityService object using the repository. Finally, it creates a SampleUuidEntityController object using the service.
The same process is repeated for the SampleOidEntityController. This way, the API and database layers are initialized.
The Configuration class is responsible for creating any objects that we want to configure when the server starts. We can add any other initialization code in the initialize() method.
Similarly, we can add more properties to the environment.properties file and read them in the fillValues() method.
We can also extend the Configuration class with our own implementation. In this case, we’ll need to update the Main class to use our implementation rather than the Configuration class.
4. RestExpress APIs
In the previous section, we looked at how the Configuration class initializes the controllers. Let’s look at the SampleUuidEntityController class to understand how to create API methods.
The sample controller contains working code for create(), read(), readAll(), update(), and delete() methods. Each of the methods internally calls the corresponding method of the service class and, subsequently, the repository class.
Next, let’s see a couple of methods to understand how they work.
4.1. Create
Let’s look at the create() method:
public SampleOidEntity create(Request request, Response response) {
    SampleOidEntity entity = request.getBodyAs(SampleOidEntity.class, "Resource details not provided");
    SampleOidEntity saved = service.create(entity);

    // Construct the response for create...
    response.setResponseCreated();

    // Include the Location header...
    String locationPattern = request.getNamedUrl(HttpMethod.GET, Constants.Routes.SINGLE_OID_SAMPLE);
    response.addLocationHeader(LOCATION_BUILDER.build(locationPattern, new DefaultTokenResolver()));

    // Return the newly-created resource...
    return saved;
}
The above code:
- reads the request body and converts it to a SampleOidEntity object
- calls the create() method of the service class and passes the entity object
- sets the response code to 201 – created
- adds the location header to the response
- returns the newly created entity
If we look at the service class, we’ll see that it performs validations and calls the create() method of the repository class.
The SampleOidEntityRepository class extends the MongodbEntityRepository class that internally uses the Mongo Java driver to perform the database operations:
public class SampleOidEntityRepository extends MongodbEntityRepository<SampleOidEntity> {
    @SuppressWarnings("unchecked")
    public SampleOidEntityRepository(MongoClient mongo, String dbName) {
        super(mongo, dbName, SampleOidEntity.class);
    }
}
4.2. Read
Now, let’s look at the read() method:
public SampleOidEntity read(Request request, Response response) {
    String id = request.getHeader(Constants.Url.SAMPLE_ID, "No resource ID supplied");
    SampleOidEntity entity = service.read(Identifiers.MONGOID.parse(id));

    return entity;
}
The method parses the ID from the request header and calls the read() method of the service class. The service class then calls the read() method of the repository class. The repository class retrieves and returns the entity from the database.
5. Server and Routing
Finally, let’s look at the Server class. The Server class bootstraps the application. It defines the routes and the controllers for the routes. It also configures the server with the metrics and other plugins.
5.1. Creating the Server
Let’s look at the constructor of the Server class:
public Server(Configuration config) {
    this.config = config;
    RestExpress.setDefaultSerializationProvider(new SerializationProvider());
    Identifiers.UUID.useShortUUID(true);

    this.server = new RestExpress()
      .setName(SERVICE_NAME)
      .setBaseUrl(config.getBaseUrl())
      .setExecutorThreadCount(config.getExecutorThreadPoolSize())
      .addMessageObserver(new SimpleConsoleLogMessageObserver());

    Routes.define(config,server);
    Relationships.define(server);
    configurePlugins(config,server);
    mapExceptions(server);
}
The constructor carries out a few steps:
- It creates a RestExpress object and sets the name, base URL, executor thread pool size, and message observer for console logging. RestExpress internally creates a Netty server. This server will be started when we call the start() method in our Main class.
- It calls the Routes.define() method to define the routes. We’ll look at the Routes class in the next section.
- It defines relationships for our entities, configures plugins based on the properties provided, and maps certain internal exceptions to exceptions that the application has handled.
5.2. Routes
The Routes.define() method defines the routes and the controller methods to be called for each route.
Let’s look at the routes for the SampleOidEntityController:
public static void define(Configuration config, RestExpress server) {
    // other routes omitted for brevity...

    server.uri("/samples/oid/{uuid}.{format}", config.getSampleOidEntityController())
      .method(HttpMethod.GET, HttpMethod.PUT, HttpMethod.DELETE)
      .name(Constants.Routes.SINGLE_OID_SAMPLE);

    server.uri("/samples/oid.{format}", config.getSampleOidEntityController())
      .action("readAll", HttpMethod.GET)
      .method(HttpMethod.POST)
      .name(Constants.Routes.SAMPLE_OID_COLLECTION);
}
Let’s look at the first route definition in detail. The uri() method maps the pattern /samples/oid/{uuid}.{format} to the SampleOidEntityController. The {uuid} and {format} are path parameters of the URL.
The GET, PUT, and DELETE methods map to the read(), update(), and delete() methods of the controller, respectively. This is the default behavior of the Netty server.
A name is assigned to the route to facilitate retrieving the route by name. This retrieval can be done using the server.getRouteUrlsByName() method if required.
The above pattern works for read(), update(), and delete(), as they all require an ID. For create() and readAll(), we need to use a different pattern that doesn’t require an ID.
Let’s look at the second route definition. The pattern /samples/oid.{format} is mapped to the SampleOidEntityController.
The action() method is used to map a method name to an HTTP method. In this case, the readAll() method is mapped to the GET method.
The POST method is allowed on the pattern and mapped to the create() method of the controller by default. And as before, a name is assigned to the route.
An important point to note is that if we define more methods or change the name of standard methods in the controller, we will need to map them to their respective HTTP methods using the action() method.
Any other URL pattern we need to define must be added to the Routes.define() method.
6. Running the Application
Let’s run the application and perform some operations on the entities. We’ll use the curl command to perform the operations.
Let’s start the application by running the Main class. The application starts on port 8081.
By default, the SampleOidEntity doesn’t have any fields except the ID and timestamps. Let’s add a field called name to the entity:
public class SampleOidEntity extends AbstractMongodbEntity implements Linkable {
    private String name;

    // constructors, getters and setters
}
6.1. Testing the APIs
Let’s create a new entity by running a curl command:
$ curl -X POST -H "Content-Type: application/json" -d "{\"name\":\"test\"}" http://localhost:8081/samples/oid.jsonThis should return the newly created entity with an ID:
{
  "_links": {
    "self": {
      "href": "http://localhost:8081/samples/oid/63a5d983ef1e572664c148fd"
    },
    "up": {
      "href": "http://localhost:8081/samples/oid"
    }
  },
  "name": "test",
  "id": "63a5d983ef1e572664c148fd",
  "createdAt": "2022-12-23T16:38:27.733Z",
  "updatedAt": "2022-12-23T16:38:27.733Z"
}
Next, let’s try to read the created entity using the id returned above:
$ curl -X GET http://localhost:8081/samples/oid/63a5d983ef1e572664c148fd.jsonThis should return the same entity as before.
7. Conclusion
In this article, we explored how to create a REST API using RestExpress.
We created a project using the RestExpress mongodb archetype. Then, we looked at the project structure and the generated classes. Finally, we ran the application and performed some operations to test the APIs.


