

Mocking is an essential part of unit testing, and the Mockito library makes it easy to write clean and intuitive unit tests for your Java code.
Get started with mocking and improve your application tests using our Mockito guide:
Handling concurrency in an application can be a tricky process with many potential pitfalls. A solid grasp of the fundamentals will go a long way to help minimize these issues.
Get started with understanding multi-threaded applications with our Java Concurrency guide:
Spring 5 added support for reactive programming with the Spring WebFlux module, which has been improved upon ever since. Get started with the Reactor project basics and reactive programming in Spring Boot:
Since its introduction in Java 8, the Stream API has become a staple of Java development. The basic operations like iterating, filtering, mapping sequences of elements are deceptively simple to use.
But these can also be overused and fall into some common pitfalls.
To get a better understanding on how Streams work and how to combine them with other language features, check out our guide to Java Streams:
Explore Spring Boot 3 and Spring 6 in-depth through building a full REST API with the framework:
Yes, Spring Security can be complex, from the more advanced functionality within the Core to the deep OAuth support in the framework.
I built the security material as two full courses - Core and OAuth, to get practical with these more complex scenarios. We explore when and how to use each feature and code through it on the backing project.
You can explore the course here:
Spring Data JPA is a great way to handle the complexity of JPA with the powerful simplicity of Spring Boot.
Get started with Spring Data JPA through the guided reference course:
Refactor Java code safely — and automatically — with OpenRewrite.
Refactoring big codebases by hand is slow, risky, and easy to put off. That’s where OpenRewrite comes in. The open-source framework for large-scale, automated code transformations helps teams modernize safely and consistently.
Each month, the creators and maintainers of OpenRewrite at Moderne run live, hands-on training sessions — one for newcomers and one for experienced users. You’ll see how recipes work, how to apply them across projects, and how to modernize code with confidence.
Join the next session, bring your questions, and learn how to automate the kind of work that usually eats your sprint time.
1. Overview
In this tutorial, we’ll discuss Role-Based Access Control (RBAC) and how we can implement this functionality using Quarkus.
RBAC is a well-known mechanism for implementing a complex security system. Quarkus is a modern cloud-native full-stack Java framework that supports RBAC out of the box.
Before we start, it’s important to note that roles can be applied in many ways. In enterprises, roles are typically just aggregations of permissions used to identify a particular group of actions a user can perform. In Jakarta, roles are tags that allow the execution of resource actions (equivalent to permission). There are different ways of implementing RBAC systems.
In this tutorial, we’ll use permissions assigned to resources to control access, and the roles will group a list of permissions.
2. RBAC
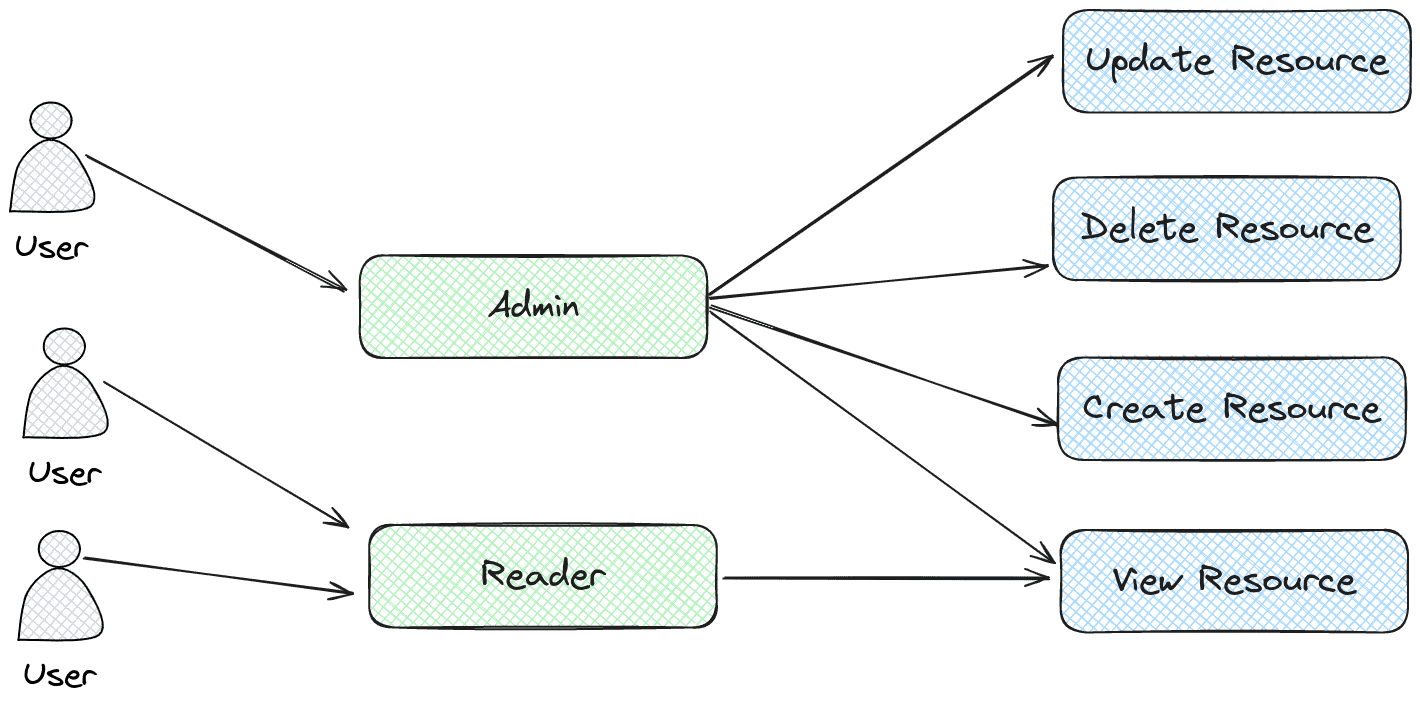
Role-based access control is a security model that grants application users access based on predefined permissions. System admins can assign and validate these permissions to particular resources upon an access attempt. To help manage permissions, they create roles to group them:
In order to demonstrate the implementation of an RBAC system using Quarkus, we’ll need some other tools like JSON Web Tokens (JWT), JPA, and Quarkus Security module. The JWT helps us implement a simple and self-contained way to validate identities and authorization, so for the sake of simplicity, we are leveraging it for our example. Similarly, JPA will help us handle the communication between domain logic and the database, while Quarkus will be the glue of all these components.
3. JWT
JSON Web Tokens (JWT) are a secure means to transmit information between user and server as a compact, URL-safe JSON object. This token is signed digitally for verification and is typically used for authentication and secure data exchange in web-based applications. During authentication, the server issues a JWT containing the user’s identity and claims, which the client will use in subsequent requests to access protected resources:
The client requests the token by providing some credentials, and then the authorization server provides the signed token; later, when trying to access a resource, the client offers the JWT token, which the resource server verifies and validates against the required permissions. Considering these foundational concepts, let’s explore how to integrate RBAC and JWT in a Quarkus application.
4. Data Design
In order to keep it simple, we’ll create a basic RBAC system to use in this example. For this, let’s use the following tables: 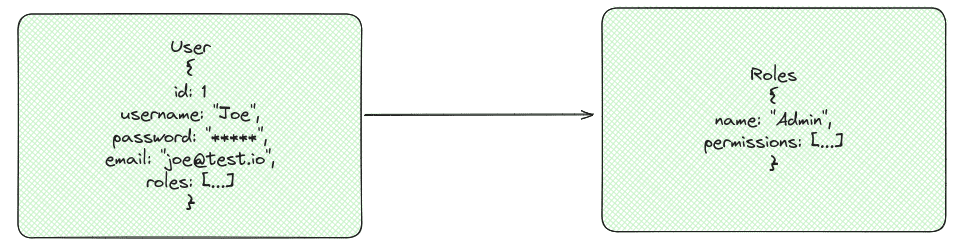
This allows us to represent the users, their roles, and the permissions that compose each role. JPA database tables will represent our domain objects:
@Entity
@Table(name = "users")
public class User {
    @Id
    @GeneratedValue(strategy = GenerationType.AUTO)
    private Long id;

    @Column(unique = true)
    private String username;

    @Column
    private String password;

    @Column(unique = true)
    private String email;

    @ManyToMany(fetch = FetchType.LAZY)
    @JoinTable(name = "user_roles",
      joinColumns = @JoinColumn(name = "user_id"),
      inverseJoinColumns = @JoinColumn(name = "role_name"))
    private Set<Role> roles = new HashSet<>();

    // Getter and Setters
}
The user’s table holds the credentials to log in and the relation between the user and the roles:
@Entity
@Table(name = "roles")
public class Role {
    @Id
    private String name;

    @Roles
    @Convert(converter = PermissionConverter.class)
    private Set<Permission> permissions = new HashSet<>();

    // Getters and Setters
}
Again, to keep it simple, the permissions are stored in a column using comma-separated values, and for that, we use the PermissionConverter.
5. JSON Web Token and Quarkus
In terms of credentials, to use the JWT tokens and enable the login, we need the following dependencies:
<dependency>
    <groupId>io.quarkus</groupId>
    <artifactId>quarkus-smallrye-jwt-build</artifactId>
    <version>3.9.4</version>
</dependency>
<dependency>
    <groupId>io.quarkus</groupId>
    <artifactId>quarkus-smallrye-jwt</artifactId>
    <version>3.9.4</version>
</dependency>
<dependency>
    <groupId>io.quarkus</groupId>
    <artifactId>quarkus-test-security</artifactId>
    <scope>test</scope>
    <version>3.9.4</version>
</dependency>
<dependency>
    <groupId>io.quarkus</groupId>
    <artifactId>quarkus-test-security-jwt</artifactId>
    <scope>test</scope>
    <version>3.9.4</version>
</dependency>
Such modules give us the tools to implement token generation, permission validation, and testing our implementation. Now, to define the dependencies and Quarkus versions, we’ll use the BOM parent, which contains the specific versions compatible with the framework. For this example, we’ll need:
Next, in order to implement the token signature, we need RSA public and private keys. Quarkus has a simple way of configuring it. Once generated, we have to config the following properties:
mp.jwt.verify.publickey.location=publicKey.pem
mp.jwt.verify.issuer=my-issuer
smallrye.jwt.sign.key.location=privateKey.pem
Quarkus, by default, looks at the /resources or the absolute path provided. The framework uses the keys to sign the claims and validate the token.
6. Credentials
Now, to create the JWT token and set its permissions, we need to validate the user’s credentials. The code below is an example of how we can do this:
@Path("/secured")
public class SecureResourceController {
    // other methods...

    @POST
    @Path("/login")
    @Consumes(MediaType.APPLICATION_JSON)
    @Produces(MediaType.APPLICATION_JSON)
    @PermitAll
    public Response login(@Valid final LoginDto loginDto) {
        if (userService.checkUserCredentials(loginDto.username(), loginDto.password())) {
            User user = userService.findByUsername(loginDto.username());
            String token = userService.generateJwtToken(user);
            return Response.ok().entity(new TokenResponse("Bearer " + token,"3600")).build();
        } else {
            return Response.status(Response.Status.UNAUTHORIZED).entity(new Message("Invalid credentials")).build();
        }
    }
}
The login endpoint validates the user credentials and emits the token as a response in the case of success. Another important thing to notice is the @PermitAll, which makes sure this endpoint is public and doesn’t require any authentication. However, we’ll look at permission in more detail soon.
Here, another important piece of code we’ll pay special attention to is the generateJwtToken method, which creates and signs a token.
public String generateJwtToken(final User user) {
    Set<String> permissions = user.getRoles()
      .stream()
      .flatMap(role -> role.getPermissions().stream())
      .map(Permission::name)
      .collect(Collectors.toSet());

    return Jwt.issuer(issuer)
      .upn(user.getUsername())
      .groups(permissions)
      .expiresIn(3600)
      .claim(Claims.email_verified.name(), user.getEmail())
      .sign();
}
In this method, we retrieve the permission list provided by each role and inject it into the token. The issuer also defines the token, the important claims, and the time to live, and then, finally, we sign the token. Once the user receives it, it will be used to authenticate all subsequent calls. The token contains all the server needs to authenticate and authorize the respective user. The user only needs to send the bearer token to the Authentication header to authenticate the call.
7. Permissions
As mentioned before, Jakarta uses @RolesAllowed to assign permission to resources. Although it calls them roles, they work like permissions (given the concepts defined by us previously), which means we only need to annotate our endpoints with it to secure them, like:
@Path("/secured")
public class SecureResourceController {
    private final UserService userService;
    private final SecurityIdentity securityIdentity;

    // constructor

    @GET
    @Path("/resource")
    @Consumes(MediaType.APPLICATION_JSON)
    @Produces(MediaType.APPLICATION_JSON)
    @RolesAllowed({"VIEW_ADMIN_DETAILS"})
    public String get() {
        return "Hello world, here are some details about the admin!";
    }

    @GET
    @Path("/resource/user")
    @Consumes(MediaType.APPLICATION_JSON)
    @Produces(MediaType.APPLICATION_JSON)
    @RolesAllowed({"VIEW_USER_DETAILS"})
    public Message getUser() {
        return new Message("Hello "+securityIdentity.getPrincipal().getName()+"!");
    }

    //...
}
Looking at the code, we can see how simple it is to add permission control to our endpoints. In our case, the /secured/resource/user now requires the VIEW_USER_DETAILS permission and the /secured/resourcerequires VIEW_ADMIN_DETAILS. We can also observe that it’s possible to assign a list of permissions instead of only one. In this case, Quarkus will require at least one of the permissions listed in @RolesAllowed.
Another important remark is that the token contains the permissions and information about the currently logged user (the principal in the security identity).
8. Testing
Quarkus offers many tools that make testing our application simple and easy to implement. Using such tools, we can configure the creation and setup of the JWTs as well as their context, making the test intention clear and easy to understand. The following test shows it:
@QuarkusTest
class SecureResourceControllerTest {
    @Test
    @TestSecurity(user = "user", roles = "VIEW_USER_DETAILS")
    @JwtSecurity(claims = {
        @Claim(key = "email", value = "[email protected]")
    })
    void givenSecureAdminApi_whenUserTriesToAccessAdminApi_thenShouldNotAllowRequest() {
        given()
          .contentType(ContentType.JSON)
          .get("/secured/resource")
          .then()
          .statusCode(403);
    }

    @Test
    @TestSecurity(user = "admin", roles = "VIEW_ADMIN_DETAILS")
    @JwtSecurity(claims = {
        @Claim(key = "email", value = "[email protected]")
    })
    void givenSecureAdminApi_whenAdminTriesAccessAdminApi_thenShouldAllowRequest() {
        given()
          .contentType(ContentType.JSON)
          .get("/secured/resource")
          .then()
          .statusCode(200)
          .body(equalTo("Hello world, here are some details about the admin!"));
    }

    //...
}
The @TestSecurity annotation allows for the definition of the security properties, while the @JwtSecurity allows for the definition of the Token’s claims. With both tools, we can test a multitude of scenarios and use cases.
The tools we saw so far are already enough to implement a robust RBAC system using Quarkus. However, it has more options.
9. Quarkus Security
Quarkus also offers a robust security system that can be integrated with our RBAC solution. Let’s check how we can combine such functionality with our RBAC implementation. First, we need to know the concepts, as the Quarkus permission system doesn’t work with roles. However, it’s possible to create a map between roles permissions. Let’s see how:
quarkus.http.auth.policy.role-policy1.permissions.VIEW_ADMIN_DETAILS=VIEW_ADMIN_DETAILS
quarkus.http.auth.policy.role-policy1.permissions.VIEW_USER_DETAILS=VIEW_USER_DETAILS
quarkus.http.auth.policy.role-policy1.permissions.SEND_MESSAGE=SEND_MESSAGE
quarkus.http.auth.policy.role-policy1.permissions.CREATE_USER=CREATE_USER
quarkus.http.auth.policy.role-policy1.permissions.OPERATOR=OPERATOR
quarkus.http.auth.permission.roles1.paths=/permission-based/*
quarkus.http.auth.permission.roles1.policy=role-policy1
Using the application properties file, we define a role-policy, which maps roles to permissions. The mapping works like quarkus.http.auth.policy.{policyName}.permissions.{roleName}={listOfPermissions}. In the example about the roles and permissions, they have the same name and map one to one. However, it’s possible this is not mandatory, and it’s also possible to map a role to a list of permissions. Then, once the mapping is done, we define the path in which this policy will be applied using the last two lines of the configuration.
The resource permission setup would also be a bit different, like:
@Path("/permission-based")
public class PermissionBasedController {
    private final SecurityIdentity securityIdentity;

    public PermissionBasedController(SecurityIdentity securityIdentity) {
        this.securityIdentity = securityIdentity;
    }

    @GET
    @Path("/resource/version")
    @Consumes(MediaType.APPLICATION_JSON)
    @Produces(MediaType.APPLICATION_JSON)
    @PermissionsAllowed("VIEW_ADMIN_DETAILS")
    public String get() {
        return "2.0.0";
    }

    @GET
    @Consumes(MediaType.APPLICATION_JSON)
    @Produces(MediaType.APPLICATION_JSON)
    @Path("/resource/message")
    @PermissionsAllowed(value = {"SEND_MESSAGE", "OPERATOR"}, inclusive = true)
    public Message message() {
        return new Message("Hello "+securityIdentity.getPrincipal().getName()+"!");
    }
}
The setup is similar, in our case the only change is the @PermissionsAllowed annotation instead of the @RolesAllowed. Moreover, permission also allows for different behaviors, such as the inclusive flag, with changes in the behavior of the permission matching mechanism from OR to AND. We use the same setup as before for testing with behaviors:
@QuarkusTest
class PermissionBasedControllerTest {
    @Test
    @TestSecurity(user = "admin", roles = "VIEW_ADMIN_DETAILS")
    @JwtSecurity(claims = {
        @Claim(key = "email", value = "[email protected]")
    })
    void givenSecureVersionApi_whenUserIsAuthenticated_thenShouldReturnVersion() {
        given()
          .contentType(ContentType.JSON)
          .get("/permission-based/resource/version")
          .then()
          .statusCode(200)
          .body(equalTo("2.0.0"));
    }

    @Test
    @TestSecurity(user = "user", roles = "SEND_MESSAGE")
    @JwtSecurity(claims = {
        @Claim(key = "email", value = "[email protected]")
    })
    void givenSecureMessageApi_whenUserOnlyHasOnePermission_thenShouldNotAllowRequest() {
        given()
          .contentType(ContentType.JSON)
          .get("/permission-based/resource/message")
          .then()
          .statusCode(403);
    }

    @Test
    @TestSecurity(user = "new-operator", roles = {"SEND_MESSAGE", "OPERATOR"})
    @JwtSecurity(claims = {
        @Claim(key = "email", value = "[email protected]")
    })
    void givenSecureMessageApi_whenUserOnlyHasBothPermissions_thenShouldAllowRequest() {
        given()
          .contentType(ContentType.JSON)
          .get("/permission-based/resource/message")
          .then()
          .statusCode(200)
          .body("message", equalTo("Hello new-operator!"));
    }
}
The Quarkus security module offers many other features, but they won’t be covered in this article.
10. Conclusion
In this article, we discussed the RBAC system and how we can leverage the Quarkus framework to implement it. We also saw some nuances on how to use role or permission and their conceptual difference in this implementation. Finally, we observed the difference between the Jakarta implementation and the Quarkus security module and how they can help test such functionality in both scenarios.


