

Mocking is an essential part of unit testing, and the Mockito library makes it easy to write clean and intuitive unit tests for your Java code.
Get started with mocking and improve your application tests using our Mockito guide:
Handling concurrency in an application can be a tricky process with many potential pitfalls. A solid grasp of the fundamentals will go a long way to help minimize these issues.
Get started with understanding multi-threaded applications with our Java Concurrency guide:
Spring 5 added support for reactive programming with the Spring WebFlux module, which has been improved upon ever since. Get started with the Reactor project basics and reactive programming in Spring Boot:
Since its introduction in Java 8, the Stream API has become a staple of Java development. The basic operations like iterating, filtering, mapping sequences of elements are deceptively simple to use.
But these can also be overused and fall into some common pitfalls.
To get a better understanding on how Streams work and how to combine them with other language features, check out our guide to Java Streams:
Explore Spring Boot 3 and Spring 6 in-depth through building a full REST API with the framework:
Yes, Spring Security can be complex, from the more advanced functionality within the Core to the deep OAuth support in the framework.
I built the security material as two full courses - Core and OAuth, to get practical with these more complex scenarios. We explore when and how to use each feature and code through it on the backing project.
You can explore the course here:
Spring Data JPA is a great way to handle the complexity of JPA with the powerful simplicity of Spring Boot.
Get started with Spring Data JPA through the guided reference course:
Refactor Java code safely — and automatically — with OpenRewrite.
Refactoring big codebases by hand is slow, risky, and easy to put off. That’s where OpenRewrite comes in. The open-source framework for large-scale, automated code transformations helps teams modernize safely and consistently.
Each month, the creators and maintainers of OpenRewrite at Moderne run live, hands-on training sessions — one for newcomers and one for experienced users. You’ll see how recipes work, how to apply them across projects, and how to modernize code with confidence.
Join the next session, bring your questions, and learn how to automate the kind of work that usually eats your sprint time.
Yes, we're now running our only Summer Sale. All Courses are 30% off until 20th July, 2026:
Yes, we're now running our only Summer Sale. All Courses are 30% off until 20th July, 2026:
1. Overview
In this tutorial, we’ll briefly introduce QuestDB, a relational column-oriented database for time series and event data. Then, we’ll learn how to send data from a Java application to the database.
2. What Is QuestDB?
QuestDB is a fast open-source time-series database with high-performance ingestion and SQL analytics. In short, QuestDB tackles difficulties when managing high throughput of time-based data and makes it easy to analyze the ingested data through simple SQL queries.
It is compatible with the InfluxDB Line Protocol, PostgreSQL Wire Protocol, and HTTP REST API. Additionally, it has a beautiful Web Console application that we can use to interact with the database directly. However, we’ll only focus on the InfluxDB Line Protocol, a text format that includes measurement, tags, fields, and a timestamp for each data point. In this case, we’ll use an easy-to-use java client library to send data and abstract away most of these details.
Some advantages of QuestDB are:
- It is easy to use and provides high performance
- It uses a relational model for time series data
- Ingestion of data is very scalable
- Provides immediate consistency
Next, we’ll create a local database instance using Docker containers. Alternatively, we can pay for the fully managed instance in the cloud that doesn’t require maintenance.
3. Installation
Let’s start using a containerized version installed using docker:
$ docker run -p 9000:9000 \
  -p 9009:9009 \
  -p 8812:8812 \
  -p 9003:9003 \
  -v "$(pwd):/var/lib/questdb" \
  -d --name questdb questdb/questdb:7.0.0
This will create a local instance of QuestDB on our machine. To check if it is up, we can access the web application exposed at port 9000:
User Interface of the QuestDB web application
Alternatively, QuestDB also exposes an endpoint at port 9003 we can use to check the database’s health.
4. Using QuestDB in Java Projects
4.1. Connecting to the Database
To begin with, we have to talk with the database from our application. For this purpose, QuestDB offers several methods of connection exposed on the following ports:
- InfluxDB Line Protocol: port 9009
- PostgreSQL Wire Protocol: port 8812
- HTTP REST API: port 9000
- Web Console: port 9000
For instance, we’ll only use the InfluxDB Line Protocol, which is the recommended method, and use the Java client to insert data:
<dependency>
    <groupId>org.questdb</groupId>
    <artifactId>questdb</artifactId>
    <version>7.0.0</version>
</dependency>
Then, we’ll send some data to the database.
4.2. Send Data
In short, we want to create a temperature tracking system that sends data to our database to the sensors table. Therefore, we need to create a Sender Object providing the correct address of the database to the builder:
Sender sender = Sender.builder().address("localhost:9009").build();The Sender is closeable, so we use it inside a try-with construct.
Then, we can refer to the sensors table and add the data simply by providing the values for each column:
sender.table(SENSORS_TABLE_NAME)
    .stringColumn("id", "KTC")
    .stringColumn("name", "Kitchen temperature (Celsius)")
    .doubleColumn("currentValue", 20)
    .atNow();
In particular, we didn’t need to create the table beforehand, as the library will do that based on the data we send to the database.
4.3. Query Data
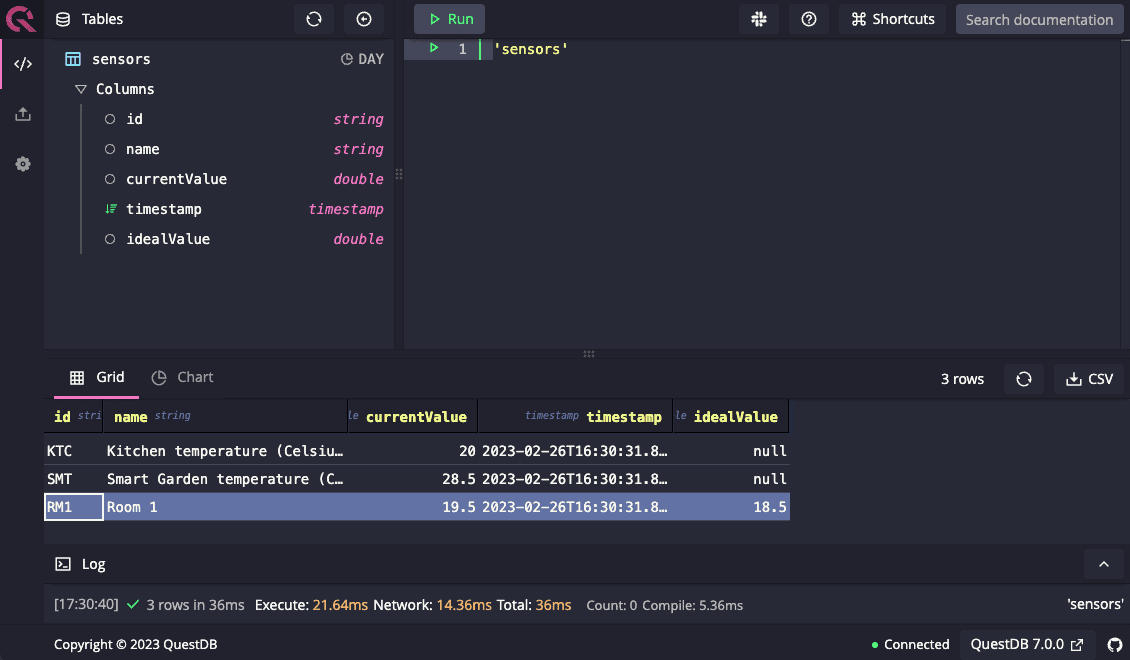
Once we have some data, we can use the SELECT statements on the web application to query data. For example, we can view the readings of our kitchen sensor using the following:
SELECT * from 'sensors' WHERE id = 'KTC'We can see this inside the web application:
4.4. Deleting Rows
QuestDB doesn’t allow deleting single rows, but it is possible to work around this by creating a copy of the table without the required rows, dropping the table, then renaming the copy to the original table name.
Granted that it is possible to use this workaround, we suggest avoiding it if possible, as it is costly.
5. Conclusions
In this article, we learned how to install and connect to QuestDB, execute queries, and interact with it from our application.


