

Mocking is an essential part of unit testing, and the Mockito library makes it easy to write clean and intuitive unit tests for your Java code.
Get started with mocking and improve your application tests using our Mockito guide:
Handling concurrency in an application can be a tricky process with many potential pitfalls. A solid grasp of the fundamentals will go a long way to help minimize these issues.
Get started with understanding multi-threaded applications with our Java Concurrency guide:
Spring 5 added support for reactive programming with the Spring WebFlux module, which has been improved upon ever since. Get started with the Reactor project basics and reactive programming in Spring Boot:
Since its introduction in Java 8, the Stream API has become a staple of Java development. The basic operations like iterating, filtering, mapping sequences of elements are deceptively simple to use.
But these can also be overused and fall into some common pitfalls.
To get a better understanding on how Streams work and how to combine them with other language features, check out our guide to Java Streams:
Explore Spring Boot 3 and Spring 6 in-depth through building a full REST API with the framework:
Yes, Spring Security can be complex, from the more advanced functionality within the Core to the deep OAuth support in the framework.
I built the security material as two full courses - Core and OAuth, to get practical with these more complex scenarios. We explore when and how to use each feature and code through it on the backing project.
You can explore the course here:
All Access is finally out, with all of my Spring courses. Learn JUnit is out as well, and Learn Maven is coming fast. And, of course, quite a bit more affordable. Finally.
>> GET THE COURSESpring Data JPA is a great way to handle the complexity of JPA with the powerful simplicity of Spring Boot.
Get started with Spring Data JPA through the guided reference course:
Refactor Java code safely — and automatically — with OpenRewrite.
Refactoring big codebases by hand is slow, risky, and easy to put off. That’s where OpenRewrite comes in. The open-source framework for large-scale, automated code transformations helps teams modernize safely and consistently.
Each month, the creators and maintainers of OpenRewrite at Moderne run live, hands-on training sessions — one for newcomers and one for experienced users. You’ll see how recipes work, how to apply them across projects, and how to modernize code with confidence.
Join the next session, bring your questions, and learn how to automate the kind of work that usually eats your sprint time.
1. Overview
Postman is a popular API development tool that simplifies designing, testing, modifying, and documenting APIs. It provides a user-friendly interface allowing users to send and receive HTTP requests, manage workflows with environments and collections, perform automated testing, create mock servers for testing, and generate API documentation.
Due to its versatility, it’s highly valued by developers, testers, and other IT professionals engaged in API-centric workflows.
In this tutorial, we’ll discuss how to install, setup, and use the most important features of Postman.
2. Installation and Setup
Postman is available for download as a desktop application for Windows, Mac, or Linux operating systems. It’s also available as a web application. However, not all features are available there.
After installation, we have to sign up and create a free account.
3. Sending an HTTP Request
One of the fundamental actions in Postman is sending a request to an API. Postman provides a collection of free public REST APIs that don’t require any authentication, and we’ll utilize those APIs to demonstrate some of Postman’s functionalities.
We’ll use the API to retrieve colleges and universities in a specific country.
Let’s create a workspace named “baeldung-test-workspace”. Once created, we can click the New button and select HTTP.
To test sending a request in Postman, we’ll set the URL to http://universities.hipolabs.com/search?country=Germany and the method to GET:
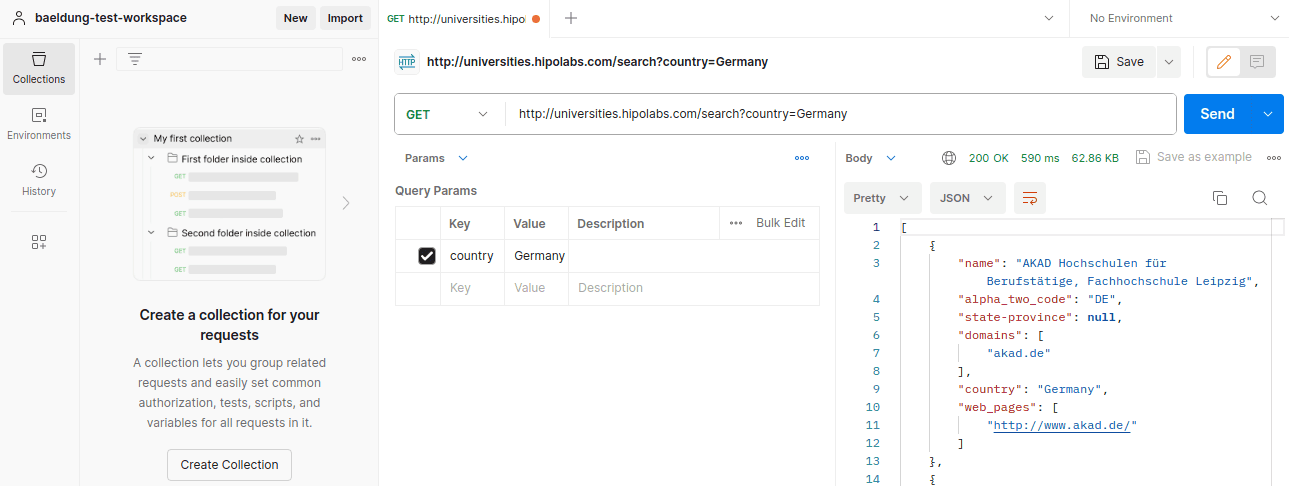
After sending the request, Postman will display the response data in the sidebar. We can view the status code, headers, and response body here.
If we don’t receive a successful response, the response status and details in the sidebar will help identify the issue.
In this example, we are using the GET method, but depending on the scenario, we can choose other most common methods such as POST, PUT, PATCH, DELETE, or input a new method.
We also used the query parameter for the country name. When using the query parameters, they can be entered either in the request URL or in the dedicated Query params tab, where they can be entered as key-value pairs. Postman naturally supports path parameters, which are also entered as a part of the request URL.
4. Environments
Effectively managing requests across various environments can be complex. However, Postman’s environments allow us to manage variables for different environments, making switching between, for example, development, testing, and production easy.
Let’s create two different environments by clicking the New button and selecting Environment: development and test:

Here, we can enter both initial and current values. The initial value is the default setting for a variable, while the current value is used in the actual requests when the variable is referenced. The initial value is used as the current value in case we leave the current value blank when saving the environment.
We’ll create a variable country in each, assigning the value “Germany” for development and “France” for the test environment:
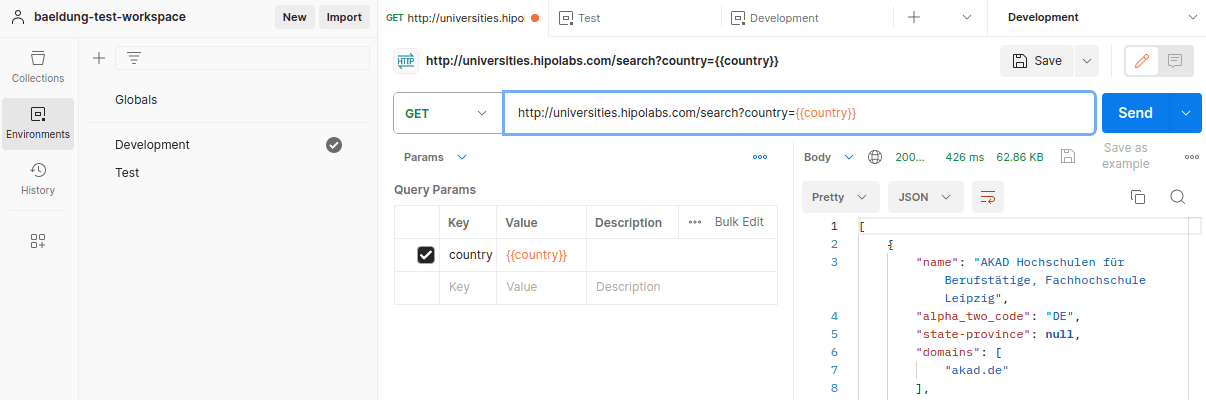
We selected the Development environment in the upper right corner and clicked the Send button. The country’s value was resolved to “Germany”. The variables are not reserved only for the query parameters – they can be referenced in the request URLs, headers, and body data.
5. Collections
Managing individual requests for various aspects of the API can be a challenge in terms of effective organization. Additionally, APIs with parameters that differ across different environments require executing the same set of requests in different environments without modifications.
This is where collections prove helpful, as they help manage API workflows more efficiently. A collection can be related to a specific environment, allowing us to use environment variables in requests.
In API workflows, executing multiple requests in a specific order is often necessary, and collections can help by executing requests in a particular order.
In general, collections are an effective way to group requests for easier management and collaboration among team members.
5.1. Creating a Collection
Let’s create a new collection by clicking the Create Collection button or saving our existing GET request. We’ll also add a GET request to retrieve all colleges and universities in France and save it to this new collection.
By clicking on the collection’s name in the left sidebar, we’re presented with multiple tabs, each allowing us to customize and configure our collection, such as by adding tests that will be executed with each request in the collection.
5.2. Collection Runner
We’ll now focus on running our collection by utilizing the Collection Runner, where we can run our requests in a specific order, either manually, on a schedule, or by running it from the command line. We can test the functional aspect of our API this way. Still, the Collection Runner also allows us to test the performance of our API by simulating a real-world traffic scenario.
Collection Runner can be further configured in various ways, but we’ll keep things simple for demonstration purposes and only select the manual run option.
Finally, the collection can be run by clicking the Run Test collection button:

Now, we can review the results of our collection run. Postman will display the results of executed requests and eventual test results if any tests were included. Here, we can view helpful information such as environment, duration, average response time, and results for each request.
6. Summary
In this article, we discussed Postman – a powerful tool for working with APIs.
We covered the essentials of how to send an HTTP request, group variables into environments that can be referenced when sending requests, and group requests into collections. However, this only scratches the surface of Postman’s extensive features. Advanced features, such as automated testing through collections and creating mock servers for testing, can significantly enhance our API development process, especially when dealing with complex scenarios.


