

Mocking is an essential part of unit testing, and the Mockito library makes it easy to write clean and intuitive unit tests for your Java code.
Get started with mocking and improve your application tests using our Mockito guide:
Handling concurrency in an application can be a tricky process with many potential pitfalls. A solid grasp of the fundamentals will go a long way to help minimize these issues.
Get started with understanding multi-threaded applications with our Java Concurrency guide:
Spring 5 added support for reactive programming with the Spring WebFlux module, which has been improved upon ever since. Get started with the Reactor project basics and reactive programming in Spring Boot:
Since its introduction in Java 8, the Stream API has become a staple of Java development. The basic operations like iterating, filtering, mapping sequences of elements are deceptively simple to use.
But these can also be overused and fall into some common pitfalls.
To get a better understanding on how Streams work and how to combine them with other language features, check out our guide to Java Streams:
Explore Spring Boot 3 and Spring 6 in-depth through building a full REST API with the framework:
Yes, Spring Security can be complex, from the more advanced functionality within the Core to the deep OAuth support in the framework.
I built the security material as two full courses - Core and OAuth, to get practical with these more complex scenarios. We explore when and how to use each feature and code through it on the backing project.
You can explore the course here:
Spring Data JPA is a great way to handle the complexity of JPA with the powerful simplicity of Spring Boot.
Get started with Spring Data JPA through the guided reference course:
Refactor Java code safely — and automatically — with OpenRewrite.
Refactoring big codebases by hand is slow, risky, and easy to put off. That’s where OpenRewrite comes in. The open-source framework for large-scale, automated code transformations helps teams modernize safely and consistently.
Each month, the creators and maintainers of OpenRewrite at Moderne run live, hands-on training sessions — one for newcomers and one for experienced users. You’ll see how recipes work, how to apply them across projects, and how to modernize code with confidence.
Join the next session, bring your questions, and learn how to automate the kind of work that usually eats your sprint time.
1. Overview
In this tutorial, we’ll walk through getting started with Open J Proxy (OJP) using a simple Spring Boot application, a local PostgreSQL instance, and the OJP server running in Docker.
OJP acts as a Type 3 JDBC driver and a remote Layer 7 database proxy, meaning that applications don’t open direct database connections. Instead, they send their JDBC operations to the OJP Server, which centrally manages pooling.
We’ll start by running PostgreSQL in Docker, then spin up the OJP Server in Docker as well. After that, we’ll generate a Spring Boot project and wire it up with the OJP JDBC driver. We’ll make sure local pooling is disabled, and finally, we’ll wrap things up by implementing a small CRUD example to see everything working end-to-end.
While we use Spring Boot here, the OJP driver works with Quarkus, Micronaut, or even plain JDBC or any other framework that relies on JDBC.
In this tutorial, we’ll create a simple Spring Boot project from scratch and fully integrate it with OJP.
2. How It Works (High-Level)
Although this tutorial focuses on hands-on integration, it helps to briefly understand how OJP fits into the request path.
With OJP, the application never opens a direct connection to PostgreSQL. Instead, all database access flows through a simple but powerful chain:
Application → OJP JDBC Driver → OJP Server → PostgreSQL
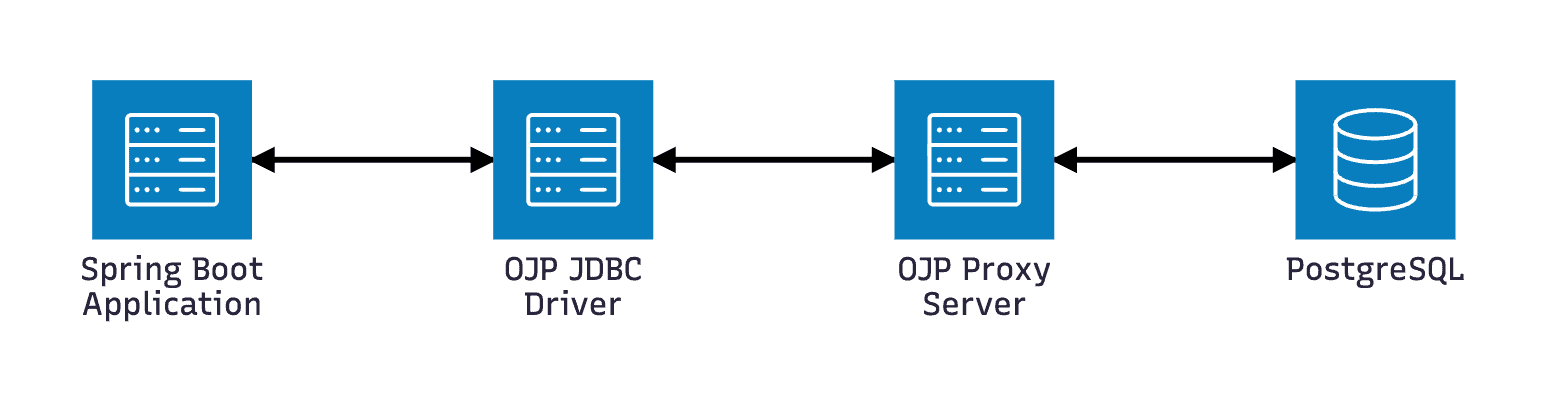
When the application asks for a JDBC connection, the OJP driver returns a virtual connection. No physical database connection is created at that point. The application can prepare statements, set parameters, and perform business logic without holding any database resources.
Only when a statement is actually executed does the OJP JDBC driver forward the request to the OJP Server over gRPC. The server, not the application, owns the real database connections and manages them in a shared pool. This allows OJP to reuse connections efficiently across multiple application instances and services.
This architecture dramatically reduces connection storms, coordinates access across distributed services, and keeps database load stable and predictable.
A natural question is: how does the OJP Server know which database to connect to?
The answer is simple. When the OJP JDBC driver establishes its session with the server, it sends all required connection metadata—database URL, credentials, and driver details. The OJP Server uses that information to create and manage the appropriate backend connections transparently.
The result is a clean separation of responsibilities: applications stay simple, and OJP handles the complexity where it belongs.
3. Running PostgreSQL with Docker
First, we need to start a PostgreSQL container using:
docker run --name ojp-postgres
  -e POSTGRES_USER=testuser
  -e POSTGRES_PASSWORD=testpassword
  -e POSTGRES_DB=defaultdb
  -d -p 5432:5432 postgres:17
  -c max_prepared_transactions=100
This creates a local database on port 5432.
4. Running the OJP Server
We’ll then start the OJP server using Docker:
docker run --rm -d --network host rrobetti/ojp:0.3.0-betaThe server listens on port 1059 by default.
5. Creating the Spring Boot Application
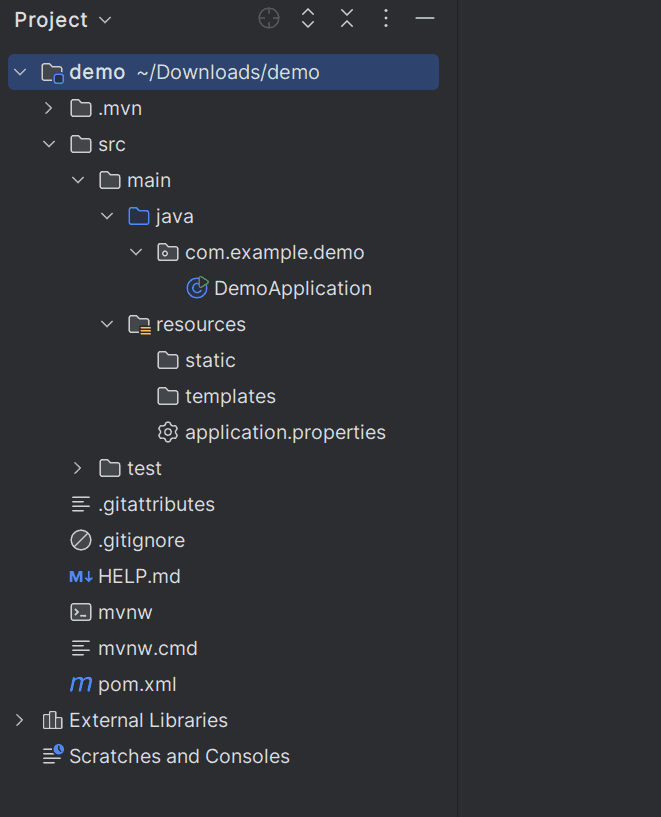
5.1. Creating a Demo App
We’ll use the standard Spring Boot structure as shown in the example below:
We also need to remember to remove HikariCP and use a driver-managed datasource that opens and closes connections on demand, as OJP handles pooling.
Let’s add this in pom.xml:
<dependency>
    <groupId>org.springframework.boot</groupId>
    <artifactId>spring-boot-starter-jdbc</artifactId>
    <exclusions>
        <!-- Use OJP's remote pool instead of Hikari -->
        <exclusion>
            <groupId>com.zaxxer</groupId>
            <artifactId>HikariCP</artifactId>
        </exclusion>
    </exclusions>
</dependency>
Then add the OJP Type 3 JDBC Driver:
<dependency>
    <groupId>org.openjproxy</groupId>
    <artifactId>ojp-jdbc-driver</artifactId>
    <version>0.3.1-beta</version>
</dependency>
5.2. Configuring Spring Boot to Use OJP
We need to edit application.properties to be like the snippet below:
spring.datasource.url=jdbc:ojp[localhost:1059]_postgresql://localhost:5432/defaultdb
spring.datasource.username=testuser
spring.datasource.password=testpassword
spring.datasource.driver-class-name=org.openjproxy.jdbc.Driver
spring.datasource.type=org.springframework.jdbc.datasource.SimpleDriverDataSource # Force Spring to create/close connections on demand.
spring.jpa.hibernate.ddl-auto=create # Tell Hibernate to create the tables automatically.
We use SimpleDriverDataSource because pooling must be fully delegated to OJP.
The spring.datasource.url is how OJP JDBC Driver knows where OJP Server is running ojp[localhost:1059] and where the actual database is. This avoids external configuration, making integration simpler.
6. Running Everything Together
Now, let’s set some sample classes: Book entity, BookRepository repository, and BookController controller, which is a common setup in REST services.
At this point, the application sends SQL operations through OJP rather than connecting directly to PostgreSQL.
With PostgreSQL and OJP already running, the logs should show that the datasource initializes without Hikari and that JDBC operations are flowing through OJP.
We can now test the app:
curl -X POST localhost:8080/books
-H "Content-Type: application/json"
-d '{"title": "OJP Introduction", "author": "Someone"}'
We're now successfully running a Spring Boot app with database access routed through OJP.7. Conclusion
This tutorial used Spring Boot, but OJP works equally well with Quarkus, Micronaut, Helidon, or Plain JDBC.
OJP also supports multiple databases, including PostgreSQL, MySQL, MariaDB, Oracle, SQL Server, IBM DB2, CockroachDB, and H2.
The following steps might be:
- trying multinode OJP deployments
- using OJP with serverless workloads
- integrating with non-Java languages via the gRPC interface


