

Mocking is an essential part of unit testing, and the Mockito library makes it easy to write clean and intuitive unit tests for your Java code.
Get started with mocking and improve your application tests using our Mockito guide:
Handling concurrency in an application can be a tricky process with many potential pitfalls. A solid grasp of the fundamentals will go a long way to help minimize these issues.
Get started with understanding multi-threaded applications with our Java Concurrency guide:
Spring 5 added support for reactive programming with the Spring WebFlux module, which has been improved upon ever since. Get started with the Reactor project basics and reactive programming in Spring Boot:
Since its introduction in Java 8, the Stream API has become a staple of Java development. The basic operations like iterating, filtering, mapping sequences of elements are deceptively simple to use.
But these can also be overused and fall into some common pitfalls.
To get a better understanding on how Streams work and how to combine them with other language features, check out our guide to Java Streams:
Explore Spring Boot 3 and Spring 6 in-depth through building a full REST API with the framework:
Yes, Spring Security can be complex, from the more advanced functionality within the Core to the deep OAuth support in the framework.
I built the security material as two full courses - Core and OAuth, to get practical with these more complex scenarios. We explore when and how to use each feature and code through it on the backing project.
You can explore the course here:
Spring Data JPA is a great way to handle the complexity of JPA with the powerful simplicity of Spring Boot.
Get started with Spring Data JPA through the guided reference course:
Refactor Java code safely — and automatically — with OpenRewrite.
Refactoring big codebases by hand is slow, risky, and easy to put off. That’s where OpenRewrite comes in. The open-source framework for large-scale, automated code transformations helps teams modernize safely and consistently.
Each month, the creators and maintainers of OpenRewrite at Moderne run live, hands-on training sessions — one for newcomers and one for experienced users. You’ll see how recipes work, how to apply them across projects, and how to modernize code with confidence.
Join the next session, bring your questions, and learn how to automate the kind of work that usually eats your sprint time.
Yes, we're now running our only Summer Sale. All Courses are 30% off until 20th July, 2026:
Yes, we're now running our only Summer Sale. All Courses are 30% off until 20th July, 2026:
1. Overview
The difference between Map and HashMap is that the first one is an interface, and the second is an implementation. However, in this article, we’ll dig a bit deeper and explain why interfaces are useful. Also, we’ll learn how to make code more flexible with interfaces and why we have different implementations for the same interface.
2. Purpose of Interfaces
An interface is a contract that defines only behavior. Each class that implements a particular interface should fulfill this contract. To understand it better, we can take an example from real life. Imagine a car. Every person will have a different image in their mind. The term car implies some qualities and behavior. Any object that has these qualities can be called a car. That is why every one of us imagined a different car.
Interfaces work the same. Map is an abstraction that defines certain qualities and behaviors. Only the class that has all of these qualities can be a Map.
3. Different Implementations
We have different implementations of the Map interface for the same reason we have different car models. All the implementations serve different purposes. It’s impossible to find the best implementation overall. There is only the best implementation for some purpose. Although a sports car is fast and looks cool, it is not the best choice for a family picnic or trip to a furniture store.
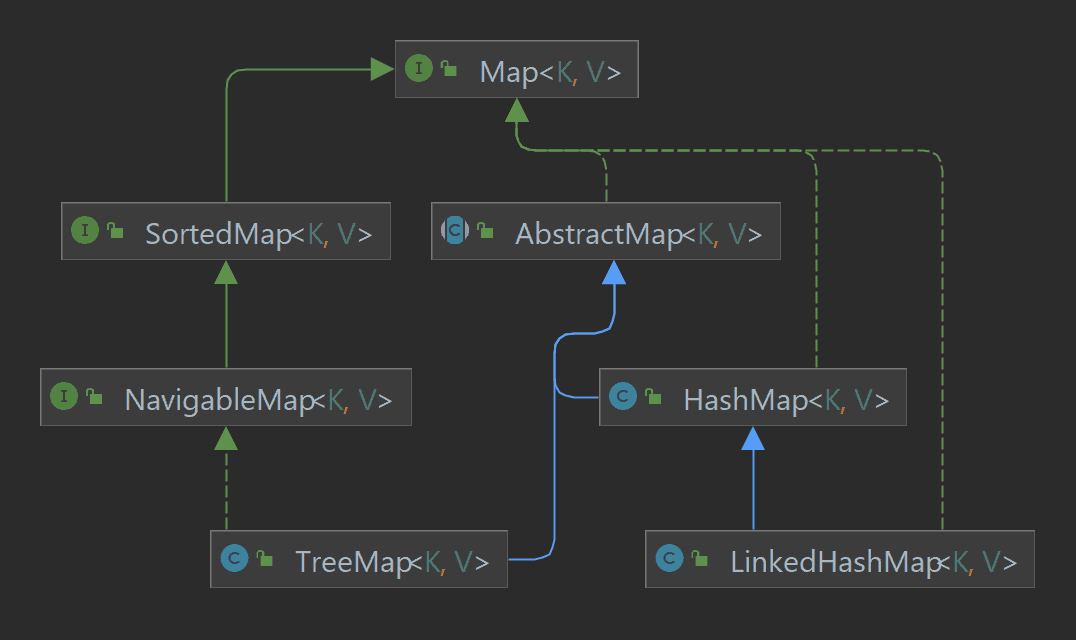
HashMap is the simplest implementation of the Map interface and provides the basic functionality. Mostly, this implementation covers all the needs. Two other widely used implementations are TreeMap, and LinkedHashMap provides additional features.
Here is a more detailed but not complete hierarchy:
4. Programming to Implementations
Imagine that we would like to print the keys and values of a HashMap in the console:
public class HashMapPrinter {

    public void printMap(final HashMap<?, ?> map) {
        for (final Entry<?, ?> entry : map.entrySet()) {
            System.out.println(entry.getKey() + " " + entry.getValue());
        }
    }
}
This is a small class that does the job. However, it contains one problem. It will be able to work only with the HashMap. Therefore any attempt to pass into the method TreeMap or even HashMap, referenced by Map will result in a compile error:
public class Main {
    public static void main(String[] args) {
        Map<String, String> map = new HashMap<>();
        HashMap<String, String> hashMap = new HashMap<>();
        TreeMap<String, String> treeMap = new TreeMap<>();

        HashMapPrinter hashMapPrinter = new HashMapPrinter();
        hashMapPrinter.printMap(hashMap);
//        hashMapPrinter.printMap(treeMap); Compile time error
//        hashMapPrinter.printMap(map); Compile time error
    }
}
Let’s try to understand why it’s happening. In both of these cases, the compiler cannot be sure that inside this method, there won’t be any invocations on HashMap specific methods.
TreeMap is on a different branch of the Map implementation (no pun intended), thus it might lack some methods that are defined in the HashMap.
In the second case, despite the real underlying object of a type HashMap, it is referenced by the Map interface. Therefore, this object will be able to expose only methods defined in the Map and not in the HashMap.
Thus, even though our HashMapPrinter is quite a simple class, it’s too specific. With this approach, it would require us to create a specific Printer for each Map implementation.
5. Programming to Interfaces
Often beginners get confused about the meaning of the expression “program to interfaces” or “code against interfaces”. Let’s consider the following example, which will make it a bit clearer. We’ll change the type of the argument to the most general type possible, which is the Map:
public class MapPrinter {

    public void printMap(final Map<?, ?> map) {
        for (final Entry<?, ?> entry : map.entrySet()) {
            System.out.println(entry.getKey() + " " + entry.getValue());
        }
    }
}
As we can see, the actual implementation stayed the same, while the only change is the type of argument. This shows that the method didn’t use any specific methods of HashMap. All the needed functionality was already defined in the Map interface, namely, method entrySet().
As a result, this minor change created a huge difference. Now, this class can work with any Map implementation:
public class Main {
    public static void main(String[] args) {
        Map<String, String> map = new HashMap<>();
        HashMap<String, String> hashMap = new HashMap<>();
        TreeMap<String, String> treeMap = new TreeMap<>();

        MapPrinter mapPrinter = new MapPrinter();
        mapPrinter.printMap(hashMap);
        mapPrinter.printMap(treeMap);
        mapPrinter.printMap(map);
    }
}
Coding to interface helped us to create a versatile class that can work with any implementation of the Map interface. This approach can eliminate code duplication and ensure our classes and methods have a well-defined purpose.
6. Where to Use Interfaces
Overall, arguments should be of the most general type possible. We saw in a previous example how just a simple change in a signature of a method could improve our code. Another place where we should have the same approach is a constructor:
public class MapReporter {

    private final Map<?, ?> map;

    public MapReporter(final Map<?, ?> map) {
        this.map = map;
    }

    public void printMap() {
        for (final Entry<?, ?> entry : this.map.entrySet()) {
            System.out.println(entry.getKey() + " " + entry.getValue());
        }
    }
}
This class can work with any implementation of the Map, just because we used the right type in the constructor.
7. Conclusion
To summarize, in this tutorial we discussed why interfaces are a great means for abstraction and defining a contract. Using the most general type possible will make code easy to reuse and easy to read. At the same time, this approach reduces the amount of code which is always a good way to simplify the codebase.


