How to Implement LRU Cache in Java
Last updated: July 27, 2026


Mocking is an essential part of unit testing, and the Mockito library makes it easy to write clean and intuitive unit tests for your Java code.
Get started with mocking and improve your application tests using our Mockito guide:
Handling concurrency in an application can be a tricky process with many potential pitfalls. A solid grasp of the fundamentals will go a long way to help minimize these issues.
Get started with understanding multi-threaded applications with our Java Concurrency guide:
Spring 5 added support for reactive programming with the Spring WebFlux module, which has been improved upon ever since. Get started with the Reactor project basics and reactive programming in Spring Boot:
Since its introduction in Java 8, the Stream API has become a staple of Java development. The basic operations like iterating, filtering, mapping sequences of elements are deceptively simple to use.
But these can also be overused and fall into some common pitfalls.
To get a better understanding on how Streams work and how to combine them with other language features, check out our guide to Java Streams:
Explore Spring Boot 3 and Spring 6 in-depth through building a full REST API with the framework:
Yes, Spring Security can be complex, from the more advanced functionality within the Core to the deep OAuth support in the framework.
I built the security material as two full courses - Core and OAuth, to get practical with these more complex scenarios. We explore when and how to use each feature and code through it on the backing project.
You can explore the course here:
All Access is finally out, with all of my Spring courses. Learn JUnit is out as well, and Learn Maven is coming fast. And, of course, quite a bit more affordable. Finally.
>> GET THE COURSE
Spring Data JPA is a great way to handle the complexity of JPA with the powerful simplicity of Spring Boot.
Get started with Spring Data JPA through the guided reference course:
Refactor Java code safely — and automatically — with OpenRewrite.
Refactoring big codebases by hand is slow, risky, and easy to put off. That’s where OpenRewrite comes in. The open-source framework for large-scale, automated code transformations helps teams modernize safely and consistently.
Each month, the creators and maintainers of OpenRewrite at Moderne run live, hands-on training sessions — one for newcomers and one for experienced users. You’ll see how recipes work, how to apply them across projects, and how to modernize code with confidence.
Join the next session, bring your questions, and learn how to automate the kind of work that usually eats your sprint time.
1. Overview
In this tutorial, we’re going to learn about the LRU cache and take a look at an implementation in Java.
2. LRU Cache
The Least Recently Used (LRU) cache is a cache eviction algorithm that organizes elements in order of use. In LRU, as the name suggests, the element that hasn’t been used for the longest time will be evicted from the cache.
For example, if we have a cache with a capacity of three items:
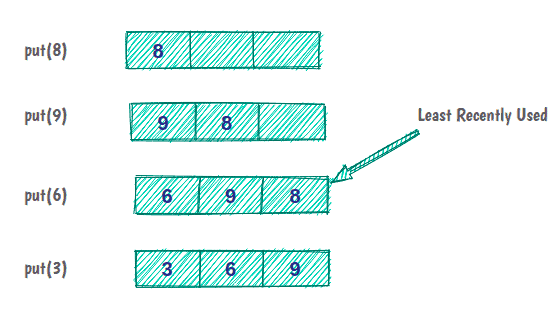
Initially, the cache is empty, and we put element 8 in the cache. Elements 9 and 6 are cached as before. But now, the cache capacity is full, and to put the next element, we have to evict the least recently used element in the cache.
Before we implement the LRU cache in Java, it’s good to know some aspects of the cache:
- All operations should run in order of O(1)
- The cache has a limited size
- It’s mandatory that all cache operations support concurrency
- If the cache is full, adding a new item must invoke the LRU strategy
2.1. Structure of an LRU Cache
Now, let’s think about a question that will help us in designing the cache.
How can we design a data structure that could do operations like reading, sorting (temporal sorting), and deleting elements in constant time?
It seems that to find the answer to this question, we need to think deeply about what has been said about LRU cache and its features:
- In practice, LRU cache is a kind of Queue — if an element is reaccessed, it goes to the end of the eviction order
- This queue will have a specific capacity as the cache has a limited size. Whenever a new element is brought in, it is added at the head of the queue. When eviction happens, it happens from the tail of the queue.
- Hitting data in the cache must be done in constant time, which isn’t possible in Queue! But, it is possible with Java’s HashMap data structure
- Removal of the least recently used element must be done in constant time, which means for the implementation of Queue, we’ll use DoublyLinkedList instead of SingleLinkedList or an array
So, the LRU cache is nothing but a combination of the DoublyLinkedList and the HashMap as shown below:
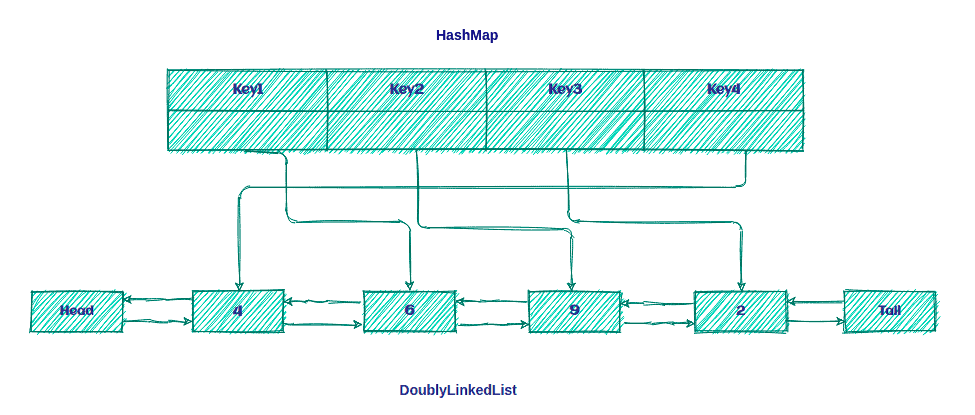
The idea is to keep the keys on the Map for quick access to data within the Queue.
2.2. LRU Algorithm
The LRU algorithm is pretty easy! If the key is present in HashMap, it’s a cache hit; else, it’s a cache miss.
We’ll follow two steps after a cache miss occurs:
- Add a new element in front of the list.
- Add a new entry in HashMap and refer to the head of the list.
And, we’ll do two steps after a cache hit:
- Remove the hit element and add it in front of the list.
- Update HashMap with a new reference to the front of the list.
Now, it’s time to see how we can implement LRU cache in Java!
3. Implementation in Java
First, we’ll define our Cache interface:
public interface Cache<K, V> {
    boolean set(K key, V value);
    Optional<V> get(K key);
    int size();
    boolean isEmpty();
    void clear();
}
Now, we’ll define the LRUCache class that represents our cache:
public class LRUCache<K, V> implements Cache<K, V> {
    private int size;
    private Map<K, LinkedListNode<CacheElement<K,V>>> linkedListNodeMap;
    private DoublyLinkedList<CacheElement<K,V>> doublyLinkedList;

    public LRUCache(int size) {
        this.size = size;
        this.linkedListNodeMap = new HashMap<>(size);
        this.doublyLinkedList = new DoublyLinkedList<>();
    }

    @Override
    public int size() {
        this.lock.readLock().lock();
        try {
            return doublyLinkedList.size();
        } finally {
            this.lock.readLock().unlock();
        }
    }

    // rest of the implementation
}
We can create an instance of the LRUCache with a specific size. In this implementation, we use HashMap collection for storing all references to LinkedListNode.
Now, let’s discuss operations on our LRUCache.
3.1. Put Operation
The first one is the put method:
public boolean put(K key, V value) {
    CacheElement<K, V> item = new CacheElement<K, V>(key, value);
    LinkedListNode<CacheElement<K, V>> newNode;
    if (this.linkedListNodeMap.containsKey(key)) {
        LinkedListNode<CacheElement<K, V>> node = this.linkedListNodeMap.get(key);
        newNode = doublyLinkedList.updateAndMoveToFront(node, item);
    } else {
        if (this.size() >= this.size) {
            this.evictElement();
        }
        newNode = this.doublyLinkedList.add(item);
    }
    if(newNode.isEmpty()) {
        return false;
    }
    this.linkedListNodeMap.put(key, newNode);
    return true;
 }
First, we find the key in the linkedListNodeMap that stores all keys/references. If the key exists, a cache hit happened, and it’s ready to retrieve CacheElement from the DoublyLinkedList and move it to the front.
After that, we update the linkedListNodeMap with a new reference and move it to the front of the list:
public LinkedListNode<T> updateAndMoveToFront(LinkedListNode<T> node, T newValue) {
    if (node.isEmpty() || (this != (node.getListReference()))) {
        return dummyNode;
    }
    detach(node);
    add(newValue);
    return head;
}
First, we check that the node is not empty. Also, the reference of the node must be the same as the list. After that, we detach the node from the list and add newValue to the list.
But if the key doesn’t exist, a cache miss happened, and we have to put a new key into the linkedListNodeMap. Before we can do that, we check the list size. If the list is full, we have to evict the least recently used element from the list.
3.2. Get Operation
Let’s take a look at our get operation:
public Optional<V> get(K key) {
   LinkedListNode<CacheElement<K, V>> linkedListNode = this.linkedListNodeMap.get(key);
   if(linkedListNode != null && !linkedListNode.isEmpty()) {
       linkedListNodeMap.put(key, this.doublyLinkedList.moveToFront(linkedListNode));
       return Optional.of(linkedListNode.getElement().getValue());
   }
   return Optional.empty();
 }
As we can see above, this operation is straightforward. First, we get the node from the linkedListNodeMap and, after that, check that it’s not null or empty.
The rest of the operation is the same as before, with just one difference on the moveToFront method:
public LinkedListNode<T> moveToFront(LinkedListNode<T> node) {
    return node.isEmpty() ? dummyNode : updateAndMoveToFront(node, node.getElement());
}
Now, let’s create some tests to verify that our cache works fine:
@Test
public void addSomeDataToCache_WhenGetData_ThenIsEqualWithCacheElement(){
    LRUCache<String,String> lruCache = new LRUCache<>(3);
    lruCache.put("1","test1");
    lruCache.put("2","test2");
    lruCache.put("3","test3");
    assertEquals("test1",lruCache.get("1").get());
    assertEquals("test2",lruCache.get("2").get());
    assertEquals("test3",lruCache.get("3").get());
}
Now, let’s test the eviction policy:
@Test
public void addDataToCacheToTheNumberOfSize_WhenAddOneMoreData_ThenLeastRecentlyDataWillEvict(){
    LRUCache<String,String> lruCache = new LRUCache<>(3);
    lruCache.put("1","test1");
    lruCache.put("2","test2");
    lruCache.put("3","test3");
    lruCache.put("4","test4");
    assertFalse(lruCache.get("1").isPresent());
 }
4. Dealing With Concurrency
So far, we assumed that our cache was just used in a single-threaded environment.
To make this container thread-safe, we need to synchronize all public methods. Let’s add a ReentrantReadWriteLock and ConcurrentHashMap into the previous implementation:
public class LRUCache<K, V> implements Cache<K, V> {
    private int size;
    private final Map<K, LinkedListNode<CacheElement<K,V>>> linkedListNodeMap;
    private final DoublyLinkedList<CacheElement<K,V>> doublyLinkedList;
    private final ReentrantReadWriteLock lock = new ReentrantReadWriteLock();

    public LRUCache(int size) {
        this.size = size;
        this.linkedListNodeMap = new ConcurrentHashMap<>(size);
        this.doublyLinkedList = new DoublyLinkedList<>();
    }
// ...
}
We prefer to use a reentrant read/write lock rather than declaring methods as synchronized because it gives us more flexibility in deciding when to use a lock on reading and writing.
4.1. writeLock
Now, let’s add a call to writeLock in our put method:
public boolean put(K key, V value) {
  this.lock.writeLock().lock();
   try {
       //..
   } finally {
       this.lock.writeLock().unlock();
   }
}
When we use writeLock on the resource, only the thread holding the lock can write to or read from the resource. So, all other threads that are either trying to read or write on the resource will have to wait until the current lock holder releases it.
This is very important to prevent a deadlock. If any of the operations inside the try block fails, we still release the lock before exiting the function with a finally block at the end of the method.
One of the other operations that needs writeLock is evictElement, which we used in the put method:
private boolean evictElement() {
    this.lock.writeLock().lock();
    try {
        //...
    } finally {
        this.lock.writeLock().unlock();
    }
}
4.2. readLock
And now it’s time to add a readLock call to the get method:
public Optional<V> get(K key) {
    this.lock.readLock().lock();
    try {
        //...
    } finally {
        this.lock.readLock().unlock();
    }
}
It seems exactly what we have done with the put method. The only difference is that we use a readLock instead of writeLock. So, this distinction between the read and write locks allows us to read the cache in parallel while it’s not being updated.
Now, let’s test our cache in a concurrent environment:
@Test
public void runMultiThreadTask_WhenPutDataInConcurrentToCache_ThenNoDataLost() throws Exception {
    final int size = 50;
    final ExecutorService executorService = Executors.newFixedThreadPool(5);
    Cache<Integer, String> cache = new LRUCache<>(size);
    CountDownLatch countDownLatch = new CountDownLatch(size);
    try {
        IntStream.range(0, size).<Runnable>mapToObj(key -> () -> {
            cache.put(key, "value" + key);
            countDownLatch.countDown();
       }).forEach(executorService::submit);
       countDownLatch.await();
    } finally {
        executorService.shutdown();
    }
    assertEquals(cache.size(), size);
    IntStream.range(0, size).forEach(i -> assertEquals("value" + i,cache.get(i).get()));
}
5. Creating a LinkedHashMap-Based LRU Cache
So far, we’ve explored what an LRU cache is and how to implement one from scratch using a HashMap and a DoublyLinkedList. While that approach gives us full control over the implementation details, Java’s LinkedHashMap class provides a much simpler way to build an LRU cache with minimal code.
Next, let’s implement an LRU cache based on LinkedHashMap.
5.1. Implementation
Java’s LinkedHashMap maintains insertion order by default, but it also supports access-order mode. When we enable access-order, the map automatically moves entries to the end whenever they’re accessed, making it perfect for LRU cache implementation.
Next, let’s create our LinkedHashMap-based LRU cache:
public class LinkedHashMapBasedLRUCache<K,V> extends LinkedHashMap<K,V> {
    private final int capacity;

    public LinkedHashMapBasedLRUCache(int capacity) {
        super(capacity, 0.75f, true);
        this.capacity = capacity;
    }

    @Override
    protected boolean removeEldestEntry(Map.Entry<K, V> eldest) {
        return size() > capacity;
    }
}
Now, let’s understand how it works.
First, we create our LinkedHashMapBasedLRUCache as a subclass of LinkedHashMap. This is because the implementation relies on two key features of LinkedHashMap:
- Access-order mode: We pass true as the third parameter to the super() constructor. This tells LinkedHashMap to reorder entries by access rather than by insertion order. Thus, every time we call get() or put() on an existing key, that entry moves to the end of the linked list.
- Automatic eviction: We override the removeEldestEntry() method that LinkedHashMap automatically calls after each put() operation. When this method returns true, the eldest entry (the head of the linked list, which is the least recently used) is automatically removed. Our implementation simply checks if the size exceeds capacity.
Next, let’s write a test to verify if our cache works as expected:
@Test
public void whenAddDataToTheCache_ThenLeastRecentlyDataWillEvict() {
    LinkedHashMapBasedLRUCache<String, String> lruCache = new LinkedHashMapBasedLRUCache<>(3);
    lruCache.put("1", "test1");
    lruCache.put("2", "test2");
    lruCache.put("3", "test3");
    lruCache.put("4", "test4");

    assertEquals(3, lruCache.size());

    assertFalse(lruCache.containsKey("1"));

    assertEquals("test2", lruCache.get("2"));
    assertEquals("test3", lruCache.get("3"));
    assertEquals("test4", lruCache.get("4"));
}
If we give it a run, the test passes.
The beauty of this approach is its simplicity compared to our custom implementation. We don’t need to manually maintain the DoublyLinkedList or handle complex pointer manipulations. LinkedHashMap handles all the heavy lifting while still providing O(1) time complexity for both get() and put() operations.
5.2. How to Make It Thread-Safe
Just like our custom implementation, this LinkedHashMap-based LRU cache is not thread-safe by default. This is because LinkedHashMap isn’t thread-safe. However, making it thread-safe is straightforward using Java’s Collections.synchronizedMap():
Map<K, V> threadSafeCache = Collections.synchronizedMap(
    new LinkedHashMapBasedLRUCache<>(capacity)
);
Next, let’s create a test to demonstrate how to use our LinkedHashMapBasedLRUCache in a concurrent environment:
@Test
public void whenPutDataInConcurrentToCache_ThenNoDataLost() throws Exception {
    final int size = 50;
    final ExecutorService executorService = Executors.newFixedThreadPool(50);
    Map<Integer, String> cache = Collections.synchronizedMap(new LinkedHashMapBasedLRUCache<>(size));
    CountDownLatch countDownLatch = new CountDownLatch(size);
    try {
        IntStream.range(0, size).<Runnable> mapToObj(key -> () -> {
            cache.put(key, "value" + key);
            countDownLatch.countDown();
        }).forEach(executorService::submit);
        countDownLatch.await();
    } finally {
        executorService.shutdown();
    }
    assertEquals(size, cache.size());
    IntStream.range(0, size)
      .forEach(i -> assertEquals("value" + i, cache.get(i)));
}
In this test, 50 threads concurrently write data to a LinkedHashMapBasedLRUCache wrapped by synchronizedMap(). The test passes if we run it. So, synchronizedMap() ensures our LinkedHashMapBasedLRUCache works in concurrent scenarios.
6. Conclusion
In this article, we learned what an LRU cache is and some of its most common features. Further, we implemented an LRU cache in Java using a HashMap and a DoublyLinkedList. Additionally, we covered concurrency in action using the lock mechanism.
Finally, we explored how to quickly implement an LRU cache based on LinkedHashMap. This approach is almost effortless because LinkedHashMap already provides the ordering mechanism we need.














