Creating a Kubernetes Admission Controller in Java
Last updated: January 8, 2024


Mocking is an essential part of unit testing, and the Mockito library makes it easy to write clean and intuitive unit tests for your Java code.
Get started with mocking and improve your application tests using our Mockito guide:
Handling concurrency in an application can be a tricky process with many potential pitfalls. A solid grasp of the fundamentals will go a long way to help minimize these issues.
Get started with understanding multi-threaded applications with our Java Concurrency guide:
Spring 5 added support for reactive programming with the Spring WebFlux module, which has been improved upon ever since. Get started with the Reactor project basics and reactive programming in Spring Boot:
Since its introduction in Java 8, the Stream API has become a staple of Java development. The basic operations like iterating, filtering, mapping sequences of elements are deceptively simple to use.
But these can also be overused and fall into some common pitfalls.
To get a better understanding on how Streams work and how to combine them with other language features, check out our guide to Java Streams:
Explore Spring Boot 3 and Spring 6 in-depth through building a full REST API with the framework:
Yes, Spring Security can be complex, from the more advanced functionality within the Core to the deep OAuth support in the framework.
I built the security material as two full courses - Core and OAuth, to get practical with these more complex scenarios. We explore when and how to use each feature and code through it on the backing project.
You can explore the course here:
Spring Data JPA is a great way to handle the complexity of JPA with the powerful simplicity of Spring Boot.
Get started with Spring Data JPA through the guided reference course:
Refactor Java code safely — and automatically — with OpenRewrite.
Refactoring big codebases by hand is slow, risky, and easy to put off. That’s where OpenRewrite comes in. The open-source framework for large-scale, automated code transformations helps teams modernize safely and consistently.
Each month, the creators and maintainers of OpenRewrite at Moderne run live, hands-on training sessions — one for newcomers and one for experienced users. You’ll see how recipes work, how to apply them across projects, and how to modernize code with confidence.
Join the next session, bring your questions, and learn how to automate the kind of work that usually eats your sprint time.
1. Introduction
After working for a while with Kubernetes, we’ll soon realize that there’s a lot of boilerplate code involved. Even for a simple service, we need to provide all required details, usually taking the form of a quite verbose YAML document.
Also, when dealing with several services deployed in a given environment, those YAML documents tend to contain a lot of repeated elements. For instance, we might want to add a given ConfigMap or some sidecar containers to all deployments.
In this article, we’ll explore how we can stick to the DRY principle and avoid all this repeated code using Kubernetes admission controllers.
2. What’s an Admission Controller?
Admission controllers are a mechanism used by Kubernetes to pre-process API requests after they’ve been authenticated but before they’re executed.
The API server process (kube-apiserver) already comes with several built-in controllers, each in charge of a given aspect of API processing.
AllwaysPullImage is a good example: This admission controller modifies pod creation requests, so the image pull policy becomes “always”, regardless of the informed value. The Kubernetes documentation contains the full list of the standard admission controllers.
Besides those built-in controllers, which actually run as part of the kubeapi-server process, Kubernetes also supports external admission controllers. In this case, the admission controller is just an HTTP service that processes requests coming from the API server.
In addition, those external admission controllers can be dynamically added and removed, hence the name dynamic admission controllers. This results in a processing pipeline that looks like this:
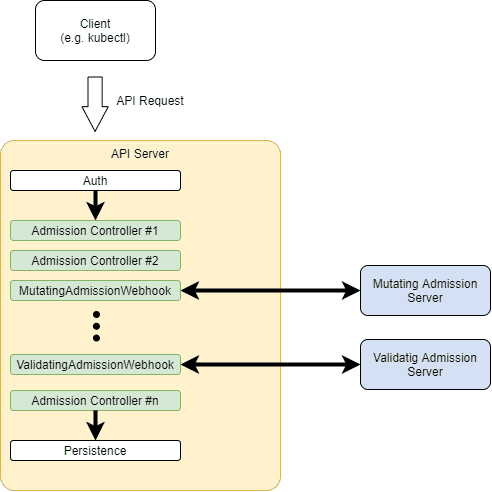
Here, we can see that the incoming API request, once authenticated, goes through each of the built-in admission controllers until it reaches the persistence layer.
3. Admission Controller Types
Currently, there are two types of admission controllers:
- Mutating admission controllers
- Validation admission controllers
As their names suggest, the main difference is the type of processing each does with an incoming request. Mutating controllers may modify a request before passing them downstream, whereas validation ones can only validate them.
An important point about those types is the order in which the API server executes them: mutating controllers come first, then validation controllers. This makes sense, as validation will only occur once we have the final request, possibly changed by any of the mutating controllers.
3.1. Admission Review Requests
The built-in admission controllers (mutating and validating) communicate with external admission controllers using a simple HTTP Request/Response pattern:
- Request: an AdmissionReview JSON object containing the API call to process in its request property
- Response: an AdmissionReview JSON object containing the result in its response property
Here’s an example of a request:
{
  "kind": "AdmissionReview",
  "apiVersion": "admission.k8s.io/v1",
  "request": {
    "uid": "c46a6607-129d-425b-af2f-c6f87a0756da",
    "kind": {
      "group": "apps",
      "version": "v1",
      "kind": "Deployment"
    },
    "resource": {
      "group": "apps",
      "version": "v1",
      "resource": "deployments"
    },
    "requestKind": {
      "group": "apps",
      "version": "v1",
      "kind": "Deployment"
    },
    "requestResource": {
      "group": "apps",
      "version": "v1",
      "resource": "deployments"
    },
    "name": "test-deployment",
    "namespace": "test-namespace",
    "operation": "CREATE",
    "object": {
      "kind": "Deployment",
      ... deployment fields omitted
    },
    "oldObject": null,
    "dryRun": false,
    "options": {
      "kind": "CreateOptions",
      "apiVersion": "meta.k8s.io/v1"
    }
  }
}
Among the available fields, some are particularly important:
- operation: This tells whether this request will create, modify or delete a resource
- object: The resource’s specification details being processed.
- oldObject: When modifying or deleting a resource, this field contains the existing resource
The expected response is also an AdmissionReview JSON object, with a response field instead response:
{
  "apiVersion": "admission.k8s.io/v1",
  "kind": "AdmissionReview",
  "response": {
    "uid": "c46a6607-129d-425b-af2f-c6f87a0756da",
    "allowed": true,
    "patchType": "JSONPatch",
    "patch": "W3sib3A ... Base64 patch data omitted"
  }
}
Let’s dissect the response object’s fields:
- uid: the value of this field must match the corresponding field present in the incoming request field
- allowed: The outcome of the review action. true means that the API call processing may proceed to the next step
- patchType: Valid only for mutating admission controllers. Indicates the patch type returned by the AdmissionReview request
- patch: Patches to apply in the incoming object. Details on next section
3.2. Patch Data
The patch field present in the response from a mutating admission controller tells the API server what needs to be changed before the request can proceed. Its value is a Base64-encoded JSONPatch object containing an array of instructions that the API server uses to modify the incoming API call’s body:
[
  {
    "op": "add",
    "path": "/spec/template/spec/volumes/-",
    "value":{
      "name": "migration-data",
      "emptyDir": {}
    }
  }
]
In this example, we have a single instruction that appends a volume to the volumes array of the deployment specification. A common issue when dealing with patches is the fact that there’s no way to add an element to an existing array unless it already exists in the original object. This is particularly annoying when dealing with Kubernetes API objects, as the most common ones (e.g., deployments) include optional arrays.
For instance, the previous example is valid only when the incoming deployment already has at least one volume. If this was not the case, we’d have to use a slightly different instruction:
[
  {
    "op": "add",
    "path": "/spec/template/spec/volumes",
    "value": [{
      "name": "migration-data",
      "emptyDir": {}
    }]
  }
]
Here, we’ve defined a new volumes field whose value is an array containing the volume definition. Previously, the value was an object since this is what we were appending to the existing array.
4. Sample Use Case: Wait-For-It
Now that we have a basic understanding of the expected behavior of an admission controller, let’s write a simple example. A common issue in Kubernetes when is managing runtime dependencies, especially when using a microservices architecture. For instance, if a particular microservice requires access to a database, there’s no point in starting if the former is offline.
To address issues like this, we can use an initContainer with our pods to do this check before starting the main container. An easy way to do that is using the popular wait-for-it shell script, also available as a docker image.
The script takes a hostname and port parameters and tries to connect to it. If the test succeeds, the container exits with a successful status code, and the pod initialization proceeds. Otherwise, it will fail, and the associated controller will keep on retrying according to the defined policy. The cool thing about externalizing this pre-flight check is that any associated Kubernetes service will notice that the failure. Consequently, no requests will be sent to it, potentially improving overall resiliency.
4.1. The Case for Admission Controller
This is what a typical deployment with the wait-for-it init container added to it:
apiVersion: apps/v1 kind: Deployment metadata: name: frontend labels: app: nginx spec: replicas: 1 selector: matchLabels: app: nginx template: metadata: labels: app: nginx spec: initContainers: - name: wait-backend image: willwill/wait-for-it args: -www.google.com:80containers: - name: nginx image: nginx:1.14.2 ports: - containerPort: 80
While not that complicated (at least in this simple example), adding the relevant code to every deployment has some drawbacks. In particular, we’re imposing on deployment authors the burden to specify exactly how a dependency check should be done. Instead, a better experience would require only defining what should be tested.
Enter our admission controller. To address this use case, we’ll write a mutating admission controller that looks for the presence of a particular annotation in a resource and adds the initContainer to it if present. This is what an annotated deployment spec would look like:
apiVersion: apps/v1
kind: Deployment
metadata:
  name: frontend
  labels:
    app: nginx
  annotations:
    com.baeldung/wait-for-it: "www.google.com:80"
spec:
  replicas: 1
  selector:
    matchLabels:
      app: nginx
  template:
    metadata:
      labels:
        app: nginx
    spec:
      containers:
      - name: nginx
        image: nginx:1.14.2
        ports:
          - containerPort: 80
Here, we’re using the annotation com.baeldung/wait-for-it to indicate the host and port we must test. What’s important, though, is nothing is telling us how the test should be done. In theory, we could change the test in any way while keeping the deployment spec unchanged.
Now, let’s move on to the implementation.
4.2. Project Structure
As discussed before, the external admission controller is just a simple HTTP service. As such, we’ll create a Spring Boot project as our basic structure. For this example, this is all we need is the Spring Web Reactive starter but, for a real-world application, it might also be useful to add features like the Actuator and/or some Cloud Config dependencies.
4.3. Handling Requests
The entry point for admission request is a simple Spring REST controller that delegates the processing of the incoming payload to a service:
@RestController
@RequiredArgsConstructor
public class AdmissionReviewController {

    private final AdmissionService admissionService;

    @PostMapping(path = "/mutate")
    public Mono<AdmissionReviewResponse> processAdmissionReviewRequest(@RequestBody Mono<ObjectNode> request) {
        return request.map((body) -> admissionService.processAdmission(body));
    }
}
Here, we’re using an ObjectNode as the input parameter. This means that we’ll try to process any well-formed JSON sent by the API Server. The reason for this lax approach is, as of this writing, there’s still no official schema published for this payload. Using a non-structured type, in this case, implies some extra work, but ensures our implementation deals a bit better with any extra fields that a particular Kubernetes implementation or version decides to throw at us.
Also, given that the request object can be any of the available resources in the Kubernetes API, adding too much structure here would not be that helpful.
4.4. Modifying Admission Requests
The meat of the processing happens in the AdmissionService class. This is a @Component class injected into the controller with a single public method: processAdmission. This method processes the incoming review request and returns the appropriate response.
The full code is available online and basically consists of a long sequence of JSON manipulations. Most of them are trivial, but some excerpts deserve some explanation:
if (admissionControllerProperties.isDisabled()) {
    data = createSimpleAllowedReview(body);
} else if (annotations.isMissingNode()) {
    data = createSimpleAllowedReview(body);
} else {
    data = processAnnotations(body, annotations);
}
First, why add a “disabled” property? Well, it turns out that, in some highly controlled environments, it might be much easier to change a configuration parameter of an existing deployment than removing and/or updating it. Since we’re using the @ConfigurationProperties mechanism to populate this property, its actual value can come from a variety of sources.
Next, we test for missing annotations, which we’ll treat as a sign that we should leave the deployment unchanged. This approach ensures the “opt-in” behavior that we want in this case.
Another interesting snippet comes from the JSONPatch generation logic in the injectInitContainer() method:
JsonNode maybeInitContainers = originalSpec.path("initContainers");
ArrayNode initContainers =
maybeInitContainers.isMissingNode() ?
  om.createArrayNode() : (ArrayNode) maybeInitContainers;
ArrayNode patchArray = om.createArrayNode();
ObjectNode addNode = patchArray.addObject();

addNode.put("op", "add");
addNode.put("path", "/spec/template/spec/initContainers");
ArrayNode values = addNode.putArray("values");
values.addAll(initContainers);
As there’s no guarantee that the incoming specification contains the initContainers field, we must handle two cases: they may be either missing or present. If it is missing, we use an ObjectMapper instance (om in the snippet above) to create a new ArrayNode. Otherwise, we just use the incoming array.
In doing so, we can use a single “add” patch instruction. Despite its name, its behavior is such that the field either will be created or replace an existing field with the same name. The value field is always an array, which includes the (possibly empty) original initContainers array. The last step adds the actual wait-for-it container:
ObjectNode wfi = values.addObject();
wfi.put("name", "wait-for-it-" + UUID.randomUUID())
// ... additional container fields added (omitted)
As container names must be unique within a pod, we just add a random UUID to a fixed prefix. This avoids any name clash with existing containers.
4.5. Deployment
The final step to start using our admission controller is to deploy it to a target Kubernetes cluster. As expected, this requires writing some YAML or using a tool like Terraform. Either way, those are the resources we need to create:
- A Deployment to run our admission controller. It’s a good idea to spin more than one replica of this service, as failures may block any new deployments to happen
- A Service to route requests from the API Server to an available pod running the admission controller
- A MutatingWebhookConfiguration resource that describes which API calls should be routed to our Service
For instance, let’s say that we’d like Kubernetes to use our admission controller every time a deployment is created or updated. In the MutatingWebhookConfiguration documents we’ll see a rule definition like this:
apiVersion: admissionregistration.k8s.io/v1
kind: MutatingWebhookConfiguration
metadata:
  name: "wait-for-it.baeldung.com"
webhooks:
- name: "wait-for-it.baeldung.com"
  rules:
  - apiGroups:   ["*"]
    apiVersions: ["*"]
    operations:  ["CREATE","UPDATE"]
    resources:   ["deployments"]
  ... other fields omitted
An important point about our server: Kubernetes requires HTTPS to communicate with external admission controllers. This means we need to provide our SpringBoot server with a proper certificate and private key. Please check the Terraform script used to deploy the sample admission controller to see one way to do this.
Also, a quick tip: Although not mentioned anywhere in the documentation, some Kubernetes implementations (e.g. GCP) require the usage of port 443, so we need to change the SpringBoot HTTPS port from its default value (8443).
4.6. Testing
Once we have the deployment artifacts ready, it’s finally time to test our admission controller in an existing cluster. In our case, we’re using Terraform to perform the deployment so all we have to do is an apply:
$ terraform apply -auto-approveOnce completed, we can check the deployment and admission controller status using kubectl:
$ kubectl get mutatingwebhookconfigurations
NAME                               WEBHOOKS   AGE
wait-for-it-admission-controller   1          58s
$ kubectl get deployments wait-for-it-admission-controller
NAME                               READY   UP-TO-DATE   AVAILABLE   AGE
wait-for-it-admission-controller   1/1     1            1           10m
Now, let’s create a simple nginx deployment including our annotation:
$ kubectl apply -f nginx.yaml
deployment.apps/frontend created
We can check the associated logs to see that the wait-for-it init container was indeed injected:
 $ kubectl logs --since=1h --all-containers deployment/frontend
wait-for-it.sh: waiting 15 seconds for www.google.com:80
wait-for-it.sh: www.google.com:80 is available after 0 seconds
Just to be sure, let’s check the deployment’s YAML:
$ kubectl get deployment/frontend -o yaml
apiVersion: apps/v1
kind: Deployment
metadata:
  annotations:
    com.baeldung/wait-for-it: www.google.com:80
    deployment.kubernetes.io/revision: "1"
		... fields omitted
spec:
  ... fields omitted
  template:
	  ... metadata omitted
    spec:
      containers:
      - image: nginx:1.14.2
        name: nginx
				... some fields omitted
      initContainers:
      - args:
        - www.google.com:80
        image: willwill/wait-for-it
        imagePullPolicy: Always
        name: wait-for-it-b86c1ced-71cf-4607-b22b-acb33a548bb2
	... fields omitted
      ... fields omitted
status:
  ... status fields omitted
This output shows the initContainer that our admission controller added to the deployment.
5. Conclusion
In this article, we’ve covered how to create a Kubernetes admission controller in Java and deploy it to an existing cluster.


