

Mocking is an essential part of unit testing, and the Mockito library makes it easy to write clean and intuitive unit tests for your Java code.
Get started with mocking and improve your application tests using our Mockito guide:
Handling concurrency in an application can be a tricky process with many potential pitfalls. A solid grasp of the fundamentals will go a long way to help minimize these issues.
Get started with understanding multi-threaded applications with our Java Concurrency guide:
Spring 5 added support for reactive programming with the Spring WebFlux module, which has been improved upon ever since. Get started with the Reactor project basics and reactive programming in Spring Boot:
Since its introduction in Java 8, the Stream API has become a staple of Java development. The basic operations like iterating, filtering, mapping sequences of elements are deceptively simple to use.
But these can also be overused and fall into some common pitfalls.
To get a better understanding on how Streams work and how to combine them with other language features, check out our guide to Java Streams:
Explore Spring Boot 3 and Spring 6 in-depth through building a full REST API with the framework:
Yes, Spring Security can be complex, from the more advanced functionality within the Core to the deep OAuth support in the framework.
I built the security material as two full courses - Core and OAuth, to get practical with these more complex scenarios. We explore when and how to use each feature and code through it on the backing project.
You can explore the course here:
Spring Data JPA is a great way to handle the complexity of JPA with the powerful simplicity of Spring Boot.
Get started with Spring Data JPA through the guided reference course:
Refactor Java code safely — and automatically — with OpenRewrite.
Refactoring big codebases by hand is slow, risky, and easy to put off. That’s where OpenRewrite comes in. The open-source framework for large-scale, automated code transformations helps teams modernize safely and consistently.
Each month, the creators and maintainers of OpenRewrite at Moderne run live, hands-on training sessions — one for newcomers and one for experienced users. You’ll see how recipes work, how to apply them across projects, and how to modernize code with confidence.
Join the next session, bring your questions, and learn how to automate the kind of work that usually eats your sprint time.
1. Introduction
In this tutorial, we’ll show how to add a custom provider to Keycloak, a popular open-source identity management solution, so we can use it with existing and/or non-standard user stores.
2. Overview of Custom Providers with Keycloak
Out-of-the-box, Keycloak provides a range of standard-based integrations based on protocols like SAML, OpenID Connect, and OAuth2. While this built-in functionality is quite powerful, sometimes it’s not enough. A common requirement, especially when legacy systems are involved, is to integrate users from those systems into Keycloak. To accommodate for this and similar integration scenarios, Keycloak supports the concept of custom providers.
Custom providers play a key role in Keycloak’s architecture. For every major functionality, like the login flow, authentication, authorization, there’s a corresponding Service Provider Interface. This approach allows us to plug custom implementations for any of those services, which Keycloak will then use as it were one of its own.
2.1. Custom Provider Deployment and Discovery
In its simplest form, a custom provider is just a standard jar file containing one or more service implementations. At startup, Keycloak will scan its classpath and pick all available providers using the standard java.util.ServiceLoader mechanism. This means all we have to do is to create a file named after the specific service interface we want to provide in the META-INF/services folder of our jar and put the fully qualified name of our implementation in it.
But, what kind of services can we add to Keycloak? If we go to the server info page, available at Keycloak’s management console, we’ll see quite a lot of them:
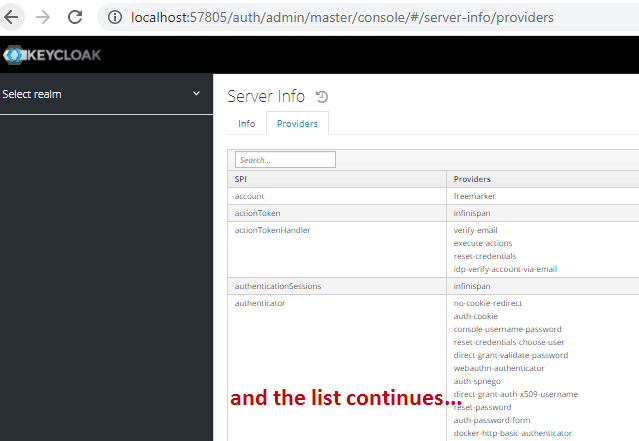
In this picture, the left column corresponds to a given Service Provider Interface (SPI, for short), and the right one shows the available providers for that particular SPI.
2.2. Available SPIs
Keycloak’s main documentation lists the following SPIs:
- org.keycloak.authentication.AuthenticatorFactory: Defines actions and interaction flows required to authenticate a user or client application
- org.keycloak.authentication.actiontoken.ActionTokenHandlerFactory: Allows us to create custom actions that Keycloak will perform upon reaching the /auth/realms/master/login-actions/action-token endpoint. As an example, this mechanism is behind the standard password reset flow. The link included in the e-mail includes such an action token
- org.keycloak.events.EventListenerProviderFactory: Creates a provider that listens for Keycloak events. The EventType Javadoc page contains a list of the available events custom a provider can handle. A typical use for using this SPI would be creating an audit database
- org.keycloak.adapters.saml.RoleMappingsProvider: Maps SAML roles received from an external identity provider into Keycloak’s ones. This mapping very flexible, allowing us to rename, remove, and/or add roles in the context of a given Realm
- org.keycloak.storage.UserStorageProviderFactory: Allows Keycloak to access custom user stores
- org.keycloak.vault.VaultProviderFactory: Allows us to use a custom vault to store Realm-specific secrets. Those can include information like encryption keys, database credentials, etc.
Now, this list by no means covers all the available SPIs: they’re just the most well documented and, in practice, most likely to require customization.
3. Custom Provider Implementation
As we’ve mentioned in this article’s introduction, our provider example will allow us to use Keycloak with a read-only custom user repository. For instance, in our case, this user repository is just a regular SQL table with a few attributes:
create table if not exists users(
    username varchar(64) not null primary key,
    password varchar(64) not null,
    email varchar(128),
    firstName varchar(128) not null,
    lastName varchar(128) not null,
    birthDate DATE not null
);
To support this custom user store, we have to implement the UserStorageProviderFactory SPI and deploy it into an existing Keycloak instance.
A key point here is the read-only part. By that, we mean that users will be able to use their credentials to log in to Keycloak, but not to change any information in the custom store, including their passwords. This, however, is not a Keycloak limitation, as it actually supports bi-directional updates. The built-in LDAP provider is a good example of a provider that supports this functionality.
3.1. Project Setup
Our custom provider project is just a regular Maven project that creates a jar file. To avoid a time-consuming compile-deploy-restart cycle of our provider into a regular Keycloak instance, we’ll use a nice trick: embed Keycloak in our project as a test-time dependency.
We’ve already covered how to embed Keycloack in a SpringBoot application, so we won’t go into details on how it’s done here. By adopting this technique, we’ll get faster start times, and hot reload capabilities, providing a smoother developer experience. Here, we’ll reuse the example SpringBoot application to run our tests directly from our custom provider, so we’ll add it in as a test dependency:
<dependency>
    <groupId>org.keycloak</groupId>
    <artifactId>keycloak-model-legacy</artifactId>
    <version>22.0.0</version>
</dependency>
<dependency>
<groupId>com.baeldung</groupId>
<artifactId>oauth-authorization-server</artifactId>
<version>0.1.0-SNAPSHOT</version>
<scope>test</scope>
</dependency>
We’re using the 22.0.0 version for the keycloak-model-legacy Keycloak dependency.
The oauth-authorization-server dependency, however, must be built locally from Baeldung’s Spring Security OAuth repository.
3.2. UserStorageProviderFactory Implementation
Let’s start our provider by creating the UserStorageProviderFactory implementation and make it available for discovery by Keycloak.
This interface contains eleven methods, but we need to implement just two of them:
- getId(): Returns a unique identifier for this provider that Keycloak will show on its administration page.
- create(): Returns the actual Provider implementation.
Keycloak invokes the create() method for every transaction, passing a KeycloakSession and a ComponentModel as arguments. Here, a transaction means any action that requires access to the user store. The prime example is the login flow: at some point, Keycloak will invoke every configured user storage for a given Realm to validate a credential. Therefore, we should avoid doing any costly initialization actions at this point, as the create() method is called all the time.
That said, the implementation is quite trivial:
public class CustomUserStorageProviderFactory
  implements UserStorageProviderFactory<CustomUserStorageProvider> {
    @Override
    public String getId() {
        return "custom-user-provider";
    }

    @Override
    public CustomUserStorageProvider create(KeycloakSession ksession, ComponentModel model) {
        return new CustomUserStorageProvider(ksession,model);
    }
}
We’ve chosen “custom-user-provider” for our provider id, and our create() implementation simply returns a new instance of our UserStorageProvider implementation. Now, we must not forget to create a service definition file and add it to our project. This file should be named org.keycloak.storage.UserStorageProviderFactory and placed in the META-INF/services folder of our final jar.
Since we’re using a standard Maven project, this means we’ll add it in the src/main/resources/META-INF/services folder:
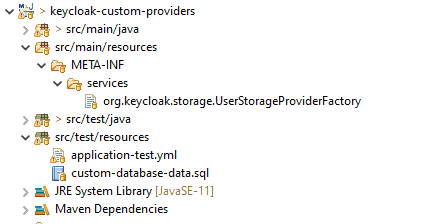
The content of this file is just the fully qualified name of the SPI implementation:
# SPI class implementation
com.baeldung.auth.provider.user.CustomUserStorageProviderFactory
3.3. UserStorageProvider Implementation
At first sight, the UserStorageProvider implementation doesn’t look as we’d expect. It contains just a few callback methods, none of which relates to actual users. The reason for this is that Keycloak expects our provider to also implement other mix-in interfaces that support specific user management aspects.
The full list of available interfaces is available in Keycloak’s documentation, where they’re referred to as Provider Capabilities. For a simple, read-only provider, the only interface we need to implement is UserLookupProvider. It provides just lookup capabilities, meaning that Keycloak will automatically import a user to its internal database when required. The original user’s password, however, will not be used for authentication. To do so, we also need to implement CredentialInputValidator.
Finally, a common requirement is the ability to display the existing users in our custom store in Keycloak’s admin interface. This requires that we implement yet another interface: UserQueryProvider. This one adds some query methods and acts as a DAO for our store.
So, given those requirements, this is how our implementation should look:
public class CustomUserStorageProvider implements UserStorageProvider,
  UserLookupProvider,
  CredentialInputValidator,
  UserQueryProvider {

    // ... private members omitted

    public CustomUserStorageProvider(KeycloakSession ksession, ComponentModel model) {
      this.ksession = ksession;
      this.model = model;
    }

    // ... implementation methods for each supported capability
}
Note that we’re saving the values passed to our constructor. We’ll later see how they play an important role in our implementation.
3.4. UserLookupProvider Implementation
Keycloak uses the methods in this interface to recover a UserModel instance given its id, username, or email. The id, in this case, is the unique identifier for this user, formatted as this: ‘f:’ unique_id ‘:’ external_id
- ‘f:’ is just a fixed prefix that indicates that this is a federated user
- unique_id is Keycloak’s id for the user
- external_id is the user identifier used by a given user store. In our case, that would be the value of the username column
Let’s go ahead and implement this interface’s methods, starting with getUserByUsername():
@Override
public UserModel getUserByUsername(String username, RealmModel realm) {
    try ( Connection c = DbUtil.getConnection(this.model)) {
        PreparedStatement st = c.prepareStatement(
          "select " +
          "  username, firstName, lastName, email, birthDate " +
          "from users " +
          "where username = ?");
        st.setString(1, username);
        st.execute();
        ResultSet rs = st.getResultSet();
        if ( rs.next()) {
            return mapUser(realm,rs);
        }
        else {
            return null;
        }
    }
    catch(SQLException ex) {
        throw new RuntimeException("Database error:" + ex.getMessage(),ex);
    }
}
As expected, this is a simple database query using the provided username to lookup its information. There are two interesting points that need some explanation: DbUtil.getConnection() and mapUser().
The DbUtil is a helper class that somehow returns a JDBC Connection from information contained in the ComponentModel that we’ve acquired in the constructor. We’ll cover its details later on.
As for mapUser(), its job is to map database records containing user data to a UserModel instance. A UserModel represents a user entity, as seen by Keycloak, and has methods to read its attributes. Our implementation of this interface, available here, extends the AbstractUserAdapter class provided by Keycloak. We’ve also added a Builder inner class to our implementation, so mapUser() can create UserModel instances easily:
private UserModel mapUser(RealmModel realm, ResultSet rs) throws SQLException {
    CustomUser user = new CustomUser.Builder(ksession, realm, model, rs.getString("username"))
      .email(rs.getString("email"))
      .firstName(rs.getString("firstName"))
      .lastName(rs.getString("lastName"))
      .birthDate(rs.getDate("birthDate"))
      .build();
    return user;
}
Similarly, the other methods basically follow the same pattern described above, so we’ll not cover them in detail. Please refer to the provider’s code and check all the getUserByXXX and searchForUser methods.
3.5. Getting a Connection
Now, let’s take a look at the DbUtil.getConnection() method:
public class DbUtil {

    public static Connection getConnection(ComponentModel config) throws SQLException{
        String driverClass = config.get(CONFIG_KEY_JDBC_DRIVER);
        try {
            Class.forName(driverClass);
        }
        catch(ClassNotFoundException nfe) {
           // ... error handling omitted
        }

        return DriverManager.getConnection(
          config.get(CONFIG_KEY_JDBC_URL),
          config.get(CONFIG_KEY_DB_USERNAME),
          config.get(CONFIG_KEY_DB_PASSWORD));
    }
}
We can see that ComponentModel is where all required parameters to create are. But, how Keycloak knows which parameters our custom provider requires? To answer this question, we need to go back to CustomUserStorageProviderFactory.
3.6. Configuration Metadata
The basic contract for CustomUserStorageProviderFactory, UserStorageProviderFactory, contains methods that allow Keycloak to query for configuration properties metadata and, also important, to validate assigned values. In our case, we’ll define a few configuration parameters required to establish a JDBC Connection. Since this metadata is static, we’ll create it in the constructor, and getConfigProperties() will simply return it.
public class CustomUserStorageProviderFactory
  implements UserStorageProviderFactory<CustomUserStorageProvider> {
    protected final List<ProviderConfigProperty> configMetadata;

    public CustomUserStorageProviderFactory() {
        configMetadata = ProviderConfigurationBuilder.create()
          .property()
            .name(CONFIG_KEY_JDBC_DRIVER)
            .label("JDBC Driver Class")
            .type(ProviderConfigProperty.STRING_TYPE)
            .defaultValue("org.h2.Driver")
            .helpText("Fully qualified class name of the JDBC driver")
            .add()
          // ... repeat this for every property (omitted)
          .build();
    }
    // ... other methods omitted

    @Override
    public List<ProviderConfigProperty> getConfigProperties() {
        return configMetadata;
    }

    @Override
    public void validateConfiguration(KeycloakSession session, RealmModel realm, ComponentModel config)
      throws ComponentValidationException {
       try (Connection c = DbUtil.getConnection(config)) {
           c.createStatement().execute(config.get(CONFIG_KEY_VALIDATION_QUERY));
       }
       catch(Exception ex) {
           throw new ComponentValidationException("Unable to validate database connection",ex);
       }
    }
}
In validateConfiguration(), we’ll get everything we need to validate the parameters passed on when our provided was added to a Realm. In our case, we use this information to establish a database connection and execute the validation query. If something goes wrong, we just throw a ComponentValidationException, signaling Keycloak that the parameters are invalid.
Moreover, although not shown here, we can also use the onCreated() method to attach logic that will be executed every time an administrator adds our provider to a Realm. This allows us to execute one-time initialization-time logic to prepare our store for use, which may be necessary for certain scenarios. For instance, we could use this method to modify our database and add a column to record whether a given user already used Keycloak.
3.7. CredentialInputValidator Implementation
This interface contains methods that validate user credentials. Since Keycloak supports different types of credentials (password, OTP tokens, X.509 certificates, etc.), our provider must inform if it supports a given type in supportsCredentialType() and is configured for it in the context of a given Realm in isConfiguredFor().
In our case, we just have support to passwords and, since they do not require any extra configuration, we can delegate the later method to the former:
@Override
public boolean supportsCredentialType(String credentialType) {
    return PasswordCredentialModel.TYPE.endsWith(credentialType);
}

@Override
public boolean isConfiguredFor(RealmModel realm, UserModel user, String credentialType) {
    return supportsCredentialType(credentialType);
}
The actual password validation happens in the isValid() method:
@Override
public boolean isValid(RealmModel realm, UserModel user, CredentialInput credentialInput) {
    if(!this.supportsCredentialType(credentialInput.getType())) {
        return false;
    }
    StorageId sid = new StorageId(user.getId());
    String username = sid.getExternalId();

    try (Connection c = DbUtil.getConnection(this.model)) {
        PreparedStatement st = c.prepareStatement("select password from users where username = ?");
        st.setString(1, username);
        st.execute();
        ResultSet rs = st.getResultSet();
        if ( rs.next()) {
            String pwd = rs.getString(1);
            return pwd.equals(credentialInput.getChallengeResponse());
        }
        else {
            return false;
        }
    }
    catch(SQLException ex) {
        throw new RuntimeException("Database error:" + ex.getMessage(),ex);
    }
}
Here, there are a couple of points worth discussing. First, notice how we’re extracting the external id from the UserModel, using a StorageId object initialized from Keycloak’s id. We could use the fact that this id has a well-known format and extract the username from there, but it’s better to play safe here and let this knowledge encapsulated in a Keycloak-provided class.
Next, there’s the actual password validation. For our simplistic and, granted, very much insecure database, password checking is trivial: just compare the database value with the user-supplied value, available through getChallengeResponse(), and we’re done. Of course, a real-world provider would require some more steps, such as generating a hash informed password and salt value from the database and compare hashes.
Finally, user stores usually have some lifecycle associated with passwords: maximum age, blocked and/or inactive status, and so on. Regardless, when implementing a provider, the isValid() method is the place to add this logic.
3.8. UserQueryProvider Implementation
The UserQueryProvider capability interface tells Keycloak that our provider can search users in its store. This comes in handy as, by supporting this capability, we’ll be able to see users in the admin console.
The methods of this interface include getUsersCount(), to get the total number of users in the store, and several getXXX() and searchXXX() methods. This query interface supports looking up not only users but also groups, which we’ll not cover this time.
As the implementation of those methods is quite similar, let’s take a look at just one of them, searchForUser():
@Override
public Stream<UserModel> searchForUserStream(RealmModel realm, String search, Integer firstResult, Integer maxResults) {
    try (Connection c = DbUtil.getConnection(this.model)) {
        PreparedStatement st = c.prepareStatement(
          "select username, firstName, lastName, email, birthDate from users where username like ? order by username limit ? offset ?");
        st.setString(1, search);
        st.setInt(2, maxResults);
        st.setInt(3, firstResult);
        st.execute();
        ResultSet rs = st.getResultSet();
        List<UserModel> users = new ArrayList<>();
        while(rs.next()) {
            users.add(mapUser(realm,rs));
        }
        return users.stream();
    }
    catch(SQLException ex) {
        throw new RuntimeException("Database error:" + ex.getMessage(),ex);
    }
}
As we can see, there’s nothing special here: just regular JDBC code. An implementation note worth mentioning: UserQueryProvider methods usually come in paged and non-paged versions. Since a user store can potentially have a large number of records, the non-paged versions should simply delegate to the paged versions, using a sensible default. Even better, we can add a configuration parameter that defines what a “sensible default” is.
4. Testing
Now that we’ve implemented our provider, it’s time to test it locally using an embedded Keycloak instance. The project’s code contains a live test class that we’ve used to bootstrap the Keycloak and custom user database and then just print the access URLs on the console before sleeping for one hour.
Using this setup, we can verify that our custom provider works as intended simply by opening the printed URL in a browser:
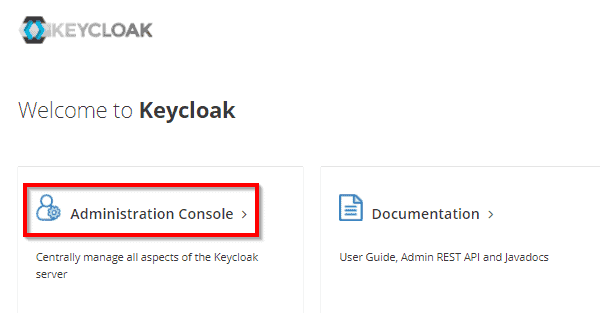
To access the administration console, we’ll use the administrator credentials, which we can get by looking at the application-test.yml file. Once logged in, let’s navigate to the “Server Info” page:

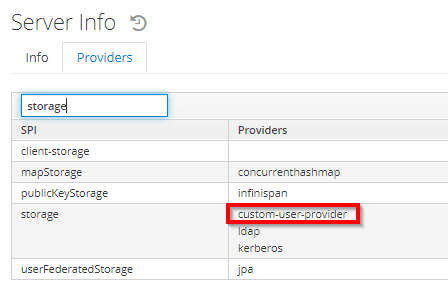
On the “Providers” tab, we can see our custom provider displayed alongside other built-in storage providers:
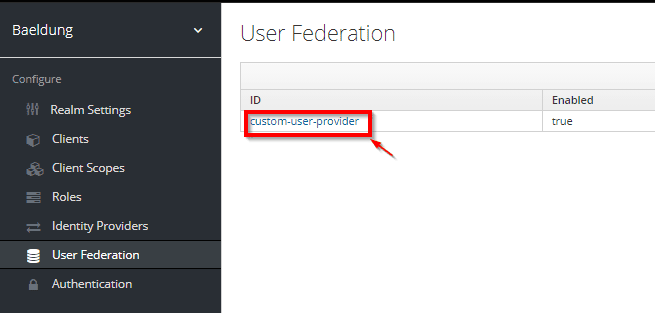
We can also check that the Baeldung realm is already using this provider. For this, we can select it on the top-left drop-down menu and then navigate to the User Federation page:
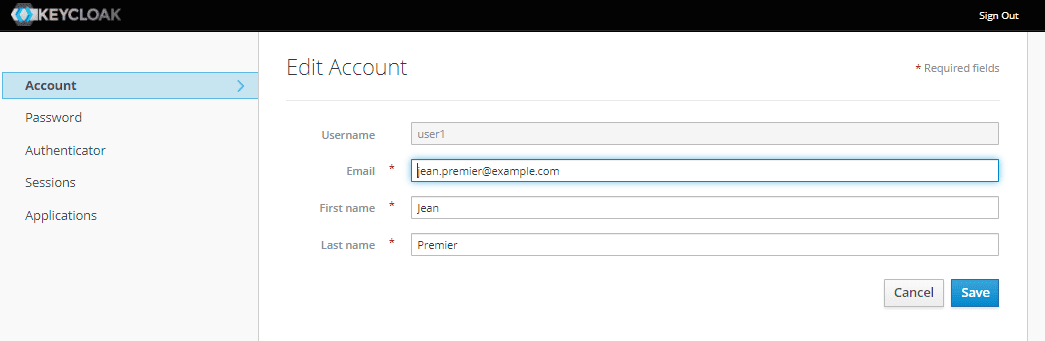
Next, let’s test an actual login into this realm. We’ll use the realm’s account management page, where a user can manage its data. Our Live Test will print this URL before going into sleep, so we can just copy it from the console and paste it into the browser’s address bar.
The test data contains three users: user1, user2, and user3. The password for all of them is the same: “changeit”. Upon successful login, we’ll see the account management page displaying the imported user’s data:
However, if we try to modify any data, we’ll get an error. This is expected, as our provider is read-only, so Keycloak doesn’t allow to modify it. For now, we’ll leave it as is since supporting bi-directional synchronization is beyond the scope of this article.
5. Conclusion
In this article, we’ve shown how to create a custom provider for Keycloak, using a User Storage Provider as a concrete example.


