

Mocking is an essential part of unit testing, and the Mockito library makes it easy to write clean and intuitive unit tests for your Java code.
Get started with mocking and improve your application tests using our Mockito guide:
Handling concurrency in an application can be a tricky process with many potential pitfalls. A solid grasp of the fundamentals will go a long way to help minimize these issues.
Get started with understanding multi-threaded applications with our Java Concurrency guide:
Spring 5 added support for reactive programming with the Spring WebFlux module, which has been improved upon ever since. Get started with the Reactor project basics and reactive programming in Spring Boot:
Since its introduction in Java 8, the Stream API has become a staple of Java development. The basic operations like iterating, filtering, mapping sequences of elements are deceptively simple to use.
But these can also be overused and fall into some common pitfalls.
To get a better understanding on how Streams work and how to combine them with other language features, check out our guide to Java Streams:
Explore Spring Boot 3 and Spring 6 in-depth through building a full REST API with the framework:
Yes, Spring Security can be complex, from the more advanced functionality within the Core to the deep OAuth support in the framework.
I built the security material as two full courses - Core and OAuth, to get practical with these more complex scenarios. We explore when and how to use each feature and code through it on the backing project.
You can explore the course here:
Spring Data JPA is a great way to handle the complexity of JPA with the powerful simplicity of Spring Boot.
Get started with Spring Data JPA through the guided reference course:
Refactor Java code safely — and automatically — with OpenRewrite.
Refactoring big codebases by hand is slow, risky, and easy to put off. That’s where OpenRewrite comes in. The open-source framework for large-scale, automated code transformations helps teams modernize safely and consistently.
Each month, the creators and maintainers of OpenRewrite at Moderne run live, hands-on training sessions — one for newcomers and one for experienced users. You’ll see how recipes work, how to apply them across projects, and how to modernize code with confidence.
Join the next session, bring your questions, and learn how to automate the kind of work that usually eats your sprint time.
1. Introduction
In this article, we’re going to have a look at property-based testing. We’ll see both property-based testing and how to do it in Java with the jqwik library.
2. Parameterised Testing
Before looking at property-based testing, let’s briefly look at parameterized testing. Parameterized testing is where we can write a single test function but then call it with many different parameters. For example:
@ParameterizedTest
@CsvSource({"4,2,2", "6,2,3", "6,3,2"})
void testIntegerDivision(int x, int y, int expected) {
    int answer = calculator.divide(x, y);
    assertEquals(expected, answer);
}
This lets us test many different sets of inputs with relative ease. That can allow us to determine an appropriate set of test cases to look at and run those tests. The challenge then becomes deciding what these test cases should be. Obviously, we can’t test every single possible set of values – that’s just unfeasible. Instead, we’d try to determine the interesting cases and test those.
For this example, we might test the following:
- A few normal cases
- Dividing a number by itself – always gives “1”
- Dividing a number by 1 – always gives the original number
- Dividing a positive number by a negative number – always gives a negative number
And so on. However, this assumes that we can think of all of these cases. What about when we don’t think of something? For example, what happens if we divide a number by 0? We didn’t think to test that, so we don’t know what the outcome will be.
3. Property-Based Testing
What if, instead, we can programmatically generate our test inputs?
One obvious way to achieve this is to have a parameterized test that generates inputs in a loop:
@ParameterizedTest
@MethodSource("provideIntegerInputs")
void testDivisionBySelf(int input) {
    int answer = calculator.divide(input, input);
    assertEquals(answer, 1);
}

private static Stream<Arguments> provideIntegerInputs() {
    return IntStream.rangeClosed(Integer.MIN_VALUE, Integer.MAX_VALUE)
        .mapToObj(i -> Arguments.of(i));
}
This is guaranteed to find any edge cases. However, it does so at a huge cost. It’s going to test every single possible integer value – that’s 4,294,967,296 different test cases. Even at 1 ms per test, that will take nearly 50 days to run.
Property-based testing is a variation of this idea. Instead of generating every single test case, we’ll generate interesting test cases based on a set of properties we have defined.
For example, for our division example, we might just test every number between -20 and +20. If we assume that any unusual cases will be in this range, then this will be representative enough while being significantly easier to manage. In this case, our properties are simply “Between -20 and +20”:
private static Stream<Arguments> provideIntegerInputs() {
    return IntStream.rangeClosed(-20, +20).mapToObj(i -> Arguments.of(i));
}
4. Getting Started With jqwik
jqwik is a library for Java testing that implements property-based testing for us. It gives us the tools to do this kind of testing incredibly easily and efficiently. This includes the ability to generate our data sets, but it also integrates with JUnit 5.
4.1. Adding Dependencies
In order to use jqwik, we need to first add it to our project. This is a single dependency that we can add to our build:
<dependency>
    <groupId>net.jqwik</groupId>
    <artifactId>jqwik</artifactId>
    <version>1.7.4</version>
    <scope>test</scope>
</dependency>
The latest version can be found in the Maven Central Repository.
We also need to ensure that we have JUnit 5 set up correctly in our project, or else we can’t run tests written with jqwik.
4.2. Our First Test
Now that we have jqwik set up, let’s write a test with it. We’ll test that dividing a number by itself returns 1, the same as we did before:
@Property
public void divideBySelf(@ForAll int value) {
    int result = divide(value, value);
    assertEquals(result, 1);
}
That’s all there is to it. So what have we done?
Firstly, the test is annotated with @Property instead of @Test. This tells JUnit to run this with the jqwik runner.
Next, we have a parameter to the test annotated with @ForAll. This tells jqwik to generate a set of interesting values for this parameter, which we can then use in our test. In this case, we don’t have any constraints, so it’ll just generate values from the set of all integers.
And what happens if we run this?
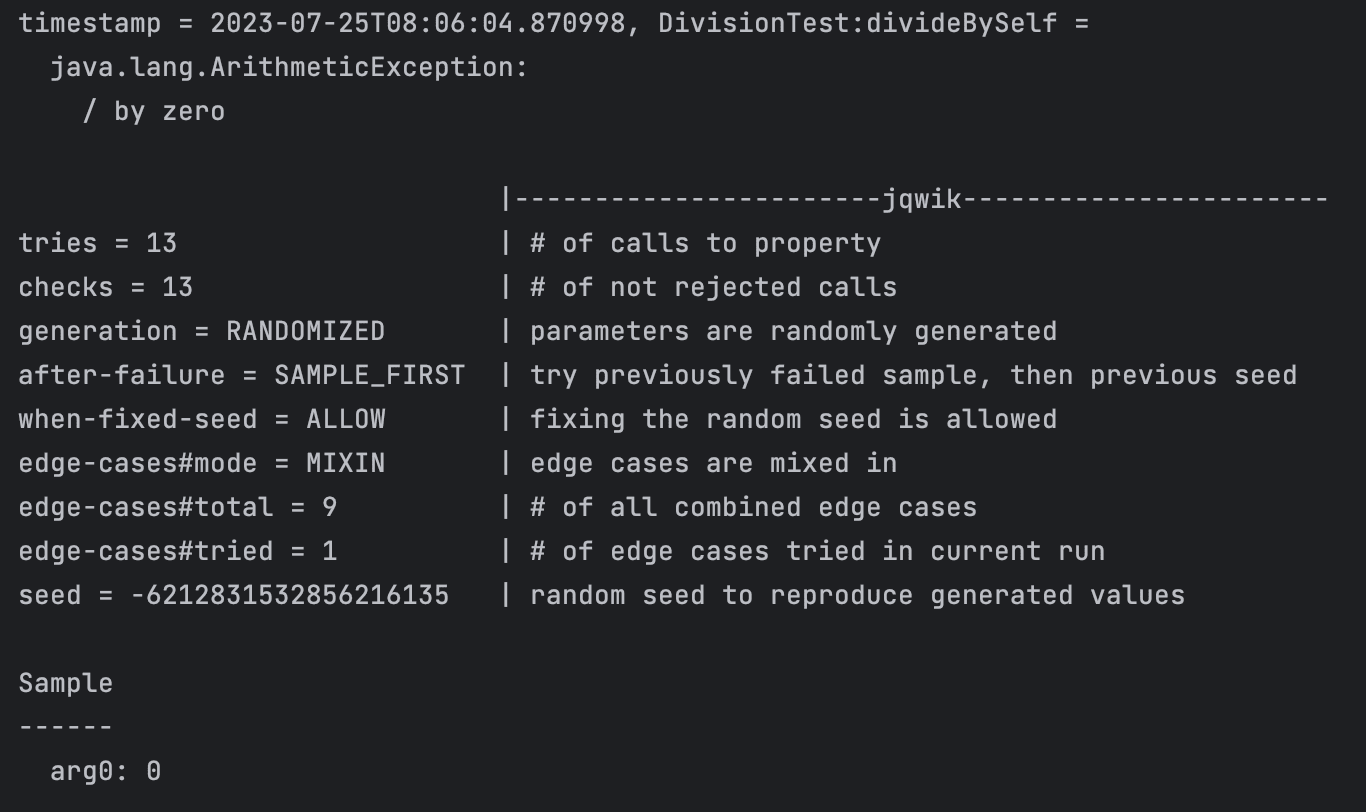
jqwik has run 13 different tests before finding one that fails. And the one that failed was an input of “0”, which causes it to throw an ArithmeticException.
This has immediately found a problem in our code, in a very small amount of test code.
5. Defining Properties
We’ve seen how to use jqwik to provide values for our tests. In this case, our test took an integer with no constraints on what the values could be.
jqwik can provide values for a standard set of types – including Strings, numbers, booleans, enumerations, and collections, amongst many others. All that’s needed is to write our tests with parameters that are themselves annotated with @ForAll, which will tell jqwik to repeatedly run our test with different generated values for this property.
We can have as many properties as we need for our test:
@Property
public void additionIsCommutative(@ForAll int a, @ForAll int b) {
    assertEquals(a + b, b + a);
}
We can even mix types as necessary as well.
5.1. Constraining Properties
However, often we need to put some constraints on what these parameters can be. For example, when testing division then, we can’t use zero for the denominator, so this needs to be a constraint in our test.
We could write our test to detect these cases and skip them. However, this will still be considered as a test case. In particular, jqwik only runs a limited number of test cases before deciding that the test passes. If we short-circuit this, then we’re defeating the point of using property testing.
Instead, jqwik allows us to constrain our properties so that the generated values are all within bounds. For example, we might want to repeat our division test but only with positive numbers:
@Property
public void dividePositiveBySelf(@ForAll @Positive int value) {
    int result = divide(value, value);
    assertEquals(result, 1);
}
Here we’ve annotated our property with @Positive. This will cause jqwik to constrain the values to only positive values – i.e., anything greater than 0.
jqwik comes with a set of constraints that can be applied to standard property types – for example:
- Whether to include nulls or not.
- Minimum and maximum values for numbers – whether integer or otherwise.
- Minimum and maximum lengths for strings and collections.
- Allowed characters in strings.
- And many more.
5.2. Custom Constraints
Often, the standard constraints will be good enough for our needs. However, in some cases, we might need to be more prescriptive. jqwik gives us the ability to write our own generation functions that can do whatever we need them to.
For example, we know that zero is the only case that we can’t use for division. Every other number should work fine. However, the standard annotations from jqwik don’t allow for us to generate everything except one value. The best we can do is generate numbers from an entire range.
So, instead, we’ll generate the numbers ourselves. This will allow us to generate any number from the entire integer range except for zero:
@Property
public void divideNonZeroBySelf(@ForAll("nonZeroNumbers") int value) {
    int result = divide(value, value);
    assertEquals(result, 1);
}

@Provide
Arbitrary<Integer> nonZeroNumbers() {
    return Arbitraries.integers().filter(v -> v != 0);
}
In order to achieve this, we’ve written a new method in our test class, annotated with @Provide, that returns an Arbitrary<Integer>. We’ve then indicated on the @ForAll annotation to generate using this method instead of just from the entire set of possible values for the parameter type. Doing this means that jqwik will now use our generation method instead of the default one.
If we try this, we’ll see that we get a large range of both positive and negative numbers from the entire spectrum of integer values. And that 0 never shows up – because we explicitly filtered it out.
5.3. Assumptions
Sometimes we need to have several properties but with constraints between them. For example, we might want to test that dividing a large number by a smaller number will always return a result greater than 1. We can easily define properties for each number, but we can’t define one property in terms of the other.
Instead, this can be done by the use of assumptions. We tell our test that we assume some precondition, and only if that precondition passes do we run the test:
@Property
public void divideLargeBySmall(@ForAll @Positive int a, @ForAll @Positive int b) {
    Assume.that(a > b);

    int result = divide(a, b);
    assertTrue(result >= 1);
}
Running this test will pass, but let’s look at the output:
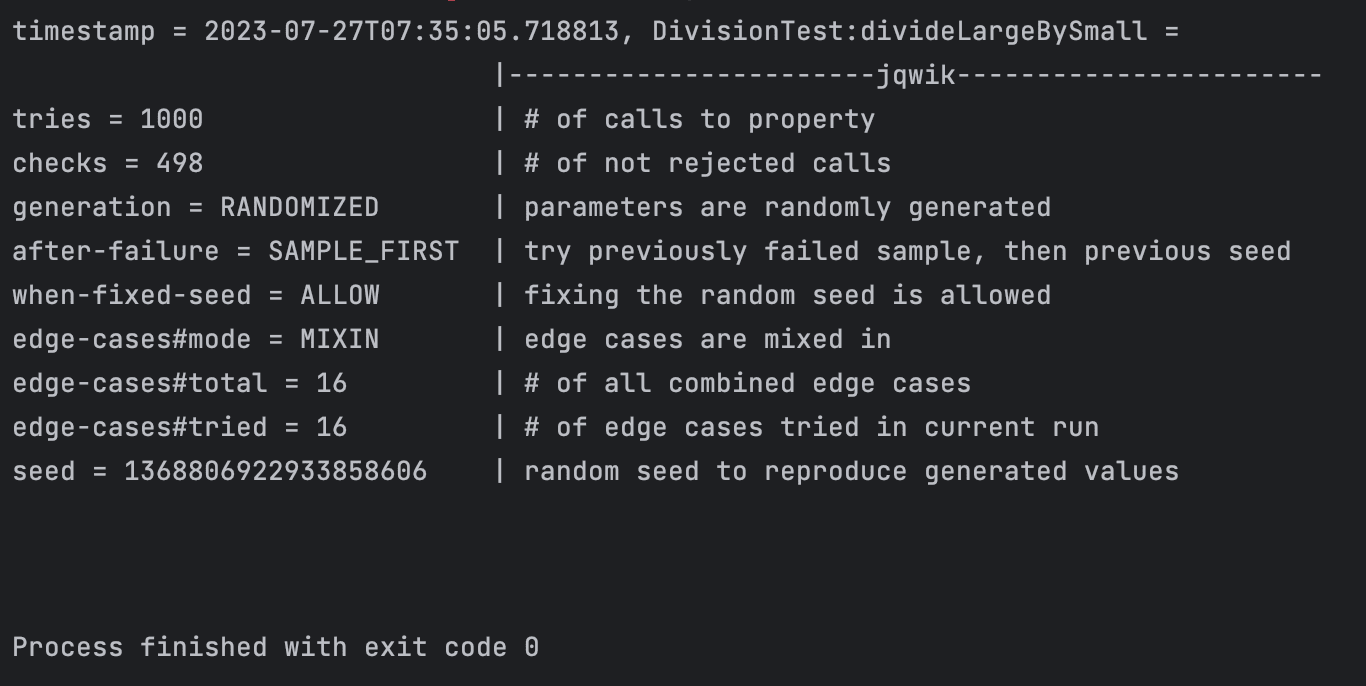
We’ve run 1,000 tries. However, we’ve only actually checked 498 of them. This is because 502 of the generated tests failed the assumption, and so didn’t get run.
jqwik has a configurable maximum discard ratio. This is the ratio of discarded tests to attempted ones and is set to “5” by default. This means that if our assumption rejected more than 5 cases for every attempted one, then the test will be considered a failure because there’s not enough viable test data. We’ll see later how these settings can be changed.
6. Result Shrinking
jqwik can very efficiently find cases where our code fails the test. However, this isn’t always useful if the generated case is quite obscure.
Instead, jqwik will attempt to “shrink” any failing cases down to the minimal case. This will help us more directly find any edge cases that we need to account for.
Let’s try a seemingly simple case. Squaring a number should produce a result that’s larger than the input.
@Property
public void square(@ForAll @Positive int a) {
    int result = a * a;
    assertTrue(result >= a);
}
However, if we run this test, then it fails:
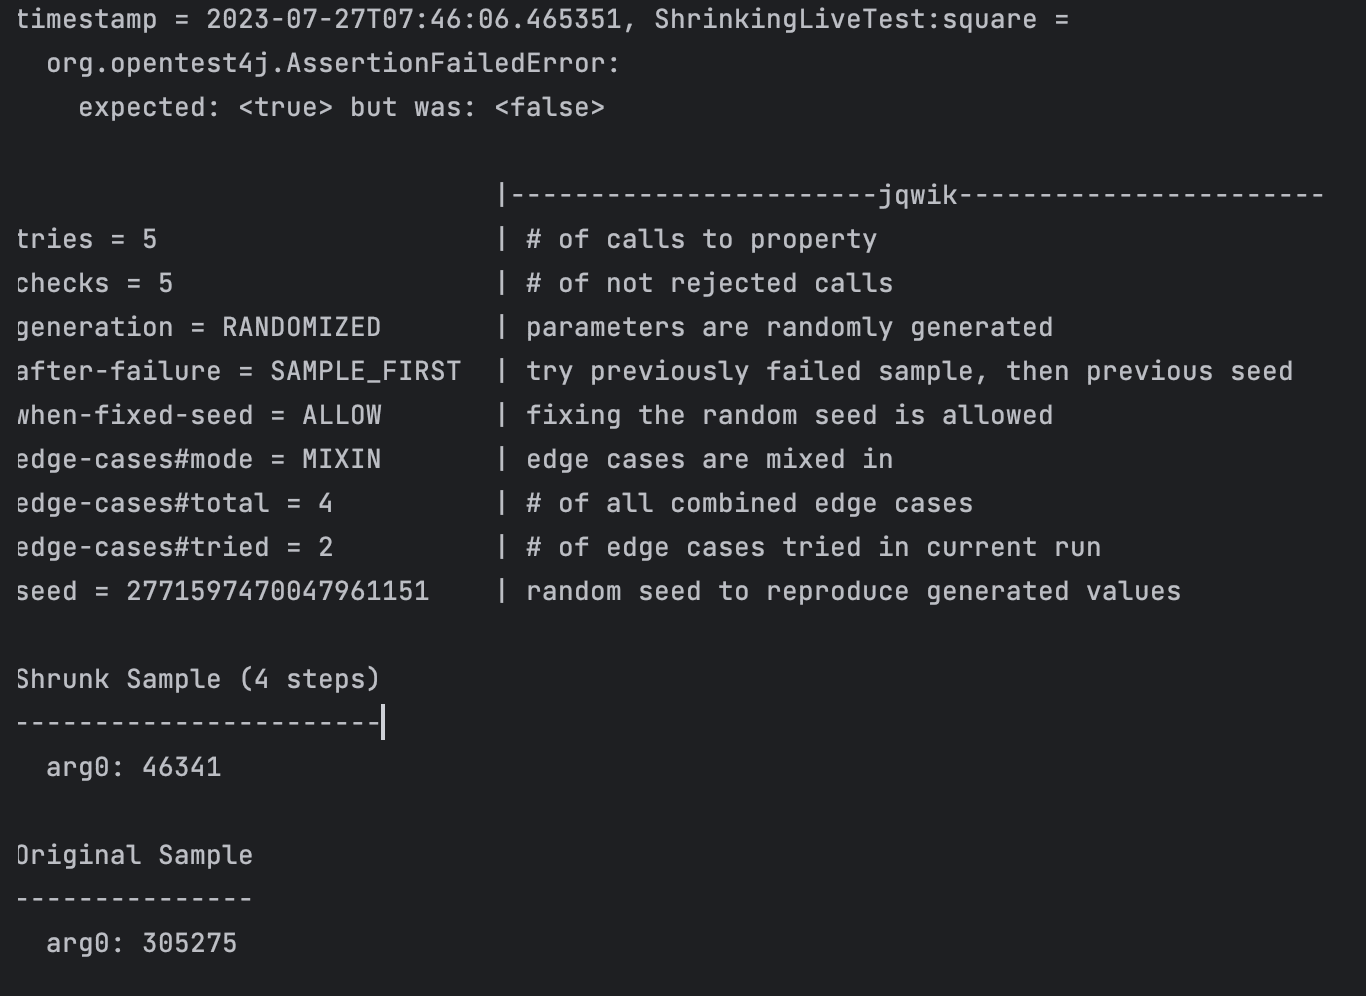
Here we’ve got some extra information. The “Original Sample” is the generated value that first failed the test, and the “Shrunk Sample” is the sample that jqwik then shrunk this to and still fails.
But why does this fail? There’s nothing unusual about it. So let’s try it ourselves. 46,341 squared is 2,147,488,281, which happens to be larger than an integer can hold. However, 46,340 squared fits in the range. So we have indeed found a surprising edge here – we can’t square 46,341 and store the result in an integer field.
7. Re-Running Tests
If our test fails, we will typically want to fix the bugs and then re-run the tests. However, if the generated test cases are random, then re-running the test might not hit the same failing condition that it did before.
jqwik gives us some tools to help with this. By default, running a previously failing test will start with the exact case that failed and then generate new conditions after that. This gives us very quick feedback on the previously failing case. It’s also possible to configure it to run the full set of tests again but re-using the same random seed. This will mean that all of the test cases are run exactly the same as before – both passing and failing ones.
However, both of those cases require some local storage. The details are stored in a file on the local filesystem – .jqwik-database by default. This means that if the tests fail on a CI build, then the stored details are lost between runs.
The other option is that we can explicitly pass a fixed seed into the test. This will cause the test to run exactly as if that seed was randomly selected. The output of our test run also gives us the seed that was used, so we can just copy that into our local test run to reproduce exactly what it did.
8. Configuring Tests
jqwik comes with some reasonable default settings out of the box, many of which we’ve seen passing mention of. For example, it’ll run 1,000 iterations to find any failing cases. In many cases, this is perfectly fine. However, if we need to change something about this, we can.
Many of these can be configured directly on the @Property annotation:
@Property(tries = 5000, shrinking = ShrinkingMode.OFF, generation = GenerationMode.RANDOMIZED)This annotation will now:
- Run the test for 5,000 iterations instead of the default.
- Disable result shrinking.
- Indicate to prefer randomized generation of properties instead of being exhaustive.
Amongst other things, we can also configure the discard ratio for assumptions, the details on how to re-run failing tests, and the details of how to randomly generate values in exactly the same way.
We can do exactly the same by using the @PropertyDefaults annotation on the test class instead, which will then configure every test method in this class. And many settings can also be configured in a junit-platform.properties file located at the root of the classpath – for example, in src/test/resources. Doing this will configure defaults for the entire project instead of just one set of tests.
9. Summary
Here we’ve seen an introduction to the jqwik library. This is a very small amount of what can be achieved with this library, but hopefully enough to see the power that property testing can bring to our projects.


