Introduction to FitNesse – An Acceptance Testing Framework
Last updated: September 23, 2026


Mocking is an essential part of unit testing, and the Mockito library makes it easy to write clean and intuitive unit tests for your Java code.
Get started with mocking and improve your application tests using our Mockito guide:
Handling concurrency in an application can be a tricky process with many potential pitfalls. A solid grasp of the fundamentals will go a long way to help minimize these issues.
Get started with understanding multi-threaded applications with our Java Concurrency guide:
Spring 5 added support for reactive programming with the Spring WebFlux module, which has been improved upon ever since. Get started with the Reactor project basics and reactive programming in Spring Boot:
Since its introduction in Java 8, the Stream API has become a staple of Java development. The basic operations like iterating, filtering, mapping sequences of elements are deceptively simple to use.
But these can also be overused and fall into some common pitfalls.
To get a better understanding on how Streams work and how to combine them with other language features, check out our guide to Java Streams:
Explore Spring Boot 3 and Spring 6 in-depth through building a full REST API with the framework:
Yes, Spring Security can be complex, from the more advanced functionality within the Core to the deep OAuth support in the framework.
I built the security material as two full courses - Core and OAuth, to get practical with these more complex scenarios. We explore when and how to use each feature and code through it on the backing project.
You can explore the course here:
All Access is finally out, with all of my Spring courses. Learn JUnit is out as well, and Learn Maven is coming fast. And, of course, quite a bit more affordable. Finally.
>> GET THE COURSE
Spring Data JPA is a great way to handle the complexity of JPA with the powerful simplicity of Spring Boot.
Get started with Spring Data JPA through the guided reference course:
Refactor Java code safely — and automatically — with OpenRewrite.
Refactoring big codebases by hand is slow, risky, and easy to put off. That’s where OpenRewrite comes in. The open-source framework for large-scale, automated code transformations helps teams modernize safely and consistently.
Each month, the creators and maintainers of OpenRewrite at Moderne run live, hands-on training sessions — one for newcomers and one for experienced users. You’ll see how recipes work, how to apply them across projects, and how to modernize code with confidence.
Join the next session, bring your questions, and learn how to automate the kind of work that usually eats your sprint time.
1. Overview
While unit and integration tests help developers verify that an application behaves as expected, they typically require programming knowledge to write and maintain. Acceptance tests, on the other hand, allow testers to verify an application’s behavior against its requirements without writing test code.
FitNesse is a popular acceptance testing framework for Java applications.
In this tutorial, we’ll see how to use FitNesse to write an acceptance test for a simple banking application.
2. Understanding the FitNesse Framework
FitNesse is an acceptance testing framework that can be used with Java applications. It provides a web-based wiki interface where we can create, edit, and run acceptance tests without writing them in a traditional programming language. FitNesse uses its own wiki-style syntax rather than standard Markdown.
Furthermore, it supports two test systems: Fit and Slim. Slim is a commonly used option in modern FitNesse tests. With Slim, FitNesse communicates with fixture code through the Slim protocol, allowing our Java code to be invoked as part of an acceptance test.
To use FitNesse, we can download its executable JAR and run it as a Java application. Alternatively, we can add FitNesse as a test dependency to a Maven or Gradle project when we want to manage it as part of the project’s build configuration.
3. Maven Dependency
Moving on, let’s add the fitnesse dependency to our pom.xml:
<dependency>
    <groupId>org.fitnesse</groupId>
    <artifactId>fitnesse</artifactId>
    <version>20260313</version>
    <scope>provided</scope>
</dependency>
The fitnesse dependency includes the FitNesse application and its embedded web server. Once we start FitNesse, it exposes a web interface that we can access from a browser to create and run acceptance tests.
4. Example Project
To demonstrate how it works, let’s create a simple banking application.
4.1. BankAccount Class
First, let’s create a class named BankAccount:
public class BankAccount {

    private double balance;

    public BankAccount(double initialBalance) {
        this.balance = initialBalance;
    }

    public void deposit(double amount) {
        balance += amount;
    }

    public void withdraw(double amount) {
        balance -= amount;
    }

    public double getBalance() {
        return balance;
    }
}
In the class above, we initialize the account with a balance provided through the constructor. Then, we define methods for depositing money, withdrawing money, and retrieving the current balance. For simplicity, we used the double type to represent monetary value.
4.2. BankAccountFixture Class
Next, let’s create a fixture class that exposes the banking operations to FitNesse:
public class BankAccountFixture {
    private BankAccount account;
    private double depositAmount;
    private double withdrawAmount;

    public void setInitialBalance(double balance) {
        account = new BankAccount(balance);
    }

    public void setDeposit(double amount) {
        this.depositAmount = amount;
    }

    public void setWithdraw(double amount) {
        this.withdrawAmount = amount;
    }

    public void execute() {
        if (depositAmount > 0) {
            account.deposit(depositAmount);
        }
        if (withdrawAmount > 0) {
            account.withdraw(withdrawAmount);
        }
    }

    public double balance() {
        return account.getBalance();
    }
}
The class above acts as a bridge between FitNesse and our BankAccount class. It exposes methods that FitNesse can invoke as part of an acceptance test.
The setInitialBalance(), setDeposit(), and setWithdraw() methods configure the test data, while execute() performs the requested operations on the account. Finally, the balance() method returns the resulting balance.
These operations represent the behavior that we want to verify through our acceptance tests.
5. Writing an Acceptance Test
To begin, let’s create a launcher class with a main() method to start the FitNesse server:
public class FitNesseLauncher {

    public static void main(String[] args) throws Exception {
        FitNesseMain.main(new String[] { "-p", "8080" });
    }
}
Next, let’s run the main() method and open the landing page by visiting it in our browser:
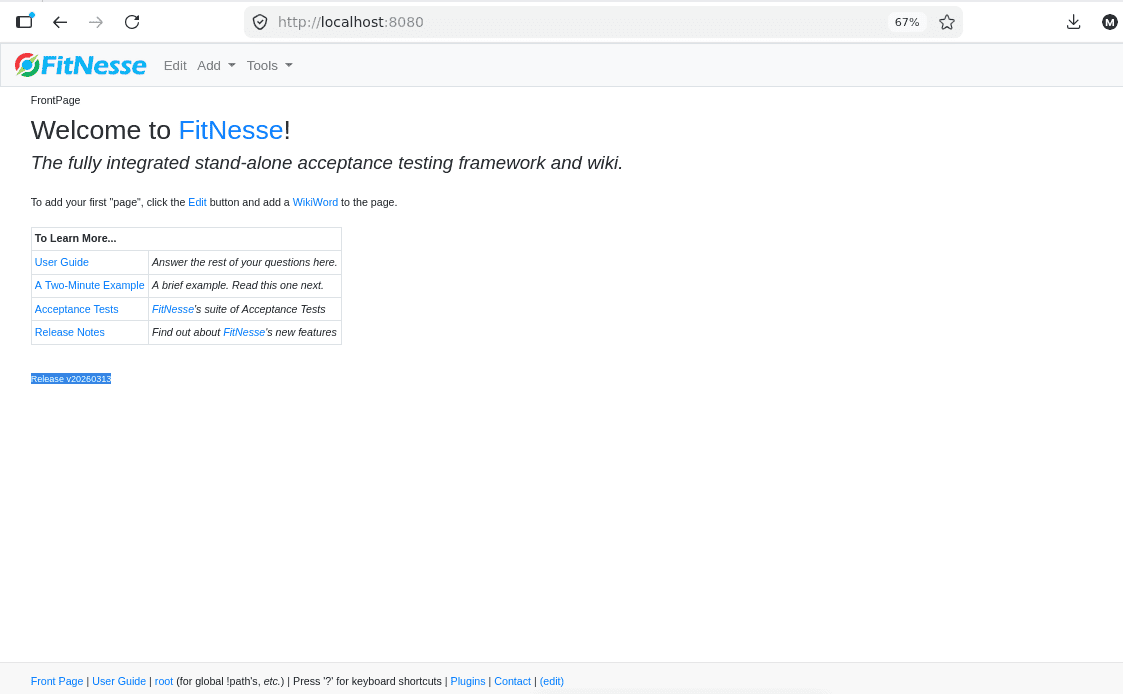
Here’s the default FitNesse landing page. Since we don’t need the default content for our example, let’s edit the page by clicking Edit and create our acceptance test:
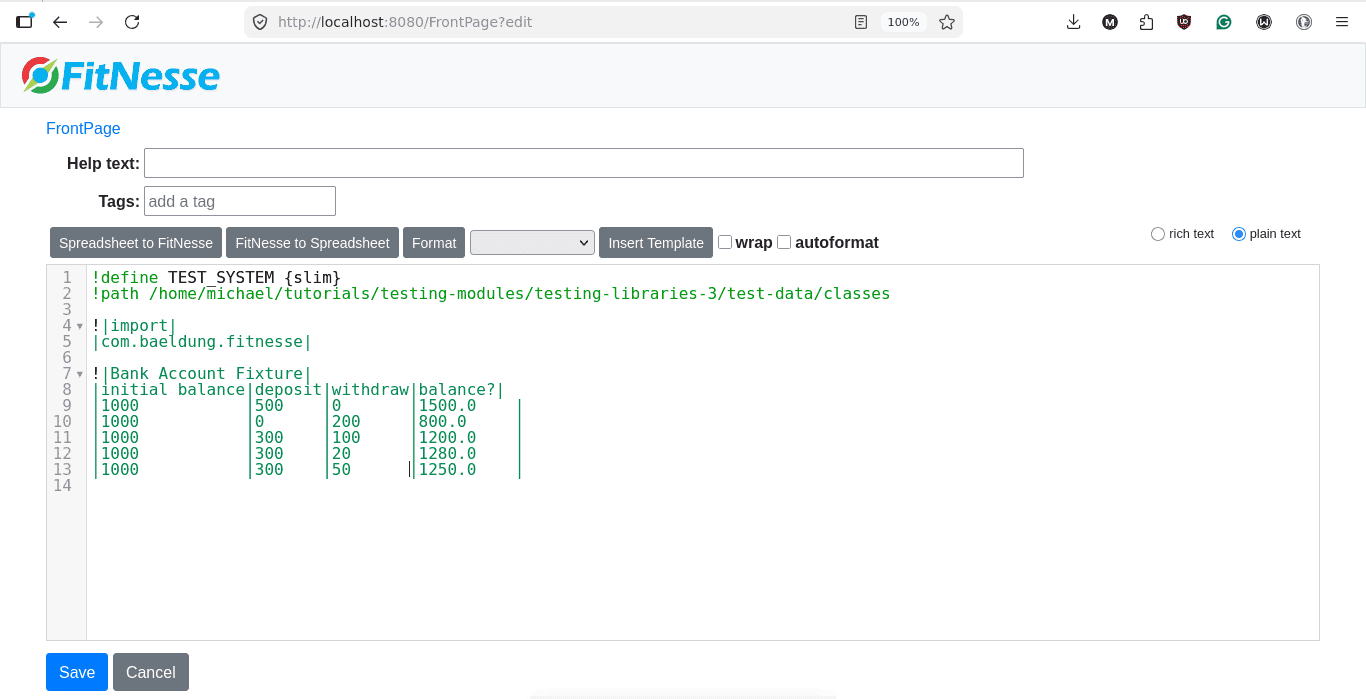
Here, we delete the original content of the page and add our test. First, we configure FitNesse to use the Slim test system. Next, we add the directory containing our compiled Java classes to the FitNesse classpath. Then, we import the package containing our fixture.
Finally, we define the acceptance test using FitNesse’s wiki table syntax.
After clicking the Save button, here’s the new page:
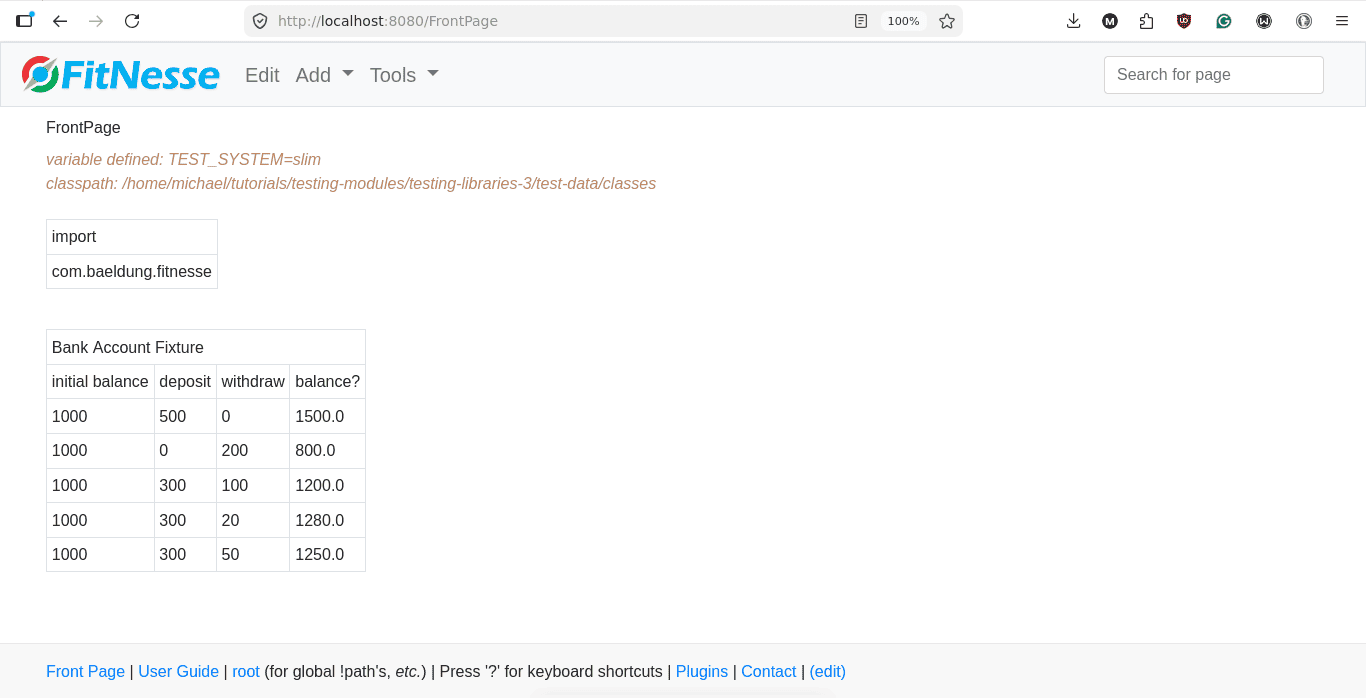
The saved page now displays our acceptance test. However, the Test button isn’t enabled yet. Let’s configure the page properties to enable test execution.
To do this, let’s click on Tools and select Properties:
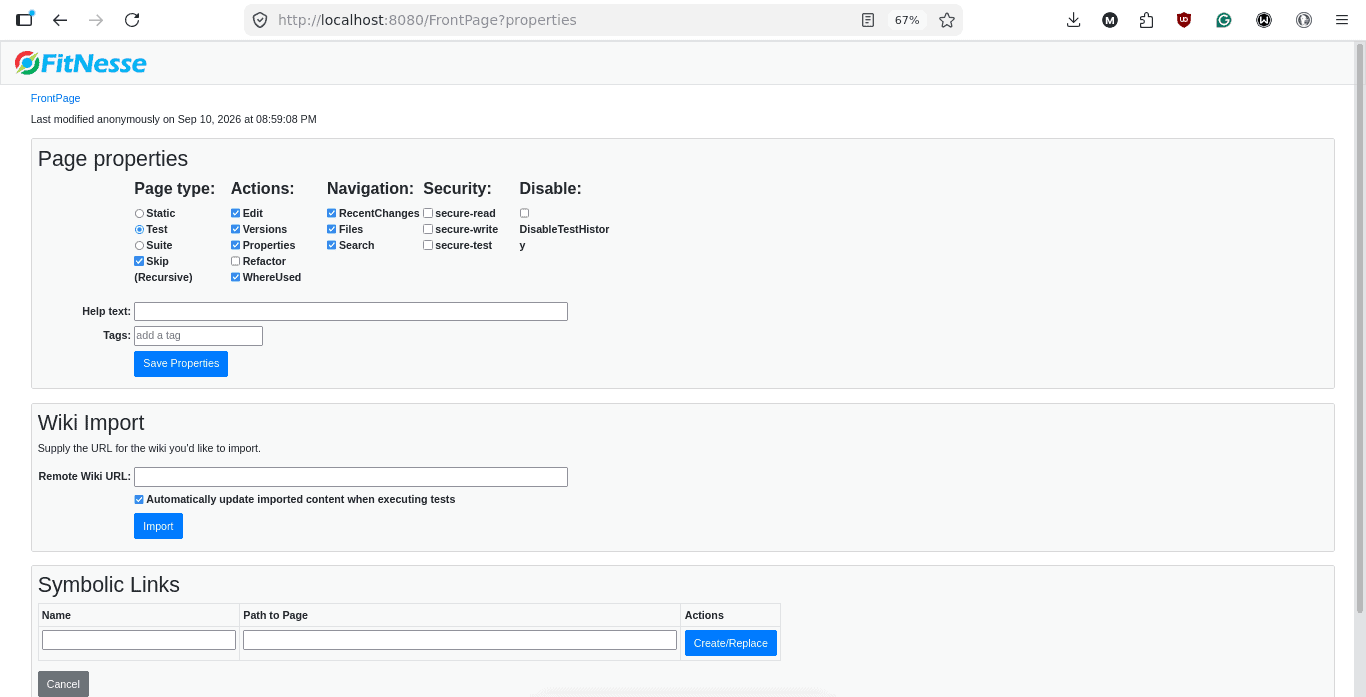
The page properties have different options. Under the Page type, let’s select Test and click the Save Properties button. After saving the properties, the Test button becomes available on the test page.
Next, let’s click Test to execute the acceptance test:
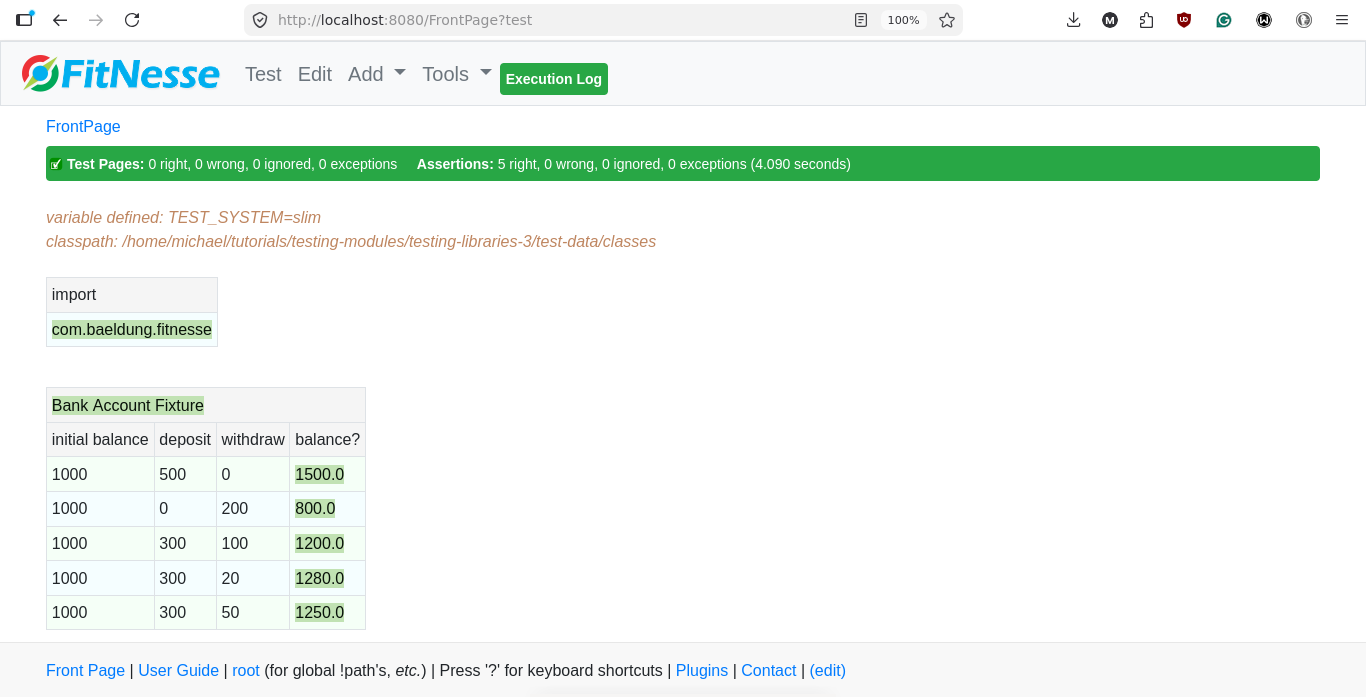
The test results show that all five assertions passed successfully, with 0 wrong assertions, 0 ignored assertions, and 0 exceptions. The resulting balances also match the expected values in each test case.
6. Conclusion
In this lesson, we learned how to use FitNesse to write and execute acceptance tests for a Java application. Also, we built a simple banking application and created a Slim fixture that allowed FitNesse to interact with the application’s business logic.
Additionally, we saw how to configure and start the FitNesse server, configure FitNesse to use the Slim test system, and add compiled Java classes to the FitNesse classpath.
As always, the source code for the examples is available over on GitHub.














