Introduction to Jakarta EE MVC / Eclipse Krazo
Last updated: January 8, 2024


Mocking is an essential part of unit testing, and the Mockito library makes it easy to write clean and intuitive unit tests for your Java code.
Get started with mocking and improve your application tests using our Mockito guide:
Handling concurrency in an application can be a tricky process with many potential pitfalls. A solid grasp of the fundamentals will go a long way to help minimize these issues.
Get started with understanding multi-threaded applications with our Java Concurrency guide:
Spring 5 added support for reactive programming with the Spring WebFlux module, which has been improved upon ever since. Get started with the Reactor project basics and reactive programming in Spring Boot:
Since its introduction in Java 8, the Stream API has become a staple of Java development. The basic operations like iterating, filtering, mapping sequences of elements are deceptively simple to use.
But these can also be overused and fall into some common pitfalls.
To get a better understanding on how Streams work and how to combine them with other language features, check out our guide to Java Streams:
Explore Spring Boot 3 and Spring 6 in-depth through building a full REST API with the framework:
Yes, Spring Security can be complex, from the more advanced functionality within the Core to the deep OAuth support in the framework.
I built the security material as two full courses - Core and OAuth, to get practical with these more complex scenarios. We explore when and how to use each feature and code through it on the backing project.
You can explore the course here:
Spring Data JPA is a great way to handle the complexity of JPA with the powerful simplicity of Spring Boot.
Get started with Spring Data JPA through the guided reference course:
Refactor Java code safely — and automatically — with OpenRewrite.
Refactoring big codebases by hand is slow, risky, and easy to put off. That’s where OpenRewrite comes in. The open-source framework for large-scale, automated code transformations helps teams modernize safely and consistently.
Each month, the creators and maintainers of OpenRewrite at Moderne run live, hands-on training sessions — one for newcomers and one for experienced users. You’ll see how recipes work, how to apply them across projects, and how to modernize code with confidence.
Join the next session, bring your questions, and learn how to automate the kind of work that usually eats your sprint time.
Yes, we're now running our only Summer Sale. All Courses are 30% off until 20th July, 2026:
Yes, we're now running our only Summer Sale. All Courses are 30% off until 20th July, 2026:
1. Introduction
Model View Controller (MVC) is a popular design pattern to build web applications. For several years, it has been a de-facto design principle for building modern web-based applications.
In this tutorial, let’s learn about building a web application using Jakarta EE MVC 2.0 with a web page and a REST API.
2. JSR-371
Jakarta MVC 2.0 (Formerly JSR 371 MVC 1.0) is an action-based web framework built on Jakarta RESTful Web Services or JAX-RS (formerly Java API for RESTful web services). JSR-371 compliments the JAX-RS with additional annotations that make building web applications more convenient.
JSR 371 or Jakarta MVC standardizes how we develop web applications in Java. Also, the main objective is to leverage the existing CDI (Contexts and Dependency Injections) and Bean Validation and support JSPs and Facelets as view technologies.
Presently, Jakarta MVC 2.1 specification work is in progress and probably will release with the Jakarta EE 10 release.
3. JSR-371 Annotations
JSR-371 defines a few more annotations apart from the JAX-RS annotations. All these annotations are part of the jakarta.mvc.* package.
3.1. jakarta.mvc.Controller
The @Controller annotation marks a resource as an MVC controller. When used for a class, all the resource methods in the class become controllers. Similarly, using this annotation on a resource method makes that method a controller. Typically, defining @Controller on a method is helpful if we want to define MVC Controllers and REST APIs in the same class.
For instance, let’s define a controller:
@Path("user")
public class UserController {
    @GET
    @Produces("text/html")
    @Controller
    public String showUserForm(){
        return "user.jsp";
    }
    @GET
    @Produces("application/json")
    public String getUserDetails(){
        return getUserDetails();
    }
}
This class has a @Controller that renders a user form (showUserForm) and a REST API that returns user details JSON (getUserDetails).
3.2. jakarta.mvc.View
Like @Controller, we can mark a resource class or a resource method with @View annotation. Typically, a resource method that returns a void should have a @View. A class with @View represents the default view for the controllers in the class with a void type.
For instance, let’s define a controller with @View:
@Controller
@Path("user")
@View("defaultModal.jsp")
public class UserController {
    @GET
    @Path("void")
    @View("userForm.jsp")
    @Produces("text/html")
    public void showForm() {
        getInitFormData();
    }

    @GET
    @Path("string")
    @Produces("text/html")
    public void showModal() {
        getModalData();
    }
}
Here, both resource class and resource method have @View annotation. The controller showForm renders the view userForm.jsp. Similarly, the showModal controller renders defaultModal.jsp, defined on the resource class.
3.3. jakarta.mvc.binding.MvcBinding
Jakarta RESTful Webservices reject a request that has binding and validation errors. A similar setup may not hold good for users interacting with a web page. Fortunately, Jakarta MVC invokes the controller even when binding and validation errors occur. Typically, the user should be well-informed about the data binding errors.
The controllers inject a BindingResult to present human-readable validation and binding error messages to the user. For example, let’s define a controller with a @MvcBinding:
@Controller
@Path("user")
public class UserController {
    @MvcBinding
    @FormParam("age")
    @Min(18)
    private int age;
    @Inject
    private BindingResult bindingResult;
    @Inject
    private Models models;
    @POST
    public String processForm() {
        if (bindingResult.isFailed()) {
            models.put("errors", bindingResult.getAllMessages());
            return "user.jsp";
        }
    }
}
Here, if a user enters an age lesser than 18, the user will be sent back to the same page with the binding errors. The user.jsp page, using an Expression Language (EL), can retrieve the request attribute errors and display them on the page.
3.4. jakarta.mvc.RedirectScoped
Consider a form where a user fills and submits the data (HTTP POST). The server processes the data and redirects the user to a success page (HTTP GET). This pattern is widely known as PRG (Post-Redirect-Get) pattern. There are a few scenarios where we like to hold the data between the POST and GET. In these scenarios, the scope of the models/beans is beyond a single request.
When a bean is annotated with @RedirectScoped, the bean’s state goes beyond a single request. Nevertheless, the state is destroyed after a POST, redirect, and Get completes. The bean demarcated with @RedirectScoped gets destroyed after a POST, Redirect, and a GET is complete.
For instance, assume that the bean User has annotation @RedirectScoped:
@RedirectScoped
public class User
{
    private String id;
    private String name;
    // getters and setters
}
Next, inject this bean into a controller:
@Controller
@Path("user")
public class UserController {
    @Inject
    private User user;
    @POST
    public String post() {
        user.setName("John Doe");
        return "redirect:/submit";
    }
    @GET
    public String get() {
        return "success.jsp";
    }
}
Here, the bean User is available for the POST and subsequent redirect and GET. Hence, the success.jsp can access the bean’s name attribute using an EL.
3.5. jakarta.mvc.UriRef
We can use an @UriRef annotation only for a resource method. @UriRef enables us to provide a name to the resource methods. Instead of controller path URIs, we can use these names to call our controllers in the views.
Assume that there is a user form with a href:
<a href="/app/user">Clich Here</a>Clicking Click Here invokes the controller mapped to GET /app/user.
@GET
@UriRef("user-details")
public String getUserDetails(String userId) {
    userService.getUserDetails(userId);
}
Here, we named our controller with user-details. Now, we can reference this name in our views instead of a URI:
<a href="${mvc.uri('user-details')}">Click Here</a>3.6. jakarta.mvc.security.CsrfProtected
This annotation mandates that the CSRF validation is necessary for invoking the resource method. If the CSRF token is invalid, the client receives a ForbiddenException (HTTP 403) exception. Only a resource method can have this annotation.
Consider a controller:
@POST
@Path("user")
@CsrfProtected
public String saveUser(User user) {
    service.saveUser(user);
}
Given that the controller has a @CsrfProtected annotation, the request reaches the controller only if it contains a valid CSRF token.
4. Building an MVC Application
Next, let’s build a web application with a REST API and a controller. Finally, let’s deploy our web application in the latest version of Eclipse Glassfish.
4.1. Generate Project
Firstly, let’s use the Maven archetype:generate to generate the Jakarta MVC 2.0 project:
mvn archetype:generate
  -DarchetypeGroupId=org.eclipse.krazo
  -DarchetypeArtifactId=krazo-jakartaee9-archetype
  -DarchetypeVersion=2.0.0 -DgroupId=com.baeldung
  -DartifactId=krazo -DkrazoImpl=jersey
The above archetype generates a maven project with the required artifacts, similar to:
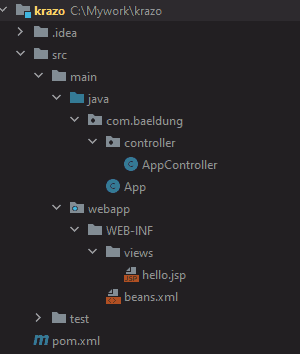
Also, the generated pom.xml contains the jakarta.platform, jakarta.mvc and org.eclipse.krazo dependencies:
<dependency>
    <groupId>jakarta.platform</groupId>
    <artifactId>jakarta.jakartaee-web-api</artifactId>
    <version>9.1.0</version>
    <scope>provided</scope>
</dependency>
<dependency>
    <groupId>jakarta.mvc</groupId>
    <artifactId>jakarta.mvc-api</artifactId>
    <version>2.0.0</version>
</dependency>
<dependency>
    <groupId>org.eclipse.krazo</groupId>
    <artifactId>krazo-jersey</artifactId>
    <version>2.0.0</version>
</dependency>
4.2. Controllers
Next, let’s define controllers for displaying a form, saving the user details, and an API for fetching user details. But, first, let’s define our application path:
@ApplicationPath("/app")
public class UserApplication extends Application {
}
The application path is defined as /app. Next, let’s define our controllers that forwards the user to a user details form:
@Path("users")
public class UserController {
@GET
@Controller
public String showForm() {
return "user.jsp";
}
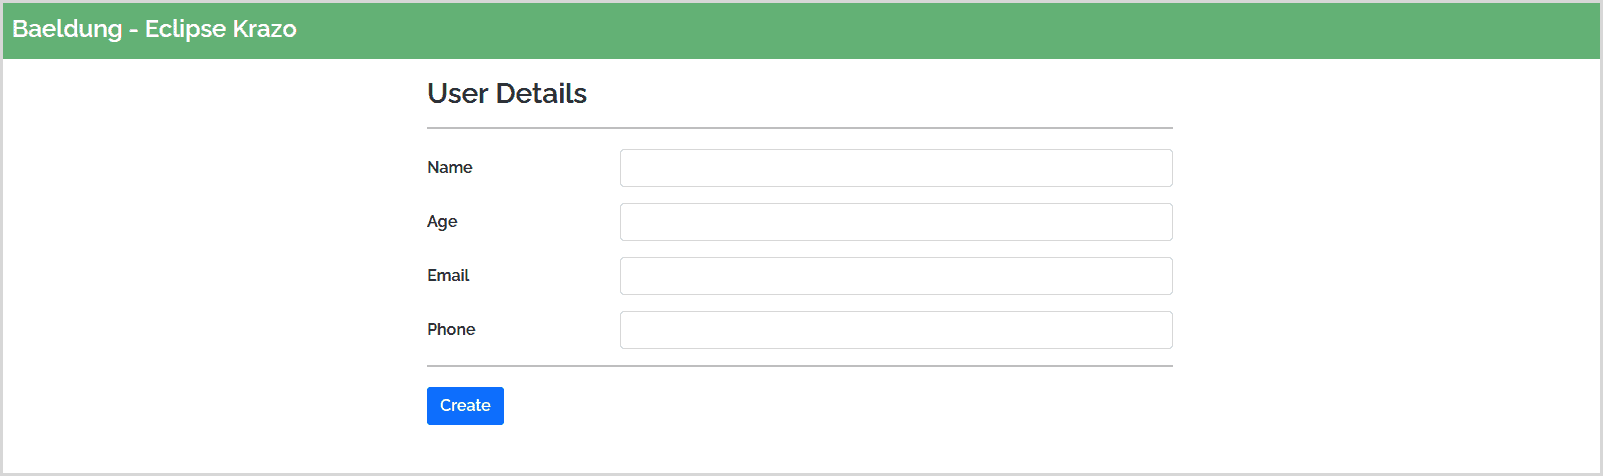
}Next, under WEB-INF/views, we can create a view user.jsp, and build and deploy the application:
mvn clean install glassfish:deployThis Glassfish Maven plugin builds, deploys, and runs on port 8080. After successful deployment, we can open a browser and hit the URL:
http://localhost:8080/mvc-2.0/app/users:
Next, let’s define an HTTP POST that handles the form submit action:
@POST
@Controller
public String saveUser(@Valid @BeanParam User user) {
    return "redirect:users/success";
}
Now, when the user clicks on Create button, the controller handles the POST request and redirects the user to a success page:

Let’s make use of Jakarta Validations, CDI, and @MvcBinding to provide form validations:
@Named("user")
public class User implements Serializable {
@MvcBinding
@Null
private String id;
@MvcBinding
@NotNull
@Size(min = 1, message = "Name cannot be blank")
@FormParam("name")
private String name;
// other validations with getters and setters
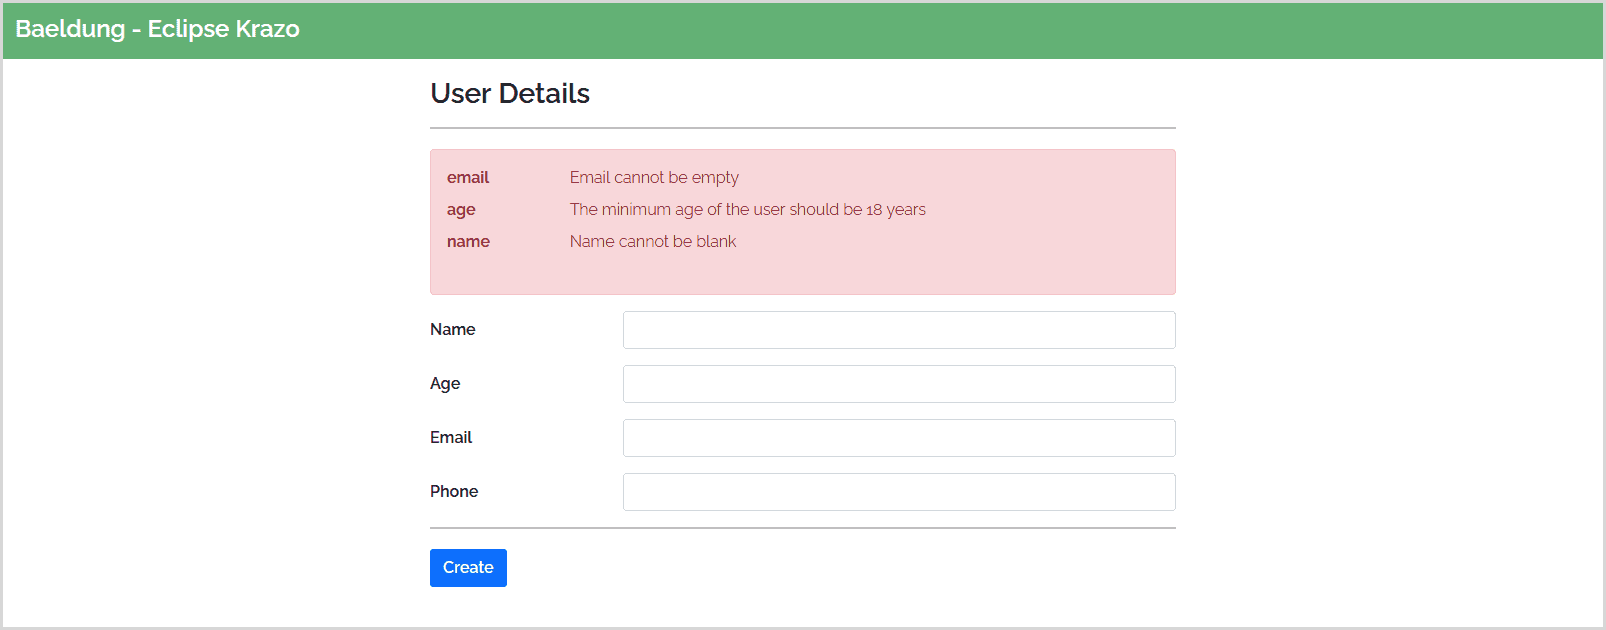
}Once we have the form validations, let’s check for binding errors. If there are any binding errors, we must present the validation messages to the user. For this, let’s inject BindingResult to handle the invalid form parameters. Let’s update our saveUser method:
@Inject
private BindingResult bindingResult;

public String saveUser(@Valid @BeanParam User user) {
    if (bindingResult.isFailed()) {
        models.put("errors", bindingResult.getAllErrors());
        return "user.jsp";
    }
    return "redirect:users/success";
}
With the validations in place, if a user submits the form without the mandatory parameters, we display the validation errors:
Next, let’s protect our POST method from CSRF attacks by using @CsrfProtected. Add @CsrfProtected to the method saveUser:
@POST
@Controller
@CsrfProtected
public String saveUser(@Valid @BeanParam User user) {
}
Next, let’s try to click Create button:

When a controller is protected from CSRF attacks, the client should always pass a CSRF token. So, let’s add a hidden field in user.jsp that adds a CSRF token on every request:
<input type="hidden" name="${mvc.csrf.name}" value="${mvc.csrf.token}"/>Similarly, let’s develop a REST API now:
@GET
@Produces(MediaType.APPLICATION_JSON)
public List<User> getUsers() {
    return users;
}
This HTTP GET API returns a list of users.
5. Conclusion
In this article, we learned about the Jakarta MVC 2.0 and how to develop a web application and a REST API using Eclipse Krazo. We have seen how MVC 2.0 standardizes the way we build MVC-based web applications in Java.


