

Mocking is an essential part of unit testing, and the Mockito library makes it easy to write clean and intuitive unit tests for your Java code.
Get started with mocking and improve your application tests using our Mockito guide:
Handling concurrency in an application can be a tricky process with many potential pitfalls. A solid grasp of the fundamentals will go a long way to help minimize these issues.
Get started with understanding multi-threaded applications with our Java Concurrency guide:
Spring 5 added support for reactive programming with the Spring WebFlux module, which has been improved upon ever since. Get started with the Reactor project basics and reactive programming in Spring Boot:
Since its introduction in Java 8, the Stream API has become a staple of Java development. The basic operations like iterating, filtering, mapping sequences of elements are deceptively simple to use.
But these can also be overused and fall into some common pitfalls.
To get a better understanding on how Streams work and how to combine them with other language features, check out our guide to Java Streams:
Explore Spring Boot 3 and Spring 6 in-depth through building a full REST API with the framework:
Yes, Spring Security can be complex, from the more advanced functionality within the Core to the deep OAuth support in the framework.
I built the security material as two full courses - Core and OAuth, to get practical with these more complex scenarios. We explore when and how to use each feature and code through it on the backing project.
You can explore the course here:
Spring Data JPA is a great way to handle the complexity of JPA with the powerful simplicity of Spring Boot.
Get started with Spring Data JPA through the guided reference course:
Refactor Java code safely — and automatically — with OpenRewrite.
Refactoring big codebases by hand is slow, risky, and easy to put off. That’s where OpenRewrite comes in. The open-source framework for large-scale, automated code transformations helps teams modernize safely and consistently.
Each month, the creators and maintainers of OpenRewrite at Moderne run live, hands-on training sessions — one for newcomers and one for experienced users. You’ll see how recipes work, how to apply them across projects, and how to modernize code with confidence.
Join the next session, bring your questions, and learn how to automate the kind of work that usually eats your sprint time.
1. Introduction
Imagine we had to manually complete tasks like processing payslips, calculating interest, and generating bills. It would become quite boring, error-prone and a never-ending list of manual tasks!
In this tutorial, we’ll take a look at Java Batch Processing (JSR 352), a part of the Jakarta EE platform, and a great specification for automating tasks like these. It offers application developers a model for developing robust batch processing systems so that they can focus on the business logic.
2. Maven Dependencies
Since JSR 352, is just a spec, we’ll need to include its API and implementation, like jberet:
<dependency>
    <groupId>javax.batch</groupId>
    <artifactId>javax.batch-api</artifactId>
    <version>1.0.1</version>
</dependency>
<dependency>
    <groupId>org.jberet</groupId>
    <artifactId>jberet-core</artifactId>
    <version>1.0.2.Final</version>
</dependency>
<dependency>
    <groupId>org.jberet</groupId>
    <artifactId>jberet-support</artifactId>
    <version>1.0.2.Final</version>
</dependency>
<dependency>
    <groupId>org.jberet</groupId>
    <artifactId>jberet-se</artifactId>
    <version>1.0.2.Final</version>
</dependency>
We’ll also add an in-memory database so we can look at some more realistic scenarios.
3. Key Concepts
JSR 352 introduces a few concepts, which we can look at this way:
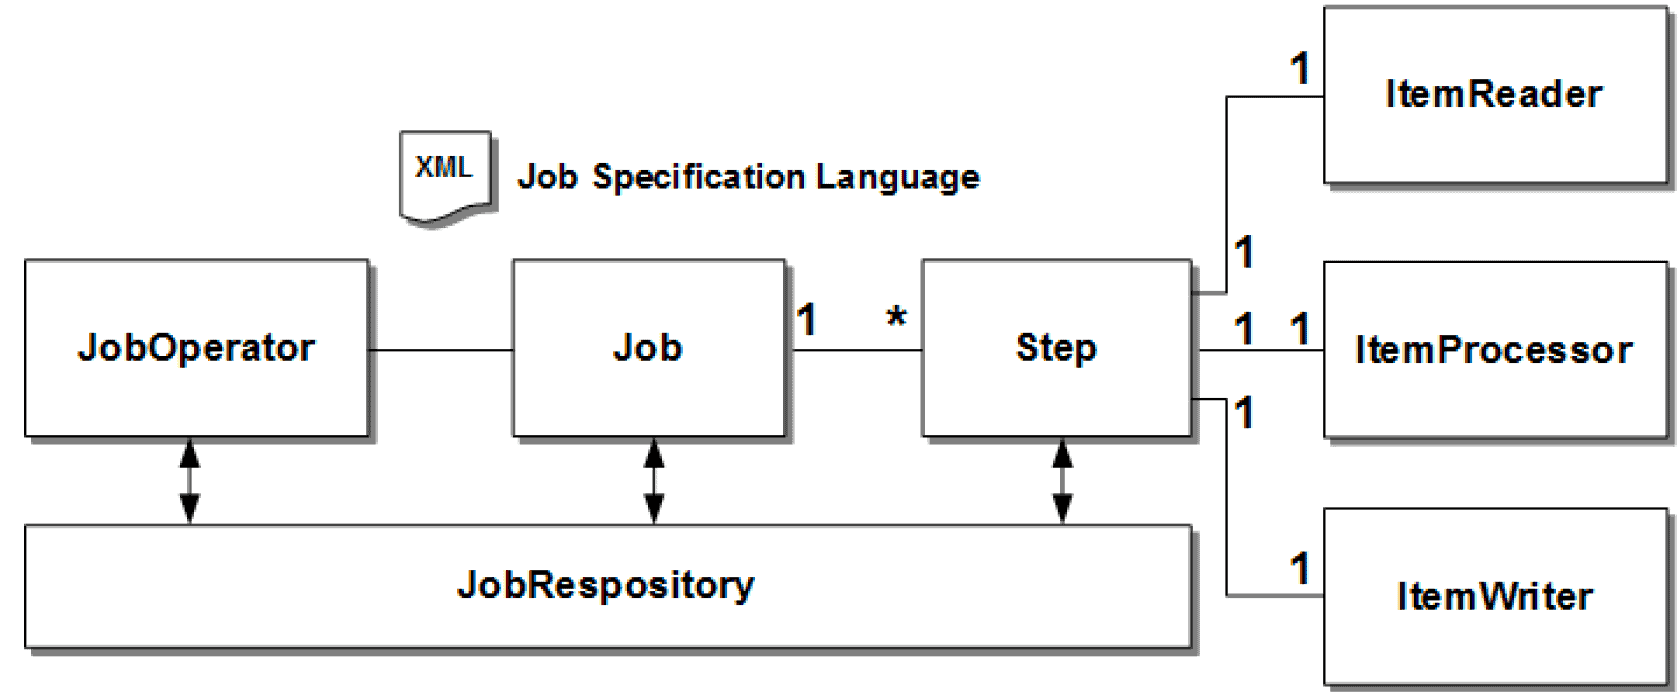
Let’s first define each piece:
- Starting on the left, we have the JobOperator. It manages all aspects of job processing such as starting, stopping, and restarting
- Next, we have the Job. A job is a logical collection of steps; it encapsulates an entire batch process
- A job will contain between 1 and n Steps. Each step is an independent, sequential unit of work. A step is composed of reading input, processing that input, and writing output
- And last, but not least, we have the JobRepository which stores the running information of the jobs. It helps to keep track of jobs, their state, and their completion results
Steps have a bit more detail than this, so let’s take a look at that next. First, we’ll look at Chunk steps and then at Batchlets.
4. Creating a Chunk
As stated earlier, a chunk is a kind of step. We’ll often use a chunk to express an operation that is performed over and over, say over a set of items. It’s kind of like intermediate operations from Java Streams.
When describing a chunk, we need to express where to take items from, how to process them, and where to send them afterward.
4.1. Reading Items
To read items, we’ll need to implement ItemReader.
In this case, we’ll create a reader that will simply emit the numbers 1 through 10:
@Named
public class SimpleChunkItemReader extends AbstractItemReader {
    private Integer[] tokens;
    private Integer count;

    @Inject
    JobContext jobContext;

    @Override
    public Integer readItem() throws Exception {
        if (count >= tokens.length) {
            return null;
        }

        jobContext.setTransientUserData(count);
        return tokens[count++];
    }

    @Override
    public void open(Serializable checkpoint) throws Exception {
        tokens = new Integer[] { 1,2,3,4,5,6,7,8,9,10 };
        count = 0;
    }
}
Now, we’re just reading from the class’s internal state here. But, of course, readItem could pull from a database, from the file system, or some other external source.
Note that we are saving some of this internal state using JobContext#setTransientUserData() which will come in handy later on.
Also, note the checkpoint parameter. We’ll pick that up again, too.
4.2. Processing Items
Of course, the reason we are chunking is that we want to perform some kind of operation on our items!
Any time we return null from an item processor, we drop that item from the batch.
So, let’s say here that we want to keep only the even numbers. We can use an ItemProcessor that rejects the odd ones by returning null:
@Named
public class SimpleChunkItemProcessor implements ItemProcessor {
    @Override
    public Integer processItem(Object t) {
        Integer item = (Integer) t;
        return item % 2 == 0 ? item : null;
    }
}
processItem will get called once for each item that our ItemReader emits.
4.3. Writing Items
Finally, the job will invoke the ItemWriter so we can write our transformed items:
@Named
public class SimpleChunkWriter extends AbstractItemWriter {
    List<Integer> processed = new ArrayList<>();
    @Override
    public void writeItems(List<Object> items) throws Exception {
        items.stream().map(Integer.class::cast).forEach(processed::add);
    }
}
How long is items? In a moment, we’ll define a chunk’s size, which will determine the size of the list that is sent to writeItems.
4.4. Defining a Chunk in a Job
Now we put all this together in an XML file using JSL or Job Specification Language. Note that we’ll list our reader, processor, chunker, and also a chunk size:
<job id="simpleChunk">
    <step id="firstChunkStep" >
        <chunk item-count="3">
            <reader ref="simpleChunkItemReader"/>
            <processor ref="simpleChunkItemProcessor"/>
            <writer ref="simpleChunkWriter"/>
        </chunk>
    </step>
</job>
The chunk size is how often progress in the chunk is committed to the job repository, which is important to guarantee completion, should part of the system fail.
We’ll need to place this file in META-INF/batch-jobs for .jar files and in WEB-INF/classes/META-INF/batch-jobs for .war files.
We gave our job the id “simpleChunk”, so let’s try that in a unit test.
Now, jobs are executed asynchronously, which makes them tricky to test. In the sample, make sure to check out our BatchTestHelper which polls and waits until the job is complete:
@Test
public void givenChunk_thenBatch_completesWithSuccess() throws Exception {
    JobOperator jobOperator = BatchRuntime.getJobOperator();
    Long executionId = jobOperator.start("simpleChunk", new Properties());
    JobExecution jobExecution = jobOperator.getJobExecution(executionId);
    jobExecution = BatchTestHelper.keepTestAlive(jobExecution);
    assertEquals(jobExecution.getBatchStatus(), BatchStatus.COMPLETED);
}
So that’s what chunks are. Now, let’s take a look at batchlets.
5. Creating a Batchlet
Not everything fits neatly into an iterative model. For example, we may have a task that we simply need to invoke once, run to completion, and return an exit status.
The contract for a batchlet is quite simple:
@Named
public class SimpleBatchLet extends AbstractBatchlet {

    @Override
    public String process() throws Exception {
        return BatchStatus.COMPLETED.toString();
    }
}
As is the JSL:
<job id="simpleBatchLet">
    <step id="firstStep" >
        <batchlet ref="simpleBatchLet"/>
    </step>
</job>
And we can test it using the same approach as before:
@Test
public void givenBatchlet_thenBatch_completeWithSuccess() throws Exception {
    JobOperator jobOperator = BatchRuntime.getJobOperator();
    Long executionId = jobOperator.start("simpleBatchLet", new Properties());
    JobExecution jobExecution = jobOperator.getJobExecution(executionId);
    jobExecution = BatchTestHelper.keepTestAlive(jobExecution);
    assertEquals(jobExecution.getBatchStatus(), BatchStatus.COMPLETED);
}
So, we’ve looked at a couple of different ways to implement steps.
Now let’s look at mechanisms for marking and guaranteeing progress.
6. Custom Checkpoint
Failures are bound to happen in the middle of a job. Should we just start over the whole thing, or can we somehow start where we left off?
As the name suggests, checkpoints help us to periodically set a bookmark in case of failure.
By default, the end of chunk processing is a natural checkpoint.
However, we can customize it with our own CheckpointAlgorithm:
@Named
public class CustomCheckPoint extends AbstractCheckpointAlgorithm {

    @Inject
    JobContext jobContext;

    @Override
    public boolean isReadyToCheckpoint() throws Exception {
        int counterRead = (Integer) jobContext.getTransientUserData();
        return counterRead % 5 == 0;
    }
}
Remember the count that we placed in transient data earlier? Here, we can pull it out with JobContext#getTransientUserData to state that we want to commit on every 5th number processed.
Without this, a commit would happen at the end of each chunk, or in our case, every 3rd number.
And then, we match that up with the checkout-algorithm directive in our XML underneath our chunk:
<job id="customCheckPoint">
    <step id="firstChunkStep" >
        <chunk item-count="3" checkpoint-policy="custom">
            <reader ref="simpleChunkItemReader"/>
            <processor ref="simpleChunkItemProcessor"/>
            <writer ref="simpleChunkWriter"/>
            <checkpoint-algorithm ref="customCheckPoint"/>
        </chunk>
    </step>
</job>
Let’s test the code, again noting that some of the boilerplate steps are hidden away in BatchTestHelper:
@Test
public void givenChunk_whenCustomCheckPoint_thenCommitCountIsThree() throws Exception {
    // ... start job and wait for completion

    jobOperator.getStepExecutions(executionId)
      .stream()
      .map(BatchTestHelper::getCommitCount)
      .forEach(count -> assertEquals(3L, count.longValue()));
    assertEquals(jobExecution.getBatchStatus(), BatchStatus.COMPLETED);
}
So, we might be expecting a commit count of 2 since we have ten items and configured the commits to be every 5th item. But, the framework does one more final read commit at the end to ensure everything has been processed, which is what brings us up to 3.
Next, let’s look at how to handle errors.
7. Exception Handling
By default, the job operator will mark our job as FAILED in case of an exception.
Let’s change our item reader to make sure that it fails:
@Override
public Integer readItem() throws Exception {
    if (tokens.hasMoreTokens()) {
        String tempTokenize = tokens.nextToken();
        throw new RuntimeException();
    }
    return null;
}
And then test:
@Test
public void whenChunkError_thenBatch_CompletesWithFailed() throws Exception {
    // ... start job and wait for completion
    assertEquals(jobExecution.getBatchStatus(), BatchStatus.FAILED);
}
But, we can override this default behavior in a number of ways:
- skip-limit specifies the number of exceptions this step will ignore before failing
- retry-limit specifies the number of times the job operator should retry the step before failing
- skippable-exception-class specifies a set of exceptions that chunk processing will ignore
So, we can edit our job so that it ignores RuntimeException, as well as a few others, just for illustration:
<job id="simpleErrorSkipChunk" >
    <step id="errorStep" >
        <chunk checkpoint-policy="item" item-count="3" skip-limit="3" retry-limit="3">
            <reader ref="myItemReader"/>
            <processor ref="myItemProcessor"/>
            <writer ref="myItemWriter"/>
            <skippable-exception-classes>
                <include class="java.lang.RuntimeException"/>
                <include class="java.lang.UnsupportedOperationException"/>
            </skippable-exception-classes>
            <retryable-exception-classes>
                <include class="java.lang.IllegalArgumentException"/>
                <include class="java.lang.UnsupportedOperationException"/>
            </retryable-exception-classes>
        </chunk>
    </step>
</job>
And now our code will pass:
@Test
public void givenChunkError_thenErrorSkipped_CompletesWithSuccess() throws Exception {
   // ... start job and wait for completion
   jobOperator.getStepExecutions(executionId).stream()
     .map(BatchTestHelper::getProcessSkipCount)
     .forEach(skipCount -> assertEquals(1L, skipCount.longValue()));
   assertEquals(jobExecution.getBatchStatus(), BatchStatus.COMPLETED);
}
8. Executing Multiple Steps
We mentioned earlier that a job can have any number of steps, so let’s see that now.
8.1. Firing the Next Step
By default, each step is the last step in the job.
In order to execute the next step within a batch job, we’ll have to explicitly specify by using the next attribute within the step definition:
<job id="simpleJobSequence">
    <step id="firstChunkStepStep1" next="firstBatchStepStep2">
        <chunk item-count="3">
            <reader ref="simpleChunkItemReader"/>
            <processor ref="simpleChunkItemProcessor"/>
            <writer ref="simpleChunkWriter"/>
        </chunk>
    </step>
    <step id="firstBatchStepStep2" >
        <batchlet ref="simpleBatchLet"/>
    </step>
</job>
If we forget this attribute, then the next step in sequence will not get executed.
And we can see what this looks like in the API:
@Test
public void givenTwoSteps_thenBatch_CompleteWithSuccess() throws Exception {
    // ... start job and wait for completion
    assertEquals(2 , jobOperator.getStepExecutions(executionId).size());
    assertEquals(jobExecution.getBatchStatus(), BatchStatus.COMPLETED);
}
8.2. Flows
A sequence of steps can also be encapsulated into a flow. When the flow is finished, it is the entire flow that transitions to the execution element. Also, elements inside the flow can’t transition to elements outside the flow.
We can, say, execute two steps inside a flow, and then have that flow transition to an isolated step:
<job id="flowJobSequence">
    <flow id="flow1" next="firstBatchStepStep3">
        <step id="firstChunkStepStep1" next="firstBatchStepStep2">
            <chunk item-count="3">
	        <reader ref="simpleChunkItemReader" />
		<processor ref="simpleChunkItemProcessor" />
		<writer ref="simpleChunkWriter" />
	    </chunk>
	</step>
	<step id="firstBatchStepStep2">
	    <batchlet ref="simpleBatchLet" />
	</step>
    </flow>
    <step id="firstBatchStepStep3">
	 <batchlet ref="simpleBatchLet" />
    </step>
</job>
And we can still see each step execution independently:
@Test
public void givenFlow_thenBatch_CompleteWithSuccess() throws Exception {
    // ... start job and wait for completion

    assertEquals(3, jobOperator.getStepExecutions(executionId).size());
    assertEquals(jobExecution.getBatchStatus(), BatchStatus.COMPLETED);
}
8.3. Decisions
We also have if/else support in the form of decisions. Decisions provide a customized way of determining a sequence among steps, flows, and splits.
Like steps, it works on transition elements such as next which can direct or terminate job execution.
Let’s see how the job can be configured:
<job id="decideJobSequence">
     <step id="firstBatchStepStep1" next="firstDecider">
	 <batchlet ref="simpleBatchLet" />
     </step>
     <decision id="firstDecider" ref="deciderJobSequence">
        <next on="two" to="firstBatchStepStep2"/>
        <next on="three" to="firstBatchStepStep3"/>
     </decision>
     <step id="firstBatchStepStep2">
	<batchlet ref="simpleBatchLet" />
     </step>
     <step id="firstBatchStepStep3">
	<batchlet ref="simpleBatchLet" />
     </step>
</job>
Any decision element needs to be configured with a class that implements Decider. Its job is to return a decision as a String.
Each next inside decision is like a case in a switch statement.
8.4. Splits
Splits are handy since they allow us to execute flows concurrently:
<job id="splitJobSequence">
   <split id="split1" next="splitJobSequenceStep3">
      <flow id="flow1">
	  <step id="splitJobSequenceStep1">
              <batchlet ref="simpleBatchLet" />
           </step>
      </flow>
      <flow id="flow2">
          <step id="splitJobSequenceStep2">
              <batchlet ref="simpleBatchLet" />
	  </step>
      </flow>
   </split>
   <step id="splitJobSequenceStep3">
      <batchlet ref="simpleBatchLet" />
   </step>
</job>
Of course, this means that the order isn’t guaranteed.
Let’s confirm that they still all get run. The flow steps will be performed in an arbitrary order, but the isolated step will always be last:
@Test
public void givenSplit_thenBatch_CompletesWithSuccess() throws Exception {
    // ... start job and wait for completion
    List<StepExecution> stepExecutions = jobOperator.getStepExecutions(executionId);

    assertEquals(3, stepExecutions.size());
    assertEquals("splitJobSequenceStep3", stepExecutions.get(2).getStepName());
    assertEquals(jobExecution.getBatchStatus(), BatchStatus.COMPLETED);
}
9. Partitioning a Job
We can also consume the batch properties within our Java code which have been defined in our job.
They can be scoped at three levels – the job, the step, and the batch-artifact.
Let’s see some examples of how they consumed.
When we want to consume the properties at job level:
@Inject
JobContext jobContext;
...
jobProperties = jobContext.getProperties();
...
This can be consumed at a step level as well:
@Inject
StepContext stepContext;
...
stepProperties = stepContext.getProperties();
...
When we want to consume the properties at batch-artifact level:
@Inject
@BatchProperty(name = "name")
private String nameString;
This comes in handy with partitions.
See, with splits, we can run flows concurrently. But we can also partition a step into n sets of items or set separate inputs, allowing us another way to split up the work across multiple threads.
To comprehend the segment of work each partition should do, we can combine properties with partitions:
<job id="injectSimpleBatchLet">
    <properties>
        <property name="jobProp1" value="job-value1"/>
    </properties>
    <step id="firstStep">
        <properties>
            <property name="stepProp1" value="value1" />
        </properties>
	<batchlet ref="injectSimpleBatchLet">
	    <properties>
		<property name="name" value="#{partitionPlan['name']}" />
	    </properties>
	</batchlet>
	<partition>
	    <plan partitions="2">
		<properties partition="0">
		    <property name="name" value="firstPartition" />
		</properties>
		<properties partition="1">
		    <property name="name" value="secondPartition" />
		</properties>
	    </plan>
	</partition>
    </step>
</job>
10. Stop and Restart
Now, that’s it for defining jobs. Now let’s talk for a minute about managing them.
We’ve already seen in our unit tests that we can get an instance of JobOperator from BatchRuntime:
JobOperator jobOperator = BatchRuntime.getJobOperator();And then, we can start the job:
Long executionId = jobOperator.start("simpleBatchlet", new Properties());However, we can also stop the job:
jobOperator.stop(executionId);And lastly, we can restart the job:
executionId = jobOperator.restart(executionId, new Properties());Let’s see how we can stop a running job:
@Test
public void givenBatchLetStarted_whenStopped_thenBatchStopped() throws Exception {
    JobOperator jobOperator = BatchRuntime.getJobOperator();
    Long executionId = jobOperator.start("simpleBatchLet", new Properties());
    JobExecution jobExecution = jobOperator.getJobExecution(executionId);
    jobOperator.stop(executionId);
    jobExecution = BatchTestHelper.keepTestStopped(jobExecution);
    assertEquals(jobExecution.getBatchStatus(), BatchStatus.STOPPED);
}
And if a batch is STOPPED, then we can restart it:
@Test
public void givenBatchLetStopped_whenRestarted_thenBatchCompletesSuccess() {
    // ... start and stop the job

    assertEquals(jobExecution.getBatchStatus(), BatchStatus.STOPPED);
    executionId = jobOperator.restart(jobExecution.getExecutionId(), new Properties());
    jobExecution = BatchTestHelper.keepTestAlive(jobOperator.getJobExecution(executionId));

    assertEquals(jobExecution.getBatchStatus(), BatchStatus.COMPLETED);
}
11. Fetching Jobs
When a batch job is submitted then the batch runtime creates an instance of JobExecution to track it.
To obtain the JobExecution for an execution id, we can use the JobOperator#getJobExecution(executionId) method.
And, StepExecution provides helpful information for tracking a step’s execution.
To obtain the StepExecution for an execution id, we can use the JobOperator#getStepExecutions(executionId) method.
And from that, we can get several metrics about the step via StepExecution#getMetrics:
@Test
public void givenChunk_whenJobStarts_thenStepsHaveMetrics() throws Exception {
    // ... start job and wait for completion
    assertTrue(jobOperator.getJobNames().contains("simpleChunk"));
    assertTrue(jobOperator.getParameters(executionId).isEmpty());
    StepExecution stepExecution = jobOperator.getStepExecutions(executionId).get(0);
    Map<Metric.MetricType, Long> metricTest = BatchTestHelper.getMetricsMap(stepExecution.getMetrics());
    assertEquals(10L, metricTest.get(Metric.MetricType.READ_COUNT).longValue());
    assertEquals(5L, metricTest.get(Metric.MetricType.FILTER_COUNT).longValue());
    assertEquals(4L, metricTest.get(Metric.MetricType.COMMIT_COUNT).longValue());
    assertEquals(5L, metricTest.get(Metric.MetricType.WRITE_COUNT).longValue());
    // ... and many more!
}
12. Disadvantages
JSR 352 is powerful, though it is lacking in a number of areas:
- There seems to be lack of readers and writers which can process other formats such as JSON
- There is no support of generics
- Partitioning only supports a single step
- The API does not offer anything to support scheduling (though J2EE has a separate scheduling module)
- Due to its asynchronous nature, testing can be a challenge
- The API is quite verbose
13. Conclusion
In this article, we looked at JSR 352 and learned about chunks, batchlets, splits, flows and much more. Yet, we’ve barely scratched the surface.


