Introduction to Cross-Platform Java Development With Codename One
Last updated: June 17, 2026


Mocking is an essential part of unit testing, and the Mockito library makes it easy to write clean and intuitive unit tests for your Java code.
Get started with mocking and improve your application tests using our Mockito guide:
Handling concurrency in an application can be a tricky process with many potential pitfalls. A solid grasp of the fundamentals will go a long way to help minimize these issues.
Get started with understanding multi-threaded applications with our Java Concurrency guide:
Spring 5 added support for reactive programming with the Spring WebFlux module, which has been improved upon ever since. Get started with the Reactor project basics and reactive programming in Spring Boot:
Since its introduction in Java 8, the Stream API has become a staple of Java development. The basic operations like iterating, filtering, mapping sequences of elements are deceptively simple to use.
But these can also be overused and fall into some common pitfalls.
To get a better understanding on how Streams work and how to combine them with other language features, check out our guide to Java Streams:
Explore Spring Boot 3 and Spring 6 in-depth through building a full REST API with the framework:
Yes, Spring Security can be complex, from the more advanced functionality within the Core to the deep OAuth support in the framework.
I built the security material as two full courses - Core and OAuth, to get practical with these more complex scenarios. We explore when and how to use each feature and code through it on the backing project.
You can explore the course here:
Spring Data JPA is a great way to handle the complexity of JPA with the powerful simplicity of Spring Boot.
Get started with Spring Data JPA through the guided reference course:
Refactor Java code safely — and automatically — with OpenRewrite.
Refactoring big codebases by hand is slow, risky, and easy to put off. That’s where OpenRewrite comes in. The open-source framework for large-scale, automated code transformations helps teams modernize safely and consistently.
Each month, the creators and maintainers of OpenRewrite at Moderne run live, hands-on training sessions — one for newcomers and one for experienced users. You’ll see how recipes work, how to apply them across projects, and how to modernize code with confidence.
Join the next session, bring your questions, and learn how to automate the kind of work that usually eats your sprint time.
Get up to speed with the core of Maven quickly, and then go beyond the foundations into the more powerful functionality of the build tool, such as profiles, scopes, multi-module projects and quite a bit more:
1. Overview
Codename One is an open-source, commercially supported platform that lets Java and Kotlin developers build cross-platform applications from a single codebase, while integrating with modern Maven-based workflows.
Its cloud-based build model reduces much of the platform-specific setup required for native development, letting us target iOS, Android, JavaScript, Windows, and macOS from the same project.
In this tutorial, we’ll build a Java 17 app named Daily Routine. It manages daily activities, has language and appearance settings, searches for places through a REST API, and displays map previews.
2. Big Picture
Let’s first look at the workflow, the finished app, and the source code we use as a reference.
2.1. Understanding the Codename One Workflow
Codename One applications are Maven projects. During development, the fastest loop is usually local, i.e., we run the app in the simulator, edit Java or Kotlin code, update CSS, and run tests from the IDE or command line:
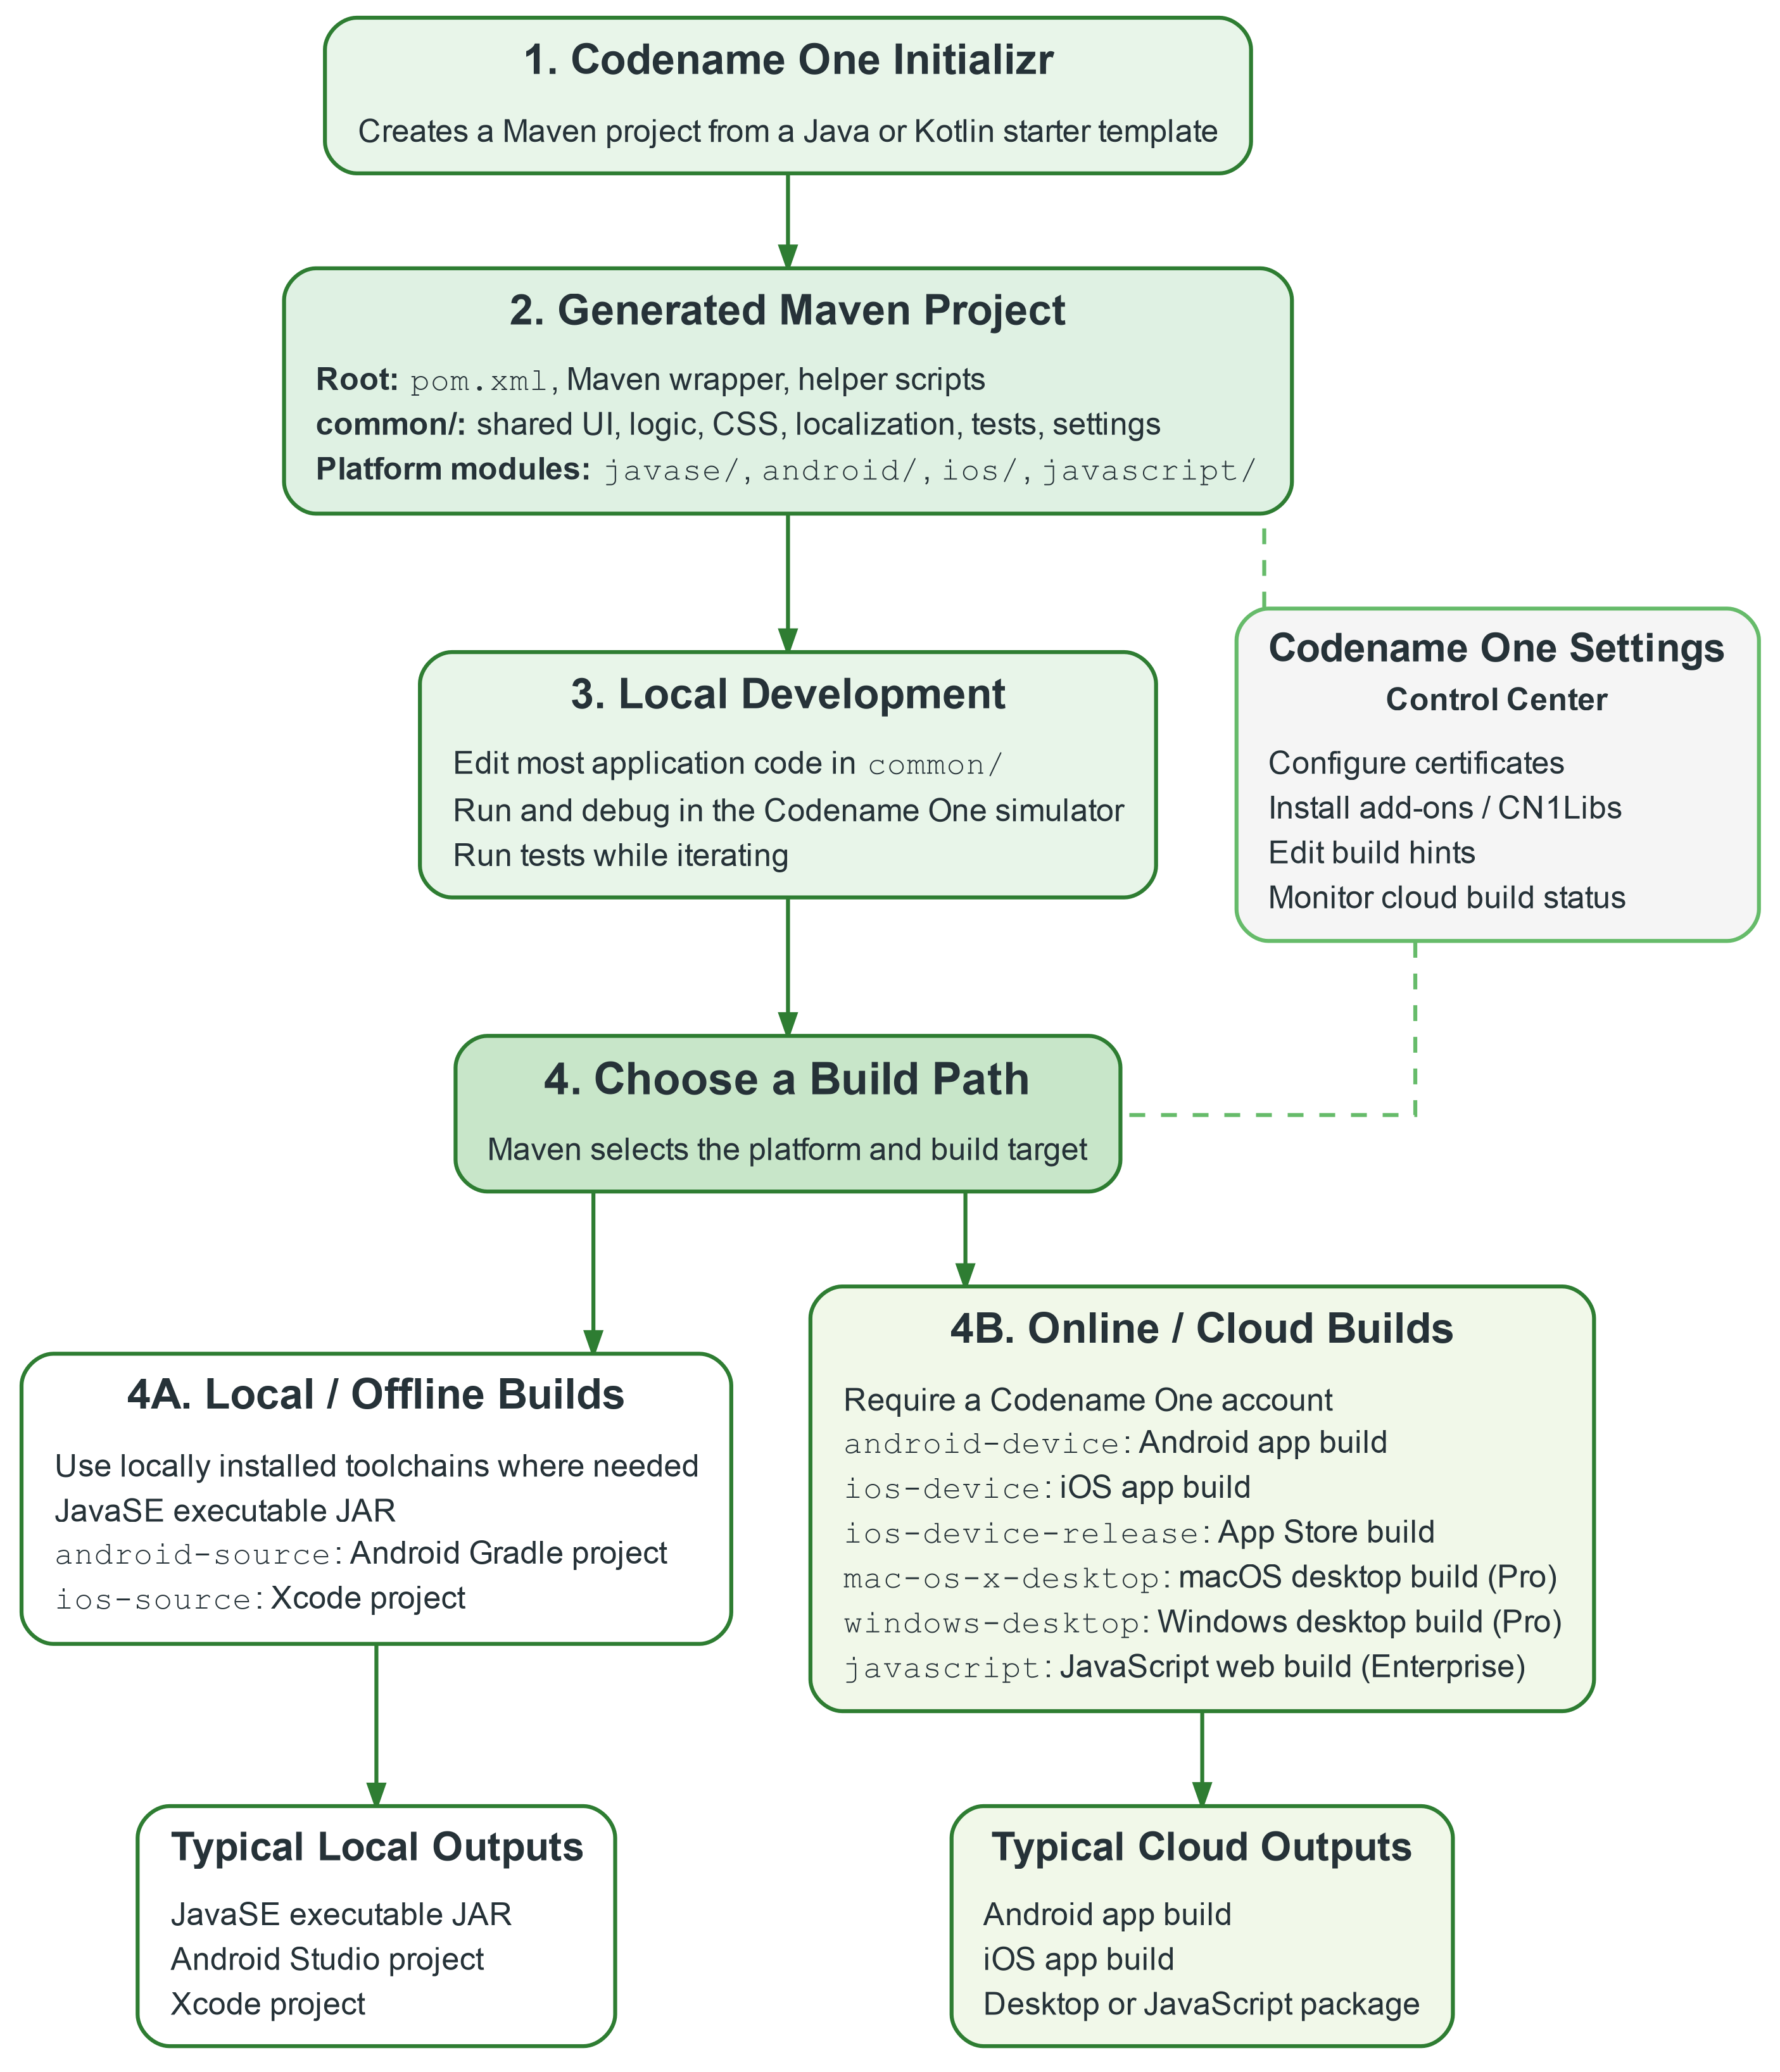
This workflow is also automation-friendly: Maven commands, simulator runs, tests, cloud builds, and real-device debugging can be driven from scripts, CI jobs, or AI agents. Java 17 projects generated by the Codename One Initializr include agent-facing guidance for realistic end-to-end app development with AI assistance.
2.2. Preview and Sources
Before setting up the project locally, let’s download the JavaScript port and open it as a local HTML file. This gives us a quick preview of the forms, navigation, activity editor, settings screen, place search, and map preview.
Let’s see an example with Firefox:
The app is intentionally more complete than a minimal example, as it includes several features:
- local JSON persistence
- service classes
- responsive styling
- localization
- REST integration
- diagnostics
- UI tests
- network error handling
- fallback logic
Rather than covering every part of the repository line by line, we use the complete source code as a reference while focusing on the main Codename One patterns.
2.3. Opening the Complete Sources From GitHub
When opening the sources from GitHub, IDE-specific actions may be missing because local IDE metadata usually isn’t committed.
When using IntelliJ IDEA, we can recreate the Codename One run configurations fairly easily:
mvn cn1:configure-intellijThis restores actions such as running the simulator, opening Codename One Settings, and updating Codename One. Other IDEs can still open the project as a Maven project, but may require running the needed Maven goals manually.
3. Setting Up the Project
Now, let’s generate a new project, inspect its structure, and run it locally.
3.1. Creating the Project With Codename One Initializr
In the Codename One Initializr, let’s use a simple configuration:
- Main class: DailyRoutine
- Package: com.baeldung.cn1tutorial
- Localization: Include resource bundles
The other defaults are fine. After clicking Generate Project, a multi-module Maven structure appears:
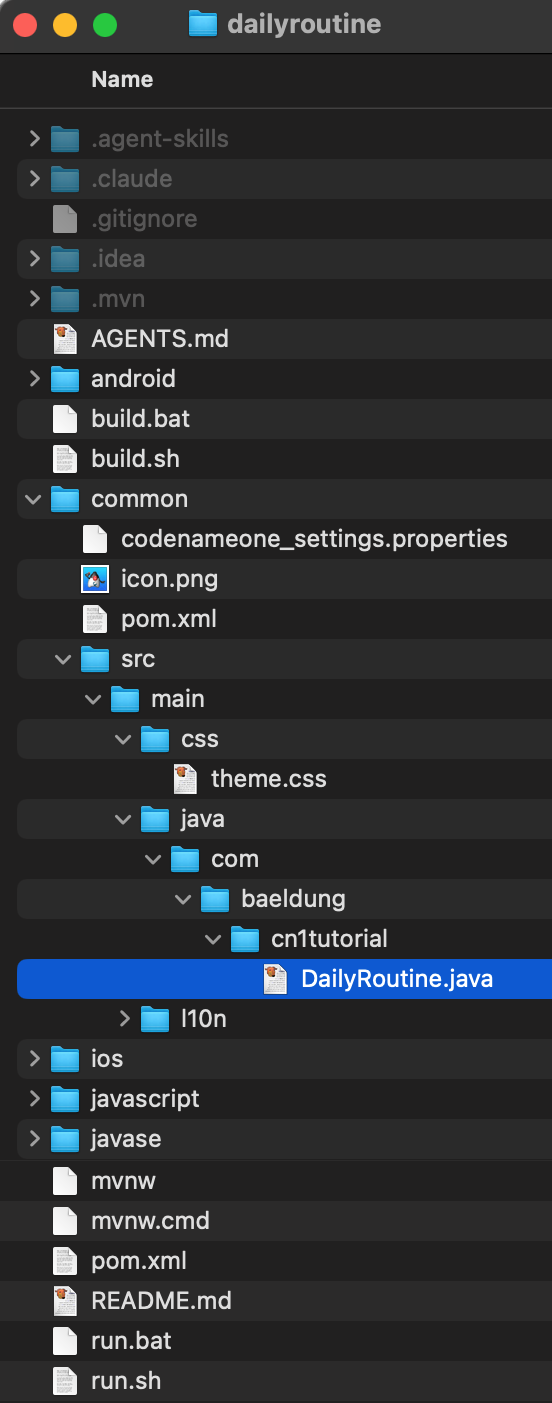
We write most of the application in the shared common module: UI forms, business logic, CSS, localization files, services, and tests. Platform-specific modules for iOS, Android, Java SE, and JavaScript are present, but we usually touch them only for native integration or platform-specific configuration.
The generated AGENTS.md file and .agent-skills directory are meant to guide AI agents, but they also help explain the project structure and workflow.
3.2. Opening the Project in IntelliJ IDEA
For this tutorial, we use IntelliJ IDEA, although the Maven structure works with other major Java IDEs.
We should open the project root, not only the common module, because the root pom.xml defines the full Maven reactor.
When we first open it, a warning informs us that the Java SDK isn’t configured:
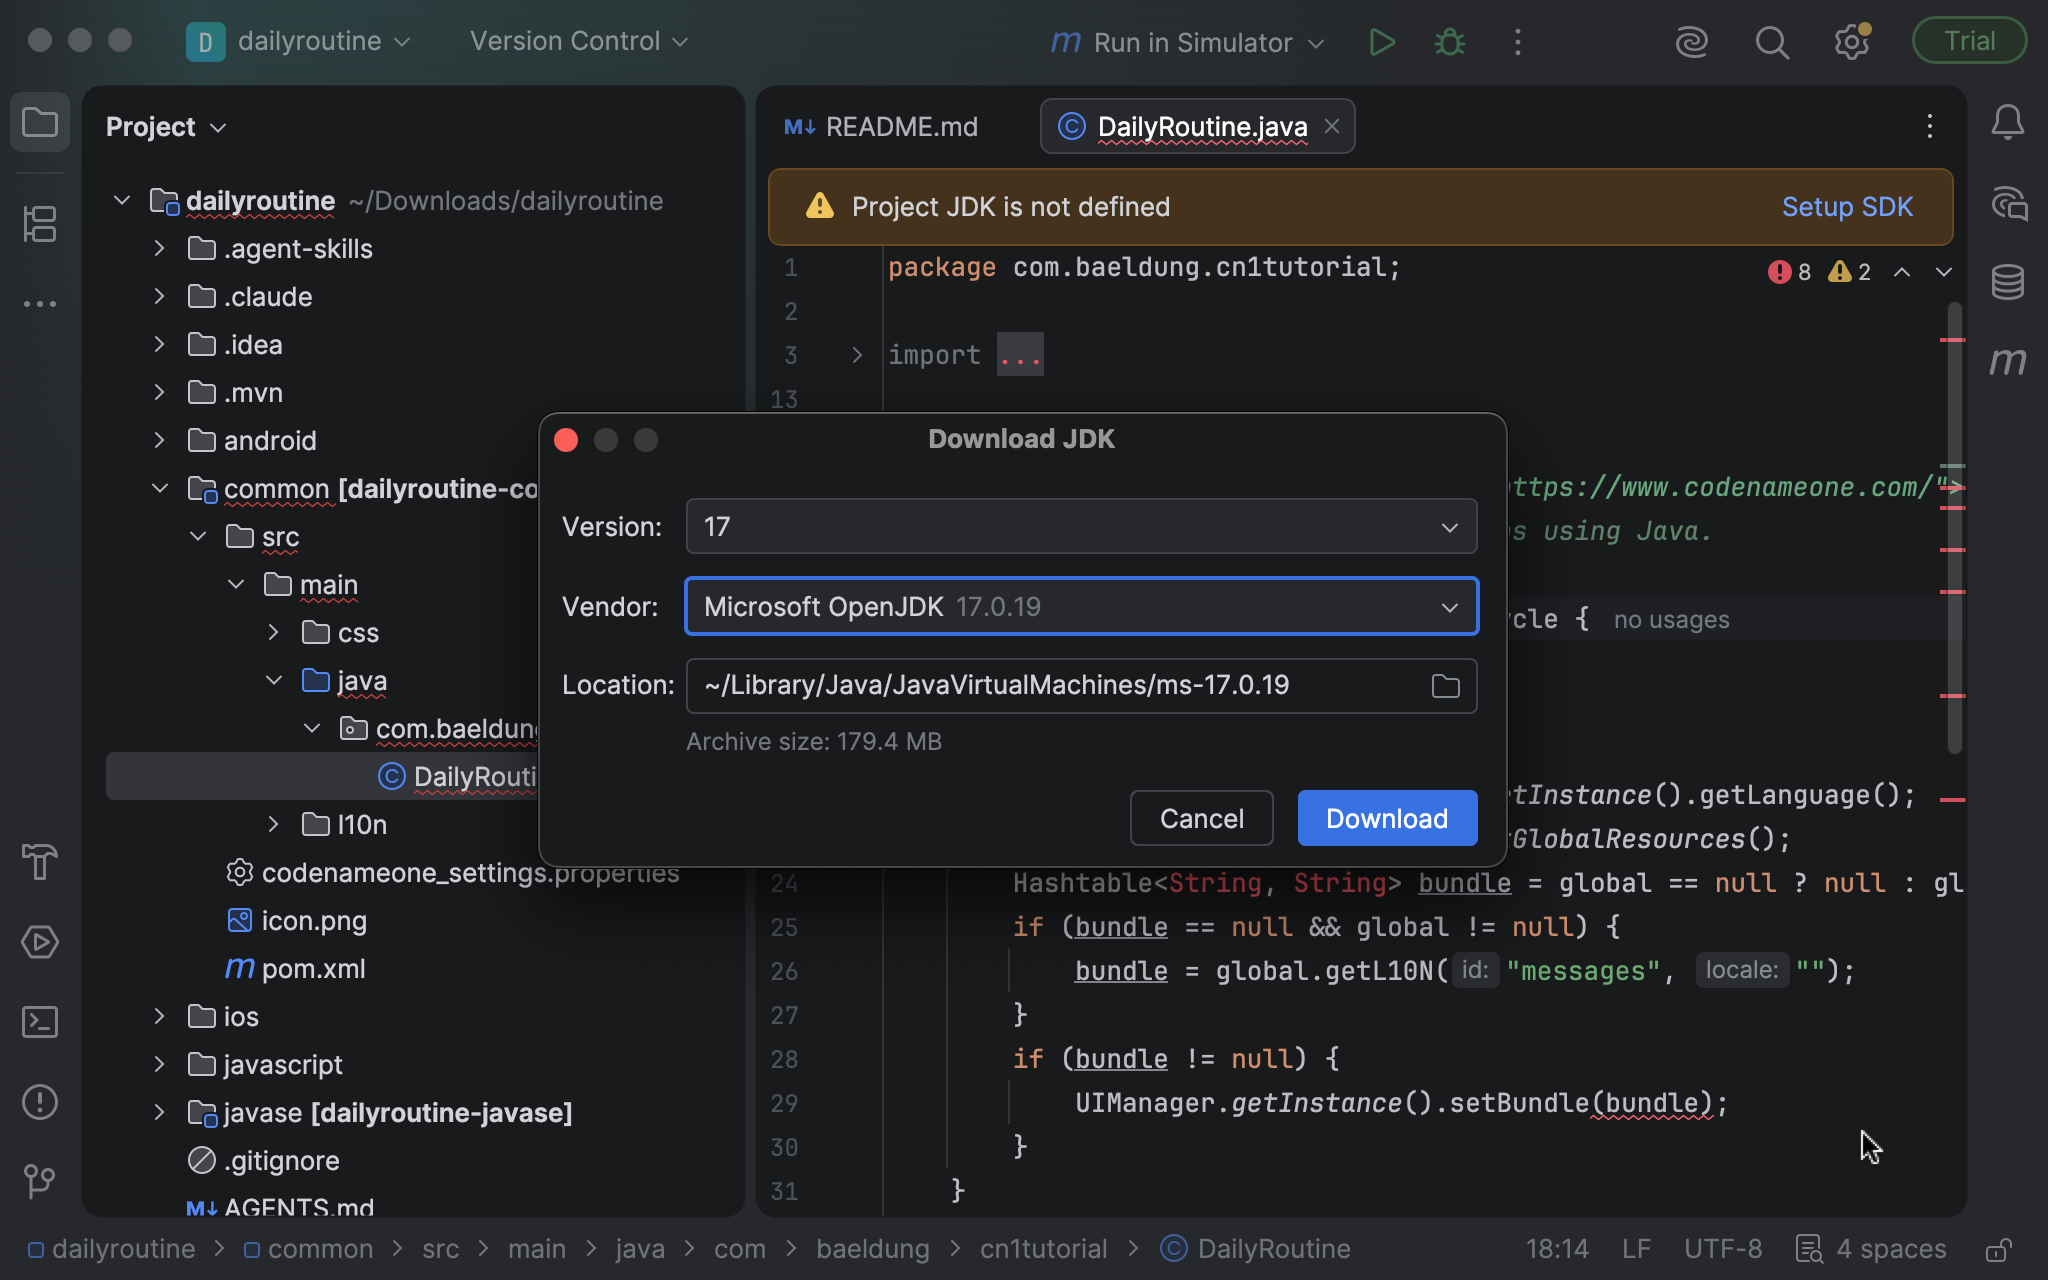
Let’s select OpenJDK 17.
3.3. Running the App in the Simulator
For UI work, we can treat the simulator as a reliable preview of real devices, as long as we compare the same platform family and a reasonably matching skin. There are options to try orientation changes, skins, system font size, light and dark styles, and much more:
The first place to inspect if we notice any odd behavior is theme.css. Additionally, certain changes to the simulator settings require us to close and reopen the simulator, so the app can adapt properly.
4. Creating the App Skeleton
Now that the project runs, let’s replace the generated screen with the structure of Daily Routine.
4.1. The Application Lifecycle
The Initializr starts with a class that extends the Codename One Lifecycle class and overrides runApp(). The DailyRoutine class keeps that entry point, but adds the setup needed by the app.
In Codename One, a Form represents one screen:
public class DailyRoutine extends Lifecycle {
    private AppContext appContext;

    @Override
    public void init(Object context) {
        super.init(context);

        Toolbar.setGlobalToolbar(true);

        // Configure logging, error handling, toolbar behavior, and network defaults
        // Create repositories, services, localization, and shared application context
        // Load saved settings and activities
        // Apply the initial theme, language, and font scale
    }

    @Override
    public void runApp() {
        if (appContext == null) {
            return;
        }
        showHome();
    }

    @Override
    public void start() {
        super.start();

        Form current = CN.getCurrentForm();
        if (current != null) {
            // App-specific refresh logic omitted for brevity
        }
    }

    public void showHome() {
        new HomeForm(appContext).show();
    }
}
The lifecycle is easier to understand visually:
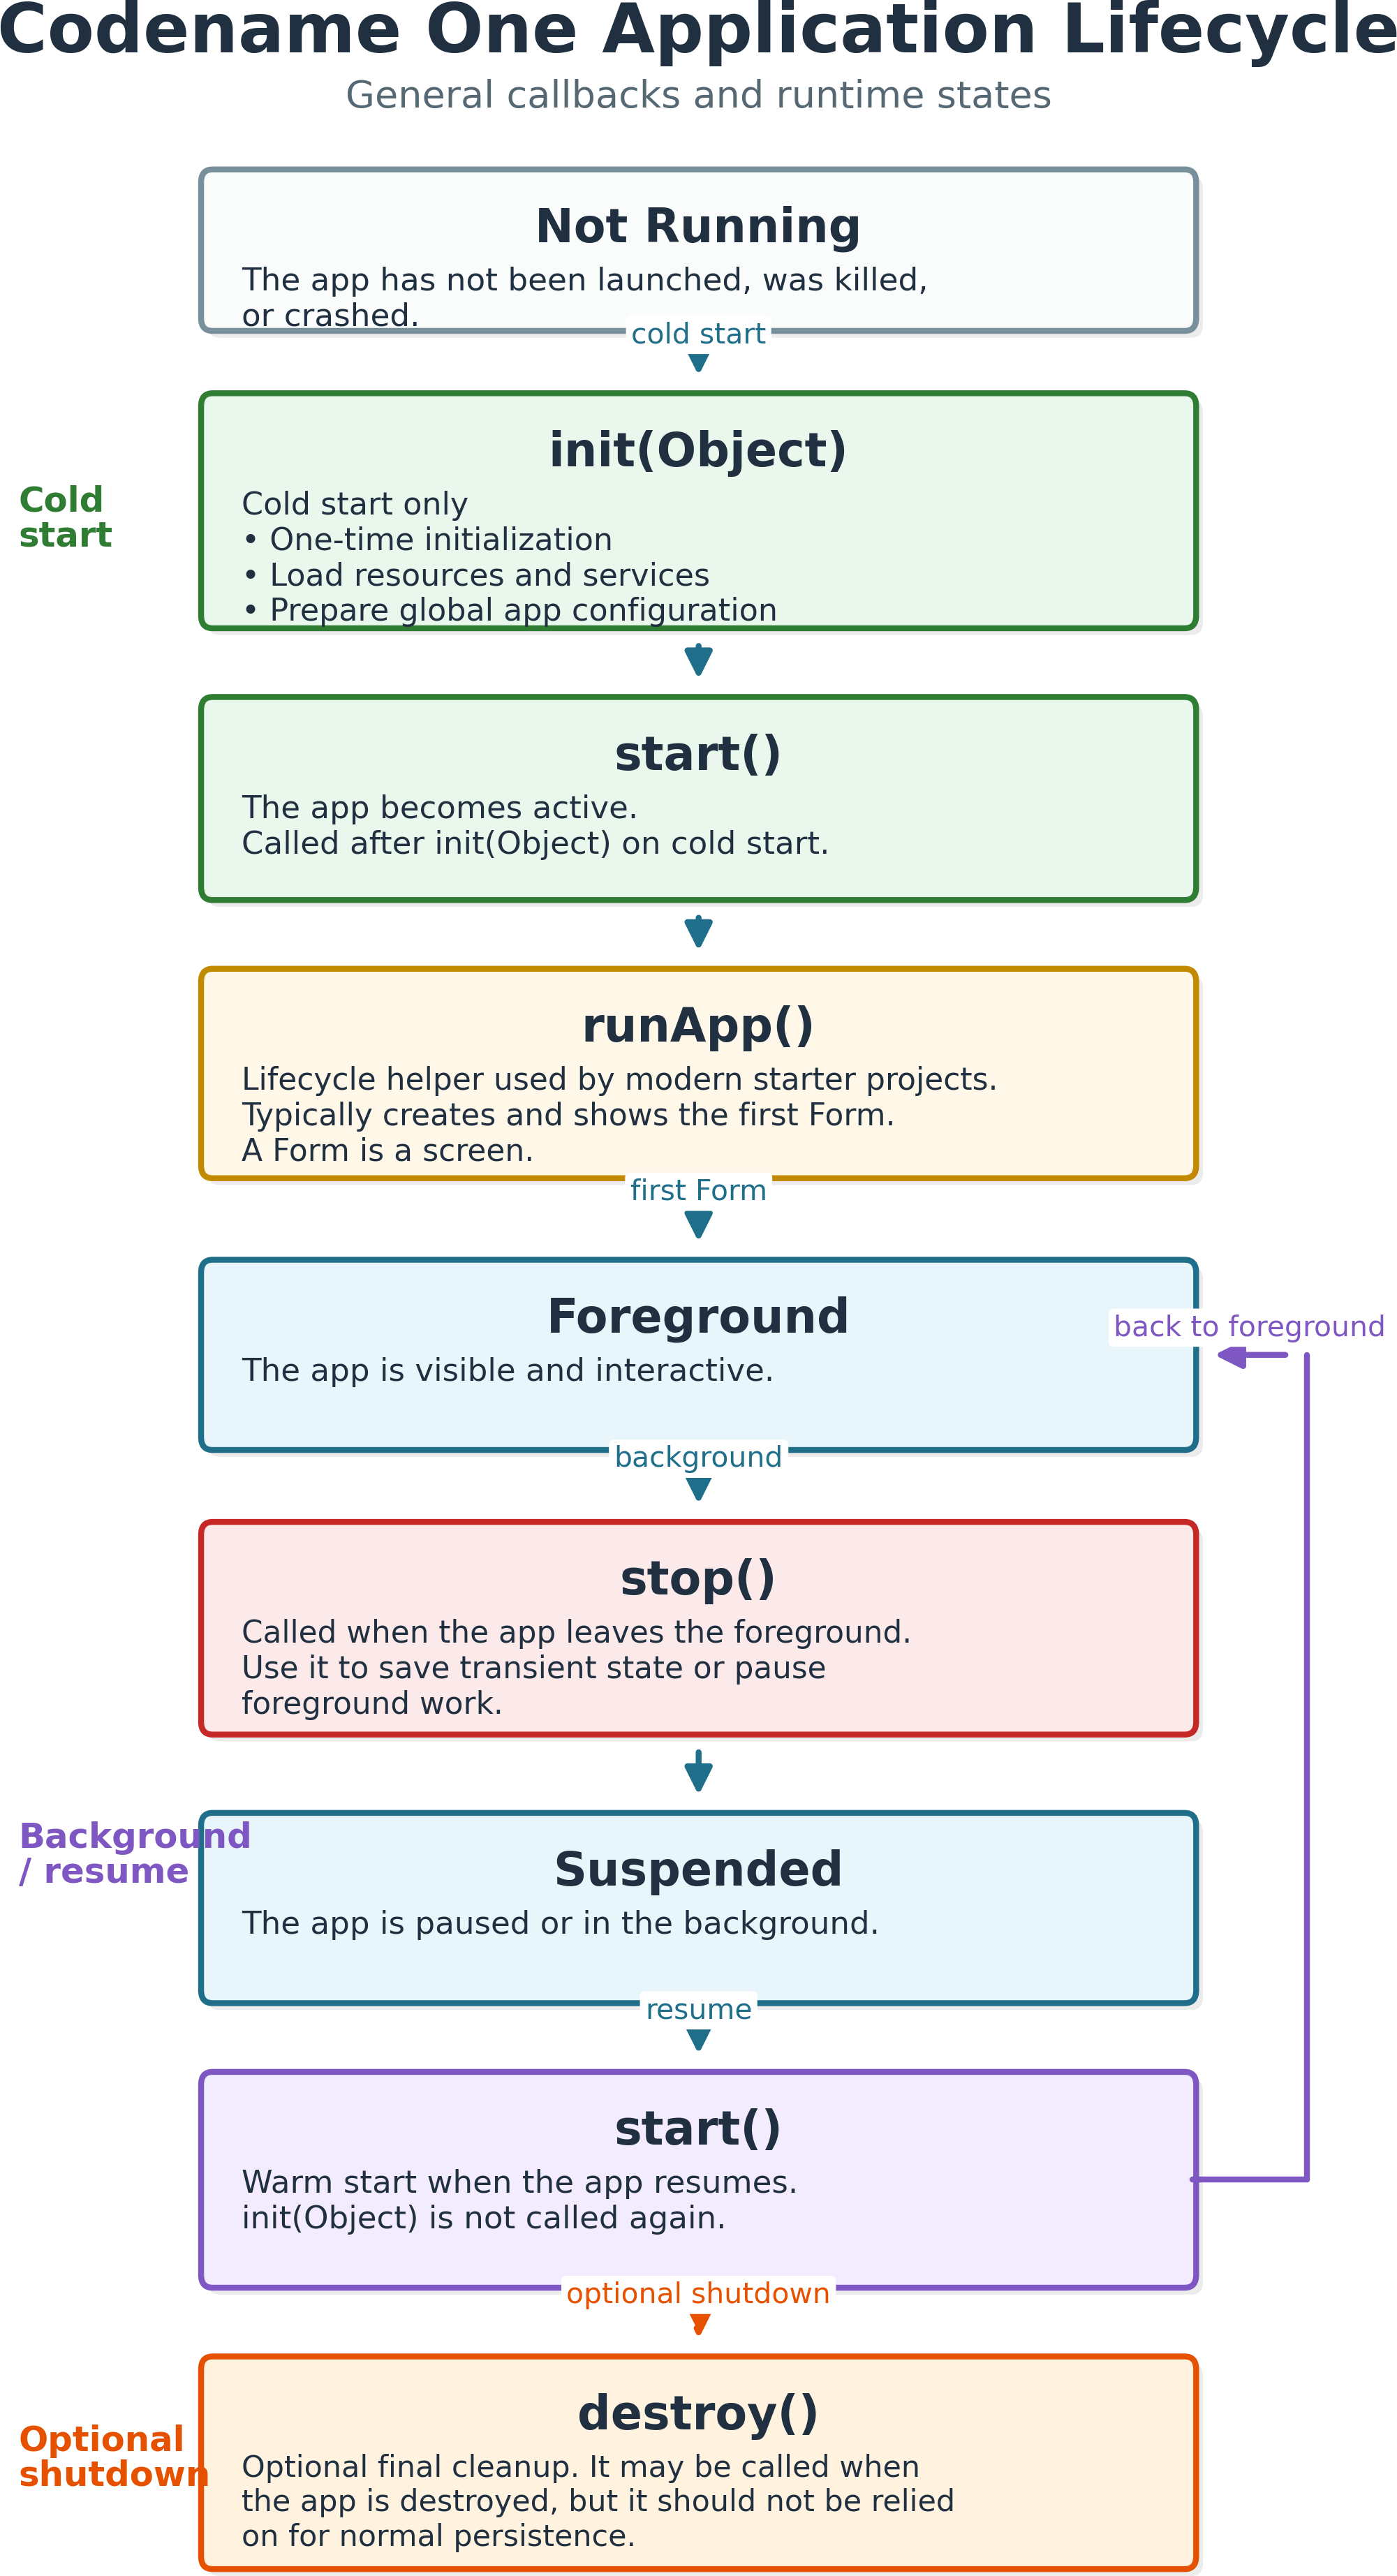
The base Lifecycle class provides the default behavior. We override only the hooks where the app needs extra setup, while calls such as super.init(context) and super.start() keep framework defaults in place.
4.2. Initializing Services and Shared State
Once super.init(context) has applied the lifecycle defaults, our init() method creates the objects that the rest of the app uses. Here, context is provided by Codename One itself; it’s not the AppContext that we create later for the forms.
This approach is a lightweight alternative to a dependency-injection framework: instead of making forms create repositories or know about application setup, we pass them an AppContext with the services, settings, localized text helpers, and navigation methods they need.
First, let’s create the persistence layer and the in-memory store:
ActivityRepository activityRepository = createActivityRepository();
SettingsRepository settingsRepository = createSettingsRepository();
ActivityStore activityStore = new ActivityStore(activityRepository);
ActivityRepository persists the activities, while SettingsRepository stores user preferences. ActivityStore keeps the current list of activities in memory and delegates loading and saving to the repository.
Next, let’s create the services used by the UI:
Resources themeResources = getTheme();

LocalizationService localizationService =
  createLocalizationService(themeResources);

PlaceSearchService placeSearchService = createPlaceSearchService();
getTheme() returns the resources already loaded by the Lifecycle base class. We discuss themes and CSS later; for now, the important point is that we pass theme resources to LocalizationService because the app localization bundles are stored there and then installed into UIManager. PlaceSearchService is the abstraction we later implement with the Geoapify REST API.
Then, let’s load the saved settings and assemble the shared application context:
AppSettings settings = settingsRepository.load();

appContext = createAppContext(
    activityStore,
    settingsRepository,
    localizationService,
    placeSearchService,
    settings
);
AppContext is the object we pass to the forms. It gives them access to shared state, services, localized text, settings, and navigation helpers, without making each form create those dependencies itself.
Finally, let’s apply the saved settings and load the activity list:
applySettings(settings, false);
activityStore.load();
This way, we keep startup code centralized in the lifecycle class, while the forms can focus on UI and user interaction.
4.3. Navigating Between Forms
A layered navigation structure may look more complex than directly creating forms everywhere, but it keeps the app easier to maintain and extend:
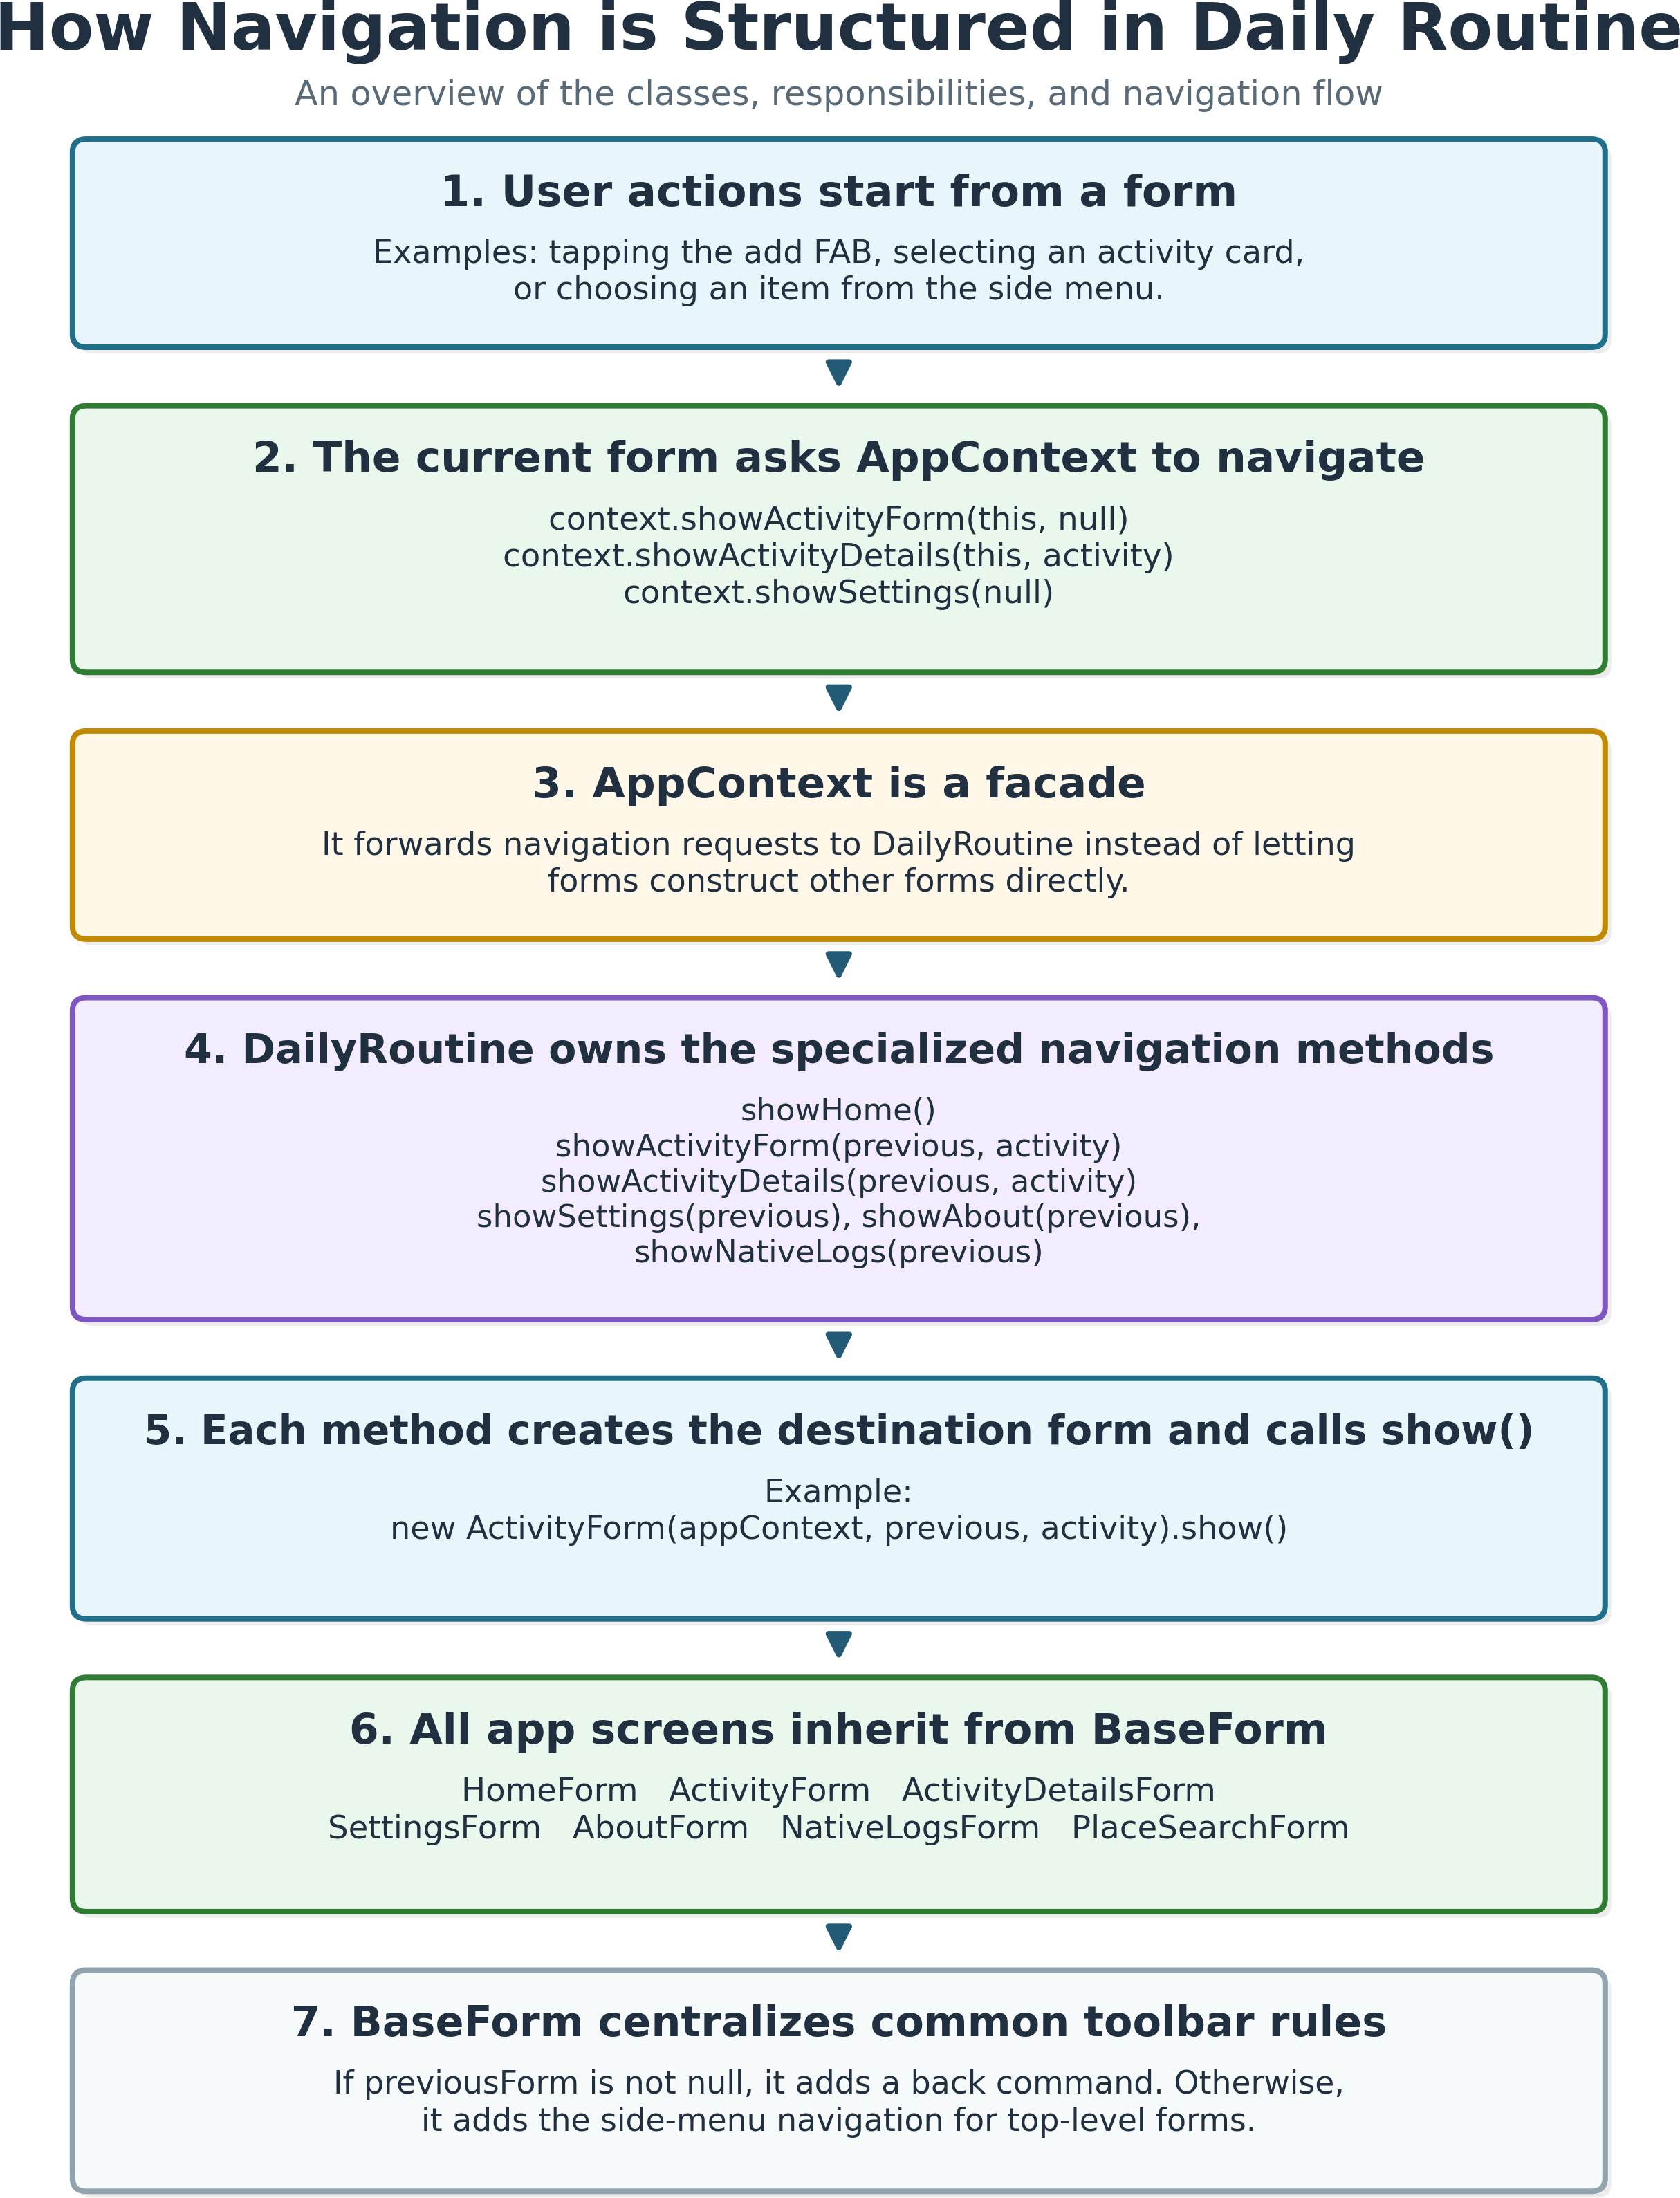
AppContext acts as a facade: forms call simple navigation methods, while DailyRoutine creates and shows destination forms. All screens inherit from BaseForm, so toolbar, back commands, and side-menu entries stay consistent.
5. Building Responsive Forms With Layouts and CSS
So, let’s look at the UI model: component trees, layout managers, UIIDs, and CSS.
5.1. Forms, Containers, and Layout Managers
Codename One UIs are easier to understand as component trees. Components live inside containers, and each container uses a layout manager to position its children.
The official Codename One tutorial on positioning components using layout managers gives a deeper explanation. For this app, the relation between the home screen and its component tree is fairly straightforward:
Each form has a title area and a content pane, and it can also expose overlay panes whose transparent background lets content underneath remain visible. The floating action button (FAB) is placed in the layered pane, so it floats above the activity list.
This hierarchy of components and overlapping layers is the basis for pixel-perfect designs in Codename One. Instead of hard-coding positions, we combine containers, layout managers, and CSS styling to adapt to device fragmentation: screen sizes, orientations, densities, safe areas, system font settings, and languages.
5.2. Styling Components With UIIDs and CSS
After defining the component hierarchy, we style components with UIIDs. A UIID is a style identifier assigned to a component, similar to a CSS class name.
The simulator’s Component Inspector helps us inspect the selected component’s class, UIID, layout, coordinates, padding, and margin. To open it, we right-click a component in the simulator and choose Inspect Component:
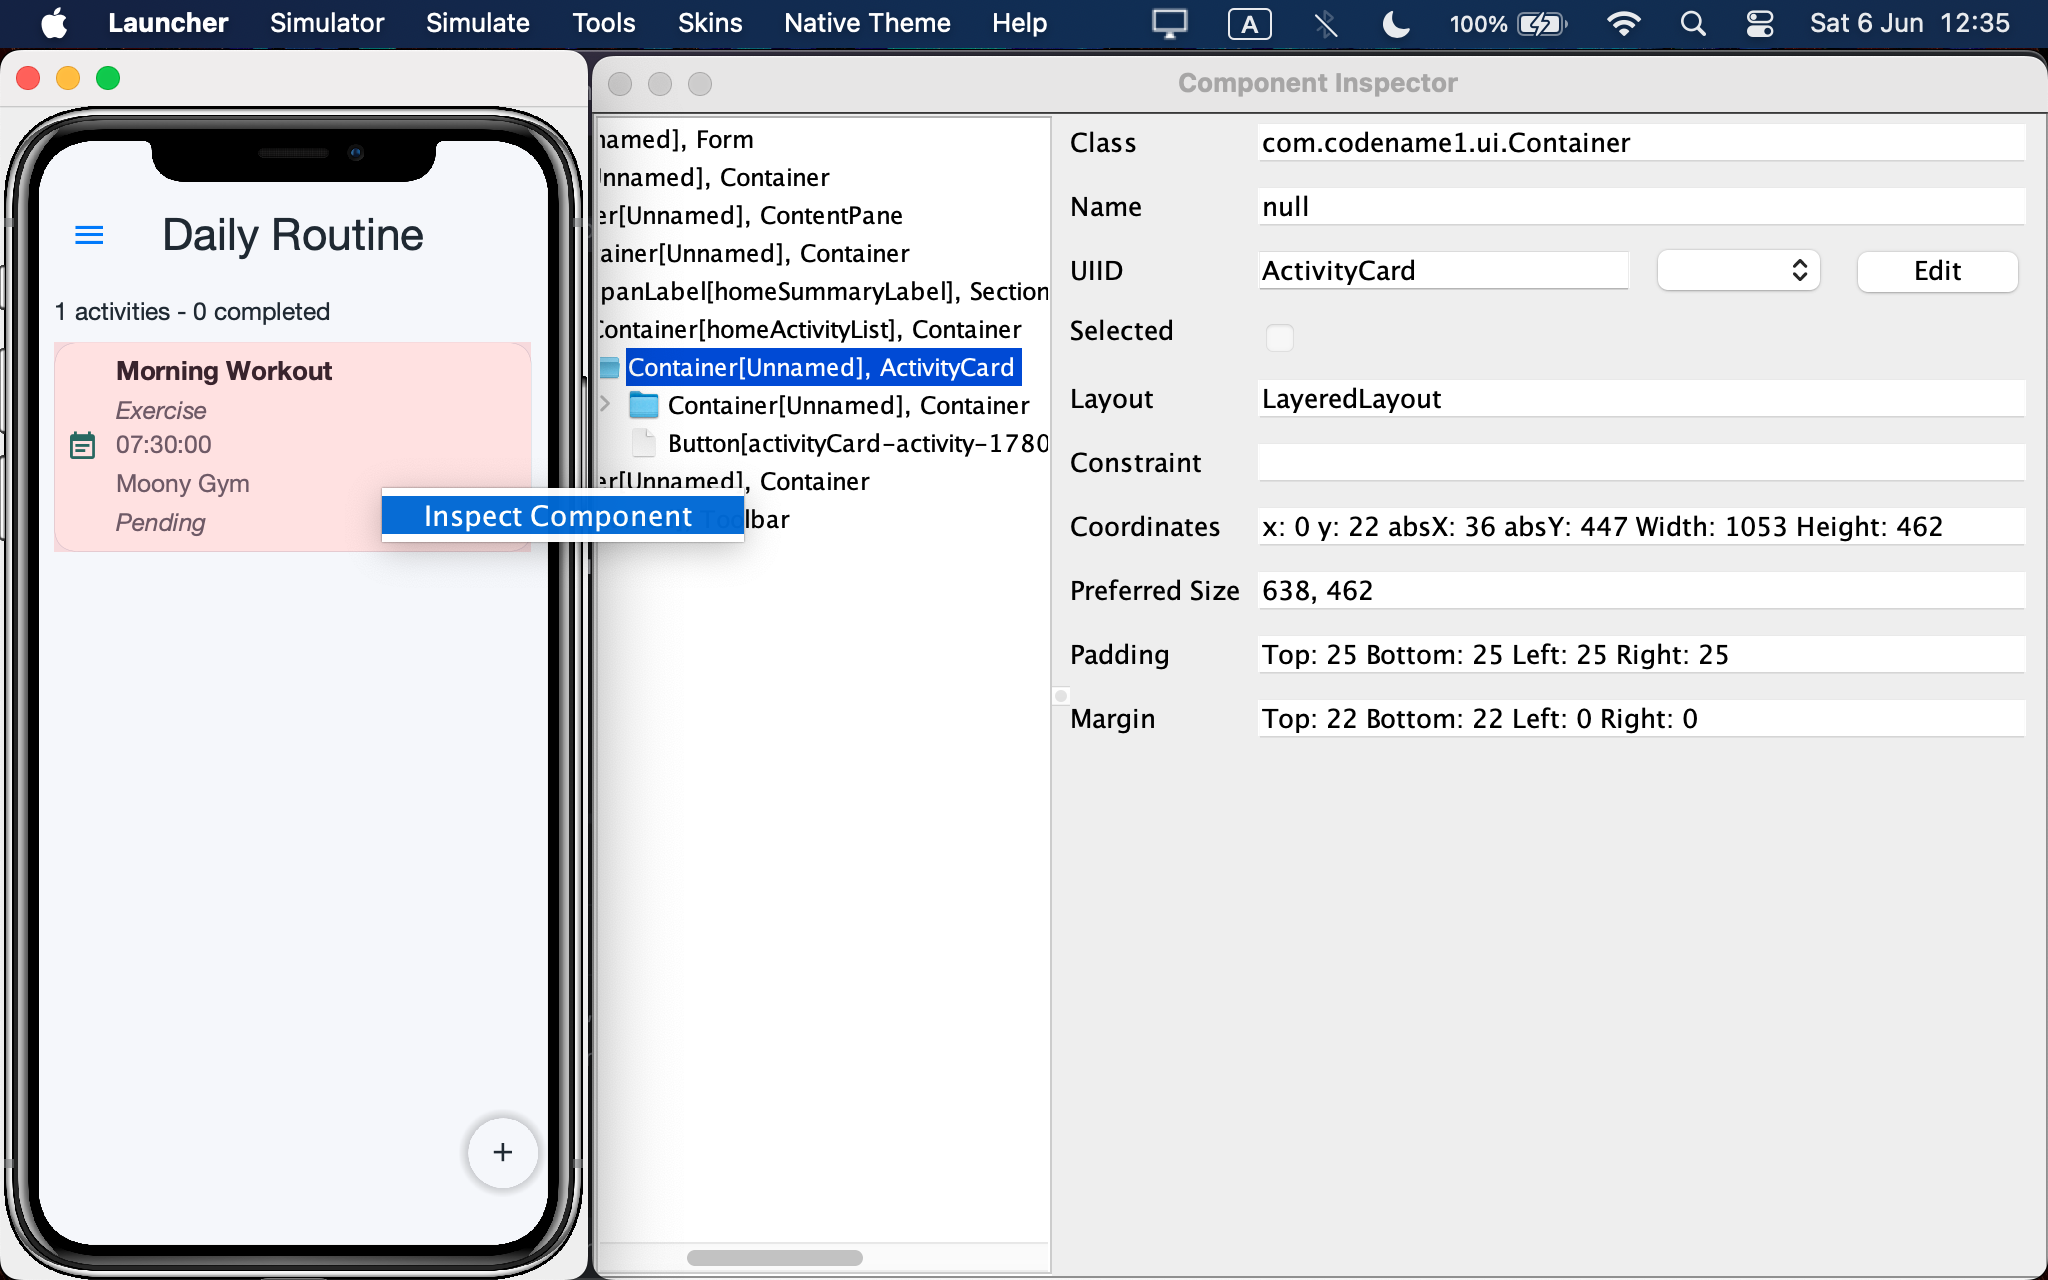
Here, the selected activity card has UIID ActivityCard and layout LayeredLayout. In Java, we assign the UIID to the card container:
Container card = new Container(new LayeredLayout());
card.setUIID("ActivityCard");
Then, CSS defines its visual appearance:
ActivityCard {
    background: #ffffff;
    background-color: #ffffff;
    color: #1f2933;
    border: 1px solid #d6dde7;
    border-radius: 3mm;
    font-family: "native:MainLight";
    font-size: 3mm;
    margin: 1.2mm 0 1.2mm 0;
    padding: 1.4mm;
}
Codename One CSS is intentionally close to web CSS, but has its own properties and conventions. Here, we use native fonts and dimensions in millimeters. The card appears pink in the screenshot because the Component Inspector highlights the selected component.
We can also define pressed and selected states and separate dark-mode rules:
ActivityCardPressed,
ActivityCard.pressed,
ActivityCard.selected {
    [...]
}

@media (prefers-color-scheme: dark) {
    ActivityCard {
        [...]
    }

    ActivityCardPressed,
    ActivityCard.pressed,
    ActivityCard.selected {
        [...]
    }
}
The UIID is the bridge between the component tree and the final appearance of the app.
5.3. Supporting Small Screens, Large Screens, and Font Scaling
If the user increases the system font size or changes the app font scale from the Settings form, labels may need more room, cards may become taller, and scrollable containers must absorb the extra content. This is useful on large screens, but can become problematic on small screens.
The complete source code includes defensive helpers for edge cases where single-line text doesn’t fit. These helpers can cap the font size so text stays within the available width. This is useful, but it adds complexity and should be evaluated on a case-by-case basis.
From this point on, we focus on the main Codename One patterns rather than implementation details. Daily Routine is the reference example, but the goal is to learn how to structure Codename One apps in general.
6. Building the Core Activity Workflow
The activity workflow gives us the core of the app: a model, a store, a list screen, an editor, and a details screen.
6.1. Modeling Activities
The central domain object is Activity, implemented as a Java record:
public record Activity(
        String id,
        String title,
        ActivityCategory category,
        LocalDate date,
        LocalTime time,
        String notes,
        boolean completed,
        PlaceInfo place,
        Instant updatedAt
) [...]
Categories are modeled with an enum. Each category has a storage code, a localization key, and a sort order:
public enum ActivityCategory {
    APPOINTMENT("appointment", "category.appointment", 0),
    ROUTINE("routine", "category.routine", 1),
    WORK("work", "category.work", 2),
    [...]
}
This keeps the model simple to persist, localize, and display.
6.2. Listing Activities on the Home Form
The home screen reads activities from ActivityStore and rebuilds the list when data changes.
Unlike a web page, a Codename One form doesn’t always update the visible UI immediately after we change the component hierarchy. This is a design choice that helps reduce unnecessary layout work, especially in complex component trees. The final call to revalidate() tells Codename One to lay out the updated listContainer again, so the changes are reflected on screen:
private void refreshList() {
    List<Activity> activities =
            context.getActivityStore().getActivitiesInInsertionOrder();

    listContainer.removeAll();

    for (Activity activity : activities) {
        listContainer.add(createCard(activity));
    }

    listContainer.revalidate();
}
The form doesn’t load JSON directly. Instead, it uses AppContext to access the current ActivityStore, keeping UI code focused on rendering and user interaction.
Each activity is displayed as a card:
private Container createCard(Activity activity) {
    Container card = new Container(new LayeredLayout());
    card.setUIID("ActivityCard");

    Container content = new Container(new BorderLayout());
    Container textColumn = new Container(BoxLayout.y());

    // Add icon, title, category, schedule, place, and status labels

    content.add(BorderLayout.CENTER, textColumn);
    card.add(content);

    Button overlay = createCardOverlayButton(
            "activityCard-" + activity.id(),
            () -> context.showActivityDetails(this, activity)
    );
    card.add(overlay);

    return card;
}
The card structure, CSS styling, and navigation follow the same pattern: component tree for structure, UIID for appearance, and AppContext for navigation.
6.3. Adding and Editing Activities
The editor form handles both new and existing activities. When saving, it validates required fields, builds an ActivityDraft, converts it into an Activity, and stores it:
private void saveActivity() {
    String title = titleField.getText() == null
            ? ""
            : titleField.getText().trim();

    if (title.length() == 0) {
        Dialog.show(
                context.text("validation.title"),
                context.text("validation.activity.title"),
                context.text("ok"),
                null
        );
        return;
    }

    ActivityDraft draft = new ActivityDraft();
    draft.setTitle(title);
    draft.setCategory(selectedCategory());
    draft.setNotes(notesArea.getText());
    draft.setCompleted(completedSwitch.isValue());
    draft.setPlace(selectedPlace);

    String id = existingActivity == null
            ? IdGenerator.newId()
            : existingActivity.id();

    context.getActivityStore().save(draft.toActivity(id));
    context.showHome();
}
The exact form has more fields, such as date and time. The pattern is that the form edits a temporary state, while the store receives a complete activity only when the user confirms.
6.4. Showing Activity Details
The details screen shows one activity and offers actions such as editing or toggling completion:
public void toggleCompleted() {
    context.getActivityStore().toggleCompleted(activityId);
    refresh();
}
Since Activity is immutable, the store toggles completion by creating a new instance and saving it.
The edit action uses the same navigation pattern:
public void editCurrentActivity() {
    context.showActivityForm(this, currentActivity());
}
At this point, the core workflow is complete: list, editor, and details form.
7. Saving and Testing Data Locally
The activity workflow now works, but data must survive restarts.
7.1. Persisting Activities as JSON
The UI doesn’t interact with files directly. It calls the store, and the store delegates persistence to ActivityRepository:
public class ActivityRepository {
    public List<Activity> loadActivities() throws IOException {
        String path = filePath();

        if (!FileSystemStorage.getInstance().exists(path)) {
            return new ArrayList<>();
        }

        String json = IOUtil.readUtf8File(path);
        return codec.decodeActivities(json);
    }

    public void saveActivities(List<Activity> activities) throws IOException {
        IOUtil.writeUtf8File(
            filePath(),
            codec.encodeActivities(activities)
        );
    }
}
The repository keeps forms independent from file storage, and its logic can be tested without involving forms or user interaction.
The JSON conversion is handled by a codec:
String json = codec.encodeActivities(activities);
List<Activity> activities = codec.decodeActivities(json);
Thus, the model stays independent, the repository owns persistence, and the UI works with domain objects.
7.2. Using the App Home Directory
Codename One provides an app-specific home directory for local files. The lifecycle creates the repositories, while each repository owns its storage path:
protected ActivityRepository createActivityRepository() {
    return new ActivityRepository();
}

protected SettingsRepository createSettingsRepository() {
    return new SettingsRepository();
}
The activity repository stores JSON under the app home directory:
public String filePath() {
    return appHomePath() + "activities.json";
}
The settings repository follows the same idea:
protected String filePath() {
    return CN.getAppHomePath() + "settings.json";
}
In the complete implementation, both repositories support a test-only override, so tests can write to a dedicated location.
This keeps persistence portable: the actual location differs between targets, but the app uses the same repository abstraction. In the simulator, the JSON files are easy to inspect and edit; on real devices and browser builds, storage is platform-specific and usually less convenient to inspect directly.
7.3. Testing the Repository
Codename One includes a testing API based on AbstractTest, usable through the simulator and device testing workflow.
Among the tests in the complete source code, one focused example verifies local persistence:
public class ActivityRepositoryRoundTripTest extends AbstractTest {
    @Override
    public boolean runTest() throws Exception {
        String path = FileSystemStorage.getInstance().getAppHomePath()
                + "tests/activity-round-trip-"
                + System.currentTimeMillis()
                + ".json";

        TestActivityRepository repository = new TestActivityRepository(path);

        List<Activity> activities = new ArrayList<>();
        Activity original = createActivity();
        activities.add(original);

        try {
            repository.saveActivities(activities);
            List<Activity> loaded = repository.loadActivities();

            assertEqual(1, loaded.size(), "Exactly one activity should be loaded");
            assertEqual(original, loaded.get(0), "The activity should survive a JSON round trip");

            return true;
        } finally {
            repository.reset();
        }
    }
}
TestActivityRepository redirects persistence to a test-specific file. Codename One also supports JUnit 5 for simulator-side tests on the JavaSE port, while AbstractTest remains the most portable option inside the Codename One runtime model.
8. Adding Place Autocomplete, REST, and Maps
Finally, we add place search and map display: a concise example of REST, JSON parsing, and embedded web content.
8.1. Searching Places With Geoapify
The editor lets the user search for a place and attach it to an activity. We use Geoapify because it provides autocomplete and map preview APIs, has a generous free tier, and enables the creation of a free API key without a credit card.
The complete source code includes a free example key, lightly obfuscated with XOR, so the demo can run out of the box. XOR isn’t security; it only avoids storing the key as plain text. For production, we should use a private key. Even better, the key shouldn’t live inside the app: the app should call the backend, and the backend should call Geoapify.
The form depends on a service interface, not on Geoapify directly:
public interface PlaceSearchService {
    SearchHandle search(
            AppContext context,
            String query,
            SuccessCallback<List<PlaceSuggestion>> onSuccess,
            FailureCallback<List<PlaceSuggestion>> onFailure
    );

    interface SearchHandle {
        void cancel();
    }
}
The implementation builds an autocomplete URL and submits a Codename One network request:
private String buildAutocompleteUrl(AppContext context, String query) {
    StringBuilder builder = new StringBuilder(
            "https://api.geoapify.com/v1/geocode/autocomplete?"
    );
    builder.append("text=").append(Util.encodeUrl(query));
    builder.append("&format=geojson");
    builder.append("&limit=").append(AppConfig.GEOAPIFY_RESULT_LIMIT);
    builder.append("&lang=").append(context.getSettings().languageCode());
    builder.append("&apiKey=").append(AppConfig.geoapifyApiKey());
    return builder.toString();
}
Again, the form depends on an application service, while provider-specific code stays in one place.
When working with callbacks and UI updates, we should also keep Codename One’s EDT (Event Dispatch Thread) in mind, so slow work, such as a network request, doesn’t block the interface.
8.2. Parsing the REST Response
Geoapify returns GeoJSON. The service extracts only the fields the app needs and creates PlaceSuggestion objects:
@SuppressWarnings("rawtypes")
private List<PlaceSuggestion> parseSuggestions(String json) throws IOException {
    JSONParser parser = new JSONParser();
    Map<String, Object> root = parser.parseJSON(new StringReader(json));

    List<PlaceSuggestion> suggestions = new ArrayList<>();

    List features = (List) root.get("features");

    // Read properties, geometry, and coordinates
    // Convert each feature into a PlaceSuggestion

    return suggestions;
}
The form receives domain objects, not raw JSON maps.
8.3. Showing a Map Preview With BrowserComponent
After the user selects a place, GeoapifyMapView checks whether a native browser component is available, then shows a Leaflet page:
browser = new BrowserComponent();
browser.setPinchToZoomEnabled(true);
browser.setNativeScrollingEnabled(true);
browser.setPage(buildMapHtml(place), null);

add(BorderLayout.CENTER, browser);
The page loads Leaflet, uses Geoapify map tiles, centers the map, and adds a marker:
private String buildMapHtml(PlaceInfo place) {
    String tileUrl = "https://maps.geoapify.com/v1/tile/"
            + AppConfig.GEOAPIFY_TILE_STYLE
            + "/{z}/{x}/{y}.png?apiKey="
            + AppConfig.geoapifyApiKey();

    return "<!doctype html><html><head>"
            + "<link rel=\"stylesheet\" "
            + "href=\"https://unpkg.com/[email protected]/dist/leaflet.css\"/>"
            + "</head><body><div id=\"map\"></div>"
            + "<script src=\"https://unpkg.com/[email protected]/dist/leaflet.js\"></script>"
            + "<script>"
            + "var map = L.map('map').setView(["
            + place.latitude() + "," + place.longitude() + "],"
            + AppConfig.MAP_ZOOM + ");"
            + "L.tileLayer('" + tileUrl + "').addTo(map);"
            + "L.marker([" + place.latitude() + ","
            + place.longitude() + "]).addTo(map);"
            + "</script></body></html>";
}
The rest of the app works with a normal Codename One component, while the embedded browser handles the map. If native browser support isn’t available, the complete source code falls back to a static Geoapify map image.
9. Conclusion
In this tutorial, we built a realistic Codename One application with Java 17 and Maven. Furthermore, we used the Daily Routine application to understand the main patterns behind Codename One development: lifecycle, shared context, navigation, forms, layout managers, UIIDs, CSS, persistence, testing, REST, and map previews.
The same design principle appeared repeatedly: keep forms focused on UI and user interaction, and move persistence, networking, localization, settings, and reusable logic into small services and repositories.
As always, the complete source code for this tutorial is available over on GitHub.


