

Mocking is an essential part of unit testing, and the Mockito library makes it easy to write clean and intuitive unit tests for your Java code.
Get started with mocking and improve your application tests using our Mockito guide:
Handling concurrency in an application can be a tricky process with many potential pitfalls. A solid grasp of the fundamentals will go a long way to help minimize these issues.
Get started with understanding multi-threaded applications with our Java Concurrency guide:
Spring 5 added support for reactive programming with the Spring WebFlux module, which has been improved upon ever since. Get started with the Reactor project basics and reactive programming in Spring Boot:
Since its introduction in Java 8, the Stream API has become a staple of Java development. The basic operations like iterating, filtering, mapping sequences of elements are deceptively simple to use.
But these can also be overused and fall into some common pitfalls.
To get a better understanding on how Streams work and how to combine them with other language features, check out our guide to Java Streams:
Explore Spring Boot 3 and Spring 6 in-depth through building a full REST API with the framework:
Yes, Spring Security can be complex, from the more advanced functionality within the Core to the deep OAuth support in the framework.
I built the security material as two full courses - Core and OAuth, to get practical with these more complex scenarios. We explore when and how to use each feature and code through it on the backing project.
You can explore the course here:
Spring Data JPA is a great way to handle the complexity of JPA with the powerful simplicity of Spring Boot.
Get started with Spring Data JPA through the guided reference course:
Refactor Java code safely — and automatically — with OpenRewrite.
Refactoring big codebases by hand is slow, risky, and easy to put off. That’s where OpenRewrite comes in. The open-source framework for large-scale, automated code transformations helps teams modernize safely and consistently.
Each month, the creators and maintainers of OpenRewrite at Moderne run live, hands-on training sessions — one for newcomers and one for experienced users. You’ll see how recipes work, how to apply them across projects, and how to modernize code with confidence.
Join the next session, bring your questions, and learn how to automate the kind of work that usually eats your sprint time.
1. Introduction
Agreeing on code styling within a team can be challenge. Therefore, automatic code formatters are often a time saver when it comes to code readability and best practices synchronization.
In this tutorial, we’ll explore Java code formatting with prettier in IntelliJ IDEA.
2. Prettier and Java Support
prettier is a popular opinionated code formatter. Unlike Java formatting tools, it’s not IDE, language, or platform specific. Thus, we can use the same tool for multiple parts of a large project, simplify workflows and enhance productivity.
Although Java isn’t natively supported, prettier offers additional language formatting through plugins. Some plugins are maintained by the prettier team, some by the community. For Java, we have a community plugin called prettier-java.
3. Installation
Since prettier is an npm package, we should make sure Node is installed along with npm. To validate, let’s check the versions:
$ node --version
v24.13.0
$ npm --version
11.6.2It’s a best practice to install npm packages locally, to make sure there are no version conflicts with other projects, and everyone on the team uses the same versions of the packages.
Next, we create a package.json file by running npm init:
$ npm init -yThis way, we create the file by accepting all default values. In this case, -y is short for –yes.
Next, we install two packages – prettier and prettier-java plugin:
$ npm install --save-dev --save-exact prettier prettier-plugin-javaHere, –save-dev saves the packages as development dependency. While –save-exact saves the current version number without any version operators.
The resulting package.json file should have a specific structure:
{
  "name": "java-test-project",
  "version": "1.0.0",
  "description": "",
  "license": "ISC",
  "author": "",
  "type": "commonjs",
  "main": "index.js",
  "scripts": {
    "test": "echo \"Error: no test specified\" && exit 1"
  },
  "devDependencies": {
    "prettier": "3.8.1",
    "prettier-plugin-java": "2.8.1"
  }
}
Notably, prettier-java requires at least Node v10.
4. Setup in IntelliJ IDEA
Now, let’s see how to set up prettier as an external tool in IntelliJ. This way, we have the most configuration flexibility, but may need to spend more time.
However, external tool setup isn’t the only option. Starting v2020.1, IntelliJ natively supports prettier. For older versions, we have an IntelliJ plugin. However, the convenience of a plugin or built-in tool comes with restrictions in terms of configuration and versioning.
In this setup, we use IntelliJ IDEA Community Edition v2025.3 on a Windows system.
4.1. Creating a Prettier Config File
In the project root directory, we create a prettier config file named .prettierrc.json with the Java plugin setup:
{
  "tabWidth": 2,
  "plugins": ["prettier-plugin-java"]
}
Here, we’ve also configured tabWidth to be two spaces. Additional configurations can be added as necessary.
4.2. Configuring External Tool
To configure an external tool in IntelliJ, we go to File > Settings > Tools External Tools. Then, on the sub-window toolbar, we click on the Add button. A pop-up window should open:
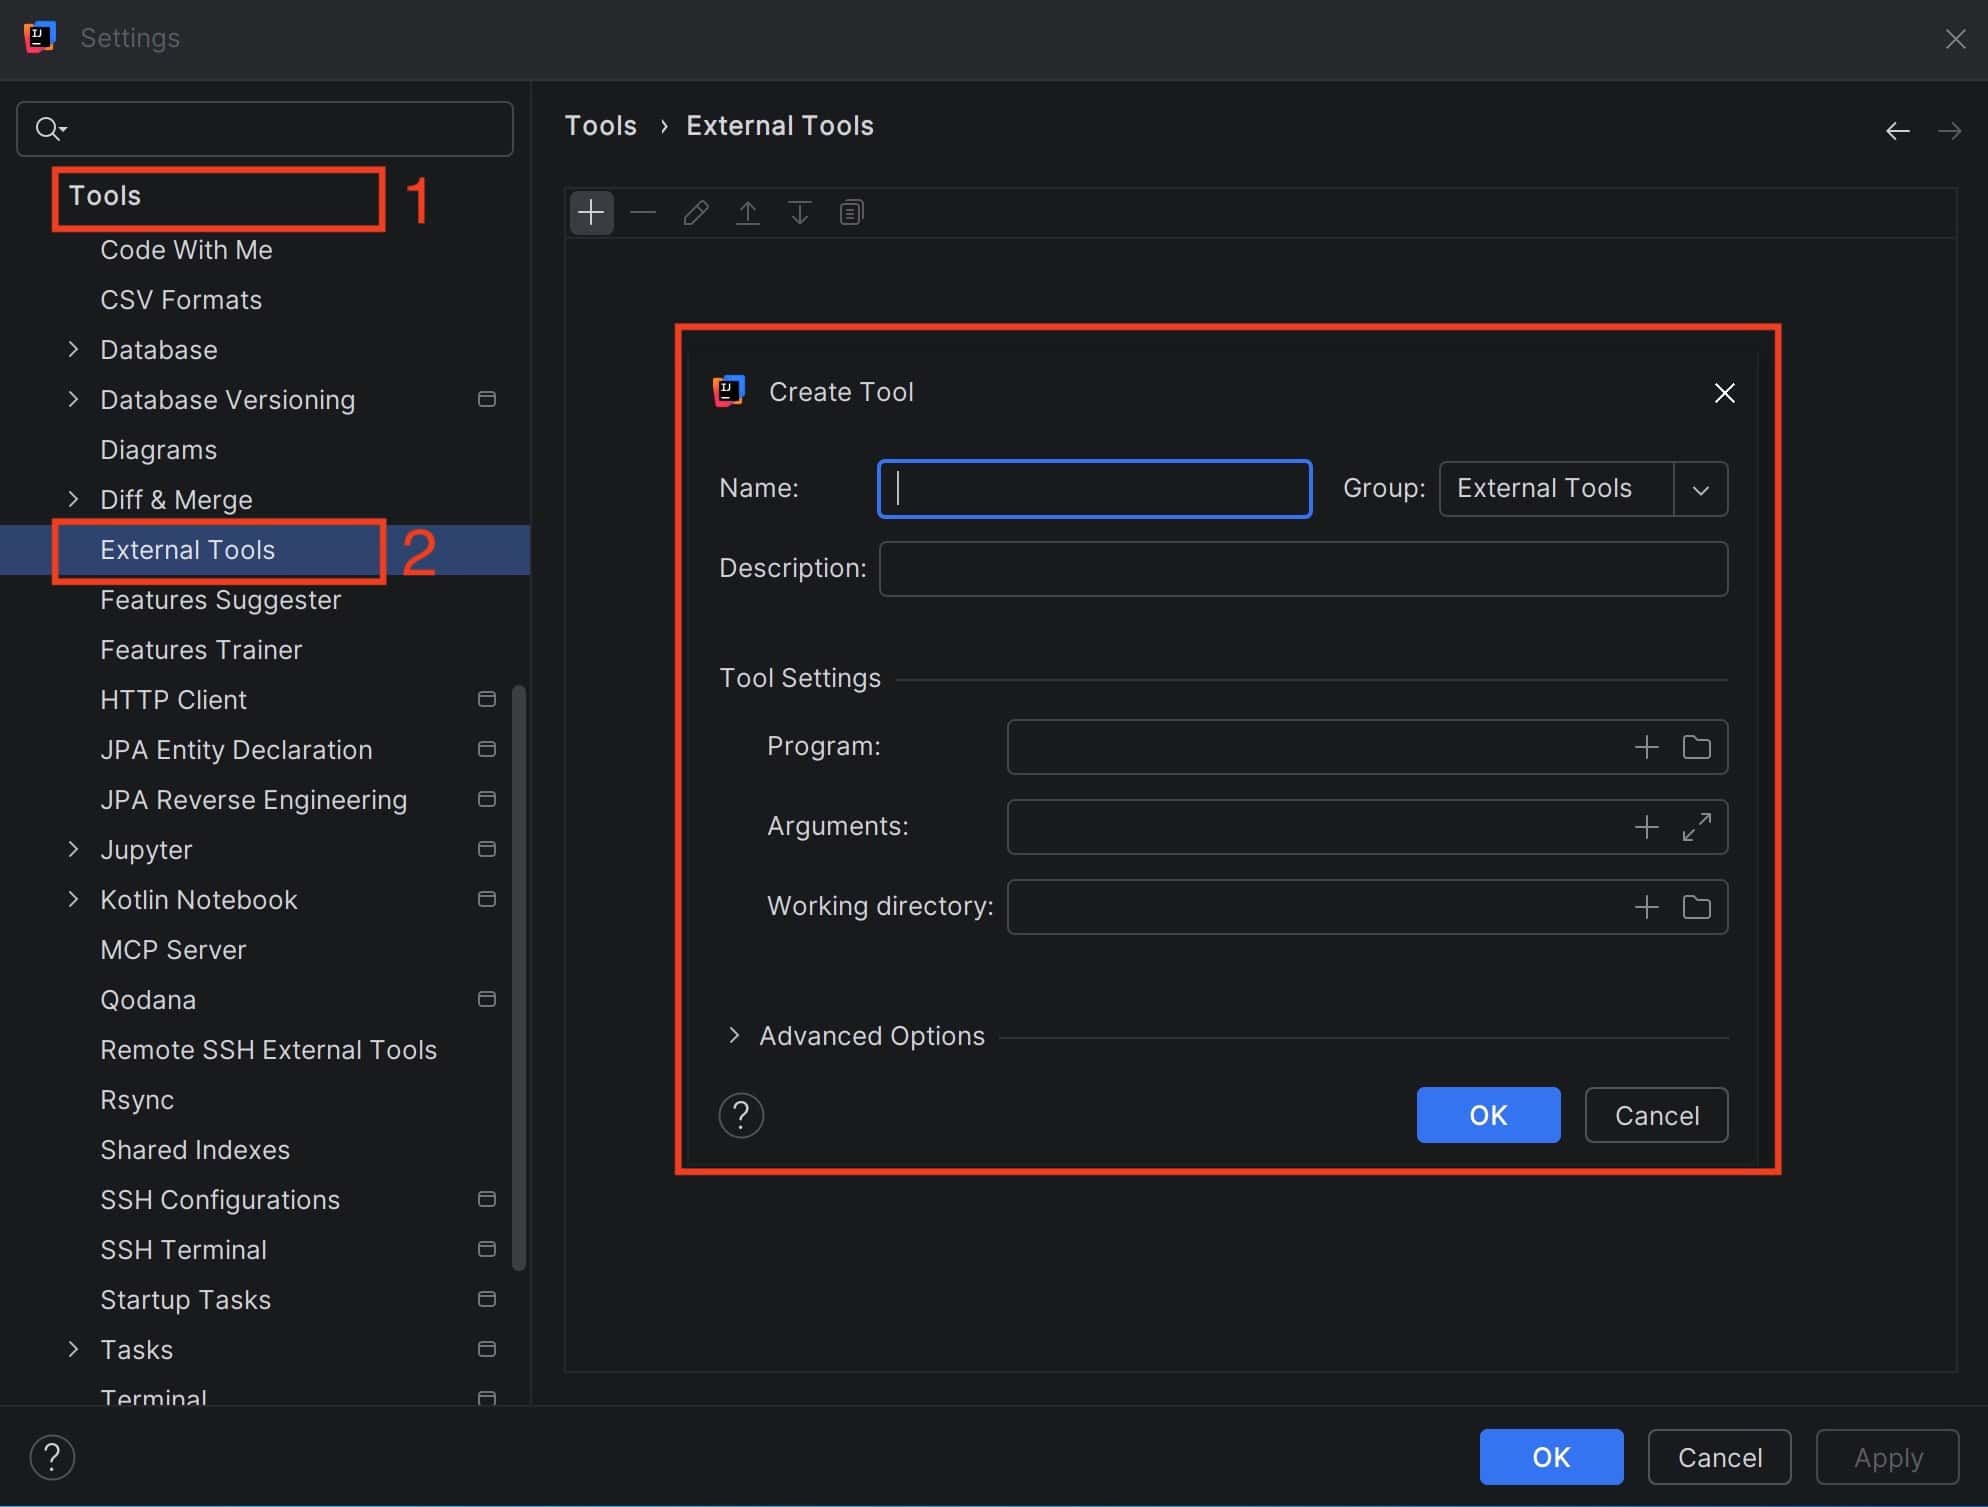
In this pop-up, let’s set the name to Prettier and skip the description.
We could use prettier’s executable path for this configuration. However, because there’s no executable file in the node_modules\prettier\bin directory on Windows, only a .cjs file, we provide a platform-independent solution. Specifically, let’s use npx, which comes with npm, to execute the locally installed prettier.
Therefore, we fill in the Program field with npx executable path C:\Program Files\nodejs\npx.cmd.
Afterwards, we set up calling prettier in the Arguments field:
prettier --config $ProjectFileDir$\.prettierrc.json --write $FilePathRelativeToProjectRoot$$FilePathRelativeToProjectRoot$ references the currently opened file, while –write tells the command to output changes directly to the specified file. So, when run, this tool formats the open file in place.
Finally, we set the Working directory field to $ProjectFileDir$. Then, let’s click the OK button on the pop-up window and the Apply button in the settings window in the end.
4.3. Running
Now that we’re done with the setup, we can open any Java file from the project and run the new tool. Of course, let’s make sure the code has styling inconsistencies for prettier to fix.
Next, we go to Tools > External Tools and select the newly created Prettier tool to run it:
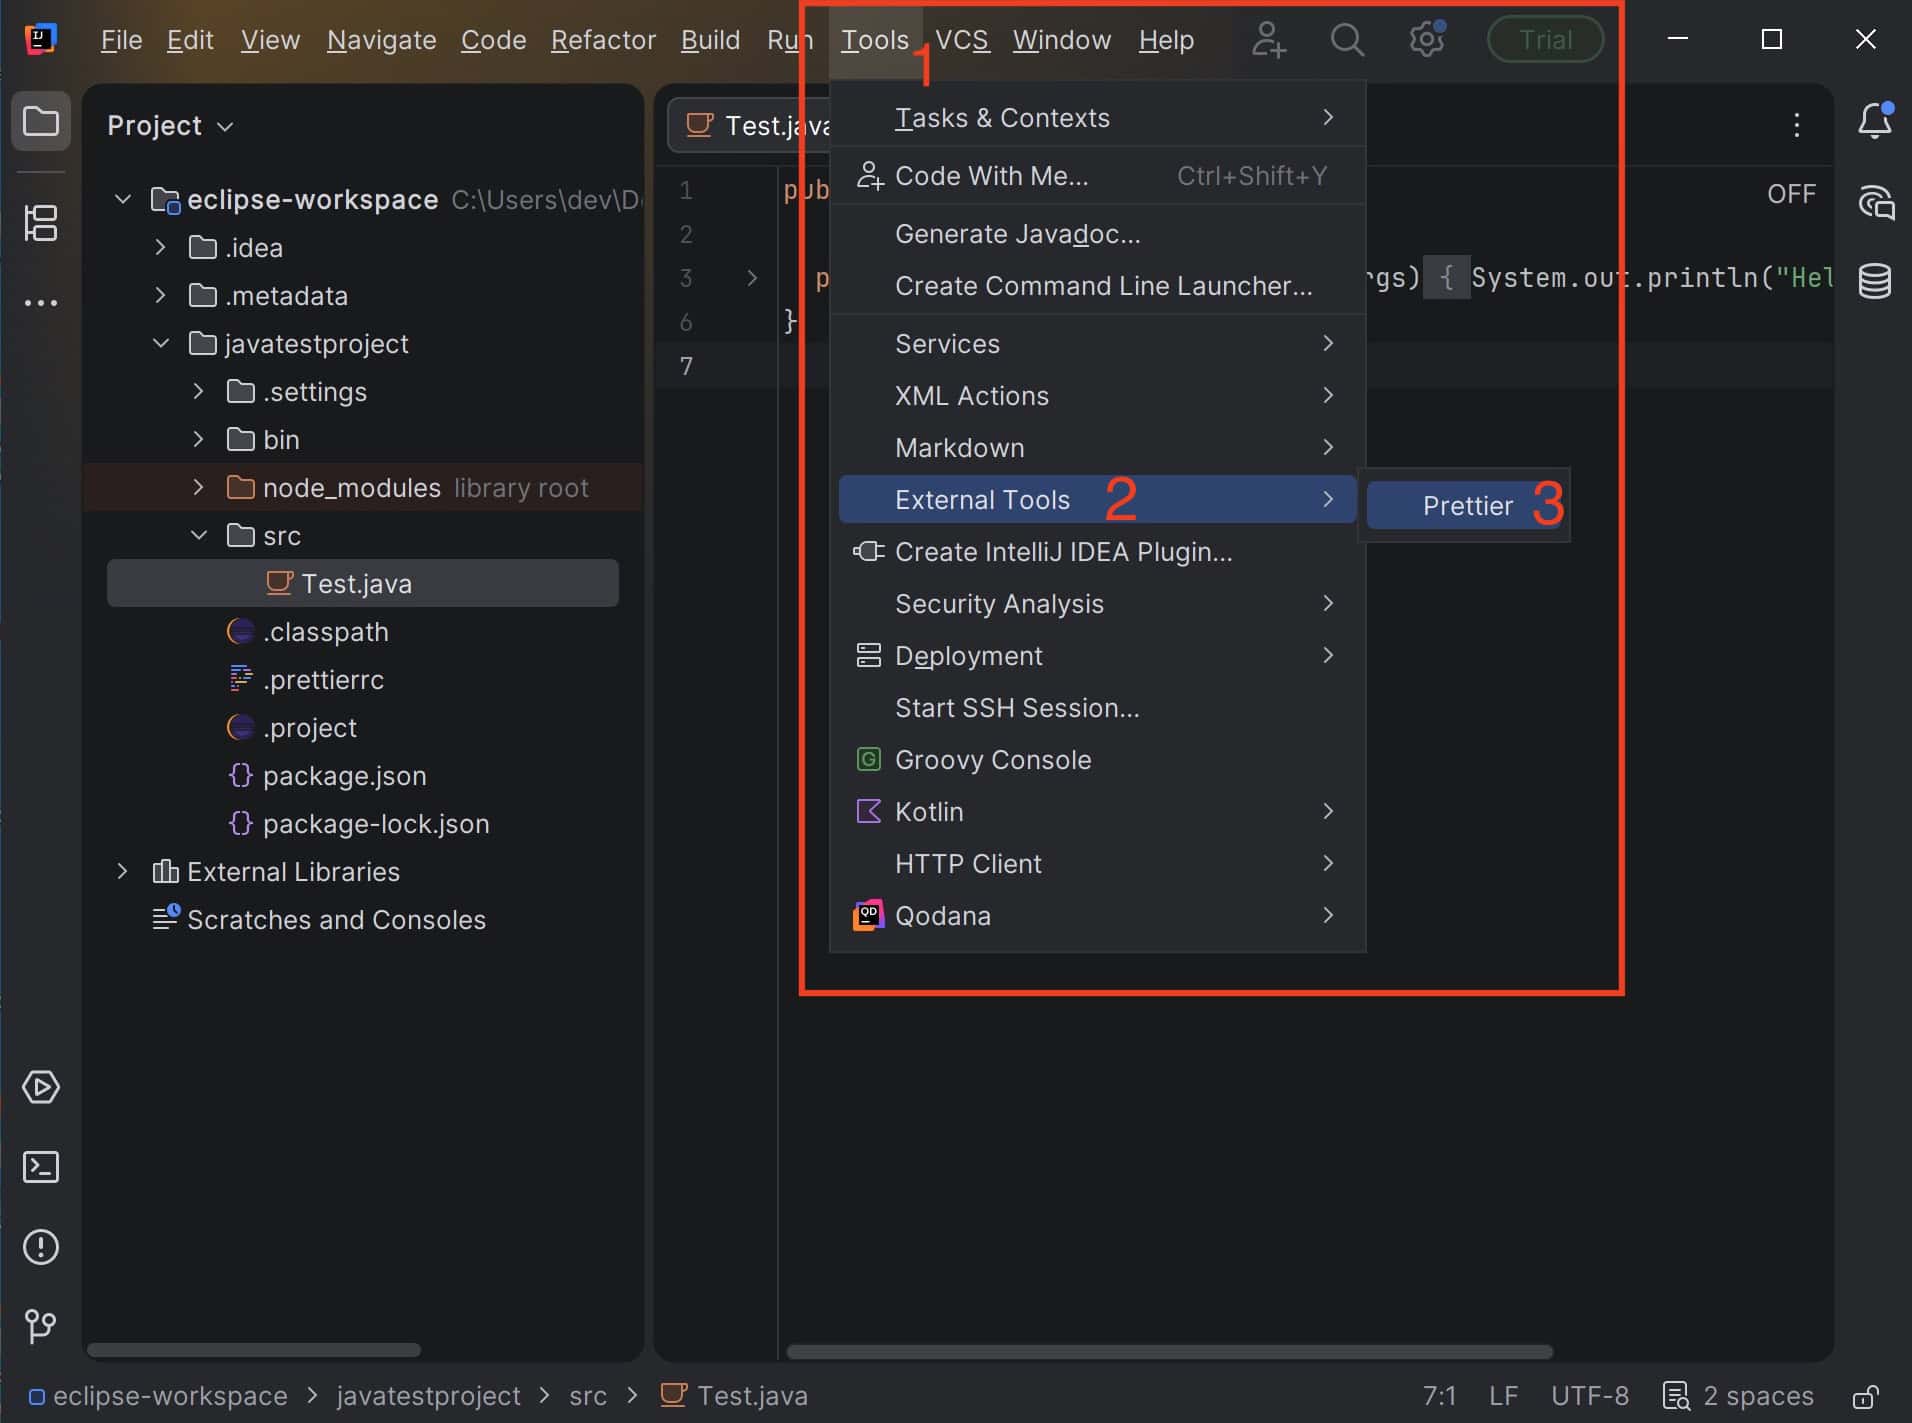
This should execute the command and fix the styling issues in place. The terminal section of the IDE should show execution details.
To trigger the tool faster, we can create a custom IntelliJ shortcut.
5. Additional Notes
The setup is similar in other popular development environments, namely Eclipse and Visual Studio Code, with the option of external tool configuration or a plugin. Eclipse’s prettier plugin, however, is outdated and no longer maintained.
One issue to be aware of, we can end up with version mismatches and a non-working setup because of multiple layers of independent tools, such as prettier, community plugin, IDE plugin. So, it’s important to pin the exact versions when we have a working solution.
In addition, because the Java plugin is maintained by the community, it usually stays behind language updates. It’s a common annoyance when working with non-native tools.
6. Summary
In this article, we’ve looked into how to manually set up and use prettier for Java in IntelliJ IDEA. This should give us transparency and full control over the configuration process.


