

Mocking is an essential part of unit testing, and the Mockito library makes it easy to write clean and intuitive unit tests for your Java code.
Get started with mocking and improve your application tests using our Mockito guide:
Handling concurrency in an application can be a tricky process with many potential pitfalls. A solid grasp of the fundamentals will go a long way to help minimize these issues.
Get started with understanding multi-threaded applications with our Java Concurrency guide:
Spring 5 added support for reactive programming with the Spring WebFlux module, which has been improved upon ever since. Get started with the Reactor project basics and reactive programming in Spring Boot:
Since its introduction in Java 8, the Stream API has become a staple of Java development. The basic operations like iterating, filtering, mapping sequences of elements are deceptively simple to use.
But these can also be overused and fall into some common pitfalls.
To get a better understanding on how Streams work and how to combine them with other language features, check out our guide to Java Streams:
Explore Spring Boot 3 and Spring 6 in-depth through building a full REST API with the framework:
Yes, Spring Security can be complex, from the more advanced functionality within the Core to the deep OAuth support in the framework.
I built the security material as two full courses - Core and OAuth, to get practical with these more complex scenarios. We explore when and how to use each feature and code through it on the backing project.
You can explore the course here:
Spring Data JPA is a great way to handle the complexity of JPA with the powerful simplicity of Spring Boot.
Get started with Spring Data JPA through the guided reference course:
Refactor Java code safely — and automatically — with OpenRewrite.
Refactoring big codebases by hand is slow, risky, and easy to put off. That’s where OpenRewrite comes in. The open-source framework for large-scale, automated code transformations helps teams modernize safely and consistently.
Each month, the creators and maintainers of OpenRewrite at Moderne run live, hands-on training sessions — one for newcomers and one for experienced users. You’ll see how recipes work, how to apply them across projects, and how to modernize code with confidence.
Join the next session, bring your questions, and learn how to automate the kind of work that usually eats your sprint time.
1. Overview
When a Java class is compiled, a class file with the same name is created. However, in the case of nested classes or nested interfaces, it creates a class file with a name combining the inner and outer class names, including a dollar sign.
In this article, we’ll see all those scenarios.
2. Details
In Java, we can write a class within a class. The class written within is called the nested class, and the class that holds the nested class is called the outer class. The scope of a nested class is bounded by the scope of its enclosing class.
Similarly, we can declare an interface within another interface or class. Such an interface is called a nested interface.
We can use nested classes and interfaces to logically group entities that are only used in one place. This not only makes our code more readable and maintainable, but it also increases encapsulation.
In the next sections, we’re going to discuss each of these in detail. We’ll also take a look at enums.
3. Nested Classes
A nested class is a class that is declared inside another class or interface. Any time we need a separate class but still want that class to behave as part of another class, the nested class is the best way to achieve it.
When we compile a Java file, it creates a .class file for the enclosing class and separate class files for all the nested classes. The generated class file for the enclosing class will have the same name as the Java class.
For nested classes, the compiler uses a different naming convention – OuterClassName$NestedClassName.class
First of all, let’s create a simple Java class:
public class Outer {

// variables and methods...
}3.1. Static Nested Classes
As the name suggests, nested classes that are declared as static are called static nested classes. In Java, only nested classes are allowed to be static.
Static nested classes can have both static and non-static fields and methods. They are tied to the outer class and not with a particular instance. Hence, we don’t need an instance of the outer class to access them.
Let’s declare a static nested class within our Outer class:
public class Outer {
static class StaticNested {
public String message() {
return "This is a static Nested Class";
}
}
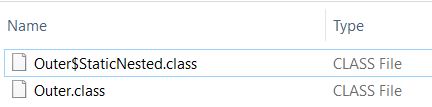
}When we compile our Outer class, the compiler creates two class files, one for Outer and another for StaticNested:
3.2. Non-Static Nested Classes
Non-static nested classes – also called inner classes – are associated with an instance of the enclosing class, and they can access all the variables and methods of the outer class.
An outer class can have only public or default access, whereas an inner class can be private, public, protected, or with default access. However, they can’t contain any static members. Also, we need to create an instance of the outer class to access the inner class.
Let’s add one more nested class to our Outer class:
public class Outer {
class Nested {
public String message() {
return "This is a non-static Nested Class";
}
}
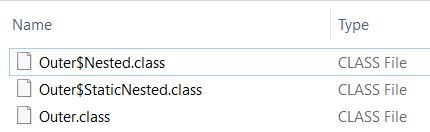
}It generates one more class file:
3.3. Local Classes
Local classes, also called inner classes, are defined in a block — a group of statements between balanced braces. For example, they can be in a method body, a for loop, or an if clause. The scope of the local class is restricted within the block just like the local variables. Local classes, when compiled, appear as a dollar sign with an auto-generated number.
The class file generated for the local class uses a naming convention – OuterClassName$1LocalClassName.class
Let’s declare a local class within a method:
public String message() {
    class Local {
        private String message() {
            return "This is a Local Class within a method";
        }
    }
    Local local = new Local();
    return local.message();
}
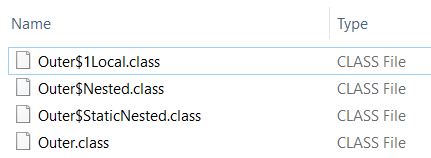
The compiler creates a separate class file for our Local class:
Similarly, we can declare a local class within an if clause:
public String message(String name) {
if (StringUtils.isEmpty(name)) {
class Local {
private String message() {
return "This is a Local class within if clause";
}
}
Local local = new Local();
return local.message();
} else
return "Welcome to " + name;
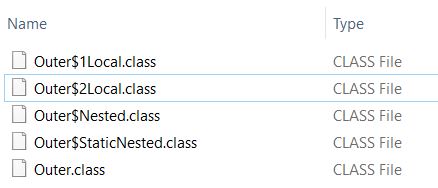
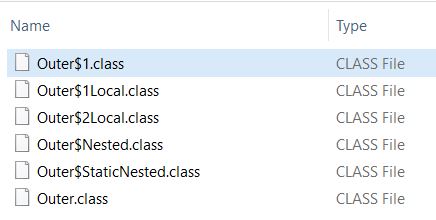
}Although we’re creating another local class with the same name, the compiler doesn’t complain. It creates one more class file and names it with the number increased:
3.4. Anonymous Inner Classes
As the name suggests, anonymous classes are the inner classes with no name. The compiler uses an auto-generated number after a dollar sign to name the class file.
We need to declare and instantiate anonymous classes in a single expression at the same time. They usually extend an existing class or implement an interface.
Let’s see a quick example:
public String greet() {
Outer anonymous = new Outer() {
@Override
public String greet() {
return "Running Anonymous Class...";
}
};
return anonymous.greet();
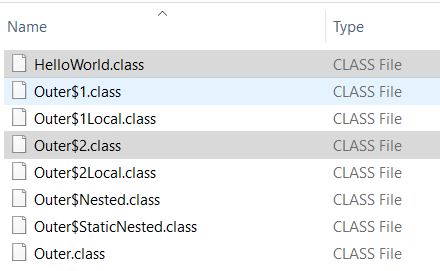
}Here, we’ve created an anonymous class by extending the Outer class, and the compiler added one more class file:
Similarly, we can implement an interface with an anonymous class.
Here, we’re creating an interface:
interface HelloWorld {
    public String greet(String name);
}
Now, let’s create an anonymous class:
public String greet(String name) {
HelloWorld helloWorld = new HelloWorld() {
@Override
public String greet(String name) {
return "Welcome to "+name;
}
};
return helloWorld.greet(name);
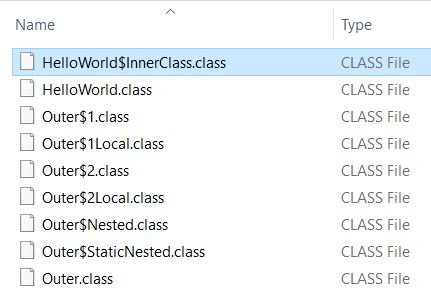
}Let’s observe the revised list of class files:
As we see, a class file is generated for the interface HelloWorld and another one for the anonymous class with the name Outer$2.
3.5. Inner Class Within Interface
We have seen class inside another class, further, we can declare a class within an interface. If the functionality of class is closely associated with interface functionality, we can declare it inside the interface. We can go for this inner class when we want to write the default implementation for interface methods.
Let’s declare an inner class inside our HelloWorld interface:
interface HelloWorld {
    public String greet(String name);
    class InnerClass implements HelloWorld {
        @Override
        public String message(String name) {
            return "Inner class within an interface";
        }
    }
}
And the compiler generates one more class file:
4. Nested Interfaces
Nested interfaces, also known as inner interfaces, are declared inside a class or another interface. The main purpose of using nested interfaces is to resolve the namespace by grouping related interfaces.
We can’t directly access nested interfaces. They can only be accessed using the outer class or outer interface. For example, the Entry interface inside the Map interface is nested and can be accessed as Map.Entry.
Let’s see how to create nested interfaces.
4.1. Interface Inside an Interface
An interface declared inside the interface is implicitly public.
Let’s declare our interface inside the HelloWorld interface:
interface HelloWorld {
    public String greet(String name);

    interface HelloSomeone{
        public String greet(String name);
    }
}
This will create a new class file named HelloWorld$HelloSomeone for the nested interface.
4.2. Interface Inside a Class
Interfaces declared inside the class can take any access modifier.
Let’s declare an interface inside our Outer class:
public class Outer {
     interface HelloOuter {
        public String hello(String name);
    }
}
It will generate a new class file with the name: OuterClass$StaticNestedClass
5. Enums
The enum was introduced in Java 5. It’s a data type that contains a fixed set of constants, and those constants are the instances of that enum.
The enum declaration defines a class called an enum type (also known as enumerated data type). We can add many things to the enum like a constructor, methods, variables, and something called a constant-specific class body.
When we create an enum, we’re creating a new class, and we’re implicitly extending the Enum class. Enum cannot inherit any other class or can’t be extended. However, it can implement an interface.
We can declare an enum as a standalone class, in its own source file, or another class member. Let’s see all the ways to create an enum.
5.1. Enum as a Class
First, let’s create a simple enum:
enum Level {
    LOW, MEDIUM, HIGH;
}
When it is compiled, the compiler will create a class file with the name Level for our enum.
5.2. Enum Within a Class
Now, let’s declare a nested enum in our Outer class:
public class Outer {
    enum Color{
        RED, GREEN, BLUE;
    }
}
The compiler will create a separate class file named Outer$Color for our nested enum.
5.3. Enum Within an Interface
Similarly, we can declare an enum within an interface:
interface HelloWorld {
    enum DIRECTIONS {
        NORTH, SOUTH, EAST, WEST;
    }
}
When the HelloWorld interface is compiled, the compiler will add one more class file named HelloWorld$Directon.
5.4. Enum Within an Enum
We can declare an enum inside another enum:
enum Foods {
    DRINKS, EATS;
    enum DRINKS {
        APPLE_JUICE, COLA;
    }
    enum EATS {
        POTATO, RICE;
    }
}
Finally, let’s take a look at the generated class files:
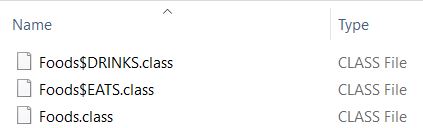
The compiler creates a separate class file for each of the enum types.
6. Conclusion
In this article, we saw different naming conventions used for Java class files. We added classes, interfaces, and enums inside a single Java file and observed how the compiler creates a separate class file for each of them.


