1. Overview
Activiti API is a workflow and Business Process Management system. We can define a process in it, execute it, and manipulate it in different ways using the services provided by the API. It requires JDK 7+.
Development using the API can be done in any IDE, but to use the Activiti Designer, we need Eclipse.
We can define a process in it using the BPMN 2.0 standard. There is another, less popular way – using Java classes like StartEvent, EndEvent, UserTask, SequenceFlow, etc.
If we want to run a process or access any of the services, we need to create a ProcessEngineConfiguration.
We can get the ProcessEngine using ProcessEngineConfiguration, in some ways, which we’ll discuss further in this article. Through the ProcessEngine we can perform the Workflow and BPMN operations.
2. Maven Dependencies
To use this API, we need to include the Activiti dependency:
<dependency>
    <groupId>org.activiti</groupId>
    <artifactId>activiti-engine</artifactId>
</dependency>
3. Creating a ProcessEngine
ProcessEngine in Activiti, is typically configured using an XML file, activiti.cfg.xml. An example of this configuration file is:
<beans xmlns="...">
    <bean id="processEngineConfiguration" class=
      "org.activiti.engine.impl.cfg.StandaloneProcessEngineConfiguration">
        <property name="jdbcUrl"
          value="jdbc:h2:mem:activiti;DB_CLOSE_DELAY=1000" />
        <property name="jdbcDriver" value="org.h2.Driver" />
        <property name="jdbcUsername" value="root" />
        <property name="jdbcPassword" value="" />
        <property name="databaseSchemaUpdate" value="true" />
    </bean>
</beans>
Now we can obtain the ProcessEngine using the ProcessEngines class:
ProcessEngine processEngine = ProcessEngines.getDefaultProcessEngine();
This statement will look for an activiti.cfg.xml file in the classpath, and construct a ProcessEngine based on the configuration in the file.
The sample code for the configuration file shows that it is just a Spring-based configuration. But, this does not mean that we can only use Activiti in a Spring environment. The capabilities of Spring are just used internally to create the ProcessEngine.
Let’s write a JUnit test case which will create the ProcessEngine using the configuration file shown above:
@Test
public void givenXMLConfig_whenGetDefault_thenGotProcessEngine() {
    ProcessEngine processEngine
      = ProcessEngines.getDefaultProcessEngine();
    assertNotNull(processEngine);
    assertEquals("root", processEngine.getProcessEngineConfiguration()
      .getJdbcUsername());
}
4. Activiti Process Engine API and Services
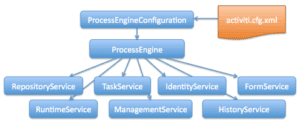
The entry point of interaction with the API is the ProcessEngine. Through the ProcessEngine, we can access various services that provide workflow/BPMN methods. The ProcessEngine and all the service objects are thread safe.

Taken from https://www.activiti.org/userguide/images/api.services.png
The ProcessEngines class will scan for the activiti.cfg.xml and activiti-context.xml files. As mentioned earlier, for all the activiti.cfg.xml files, the ProcessEngine will be created in a typical way.
Whereas, for all the activiti-context.xml files, it will be created in the Spring way — I’ll create the Spring Application Context and will obtain the ProcessEngine from that. During the execution of a process, all the steps will be visited in the order that is defined in the BPMN file.
During the execution of a process, all the steps will be visited in the order that is defined in the BPMN file.
A ProcessDefinition represents a business process. It’s used to define the structure and behavior of different steps in the process. Deploying a process definition means loading the process definition into the Activiti database.
Process definitions are mostly defined by the BPMN 2.0 standard. It’s also possible to define them using Java code. All the terms defined in this section are available as Java classes as well.
Once we start running a process definition, it can be referred to as a process
A ProcessInstance is one execution of a ProcessDefinition.
A StartEvent is associated with every business process. It indicates the entry point of the process. Similarly, there is an EndEvent which indicates the end of the process. We can define conditions over these events.
All the steps (or elements) in between the start and end are referred to as Tasks. Tasks can be of various types. The most commonly used tasks are UserTasks and ServiceTasks.
UserTasks, as the name suggests, are such that they need to be carried out manually by a user.
ServiceTasks, on the other hand, are configured with a piece of code. Whenever the execution reaches them, their block of code will be executed.
SequenceFlows connect the Tasks. We can define the SequenceFlows by the source and target elements that they’ll connect. Again, we can also define conditions over the SequenceFlows to create conditional paths in the process.
4.2. Services
We’ll discuss in brief the services provided by Activiti:
- RepositoryService helps us manipulate the deployment of process definitions. This service deals with the static data related to a process definition
- RuntimeService manages the ProcessInstances (currently running processes) as well as the process variables
- TaskService keeps track of the UserTasks. The Tasks that need to be carried out manually by a user are at the core of the Activiti API. We can create a task, claim and complete a task, manipulate the assignee of the task, etc. using this service
- FormService is an optional service. The API can be used without it, and without sacrificing any of its features. It is used to define the start form and task form in a process.
- IdentityService manages the Users and Groups
- HistoryService keeps track of the history of Activiti Engine. We can also set different history levels.
- ManagementService is related to the metadata and usually not required when creating an application
- DynamicBpmnService helps us to change anything in a process without redeploying it
5. Working With Activiti Services
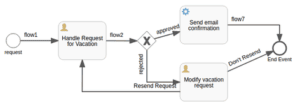
To learn how we can work with different services and run a process, let’s take an example of a process for “Employee vacation request”:

The BPMN 2.0 file, VacationRequest.bpmn20.xml, for this process will have the start event defined as:
<startEvent id="startEvent" name="request"
  activiti:initiator="employeeName">
    <extensionElements>
        <activiti:formProperty id="numberOfDays"
          name="Number of days" type="long" required="true"/>
        <activiti:formProperty id="startDate"
          name="Vacation start date (MM-dd-yyyy)" type="date"
          datePattern="MM-dd-yyyy hh:mm" required="true"/>
        <activiti:formProperty id="reason" name="Reason for leave"
          type="string"/>
     </extensionElements>
</startEvent>
Similarly, the first user task, assigned to the user group “management”, will look like this:
<userTask id="handle_vacation_request" name=
  "Handle Request for Vacation">
    <documentation>${employeeName} would like to take ${numberOfDays} day(s)
      of vacation (Motivation: ${reason}).</documentation>
    <extensionElements>
        <activiti:formProperty id="vacationApproved" name="Do you approve
          this vacation request?" type="enum" required="true"/>
        <activiti:formProperty id="comments" name="Comments from Manager"
          type="string"/>
    </extensionElements>
    <potentialOwner>
      <resourceAssignmentExpression>
        <formalExpression>management</formalExpression>
      </resourceAssignmentExpression>
    </potentialOwner>
</userTask>
With the ServiceTask, we need to define the piece of code to be executed. We have this piece of code as a Java class:
<serviceTask id="send-email-confirmation" name="Send email confirmation"
  activiti:class=
  "com.example.activiti.servicetasks.SendEmailServiceTask.java">
</serviceTask>
The conditional flow will be shown by adding the “conditionExpression” tag in the “sequenceFlow”:
<sequenceFlow id="flow3" name="approved"
  sourceRef="sid-12A577AE-5227-4918-8DE1-DC077D70967C"
  targetRef="send-email-confirmation">
    <conditionExpression xsi:type="tFormalExpression">
      <![CDATA[${vacationApproved == 'true'}]]>
    </conditionExpression>
</sequenceFlow>
Here, vacationApproved is the formProperty of the UserTask shown above.
As we can see in the diagram, it is a very simple process. The employee makes a vacation request, providing the number of days and the start date of vacation. The request goes to the manager. They can approve/disapprove the request.
If approved, there is a Service task defined to send the confirmation email. If disapproved, the Employee can either select to modify and resend the request, or do nothing.
Service tasks are provided with some piece of code to execute (here, as a Java class). We have given the class SendEmailServiceTask.java.
These types of classes should extend the JavaDelegate. Also, we need to override its execute() method, which will be performed when the process execution reaches this step.
5.1. Deploying a Process
To make our process known to the Activiti Engine, we need to deploy the process. We can do it programmatically using the RepositoryService. Let’s write a JUnit test to show this:
@Test
public void givenBPMN_whenDeployProcess_thenDeployed() {
    ProcessEngine processEngine
      = ProcessEngines.getDefaultProcessEngine();
    RepositoryService repositoryService
      = processEngine.getRepositoryService();
    repositoryService.createDeployment()
      .addClasspathResource(
      "org/activiti/test/vacationRequest.bpmn20.xml")
      .deploy();
    Long count=repositoryService.createProcessDefinitionQuery().count();
    assertEquals("1", count.toString());
}
Deployment means that the engine will parse the BPMN file and convert it into something executable. Also, a record will be added to the Repository table for every deployment.
Hence, afterward, we can query the Repository service to get the deployed processes; the ProcessDefinitions.
5.2. Starting a ProcessInstance
After deploying the ProcessDefinition to Activiti Engine, we can execute the process by creating ProcessInstances. The ProcessDefinition is a blueprint, and the ProcessInstance is the runtime execution of it.
For a single ProcessDefinition, there can be multiple ProcessInstances.
All the details related to the ProcessInstances can be accessed through the RuntimeService.
In our example, at the start event, we need to pass the number of vacation days, the start date, and the reason. We will use the process variables, and pass them while creating the ProcessInstance.
Let’s write a JUnit test case to get a better idea:
@Test
public void givenDeployedProcess_whenStartProcessInstance_thenRunning() {
    //deploy the process definition
    Map<String, Object> variables = new HashMap>();
    variables.put("employeeName", "John");
    variables.put("numberOfDays", 4);
    variables.put("vacationMotivation", "I need a break!");

    RuntimeService runtimeService = processEngine.getRuntimeService();
    ProcessInstance processInstance = runtimeService
      .startProcessInstanceByKey("vacationRequest", variables);
    Long count=runtimeService.createProcessInstanceQuery().count();

    assertEquals("1", count.toString());
}
The multiple instances of a single process definition will differ by the process variables.
There are multiple ways to start a process instance. Here, we are using the key of the process. After starting the process instance, we can get the information about it by querying the RuntimeService.
5.3. Completing Tasks
When our process instance starts running, the first step is a user task, assigned to the user group “management”.
The user might have an inbox that would have a list of tasks to be done by them. Now, if we want to continue the process execution, the user needs to finish this task. For Activiti Engine, it’s called “completing the task”.
We can query the TaskService, to get the task object and then complete it.
The code we need to write for this looks like:
@Test
public void givenProcessInstance_whenCompleteTask_thenGotNextTask() {
    // deploy process and start process instance
    TaskService taskService = processEngine.getTaskService();
    List<Task> tasks = taskService.createTaskQuery()
      .taskCandidateGroup("management").list();
    Task task = tasks.get(0);

    Map<String, Object> taskVariables = new HashMap<>();
    taskVariables.put("vacationApproved", "false");
    taskVariables.put("comments", "We have a tight deadline!");
    taskService.complete(task.getId(), taskVariables);

    Task currentTask = taskService.createTaskQuery()
      .taskName("Modify vacation request").singleResult();
    assertNotNull(currentTask);
}
Note that the complete() method of TaskService also takes in the required process variables. We pass in the reply from the manager.
After this, the process engine will continue to the next step. Here, the next step asks the employee if the vacation request is to be re-sent or not.
So, our ProcessInstance is now waiting at this UserTask, which has the name “Modify vacation request”.
5.4. Suspending and Activating a Process
We can suspend a ProcessDefinition and also a ProcessInstance. If we suspend a ProcessDefinition, we cannot create an instance of it while it is suspended. We can do this using the RepositoryService:
@Test(expected = ActivitiException.class)
public void givenDeployedProcess_whenSuspend_thenNoProcessInstance() {
    // deploy the process definition
    repositoryService.suspendProcessDefinitionByKey("vacationRequest");
    runtimeService.startProcessInstanceByKey("vacationRequest");
}
To activate it again, we just need to call one of the repositoryService.activateProcessDefinitionXXX methods.
Similarly, we can suspend a ProcessInstance, using the RuntimeService.
6. Conclusion
In this article, we saw how we could use Activiti with Java. We created a sample ProcessEngineCofiguration file, which helps us to create the ProcessEngine.
Using it, we accessed various services provided by the API. These services help us to manage and keep track of ProcessDefinitions, ProcessInstances, UserTasks, etc.
As always, the code for examples we saw in the article lies over on GitHub.


