

Mocking is an essential part of unit testing, and the Mockito library makes it easy to write clean and intuitive unit tests for your Java code.
Get started with mocking and improve your application tests using our Mockito guide:
Handling concurrency in an application can be a tricky process with many potential pitfalls. A solid grasp of the fundamentals will go a long way to help minimize these issues.
Get started with understanding multi-threaded applications with our Java Concurrency guide:
Spring 5 added support for reactive programming with the Spring WebFlux module, which has been improved upon ever since. Get started with the Reactor project basics and reactive programming in Spring Boot:
Since its introduction in Java 8, the Stream API has become a staple of Java development. The basic operations like iterating, filtering, mapping sequences of elements are deceptively simple to use.
But these can also be overused and fall into some common pitfalls.
To get a better understanding on how Streams work and how to combine them with other language features, check out our guide to Java Streams:
Explore Spring Boot 3 and Spring 6 in-depth through building a full REST API with the framework:
Yes, Spring Security can be complex, from the more advanced functionality within the Core to the deep OAuth support in the framework.
I built the security material as two full courses - Core and OAuth, to get practical with these more complex scenarios. We explore when and how to use each feature and code through it on the backing project.
You can explore the course here:
Spring Data JPA is a great way to handle the complexity of JPA with the powerful simplicity of Spring Boot.
Get started with Spring Data JPA through the guided reference course:
Refactor Java code safely — and automatically — with OpenRewrite.
Refactoring big codebases by hand is slow, risky, and easy to put off. That’s where OpenRewrite comes in. The open-source framework for large-scale, automated code transformations helps teams modernize safely and consistently.
Each month, the creators and maintainers of OpenRewrite at Moderne run live, hands-on training sessions — one for newcomers and one for experienced users. You’ll see how recipes work, how to apply them across projects, and how to modernize code with confidence.
Join the next session, bring your questions, and learn how to automate the kind of work that usually eats your sprint time.
Yes, we're now running our only Summer Sale. All Courses are 30% off until 20th July, 2026:
Yes, we're now running our only Summer Sale. All Courses are 30% off until 20th July, 2026:
1. Overview
In this tutorial, we’ll go through the basics of Hibernate Object/Grid Mapper (OGM).
Hibernate OGM provides Java Persistence API (JPA) support for NoSQL datastores. NoSQL is an umbrella term covering a wide variety of data storage. For example, this includes key-value, document, column-oriented and graph-oriented datastores.
Note: Hibernate OGM is not in active development and support anymore. The last update was done in 2018, and there may be no plan to continue work on this.
2. The Architecture of Hibernate OGM
Hibernate traditionally offers an Object Relational Mapping (ORM) engine for relational databases. Hibernate OGM engine extends its functionality to support NoSQL datastores. The primary benefit of using it is the consistency of the JPA interface across relational and NoSQL datastores.
Hibernate OGM is able to provide abstraction over a number of NoSQL datastores because of two key interfaces, DatastoreProvider and GridDialect. Therefore, each new NoSQL datastore that it supports comes with an implementation of these interfaces.
As of today, it does not support all NoSQL datastores, but it is capable of working with many of them like Infinispan and Ehcache (key-value), MongoDB and CouchDB (document), and Neo4j (graph).
It also fully supports transactions and can work with standard JTA providers. Firstly, this can be provided through the Jakarta EE container without any explicit configuration. Moreover, we can use a standalone JTA transaction manager like Narayana in the Java SE environment.
3. Setup
For this tutorial, we’ll use Maven to pull the required dependencies to work with Hibernate OGM. We’ll also use MongoDB.
To clarify, let’s see how to set them up for the tutorial.
3.1. Maven Dependencies
Let’s see the dependencies required to work with Hibernate OGM and MongoDB:
<dependency>
    <groupId>org.hibernate.ogm</groupId>
    <artifactId>hibernate-ogm-mongodb</artifactId>
    <version>5.4.0.Final</version>
</dependency>
<dependency>
    <groupId>org.jboss.narayana.jta</groupId>
    <artifactId>narayana-jta</artifactId>
    <version>5.9.2.Final</version>
</dependency>
Here we’re pulling required dependencies through Maven:
- Hibernate OGM dialect for MongoDB
- Narayana Transaction Manager (actual provider of the JTA)
3.2. Persistence Unit
We’ll also have to define datastore details in the Hibernate persistance.xml:
<persistence-unit name="ogm-mongodb" transaction-type="JTA">
    <provider>org.hibernate.ogm.jpa.HibernateOgmPersistence</provider>
    <properties>
        <property name="hibernate.ogm.datastore.provider" value="MONGODB" />
        <property name="hibernate.ogm.datastore.database" value="TestDB" />
        <property name="hibernate.ogm.datastore.create_database" value="true" />
    </properties>
</persistence-unit>
Note the definitions we’ve provided here:
- the value of attribute transaction-type as “JTA” (this implies that we want a JTA entity manager from the EntityManagerFactory)
- the provider, which is HibernateOgmPersistence for Hibernate OGM
- a few additional details related to the DB (these typically vary between different data sources)
The configuration assumes MongoDB is running and accessible on defaults. If this is not the case, we can always provide details as necessary. One of our previous articles also covers setting up MongoDB in detail.
4. Entity Definition
Now that we’ve gone through the basics, let’s define some entities. If we worked with Hibernate ORM or JPA before, this has nothing more to add. This is the fundamental premise of Hibernate OGM. It promises to let us work with different NoSQL datastores with just the knowledge of JPA.
For this tutorial, we’ll define a simple object model:
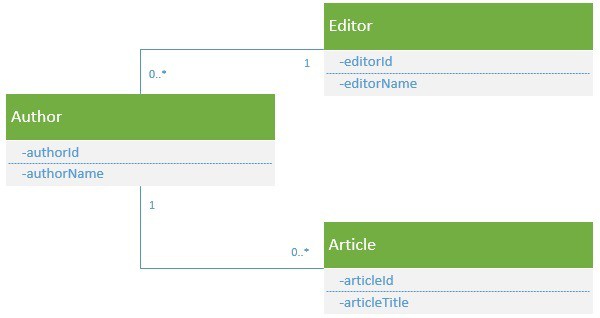
It defines Article, Author and Editor classes along with their relationships.
Let’s also define them in Java:
@Entity
public class Article {
    @Id
    @GeneratedValue(generator = "uuid")
    @GenericGenerator(name = "uuid", strategy = "uuid2")
    private String articleId;

    private String articleTitle;

    @ManyToOne
    private Author author;

    // constructors, getters and setters...
}
@Entity
public class Author {
@Id
@GeneratedValue(generator = "uuid")
@GenericGenerator(name = "uuid", strategy = "uuid2")
private String authorId;
private String authorName;
@ManyToOne
private Editor editor;
@OneToMany(mappedBy = "author", cascade = CascadeType.PERSIST)
private Set<Article> authoredArticles = new HashSet<>();
// constructors, getters and setters...
}@Entity
public class Editor {
@Id
@GeneratedValue(generator = "uuid")
@GenericGenerator(name = "uuid", strategy = "uuid2")
private String editorId;
private String editorName;
@OneToMany(mappedBy = "editor", cascade = CascadeType.PERSIST)
private Set<Author> assignedAuthors = new HashSet<>();
// constructors, getters and setters...
}We’ve now defined entity classes and annotated them with JPA standard annotations:
- @Entity to establish them as JPA entities
- @Id to generate primary keys for the entities with UUIDs
- @OneToMany and @ManyToOne to establish bidirectional relationships between the entities
5. Operations
Now that we’ve created our entities, let’s see if we can perform some operations on them. As a first step, we’ll have to generate some test data. Here, we’ll create an Editor, a few Author, and some Article. We’ll also establish their relationships.
Thereafter, before we can perform any operation, we’ll need an instance of EntityManagerFactory. We can use this to create EntityManager. Along with this, we need to create TransactionManager to handle transaction boundaries.
Let’s see how we can use these to persist and retrieve the entities we created earlier:
private void persistTestData(EntityManagerFactory entityManagerFactory, Editor editor)
  throws Exception {
    TransactionManager transactionManager =
      com.arjuna.ats.jta.TransactionManager.transactionManager();
    transactionManager.begin();
    EntityManager entityManager = entityManagerFactory.createEntityManager();

    entityManager.persist(editor);
    entityManager.close();
    transactionManager.commit();
}
Here, we are using EntityManager to persist the root entity, which cascades to all its relations. We are also performing this operation within a defined transaction boundary.
Now we’re ready to load the entity that we just persisted and verify its contents. We can run a test to verify this:
@Test
public void givenMongoDB_WhenEntitiesCreated_thenCanBeRetrieved() throws Exception {
    EntityManagerFactory entityManagerFactory =
      Persistence.createEntityManagerFactory("ogm-mongodb");
    Editor editor = generateTestData();
    persistTestData(entityManagerFactory, editor);

    TransactionManager transactionManager =
      com.arjuna.ats.jta.TransactionManager.transactionManager();
    transactionManager.begin();
    EntityManager entityManager = entityManagerFactory.createEntityManager();
    Editor loadedEditor = entityManager.find(Editor.class, editor.getEditorId());

    assertThat(loadedEditor).isNotNull();
    // Other assertions to verify the entities and relations
}
Here, we’re using the EntityManager again to find the data and perform standard assertions on it. When we run this test, it instantiates the datastore, persists the entities, retrieves them back, and verifies.
Again, we’ve just used JPA to persist the entities along with their relationship. Similarly, we use JPA to load the entities back and it all works fine, even when our database choice is MongoDB instead of a traditional relational database.
6. Switching Backend
We can also switch our backend. Let’s find out now how difficult it’ll be to do this.
We’ll change our backend to Neo4j, which happens to be a popular graph-oriented datastore.
Firstly, let’s add the Maven dependency for Neo4j:
<dependency>
    <groupId>org.hibernate.ogm</groupId>
    <artifactId>hibernate-ogm-neo4j</artifactId>
    <version>5.4.0.Final</version>
</dependency>
Next, we’ll have to add the relevant persistence unit in our persistence.xml:
<persistence-unit name="ogm-neo4j" transaction-type="JTA">
    <provider>org.hibernate.ogm.jpa.HibernateOgmPersistence</provider>
    <properties>
        <property name="hibernate.ogm.datastore.provider" value="NEO4J_EMBEDDED" />
        <property name="hibernate.ogm.datastore.database" value="TestDB" />
        <property name="hibernate.ogm.neo4j.database_path" value="target/test_data_dir" />
    </properties>
</persistence-unit>
In short, these are the very basic configurations required for Neo4j. This can be detailed further as required.
Well, that’s pretty much what needs to be done. When we run the same test with Neo4j as the backend datastore, it works pretty seamlessly.
Note that we’ve switched our backend from MongoDB, which happens to be a document-oriented datastore, to Neo4j, which is a graph-oriented datastore. And we did all this with minimal changes and without needing any changes in any of our operations.
7. Conclusion
In this article, we’ve gone through the basics of Hibernate OGM, including its architecture. Subsequently, we implemented a basic domain model and performed various operations using various DBs.


