


Mocking is an essential part of unit testing, and the Mockito library makes it easy to write clean and intuitive unit tests for your Java code.
Get started with mocking and improve your application tests using our Mockito guide:
Handling concurrency in an application can be a tricky process with many potential pitfalls. A solid grasp of the fundamentals will go a long way to help minimize these issues.
Get started with understanding multi-threaded applications with our Java Concurrency guide:
Spring 5 added support for reactive programming with the Spring WebFlux module, which has been improved upon ever since. Get started with the Reactor project basics and reactive programming in Spring Boot:
Since its introduction in Java 8, the Stream API has become a staple of Java development. The basic operations like iterating, filtering, mapping sequences of elements are deceptively simple to use.
But these can also be overused and fall into some common pitfalls.
To get a better understanding on how Streams work and how to combine them with other language features, check out our guide to Java Streams:
Explore Spring Boot 3 and Spring 6 in-depth through building a full REST API with the framework:
Yes, Spring Security can be complex, from the more advanced functionality within the Core to the deep OAuth support in the framework.
I built the security material as two full courses - Core and OAuth, to get practical with these more complex scenarios. We explore when and how to use each feature and code through it on the backing project.
You can explore the course here:
All Access is finally out, with all of my Spring courses. Learn JUnit is out as well, and Learn Maven is coming fast. And, of course, quite a bit more affordable. Finally.
>> GET THE COURSE
Spring Data JPA is a great way to handle the complexity of JPA with the powerful simplicity of Spring Boot.
Get started with Spring Data JPA through the guided reference course:
Refactor Java code safely — and automatically — with OpenRewrite.
Refactoring big codebases by hand is slow, risky, and easy to put off. That’s where OpenRewrite comes in. The open-source framework for large-scale, automated code transformations helps teams modernize safely and consistently.
Each month, the creators and maintainers of OpenRewrite at Moderne run live, hands-on training sessions — one for newcomers and one for experienced users. You’ll see how recipes work, how to apply them across projects, and how to modernize code with confidence.
Join the next session, bring your questions, and learn how to automate the kind of work that usually eats your sprint time.
1. Introduction
In this article, we’re going to look at how to use Common Table Expressions (CTE) in Hibernate. We’ll see what a CTE is, what they’re used for, and how to use them in Hibernate queries.
Note that the introduction of CTE support is specific to Hibernate and HQL. This is not part of the standard JPA specification, and alternative implementations may not support CTE queries at all, or may support them in different ways.
2. What are Common Table Expressions
A Common Table Expression, or CTE, is a construct we can use within our queries to create a named result set that we can then refer to from within our main query.
At their simplest, we can treat these as equivalent to subqueries or joins:
-- Subquery
SELECT customer_id, total_spent
FROM (
    SELECT customer_id, SUM(amount) AS total_spent
    FROM orders
    GROUP BY customer_id
) customer_totals
WHERE total_spent > (
    SELECT AVG(total_spent)
    FROM (
        SELECT customer_id, SUM(amount) AS total_spent
        FROM orders
        GROUP BY customer_id
    ) customer_totals
);

-- CTE
WITH customer_totals AS (
    SELECT customer_id, SUM(amount) AS total_spent
    FROM orders
    GROUP BY customer_id
)
SELECT customer_id, total_spent
FROM customer_totals
WHERE total_spent > ( SELECT AVG(total_spent) FROM customer_totals );
These two SQL statements do the same thing. They each return the total spend of all customers who have spent more than the average amount. However, the CTE version works by defining a name, customer_totals, for our subquery and then allowing us to reference that name whenever we want. This is both easier to understand and more efficient for the database to execute.
3. Setting Up
Now that we know what CTEs are, we’re ready to start using them. Before we can do this, we need to do a little bit of setting up.
3.1. Dependencies
To use CTEs in Hibernate, we need to use version 6.2 or newer. The newest release at the time of writing is 7.4.4.Final:
<dependency>
    <groupId>org.hibernate.orm</groupId>
    <artifactId>hibernate-core</artifactId>
    <version>7.4.4.Final</version>
</dependency>
If we’re getting Hibernate via Spring Boot, this means Spring Boot version 3.1 or newer is needed:
<dependency>
    <groupId>org.springframework.boot</groupId>
    <artifactId>spring-boot-starter-data-jpa</artifactId>
</dependency>
Now we have our dependencies, let’s next consider what data we’ll be querying.
3.2. Database
For this article, we need to set up a database. Our table will look as follows:
CREATE TABLE employee (
    id         BIGINT PRIMARY KEY,
    name       VARCHAR(100)   NOT NULL,
    title      VARCHAR(100)   NOT NULL,
    department VARCHAR(50)    NOT NULL,
    salary     NUMERIC(10, 2) NOT NULL,
    manager_id BIGINT REFERENCES employee (id)
);
Note that the manager_id column references back to the same employee table. This allows us to store a hierarchical structure in a single table.
We then need some data in our database:
| ID | Name | Title | Department | Salary | Manager |
| 1 | Alice Turner | CEO | Executive | 220,000 | — |
| 2 | Ben Rodgers | VP Engineering | Engineering | 180,000 | Alice Turner (1) |
| 3 | Carla Nunes | VP Sales | Sales | 175,000 | Alice Turner (1) |
| 4 | David Kim | Engineering Manager | Engineering | 140,000 | Ben Rodgers (2) |
| 5 | Ella Novak | Engineering Manager | Engineering | 138,000 | Ben Rodgers (2) |
| 6 | Frank Osei | Sales Manager | Sales | 120,000 | Carla Nunes (3) |
| 7 | Grace Lin | Senior Engineer | Engineering | 115,000 | David Kim (4) |
| 8 | Hugo Alvarez | Software Engineer | Engineering | 95,000 | David Kim (4) |
| 9 | Ivy Chen | Software Engineer | Engineering | 98,000 | Ella Novak (5) |
| 10 | Jack Meyer | Sales Rep | Sales | 80,000 | Frank Osei (6) |
| 11 | Kara Diaz | Sales Rep | Sales | 82,000 | Frank Osei (6) |
| 12 | Liam Foster | Junior Engineer | Engineering | 75,000 | Grace Lin (7) |
This gives us a set of employees that make a tree structure, rooted at “Alice”.
3.2. JPA Entity
Finally, since we’re going to be working with Hibernate, we also need a Hibernate entity to represent our data:
@Entity
@Table(name = "employee")
public class Employee {

    @Id
    private Long id;

    private String name;
    private String title;
    private String department;
    private BigDecimal salary;

    @ManyToOne
    @JoinColumn(name = "manager_id")
    private Employee manager;
}
The Employee entity gives us access to all of our data. As with our table structure, we’ve also got our reference back to the same entity. This time it’s in the form of a manager field that gives us the complete row.
4. Basic CTEs in Hibernate
Now that we’ve got our database and entity, we’re ready to query it.
As with SQL, Hibernate allows us to use the WITH clause in our HQL queries. This is used to define a new named result set that we can treat as any table or view within our main query.
For example:
List<Employee> employees = session.createQuery("""
    WITH engineers AS (
        SELECT e.id AS id
        FROM Employee e
        WHERE e.department = 'Engineering'
    )
    SELECT e
    FROM Employee e
    WHERE e.id IN (SELECT id FROM engineers)
    AND e.salary > 100000
    ORDER BY e.name ASC
""", Employee.class).getResultList();
We can consider this in two parts. Our WITH clause generates a new result set named engineers consisting of all of the IDs of employees in the “Engineering” department. Our main query then uses this in a sub-select to only return the Employee records that match.
Note that the return type from our WITH clause is always an AnonymousTupleType.This means that we can only include individual values in it, and not entire entities. We also need to give every value a distinct name with AS. We can then refer to these values by name in the main query.
Here, the engineers result set contains IDs 2, 4, 5, 7, 8, 9, and 12. Our IN clause then matches only those when selecting Employee entities, before further filtering by salary, to give an overall result of “Ben”, “David”, “Ella” and “Grace”.
We can also make our WITH clause more complicated, allowing us to resolve this complexity once and refer to it as needed in our main query:
List<Employee> employees = session.createQuery("""
    WITH dept_avg AS (
        SELECT e.department AS department, AVG(e.salary) AS avgSalary
        FROM Employee e
        GROUP BY e.department
    )
    SELECT e
    FROM Employee e
    JOIN dept_avg d ON e.department = d.department
    WHERE e.salary > d.avgSalary
    ORDER BY e.department, e.salary DESC
""", Employee.class).getResultList();
This time, our WITH clause is an aggregate query that will calculate the average salary for each department. On a very large table, this could be expensive. Writing it as a CTE separates the calculation from the main query, making the query easier to read and maintain. Depending on the database and its optimizer, the CTE may be materialized once or inlined into the main query, whichever produces the most efficient execution plan.
Here, our dept_avg result set will be as follows:
| department | avgSalary |
| CEO | 220,000 |
| Engineering | 120,142.85714286 |
| Sales | 114,250 |
Our main query can then join to this by name, as if it were a table or view in the database. This then allows us to combine the data from our dept_avg result set with the data from our main Employee entity to match the rows that we’re interested in. In this case, “Ben”, “David”, “Ella”, “Carla” and “Frank”.
5. Recursive CTEs
The place that CTEs can become really powerful is when we want to do any graph-based queries. We can write our WITH clause to be recursive. We do this by splitting it into two parts with a UNION, and can then reference back to the same named WITH clause from within this second part:
For example, let’s start with a simple CTE query:
List<Employee> employees = session.createQuery("""
    WITH subordinates AS (
        SELECT e.id AS id FROM Employee e WHERE e.manager.id = 2
    )
    SELECT e
    FROM Employee e
    WHERE e.id IN (SELECT s.id FROM subordinates s)
    ORDER BY e.department, e.name
    """, Employee.class).getResultList();
On its own, this is an overly complicated way to return every Employee who has a manager ID of “2”. Running this as-is will return “David” and “Ella”.
However, we can extend the WITH clause to be recursive as follows:
List<Employee> employees = session.createQuery("""
    WITH subordinates AS (
        SELECT e.id AS id FROM Employee e WHERE e.manager.id = 2

        UNION

        SELECT e2.id AS id FROM Employee e2 JOIN subordinates s ON e2.manager.id = s.id
    )
    SELECT e
    FROM Employee e
    WHERE e.id IN (SELECT s.id FROM subordinates s)
    ORDER BY e.department, e.name
    """, Employee.class).getResultList();
All we’ve added here is the UNION and the second part of our WITH clause. This now selects every Employee whose manager ID is either “2” or is part of the already built list of IDs. This will then return “David”, “Ella”, “Grace”, “Hugo”, “Ivy” and “Liam”.
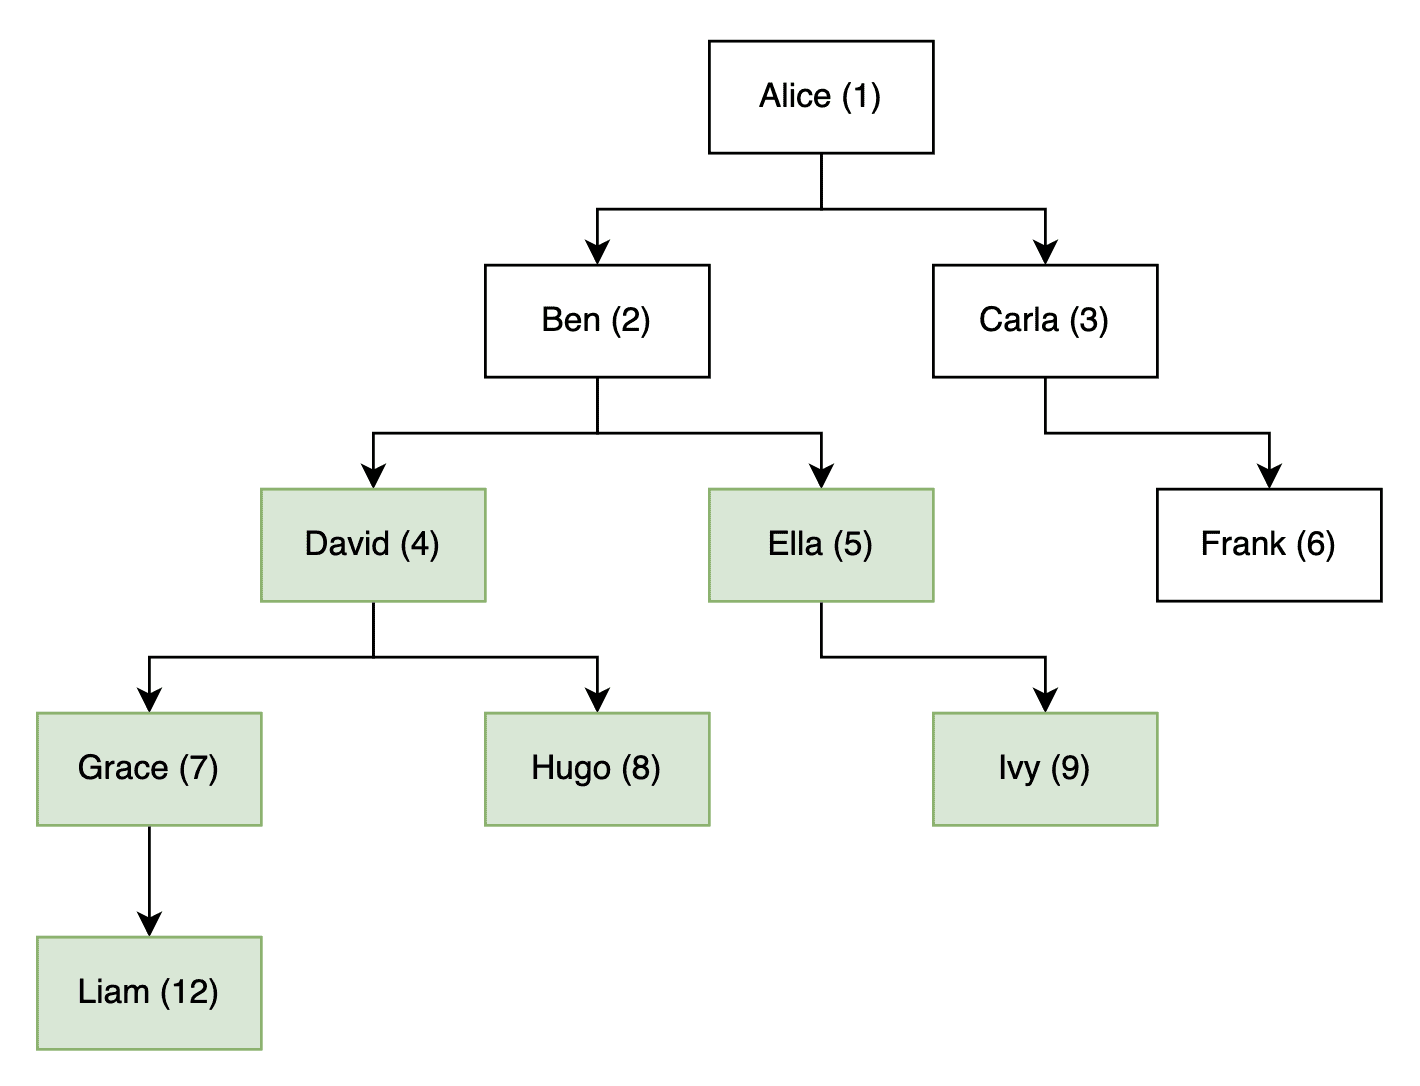
This query even reached as far as “Liam”, who is 3 steps away from our original ID, and it would continue as far as the data allowed it.
Note that by using UNION instead of UNION ALL, if we ever encounter a situation where the data is cyclical, we’ll only return each unique row once.
6. Summary
In this article, we’ve had a very brief look at using CTEs in Hibernate. We’ve seen what they are, how they work, and how we can use them. Next time you need queries like this, why not give it a go?














