Organizing Layers Using Hexagonal Architecture, DDD, and Spring
Last updated: May 11, 2024


Mocking is an essential part of unit testing, and the Mockito library makes it easy to write clean and intuitive unit tests for your Java code.
Get started with mocking and improve your application tests using our Mockito guide:
Handling concurrency in an application can be a tricky process with many potential pitfalls. A solid grasp of the fundamentals will go a long way to help minimize these issues.
Get started with understanding multi-threaded applications with our Java Concurrency guide:
Spring 5 added support for reactive programming with the Spring WebFlux module, which has been improved upon ever since. Get started with the Reactor project basics and reactive programming in Spring Boot:
Since its introduction in Java 8, the Stream API has become a staple of Java development. The basic operations like iterating, filtering, mapping sequences of elements are deceptively simple to use.
But these can also be overused and fall into some common pitfalls.
To get a better understanding on how Streams work and how to combine them with other language features, check out our guide to Java Streams:
Explore Spring Boot 3 and Spring 6 in-depth through building a full REST API with the framework:
Yes, Spring Security can be complex, from the more advanced functionality within the Core to the deep OAuth support in the framework.
I built the security material as two full courses - Core and OAuth, to get practical with these more complex scenarios. We explore when and how to use each feature and code through it on the backing project.
You can explore the course here:
Spring Data JPA is a great way to handle the complexity of JPA with the powerful simplicity of Spring Boot.
Get started with Spring Data JPA through the guided reference course:
Refactor Java code safely — and automatically — with OpenRewrite.
Refactoring big codebases by hand is slow, risky, and easy to put off. That’s where OpenRewrite comes in. The open-source framework for large-scale, automated code transformations helps teams modernize safely and consistently.
Each month, the creators and maintainers of OpenRewrite at Moderne run live, hands-on training sessions — one for newcomers and one for experienced users. You’ll see how recipes work, how to apply them across projects, and how to modernize code with confidence.
Join the next session, bring your questions, and learn how to automate the kind of work that usually eats your sprint time.
1. Overview
In this tutorial, we’ll implement a Spring application using DDD. Additionally, we’ll organize layers with the help of Hexagonal Architecture.
With this approach, we can easily exchange the different layers of the application.
2. Hexagonal Architecture
Hexagonal architecture is a model of designing software applications around domain logic to isolate it from external factors.
The domain logic is specified in a business core, which we’ll call the inside part, with the rest being outside parts. Access to domain logic from the outside is available through ports and adapters.
3. Principles
First, we should define principles to divide our code. As explained briefly already, hexagonal architecture defines the inside and outside part.
What we’ll do here is divide our application into three layers: application (outside), domain (inside), and infrastructure (outside):
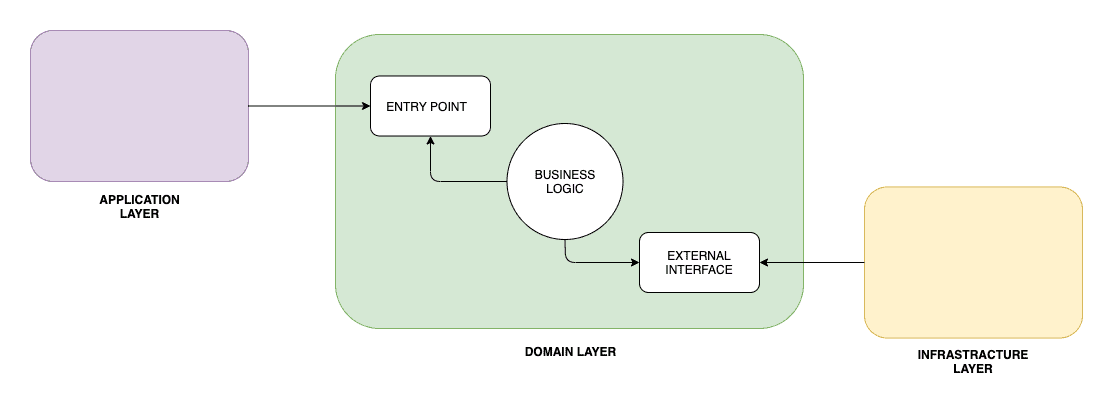
Through the application layer, the user or any other program interacts with the application. This area should contain things like user interfaces, RESTful controllers, and JSON serialization libraries. It includes anything that exposes entry to our application, and orchestrates the execution of domain logic.
In the domain layer, we keep the code that touches and implements business logic. This is the core of our application. This layer should be isolated from both the application part and infrastructure part. In addition, it should also contain interfaces that define the API to communicate with external parts, like the database, which the domain interacts with.
Finally, the infrastructure layer is the part that contains anything that the application needs to work, such as database configuration or Spring configuration. It also implements infrastructure-dependent interfaces from the domain layer.
4. Domain Layer
Let’s begin by implementing our core layer, which is the domain layer.
First, we should create the Order class:
public class Order {
    private UUID id;
    private OrderStatus status;
    private List<OrderItem> orderItems;
    private BigDecimal price;

    public Order(UUID id, Product product) {
        this.id = id;
        this.orderItems = new ArrayList<>(Arrays.astList(new OrderItem(product)));
        this.status = OrderStatus.CREATED;
        this.price = product.getPrice();
    }

    public void complete() {
        validateState();
        this.status = OrderStatus.COMPLETED;
    }

    public void addOrder(Product product) {
        validateState();
        validateProduct(product);
        orderItems.add(new OrderItem(product));
        price = price.add(product.getPrice());
    }

    public void removeOrder(UUID id) {
        validateState();
        final OrderItem orderItem = getOrderItem(id);
        orderItems.remove(orderItem);

        price = price.subtract(orderItem.getPrice());
    }

    // getters
}
This is our aggregate root. Anything related to our business logic will go through this class. Additionally, Order is responsible for keeping itself in the correct state:
- The order can only be created with the given ID and based on one Product; the constructor itself also inits the order with CREATED status.
- Once the order is completed, changing OrderItems is impossible.
- It’s impossible to change the Order from outside the domain object, like with a setter.
Furthermore, the Order class is also responsible for creating its OrderItem.
So let’s create the OrderItem class:
public class OrderItem {
    private UUID productId;
    private BigDecimal price;

    public OrderItem(Product product) {
        this.productId = product.getId();
        this.price = product.getPrice();
    }

    // getters
}
As we can see, OrderItem is created based on a Product. It keeps the reference to it and stores the current price of the Product.
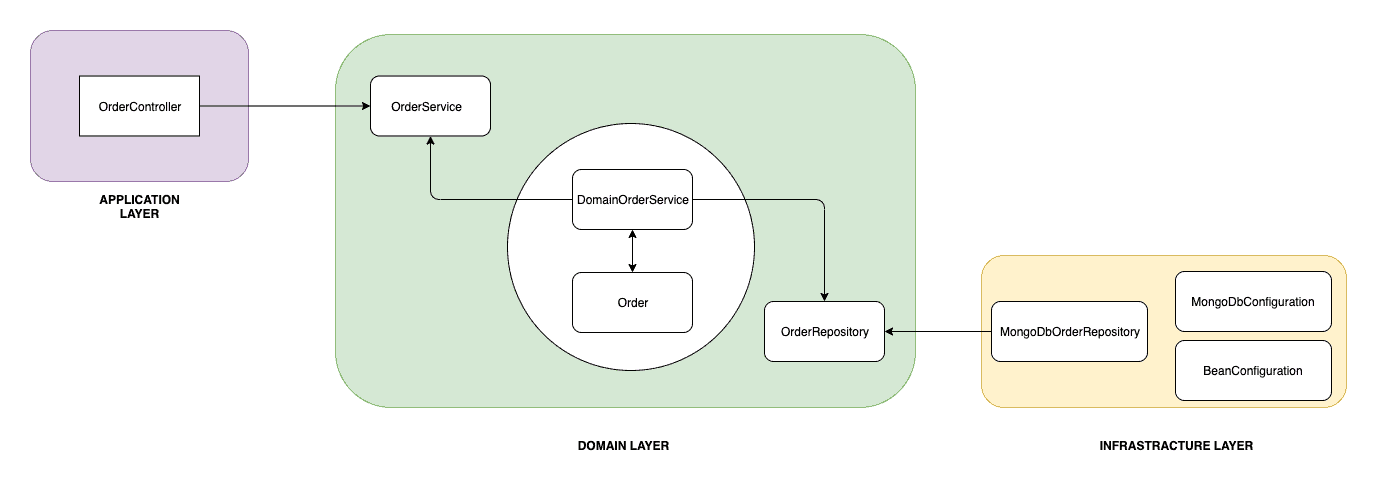
Next, we’ll create a repository interface (a port in Hexagonal Architecture). The implementation of the interface will be in the infrastructure layer:
public interface OrderRepository {
    Optional<Order> findById(UUID id);

    void save(Order order);
}
Finally, we should make sure that the Order will always be saved after each action. To do that, we’ll define a Domain Service, which usually contains logic that can’t be a part of our root:
public class DomainOrderService implements OrderService {

    private final OrderRepository orderRepository;

    public DomainOrderService(OrderRepository orderRepository) {
        this.orderRepository = orderRepository;
    }

    @Override
    public UUID createOrder(Product product) {
        Order order = new Order(UUID.randomUUID(), product);
        orderRepository.save(order);

        return order.getId();
    }

    @Override
    public void addProduct(UUID id, Product product) {
        Order order = getOrder(id);
        order.addOrder(product);

        orderRepository.save(order);
    }

    @Override
    public void completeOrder(UUID id) {
        Order order = getOrder(id);
        order.complete();

        orderRepository.save(order);
    }

    @Override
    public void deleteProduct(UUID id, UUID productId) {
        Order order = getOrder(id);
        order.removeOrder(productId);

        orderRepository.save(order);
    }

    private Order getOrder(UUID id) {
        return orderRepository
          .findById(id)
          .orElseThrow(RuntimeException::new);
    }
}
In a hexagonal architecture, this service is an adapter that implements the port. We won’t register it as a Spring bean because, from a domain perspective, this is in the inside part, and Spring configuration is on the outside. We’ll manually wire it with Spring in the infrastructure layer a bit later.
Because the domain layer is completely decoupled from the application and infrastructure layers, we can also test it independently:
class DomainOrderServiceUnitTest {

    private OrderRepository orderRepository;
    private DomainOrderService tested;
    @BeforeEach
    void setUp() {
        orderRepository = mock(OrderRepository.class);
        tested = new DomainOrderService(orderRepository);
    }

    @Test
    void shouldCreateOrder_thenSaveIt() {
        final Product product = new Product(UUID.randomUUID(), BigDecimal.TEN, "productName");

        final UUID id = tested.createOrder(product);

        verify(orderRepository).save(any(Order.class));
        assertNotNull(id);
    }
}
5. Application Layer
In this section, we’ll implement the application layer. We’ll allow the user to communicate with our application via a RESTful API.
So let’s create the OrderController:
@RestController
@RequestMapping("/orders")
public class OrderController {

    private OrderService orderService;

    @Autowired
    public OrderController(OrderService orderService) {
        this.orderService = orderService;
    }

    @PostMapping
    CreateOrderResponse createOrder(@RequestBody CreateOrderRequest request) {
        UUID id = orderService.createOrder(request.getProduct());

        return new CreateOrderResponse(id);
    }

    @PostMapping(value = "/{id}/products")
    void addProduct(@PathVariable UUID id, @RequestBody AddProductRequest request) {
        orderService.addProduct(id, request.getProduct());
    }

    @DeleteMapping(value = "/{id}/products")
    void deleteProduct(@PathVariable UUID id, @RequestParam UUID productId) {
        orderService.deleteProduct(id, productId);
    }

    @PostMapping("/{id}/complete")
    void completeOrder(@PathVariable UUID id) {
        orderService.completeOrder(id);
    }
}
This simple Spring Rest controller is responsible for orchestrating the execution of domain logic.
This controller adapts the outside RESTful interface to our domain. It does so by calling the appropriate methods from OrderService (port).
6. Infrastructure Layer
The infrastructure layer contains the logic needed to run the application.
We’ll start by creating the configuration classes. First, we’ll implement a class that will register our OrderService as a Spring bean:
@Configuration
public class BeanConfiguration {

    @Bean
    OrderService orderService(OrderRepository orderRepository) {
        return new DomainOrderService(orderRepository);
    }
}
Next, we’ll create the configuration responsible for enabling the Spring Data repositories we’ll use:
@EnableMongoRepositories(basePackageClasses = SpringDataMongoOrderRepository.class)
public class MongoDBConfiguration {
}
We’ve used the basePackageClasses property because those repositories can only be in the infrastructure layer. Hence, there’s no reason for Spring to scan the whole application. Furthermore, this class can contain everything related to establishing a connection between MongoDB and our application.
Finally, we’ll implement the OrderRepository from the domain layer. We’ll use our SpringDataMongoOrderRepository in our implementation:
@Component
public class MongoDbOrderRepository implements OrderRepository {

    private SpringDataMongoOrderRepository orderRepository;

    @Autowired
    public MongoDbOrderRepository(SpringDataMongoOrderRepository orderRepository) {
        this.orderRepository = orderRepository;
    }

    @Override
    public Optional<Order> findById(UUID id) {
        return orderRepository.findById(id);
    }

    @Override
    public void save(Order order) {
        orderRepository.save(order);
    }
}
This implementation stores our Order in MongoDB. In a hexagonal architecture, this implementation is also an adapter.
7. Benefits
The first advantage of this approach is that we separate work for each layer. We can focus on one layer without affecting others.
Furthermore, they’re naturally easier to understand because each of them focuses on its logic.
Another big advantage is that we’ve isolated the domain logic from everything else. The domain part only contains business logic, and can be easily moved to a different environment.
In fact, let’s change the infrastructure layer to use Cassandra as a database:
@Component
public class CassandraDbOrderRepository implements OrderRepository {

    private final SpringDataCassandraOrderRepository orderRepository;

    @Autowired
    public CassandraDbOrderRepository(SpringDataCassandraOrderRepository orderRepository) {
        this.orderRepository = orderRepository;
    }

    @Override
    public Optional<Order> findById(UUID id) {
        Optional<OrderEntity> orderEntity = orderRepository.findById(id);
        if (orderEntity.isPresent()) {
            return Optional.of(orderEntity.get()
                .toOrder());
        } else {
            return Optional.empty();
        }
    }

    @Override
    public void save(Order order) {
        orderRepository.save(new OrderEntity(order));
    }

}
Unlike with MongoDB, we now use an OrderEntity to persist the domain in the database.
If we add technology-specific annotations to our Order domain object, then we violate the decoupling between infrastructure and domain layers.
The repository adapts the domain to our persistence needs.
Let’s go a step further and transform our RESTful application into a command-line application:
@Component
public class CliOrderController {

    private static final Logger LOG = LoggerFactory.getLogger(CliOrderController.class);

    private final OrderService orderService;

    @Autowired
    public CliOrderController(OrderService orderService) {
        this.orderService = orderService;
    }

    public void createCompleteOrder() {
        LOG.info("<<Create complete order>>");
        UUID orderId = createOrder();
        orderService.completeOrder(orderId);
    }

    public void createIncompleteOrder() {
        LOG.info("<<Create incomplete order>>");
        UUID orderId = createOrder();
    }

    private UUID createOrder() {
        LOG.info("Placing a new order with two products");
        Product mobilePhone = new Product(UUID.randomUUID(), BigDecimal.valueOf(200), "mobile");
        Product razor = new Product(UUID.randomUUID(), BigDecimal.valueOf(50), "razor");
        LOG.info("Creating order with mobile phone");
        UUID orderId = orderService.createOrder(mobilePhone);
        LOG.info("Adding a razor to the order");
        orderService.addProduct(orderId, razor);
        return orderId;
    }
}
Unlike before, we’ve now hardwired a set of predefined actions that interact with our domain. We could use this to populate our application with mocked data, for example.
Even though we completely changed the purpose of the application, we haven’t touched the domain layer.
8. Conclusion
In this article, we learned how to separate the logic related to our application into specific layers.
First, we defined three main layers: application, domain, and infrastructure. Then we described how to fill them, and explained the advantages.
Next, we came up with the implementation for each layer:
 Finally, we swapped the application and infrastructure layers without impacting the domain.


