Mocking is an essential part of unit testing, and the Mockito library makes it easy to write clean and intuitive unit tests for your Java code.
Get started with mocking and improve your application tests using our Mockito guide:
Handling concurrency in an application can be a tricky process with many potential pitfalls. A solid grasp of the fundamentals will go a long way to help minimize these issues.
Get started with understanding multi-threaded applications with our Java Concurrency guide:
Spring 5 added support for reactive programming with the Spring WebFlux module, which has been improved upon ever since. Get started with the Reactor project basics and reactive programming in Spring Boot:
Since its introduction in Java 8, the Stream API has become a staple of Java development. The basic operations like iterating, filtering, mapping sequences of elements are deceptively simple to use.
But these can also be overused and fall into some common pitfalls.
To get a better understanding on how Streams work and how to combine them with other language features, check out our guide to Java Streams:
Explore Spring Boot 3 and Spring 6 in-depth through building a full REST API with the framework:
Yes, Spring Security can be complex, from the more advanced functionality within the Core to the deep OAuth support in the framework.
I built the security material as two full courses - Core and OAuth, to get practical with these more complex scenarios. We explore when and how to use each feature and code through it on the backing project.
You can explore the course here:
All Access is finally out, with all of my Spring courses. Learn JUnit is out as well, and Learn Maven is coming fast. And, of course, quite a bit more affordable. Finally.
>> GET THE COURSE
Spring Data JPA is a great way to handle the complexity of JPA with the powerful simplicity of Spring Boot.
Get started with Spring Data JPA through the guided reference course:
Refactor Java code safely — and automatically — with OpenRewrite.
Refactoring big codebases by hand is slow, risky, and easy to put off. That’s where OpenRewrite comes in. The open-source framework for large-scale, automated code transformations helps teams modernize safely and consistently.
Each month, the creators and maintainers of OpenRewrite at Moderne run live, hands-on training sessions — one for newcomers and one for experienced users. You’ll see how recipes work, how to apply them across projects, and how to modernize code with confidence.
Join the next session, bring your questions, and learn how to automate the kind of work that usually eats your sprint time.
1. Overview
Google Sheets provides a convenient way to store and manipulate spreadsheets and collaborate with others on a document.
Sometimes, it can be useful to access these documents from an application, say to perform an automated operation. For this purpose, Google provides the Google Sheets API that developers can interact with.
In this article, we’re going to take a look at how we can connect to the API and perform operations on Google Sheets.
2. Maven Dependencies
To connect to the API and manipulate documents, we’ll need to add the google-api-client, google-oauth-client-jetty and google-api-services-sheets dependencies:
<dependency>
    <groupId>com.google.api-client</groupId>
    <artifactId>google-api-client</artifactId>
    <version>1.23.0</version>
</dependency>
<dependency>
    <groupId>com.google.oauth-client</groupId>
    <artifactId>google-oauth-client-jetty</artifactId>
    <version>1.23.0</version>
</dependency>
<dependency>
    <groupId>com.google.apis</groupId>
    <artifactId>google-api-services-sheets</artifactId>
    <version>v4-rev493-1.23.0</version>
</dependency>
3. Authorization
The Google Sheets API requires OAuth 2.0 authorization before we can access it through an application.
First, we need to obtain a set of OAuth credentials, then use this in our application to submit a request for authorization.
3.1. Obtaining OAuth 2.0 Credentials
To obtain the credentials, we’ll need to create a project in the Google Developers Console and then enable the Google Sheets API for the project. The first step in the Google Quickstart guide contains detailed information on how to do this.
Once we’ve downloaded the JSON file with the credential information, let’s copy the contents in a google-sheets-client-secret.json file in the src/main/resources directory of our application.
The contents of the file should be similar to this:
{
  "installed":
    {
      "client_id":"<your_client_id>",
      "project_id":"decisive-octane-187810",
      "auth_uri":"https://accounts.google.com/o/oauth2/auth",
      "token_uri":"https://accounts.google.com/o/oauth2/token",
      "auth_provider_x509_cert_url":"https://www.googleapis.com/oauth2/v1/certs",
      "client_secret":"<your_client_secret>",
      "redirect_uris":["urn:ietf:wg:oauth:2.0:oob","http://localhost"]
    }
}
3.2. Obtaining a Credential Object
A successful authorization returns a Credential object we can use to interact with the Google Sheets API.
Let’s create a GoogleAuthorizeUtil class with a static authorize() method which reads the content of the JSON file above and builds a GoogleClientSecrets object.
Then, we’ll create a GoogleAuthorizationCodeFlow and send the authorization request:
public class GoogleAuthorizeUtil {
    public static Credential authorize() throws IOException, GeneralSecurityException {

        // build GoogleClientSecrets from JSON file

        List<String> scopes = Arrays.asList(SheetsScopes.SPREADSHEETS);

        // build Credential object

        return credential;
    }
}
In our example, we’re setting the SPREADSHEETS scope since we want to access Google Sheets and using an in-memory DataStoreFactory to store the credentials received. Another option is using a FileDataStoreFactory to store the credentials in a file.
For the full source code of the GoogleAuthorizeUtil class, check out the project code on GitHub.
4. Constructing the Sheets Service Instance
For interacting with Google Sheets, we’ll need a Sheets object which is the client for reading and writing through the API.
Let’s create a SheetsServiceUtil class that uses the Credential object above to obtain an instance of Sheets:
public class SheetsServiceUtil {
    private static final String APPLICATION_NAME = "Google Sheets Example";

    public static Sheets getSheetsService() throws IOException, GeneralSecurityException {
        Credential credential = GoogleAuthorizeUtil.authorize();
        return new Sheets.Builder(
          GoogleNetHttpTransport.newTrustedTransport(),
          JacksonFactory.getDefaultInstance(), credential)
          .setApplicationName(APPLICATION_NAME)
          .build();
    }
}
Next, we’ll take a look at some of the most common operations we can perform using the API.
5. Writing Values on a Sheet
Interacting with an existing spreadsheet requires knowing that spreadsheet’s id, which we can find from its URL.
For our examples, we’re going to use a public spreadsheet called “Expenses”, located at:
https://docs.google.com/spreadsheets/d/1sILuxZUnyl_7-MlNThjt765oWshN3Xs-PPLfqYe4DhI/edit#gid=0
Based on this URL, we can identify this spreadsheet’s id as “1sILuxZUnyl_7-MlNThjt765oWshN3Xs-PPLfqYe4DhI”.
Also, to read and write values, we’re going to use spreadsheets.values collections.
The values are represented as ValueRange objects, which are lists of lists of Java Objects, corresponding to rows or columns in a sheet.
Let’s create a test class where we initialize our Sheets service object and a SPREADSHEET_ID constant:
public class GoogleSheetsLiveTest {
    private static Sheets sheetsService;
    private static String SPREADSHEET_ID = // ...

    @BeforeClass
    public static void setup() throws GeneralSecurityException, IOException {
        sheetsService = SheetsServiceUtil.getSheetsService();
    }
}
Then, we can write values by:
- writing to a single range
- writing to multiple ranges
- appending data after a table
5.1. Writing to a Single Range
To write values to a single range on a sheet, we’ll use the spreadsheets().values().update() method:
@Test
public void whenWriteSheet_thenReadSheetOk() throws IOException {
    ValueRange body = new ValueRange()
      .setValues(Arrays.asList(
        Arrays.asList("Expenses January"),
        Arrays.asList("books", "30"),
        Arrays.asList("pens", "10"),
        Arrays.asList("Expenses February"),
        Arrays.asList("clothes", "20"),
        Arrays.asList("shoes", "5")));
    UpdateValuesResponse result = sheetsService.spreadsheets().values()
      .update(SPREADSHEET_ID, "A1", body)
      .setValueInputOption("RAW")
      .execute();
}
Here, we’re first creating a ValueRange object with multiple rows containing a list of expenses for two months.
Then, we’re using the update() method to build a request that writes the values to the spreadsheet with the given id, starting at the “A1” cell.
To send the request, we’re using the execute() method.
If we want our value sets to be considered as columns instead of rows, we can use the setMajorDimension(“COLUMNS”) method.
The “RAW” input option means the values are written exactly as they are, and not computed.
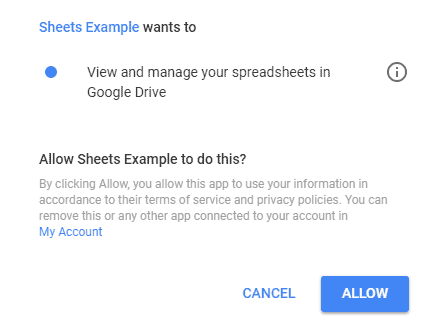
When executing this JUnit test, the application will open a browser window using the system’s default browser that asks the user to log in and give our application permission to interact with Google Sheets on the user’s behalf:
Note that this manual step can be bypassed if you have an OAuth Service Account.
A requirement for the application to be able to view or edit the spreadsheet is that the signed-in user has a view or edit access to it. Otherwise, the request will result in a 403 error. The spreadsheet we use for our example is set to public edit access.
Now, if we check the spreadsheet, we’ll see the range “A1:B6” is updated with our value sets.
Let’s move on to writing to multiple disparate ranges in a single request.
5.2. Writing to Multiple Ranges
If we want to update multiple ranges on a sheet, we can use a BatchUpdateValuesRequest for better performance:
List<ValueRange> data = new ArrayList<>();
data.add(new ValueRange()
  .setRange("D1")
  .setValues(Arrays.asList(
    Arrays.asList("January Total", "=B2+B3"))));
data.add(new ValueRange()
  .setRange("D4")
  .setValues(Arrays.asList(
    Arrays.asList("February Total", "=B5+B6"))));

BatchUpdateValuesRequest batchBody = new BatchUpdateValuesRequest()
  .setValueInputOption("USER_ENTERED")
  .setData(data);

BatchUpdateValuesResponse batchResult = sheetsService.spreadsheets().values()
  .batchUpdate(SPREADSHEET_ID, batchBody)
  .execute();
In this example, we’re first building a list of ValueRanges, each made up of two cells that represent the name of the month and the total expenses.
Then, we’re creating a BatchUpdateValuesRequest with the input option “USER_ENTERED”, as opposed to “RAW”, meaning the cell values will be computed based on the formula of adding two other cells.
Finally, we’re creating and sending the batchUpdate request. As a result, the ranges “D1:E1” and “D4:E4” will be updated.
5.3. Appending Data After a Table
Another way of writing values in a sheet is by appending them at the end of a table.
For this, we can use the append() method:
ValueRange appendBody = new ValueRange()
  .setValues(Arrays.asList(
    Arrays.asList("Total", "=E1+E4")));
AppendValuesResponse appendResult = sheetsService.spreadsheets().values()
  .append(SPREADSHEET_ID, "A1", appendBody)
  .setValueInputOption("USER_ENTERED")
  .setInsertDataOption("INSERT_ROWS")
  .setIncludeValuesInResponse(true)
  .execute();

ValueRange total = appendResult.getUpdates().getUpdatedData();
assertThat(total.getValues().get(0).get(1)).isEqualTo("65");
First, we’re building the ValueRange object containing the cell values we want to add.
In our case, this contains a cell with the total expenses for both months that we find by adding the “E1” and “E2” cell values.
Then, we’re creating a request that will append the data after the table containing the “A1” cell.
The INSERT_ROWS option means that we want the data to be added to a new row, and not replace any existing data after the table. This means the example will write the range “A7:B7” in its first run.
On subsequent runs, the table that starts at the “A1” cell will now stretch to include the “A7:B7” row, so a new row goes to the “A8:B8” row, and so on.
We also need to set the includeValuesInResponse property to true if we want to verify the response to a request. As a result, the response object will contain the updated data.
6. Reading Values from a Sheet
Let’s verify that our values were written correctly by reading them from the sheet.
We can do this by using the spreadsheets().values().get() method to read a single range or the batchUpdate() method to read multiple ranges:
List<String> ranges = Arrays.asList("E1","E4");
BatchGetValuesResponse readResult = sheetsService.spreadsheets().values()
  .batchGet(SPREADSHEET_ID)
  .setRanges(ranges)
  .execute();

ValueRange januaryTotal = readResult.getValueRanges().get(0);
assertThat(januaryTotal.getValues().get(0).get(0))
  .isEqualTo("40");

ValueRange febTotal = readResult.getValueRanges().get(1);
assertThat(febTotal.getValues().get(0).get(0))
  .isEqualTo("25");
Here, we’re reading the ranges “E1” and “E4” and verifying that they contain the total for each month that we wrote before.
7. Creating New Spreadsheets
Besides reading and updating values, we can also manipulate sheets or entire spreadsheets by using spreadsheets() and spreadsheets().sheets() collections.
Let’s see an example of creating a new spreadsheet:
@Test
public void test() throws IOException {
    Spreadsheet spreadSheet = new Spreadsheet().setProperties(
      new SpreadsheetProperties().setTitle("My Spreadsheet"));
    Spreadsheet result = sheetsService
      .spreadsheets()
      .create(spreadSheet).execute();

    assertThat(result.getSpreadsheetId()).isNotNull();
}
Here, we’re first creating a Spreadsheet object with the title “My Spreadsheet” then building and sending a request using the create() and execute() methods.
The new spreadsheet will be private and placed in the signed-in user’s Drive.
8. Other Updating Operations
Most other operations take the form of a Request object, which we then add to a list and use to build a BatchUpdateSpreadsheetRequest.
Let’s see how we can send two requests to change the title of a spreadsheet and copy-paste a set of cells from one sheet to another:
@Test
public void whenUpdateSpreadSheetTitle_thenOk() throws IOException {
    UpdateSpreadsheetPropertiesRequest updateSpreadSheetRequest
      = new UpdateSpreadsheetPropertiesRequest().setFields("*")
      .setProperties(new SpreadsheetProperties().setTitle("Expenses"));

    CopyPasteRequest copyRequest = new CopyPasteRequest()
      .setSource(new GridRange().setSheetId(0)
        .setStartColumnIndex(0).setEndColumnIndex(2)
        .setStartRowIndex(0).setEndRowIndex(1))
      .setDestination(new GridRange().setSheetId(1)
        .setStartColumnIndex(0).setEndColumnIndex(2)
        .setStartRowIndex(0).setEndRowIndex(1))
      .setPasteType("PASTE_VALUES");

    List<Request> requests = new ArrayList<>();
    requests.add(new Request()
      .setCopyPaste(copyRequest));
    requests.add(new Request()
      .setUpdateSpreadsheetProperties(updateSpreadSheetRequest));

    BatchUpdateSpreadsheetRequest body
      = new BatchUpdateSpreadsheetRequest().setRequests(requests);

    sheetsService.spreadsheets().batchUpdate(SPREADSHEET_ID, body).execute();
}
Here, we’re creating an UpdateSpreadSheetPropertiesRequest object which specifies the new title, a CopyPasteRequest object which contains the source and destination of the operation and then adding these objects to a List of Requests.
Then, we’re executing both requests as a batch update.
Many other types of requests are available to use in a similar manner. For example, we can create a new sheet in a spreadsheet with an AddSheetRequest or alter values with a FindReplaceRequest.
We can perform other operations such as changing borders, adding filters or merging cells. The full list of Request types is available here.
9. Conclusion
In this article, we’ve seen how we can connect to the Google Sheets API from a Java application and a few examples of manipulating documents stored in Google Sheets.