

Mocking is an essential part of unit testing, and the Mockito library makes it easy to write clean and intuitive unit tests for your Java code.
Get started with mocking and improve your application tests using our Mockito guide:
Handling concurrency in an application can be a tricky process with many potential pitfalls. A solid grasp of the fundamentals will go a long way to help minimize these issues.
Get started with understanding multi-threaded applications with our Java Concurrency guide:
Spring 5 added support for reactive programming with the Spring WebFlux module, which has been improved upon ever since. Get started with the Reactor project basics and reactive programming in Spring Boot:
Since its introduction in Java 8, the Stream API has become a staple of Java development. The basic operations like iterating, filtering, mapping sequences of elements are deceptively simple to use.
But these can also be overused and fall into some common pitfalls.
To get a better understanding on how Streams work and how to combine them with other language features, check out our guide to Java Streams:
Explore Spring Boot 3 and Spring 6 in-depth through building a full REST API with the framework:
Yes, Spring Security can be complex, from the more advanced functionality within the Core to the deep OAuth support in the framework.
I built the security material as two full courses - Core and OAuth, to get practical with these more complex scenarios. We explore when and how to use each feature and code through it on the backing project.
You can explore the course here:
Spring Data JPA is a great way to handle the complexity of JPA with the powerful simplicity of Spring Boot.
Get started with Spring Data JPA through the guided reference course:
Refactor Java code safely — and automatically — with OpenRewrite.
Refactoring big codebases by hand is slow, risky, and easy to put off. That’s where OpenRewrite comes in. The open-source framework for large-scale, automated code transformations helps teams modernize safely and consistently.
Each month, the creators and maintainers of OpenRewrite at Moderne run live, hands-on training sessions — one for newcomers and one for experienced users. You’ll see how recipes work, how to apply them across projects, and how to modernize code with confidence.
Join the next session, bring your questions, and learn how to automate the kind of work that usually eats your sprint time.
Yes, we're now running our only Summer Sale. All Courses are 30% off until 20th July, 2026:
Yes, we're now running our only Summer Sale. All Courses are 30% off until 20th July, 2026:
1. Overview
Flowable is a business process engine written in Java. In this tutorial, we’ll go through the details of business processes and understand how we can leverage the Flowable Java API to create and deploy a sample business process.
2. Understanding Business Processes
Simply put, a Business Process is a set of tasks that, once completed in a defined order, accomplishes a defined objective. Each task in a Business Process has clearly defined inputs and outputs. These tasks may require human intervention or may be completely automated.
OMG (Object Management Group) has defined a standard called Business Process Model and Notation (BPMN) for businesses to define and communicate their processes. BPMN has come to be widely supported and accepted in the industry. The Flowable API fully supports creating and deploying BPMN 2.0 process definitions.
3. Creating Process Definitions
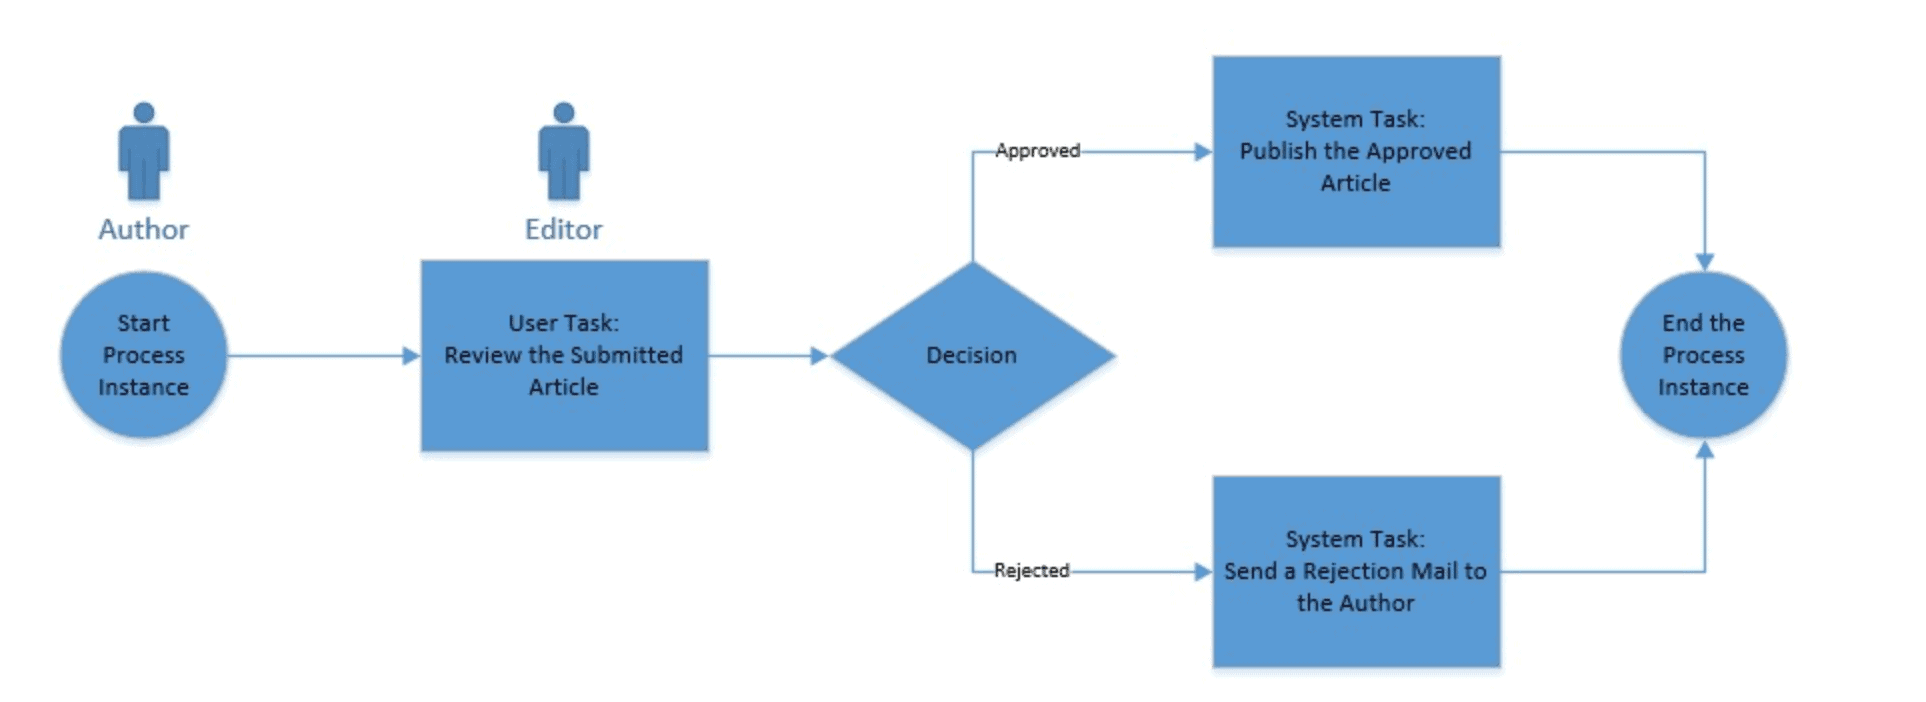
Let’s suppose we have a simple process for article review before publishing.
The gist of this process is that authors submit an article, and editors either accept or reject it. If accepted, the article is published immediately; however, if rejected, the author is notified through email:
We create process definitions as XML files using the BPMN 2.0 XML standard.
Let’s define our simple process as per the BPMN 2.0 standard:
<?xml version="1.0" encoding="UTF-8"?>
<definitions
    xmlns="http://www.omg.org/spec/BPMN/20100524/MODEL"
    xmlns:xsi="http://www.w3.org/2001/XMLSchema-instance"
    xmlns:xsd="http://www.w3.org/2001/XMLSchema"
    xmlns:bpmndi="http://www.omg.org/spec/BPMN/20100524/DI"
    xmlns:omgdc="http://www.omg.org/spec/DD/20100524/DC"
    xmlns:omgdi="http://www.omg.org/spec/DD/20100524/DI"
    xmlns:flowable="http://flowable.org/bpmn"
    typeLanguage="http://www.w3.org/2001/XMLSchema"
    expressionLanguage="http://www.w3.org/1999/XPath"
    targetNamespace="http://www.flowable.org/processdef">
    <process id="articleReview"
      name="A simple process for article review." isExecutable="true">
        <startEvent id="start" />
        <sequenceFlow sourceRef="start" targetRef="reviewArticle" />
        <userTask id="reviewArticle" name="Review the submitted tutorial"
          flowable:candidateGroups="editors" />
        <sequenceFlow sourceRef="reviewArticle" targetRef="decision" />
        <exclusiveGateway id="decision" />
        <sequenceFlow sourceRef="decision" targetRef="tutorialApproved">
            <conditionExpression xsi:type="tFormalExpression">
                <![CDATA[${approved}]]>
            </conditionExpression>
        </sequenceFlow>
        <sequenceFlow sourceRef="decision" targetRef="tutorialRejected">
            <conditionExpression xsi:type="tFormalExpression">
                <![CDATA[${!approved}]]>
            </conditionExpression>
        </sequenceFlow>
        <serviceTask id="tutorialApproved" name="Publish the approved tutorial."
          flowable:class="com.baeldung.service.PublishArticleService" />
        <sequenceFlow sourceRef="tutorialApproved" targetRef="end" />
        <serviceTask id="tutorialRejected" name="Send out rejection email"
          flowable:class="com.baeldung.service.SendMailService" />
        <sequenceFlow sourceRef="tutorialRejected" targetRef="end" />
        <endEvent id="end" />
    </process>
</definitions>
Now, there are quite a number of elements here that are standard XML stuff, while others are specific to BPMN 2.0:
- The entire process is wrapped in a tag called “process”, which in turn, is part of a tag called “definitions”
- A process consists of events, flows, tasks, and gateways
- An event is either a start event or an end event
- A flow (in this example, a sequence flow) connects other elements like events and tasks
- Tasks are where actual work is done; these can be “user tasks” or “service tasks”, among others
- A user task requires a human user to interact with the Flowable API and take action
- A service task represents an automatic task, which can be a call to a Java class or even an HTTP call
- A gateway executes based on the attribute “approved”; this is known as a process variable, and we’ll see how to set them later
While we can create process definition files in any text editor, this isn’t always the most convenient way. Fortunately, though, Flowable also comes with user interface options to do this using either an Eclipse plugin or a Web Application. If you’re using IntelliJ instead, there’s an IntelliJ plugin available as well.
4. Working with Flowable API
Now that we’ve defined our simple process in an XML file as per the BPMN 2.0 standard, we need a way to submit and run it. Flowable provides the Process Engine API to interact with Flowable Engines. Flowable is very flexible and offers several ways to deploy this API.
Given that Flowable is a Java API, we can include the process engine in any Java application by simply including the requisite JAR files. We can very well leverage Maven for managing these dependencies.
Moreover, Flowable comes with bundled APIs to interact with Flowable over HTTP. We can use these APIs to pretty much do anything otherwise possible through Flowable API.
Finally, Flowable has excellent support for integration with Spring and Spring Boot! We’ll make use of Flowable and Spring Boot integration in our tutorial.
5. Creating a Demo Application with Process Engine
Let’s now create a simple application that wraps a process engine from Flowable and offers an HTTP-based API to interact with the Flowable API. There may as well be a web or mobile application sitting on top of the API to make the experience better, but we’ll skip for that for this tutorial.
We’ll create our demo as a Spring Boot application.
5.1. Dependencies
First, let’s see the dependencies we need to pull from Maven:
<dependency>
    <groupId>org.springframework.boot</groupId>
    <artifactId>spring-boot-starter-web</artifactId>
</dependency>
<dependency>
    <groupId>org.flowable</groupId>
    <artifactId>flowable-spring-boot-starter</artifactId>
    <version>7.0.1</version>
</dependency>
<dependency>
    <groupId>com.h2database</groupId>
    <artifactId>h2</artifactId>
    <scope>runtime</scope>
</dependency>
The dependencies we require are all available at Maven Central:
- Spring Boot Starter for Web — this is a standard starter for Spring Boot
- Flowable Starter for Spring Boot — this is required for Spring Boot Flowable Engines
- H2 Database — Flowable requires a database to store data, and H2 is the default in-memory database
5.2. Process Definition
When we start our Spring Boot application, it tries to automatically load all process definitions present under the folder “resources/processes”. Therefore, let’s create an XML file with the process definition we created above, with the name “article-workflow.bpmn20.xml”, and place it in that folder.
5.3. Configurations
As we’re aware that Spring Boot takes a highly opinionated approach towards application configuration, that goes true for Flowable as part of Spring Boot as well. For instance, detecting H2 as the only database driver on the classpath, Flowable automatically configures it for use.
Obviously, every aspect that is configurable can be configured in a custom manner through application properties. For this tutorial, however, we’ll stick to the defaults!
5.4. Java Delegates
In our process definition, we’ve used a couple of Java classes that are supposed to be invoked as parts of service tasks. These classes implement the JavaDelegate interface and are known as Java Delegates in Flowable. We’ll now define dummy classes for these Java Delegates:
public class PublishArticleService implements JavaDelegate {
    public void execute(DelegateExecution execution) {
        System.out.println("Publishing the approved article.");
    }
}
public class SendMailService implements JavaDelegate {
public void execute(DelegateExecution execution) {
System.out.println("Sending rejection mail to author.");
}
}Obviously, we must replace these dummy classes with actual services to publish an article or send an email.
5.5. HTTP APIs
Finally, let’s create some endpoints to interact with the process engine and work with the process we’ve defined.
We’ll begin by defining a controller exposing three endpoints:
@RestController
public class ArticleWorkflowController {
    @Autowired
    private ArticleWorkflowService service;

    @PostMapping("/submit")
    public void submit(@RequestBody Article article) {
        service.startProcess(article);
    }

    @GetMapping("/tasks")
    public List<Article> getTasks(@RequestParam String assignee) {
        return service.getTasks(assignee);
    }

    @PostMapping("/review")
    public void review(@RequestBody Approval approval) {
        service.submitReview(approval);
    }
}
Our controller exposes endpoints to submit an article for review, fetch a list of articles to review, and finally, to submit a review for an article. Article and Approval are standard POJOs that can be found in the repository.
We are actually delegating most of the work to ArticleWorkflowService:
@Service
public class ArticleWorkflowService {
    @Autowired
    private RuntimeService runtimeService;

    @Autowired
    private TaskService taskService;

    @Transactional
    public void startProcess(Article article) {
        Map<String, Object> variables = new HashMap<>();
        variables.put("author", article.getAuthor());
        variables.put("url", article.getUrl());
        runtimeService.startProcessInstanceByKey("articleReview", variables);
    }

    @Transactional
    public List<Article> getTasks(String assignee) {
        List<Task> tasks = taskService.createTaskQuery()
          .taskCandidateGroup(assignee)
          .list();
        return tasks.stream()
          .map(task -> {
              Map<String, Object> variables = taskService.getVariables(task.getId());
              return new Article(task.getId(), (String) variables.get("author"), (String) variables.get("url"));
          })
          .collect(Collectors.toList());
    }

    @Transactional
    public void submitReview(Approval approval) {
        Map<String, Object> variables = new HashMap<String, Object>();
        variables.put("approved", approval.isStatus());
        taskService.complete(approval.getId(), variables);
    }
}
Now, most of the code here is pretty intuitive, but let’s understand the salient points:
- RuntimeService to instantiate the process for a particular submission
- TaskService to query and update tasks
- Wrapping all database calls in transactions supported by Spring
- Storing details like author and URL, among others, in a Map, and saving with the process instance; these are known as process variables, and we can access them within a process definition, as we saw earlier
Now, we’re ready to test our application and process engine. Once we start the application, we can simply use curl or any REST client like Postman to interact with the endpoints we’ve created.
6. Unit Testing Processes
Flowable supports different versions of JUnit, including JUnit 5, for creating unit tests for business processes. Flowable integration with Spring has suitable support for this as well. Let’s see a typical unit test for a process in Spring:
@ExtendWith(FlowableSpringExtension.class)
@ExtendWith(SpringExtension.class)
public class ArticleWorkflowUnitTest {
    @Autowired
    private RuntimeService runtimeService;

    @Autowired
    private TaskService taskService;

    @Test
    @Deployment(resources = { "processes/article-workflow.bpmn20.xml" })
    void articleApprovalTest() {
        Map<String, Object> variables = new HashMap<>();
        variables.put("author", "[email protected]");
        variables.put("url", "http://baeldung.com/dummy");

        runtimeService.startProcessInstanceByKey("articleReview", variables);
        Task task = taskService.createTaskQuery().singleResult();

        assertEquals("Review the submitted tutorial", task.getName());

        variables.put("approved", true);
        taskService.complete(task.getId(), variables);

        assertEquals(0, runtimeService.createProcessInstanceQuery().count());
    }
}
This should pretty much look like a standard unit test in Spring, except for few annotations like @Deployment. Now, the @Deployment annotation is provided by Flowable to create and delete a process deployment around test methods.
7. Understanding the Deployment of Processes
While we’ll not cover the details of process deployment in this tutorial, it is worthwhile to cover some aspects that are of importance.
Typically, processes are archived as Business Archive (BAR) and deployed in an application. While being deployed, this archive is scanned for artifacts — like process definitions — and processed. You may have noticed the convention of the process definition file ending with “.bpmn20.xml”.
While we’ve used the default in-memory H2 database in our tutorial, this actually cannot be used in a real-world application, for the simple reason that an in-memory database will not retain any data across start-ups and is practically impossible to use in a clustered environment! Hence, we must use a production-grade relational database and provide the required configurations in the application.
While BPMN 2.0 itself does not have any notion of versioning, Flowable creates a version attribute for the process, which is deployed in the database. If an updated version of the same process, as identified by the attribute “id”, is deployed, a new entry is created with the version being incremented. When we try to start a process by “id”, the process engine fetches the latest version of the process definition deployed.
If we use one of the designers we discussed earlier to create the process definition, we already have a visualization for our process. We can export the process diagram as an image and place it alongside the XML process definition file. If we stick to the standard naming convention suggested by Flowable, this image will be processed by the process engine along with the process itself. Moreover, we can fetch this image through APIs as well!
8. Browsing History of Process Instances
It is often of key importance in the case of business processes to understand what happened in the past. We may need this for simple debugging or complex legal auditing purposes.
Flowable records what happens through the process execution and keeps it in the database. Moreover, Flowable makes this history available through APIs to query and analyze. There are six entities under which Flowable records these, and the HistoryService has methods to query them all.
Let’s see a simple query to fetch finished process instances:
HistoryService historyService = processEngine.getHistoryService();
List<HistoricActivityInstance> activities = historyService
  .createHistoricActivityInstanceQuery()
  .processInstanceId(processInstance.getId())
  .finished()
  .orderByHistoricActivityInstanceEndTime()
  .asc()
  .list();
As we can see, the API to query recorded data is pretty composable. In this example, we’re querying finished process instances by ID and ordering them in ascending order of their end time.
9. Monitoring Processes
Monitoring is a key aspect of any business-critical application, and even more so for an application handling business processes of an organization. Flowable has several options to let us monitor processes in real time.
Flowable provides specific MBeans that we can access over JMX, to not only gather data for monitoring but to perform many other activities as well. We can integrate this with any standard JMX client, including jconsole, which is present alongside standard Java distributions.
Using JMX for monitoring opens a lot of options but is relatively complex and time-consuming. However, since we’re using Spring Boot, we’re in luck!
Spring Boot offers Actuator Endpoints to gather application metrics over HTTP. We can seamlessly integrate this with a tool stack like Prometheus and Grafana to create a production-grade monitoring tool with minimal effort.
Flowable provides an additional Actuator Endpoint exposing information about the running processes. This is not as good as gathering information through JMX, but it is quick, easy and, most of all, sufficient.
10. Conclusion
In this tutorial, we discussed business processes and how to define them in the BPMN 2.0 standard. Then, we discussed the capabilities of Flowable process engine and APIs to deploy and execute processes. We saw how to integrate this in a Java application, specifically in Spring Boot.
Continuing further, we discussed other important aspects of processes like their deployment, visualization, and monitoring. Needless to say, we’ve just scratched the surface of the business process and a powerful engine like Flowable. Flowable has a very rich API with sufficient documentation available. This tutorial, however, should have piqued our interest in the subject!


