

1. Introduction
In this article, we will build the backend of a blogging service powered by the Fauna database service, using Spring and Java 17.
NOTE: This article is using a deprecated version of the Fauna Query Language. Refer to Fauna’s Documentation for the latest version of the query language.
2. Project Setup
We have some initial setup steps that we need to perform before we can start building our service – specifically, we need to create a Fauna database and a blank Spring application.
2.1. Creating a Fauna Database
Before starting, we’ll need a Fauna database to work with. If we don’t already have one, we’ll need to create a new account with Fauna.
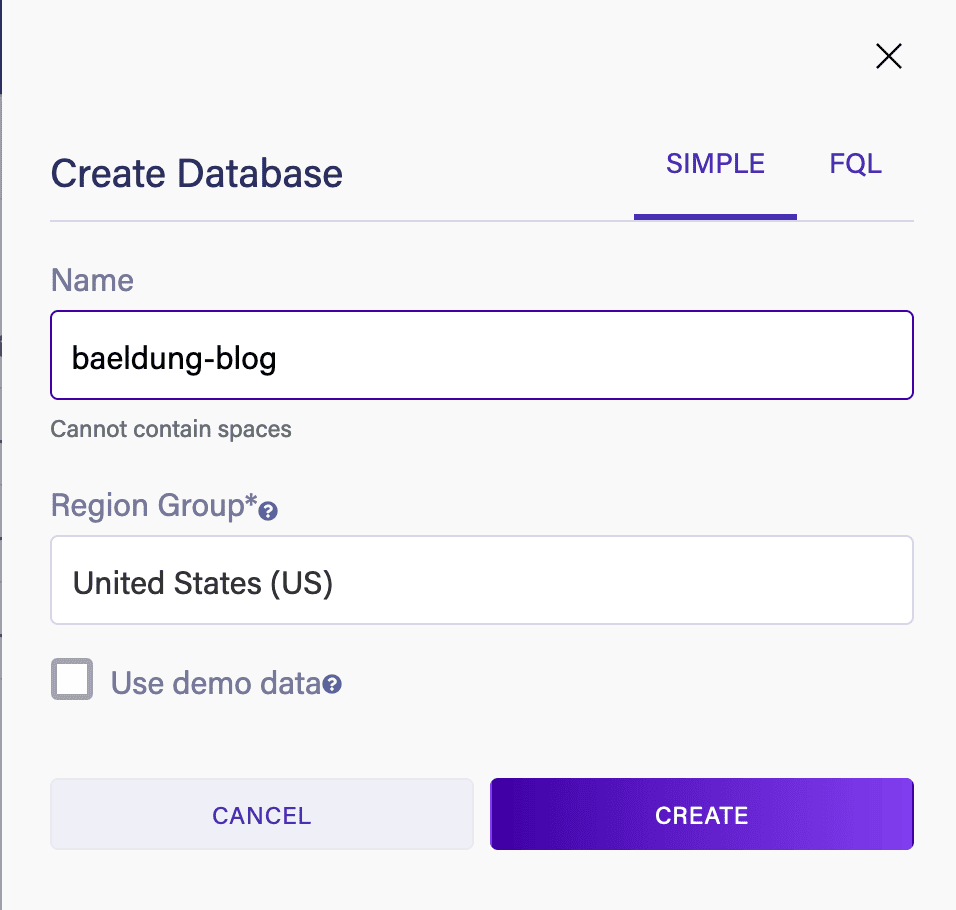
Once this is done, we can create a new database. Give this a name and a region, and opt not to include the demo data as we want to build our own schema:
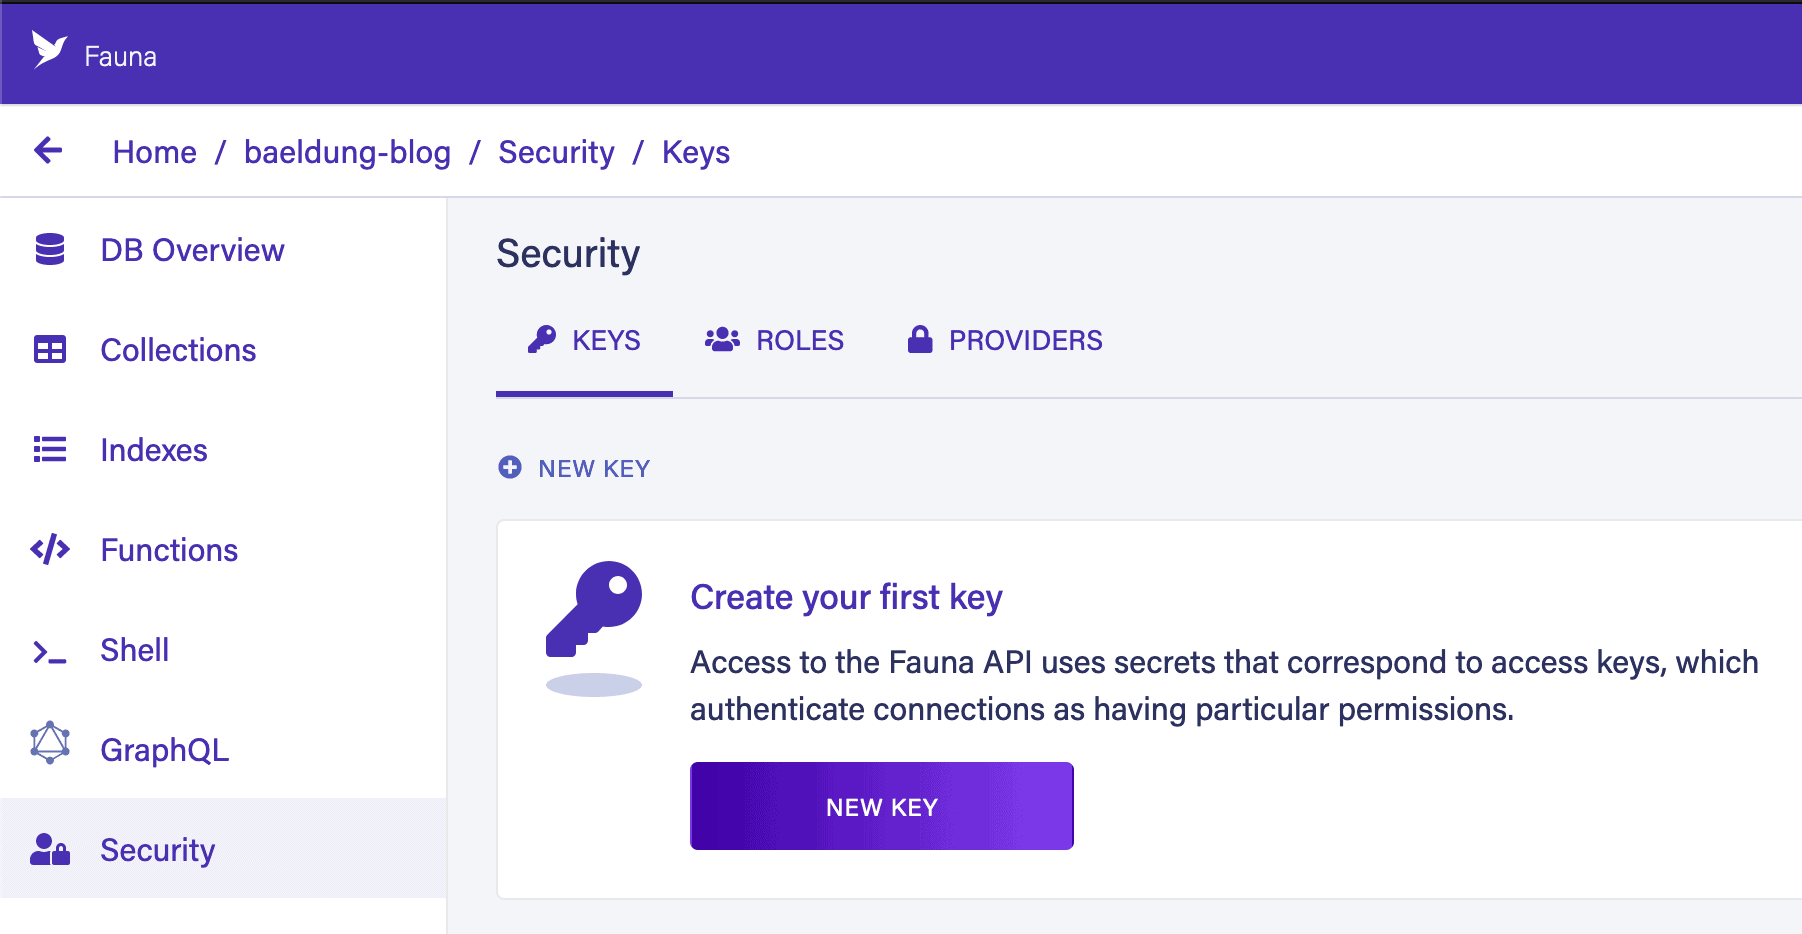
Next, we need to create a security key to access this from our application. We can do this from the Security tab within our database:
In here, we need to select a “Role” of “Server” and, optionally, give the key a name. This means that the key can access this database, but only this database. Alternatively, we have an option of “Admin”, which can be used to access any database in our account:
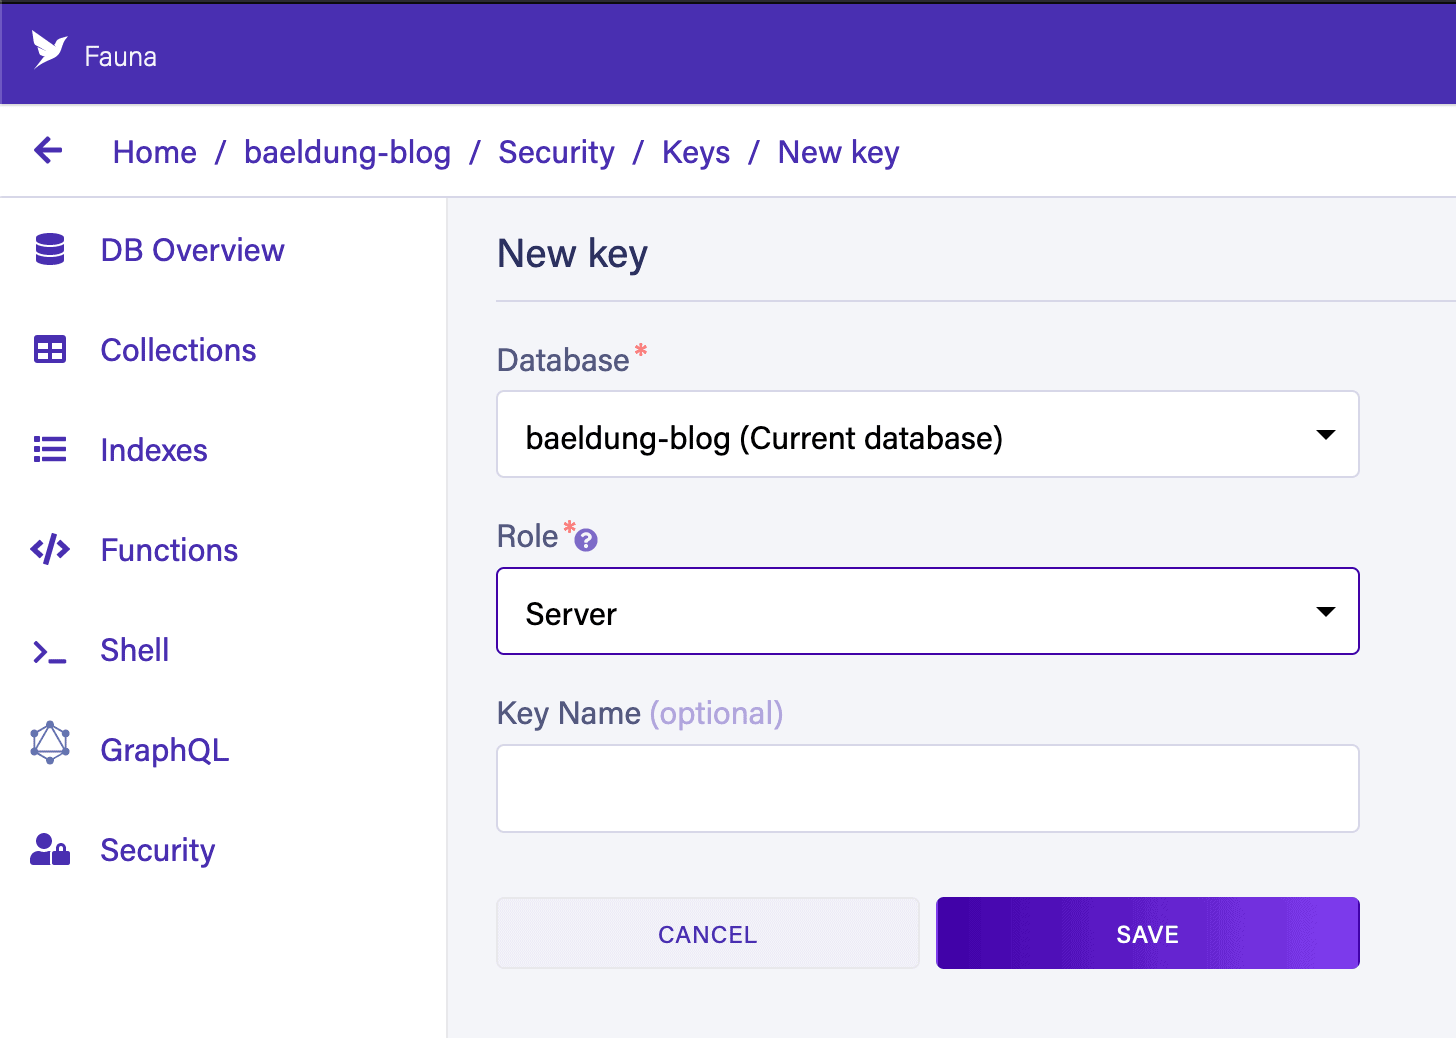
When this is done, we need to write down our secret. This is necessary to access the service, but it can’t be obtained again once we leave this page, for security reasons.
2.2. Creating a Spring Application
Once we have our database, we can create our application. Since this will be a Spring webapp, we’re best off bootstrapping this from Spring Initializr.
We want to select the options to create a Maven project using the latest release of Spring and the latest LTS release of Java – at the time of writing, these were Spring 2.6.2 and Java 17. We also want to select Spring Web and Spring Security as dependencies for our service:
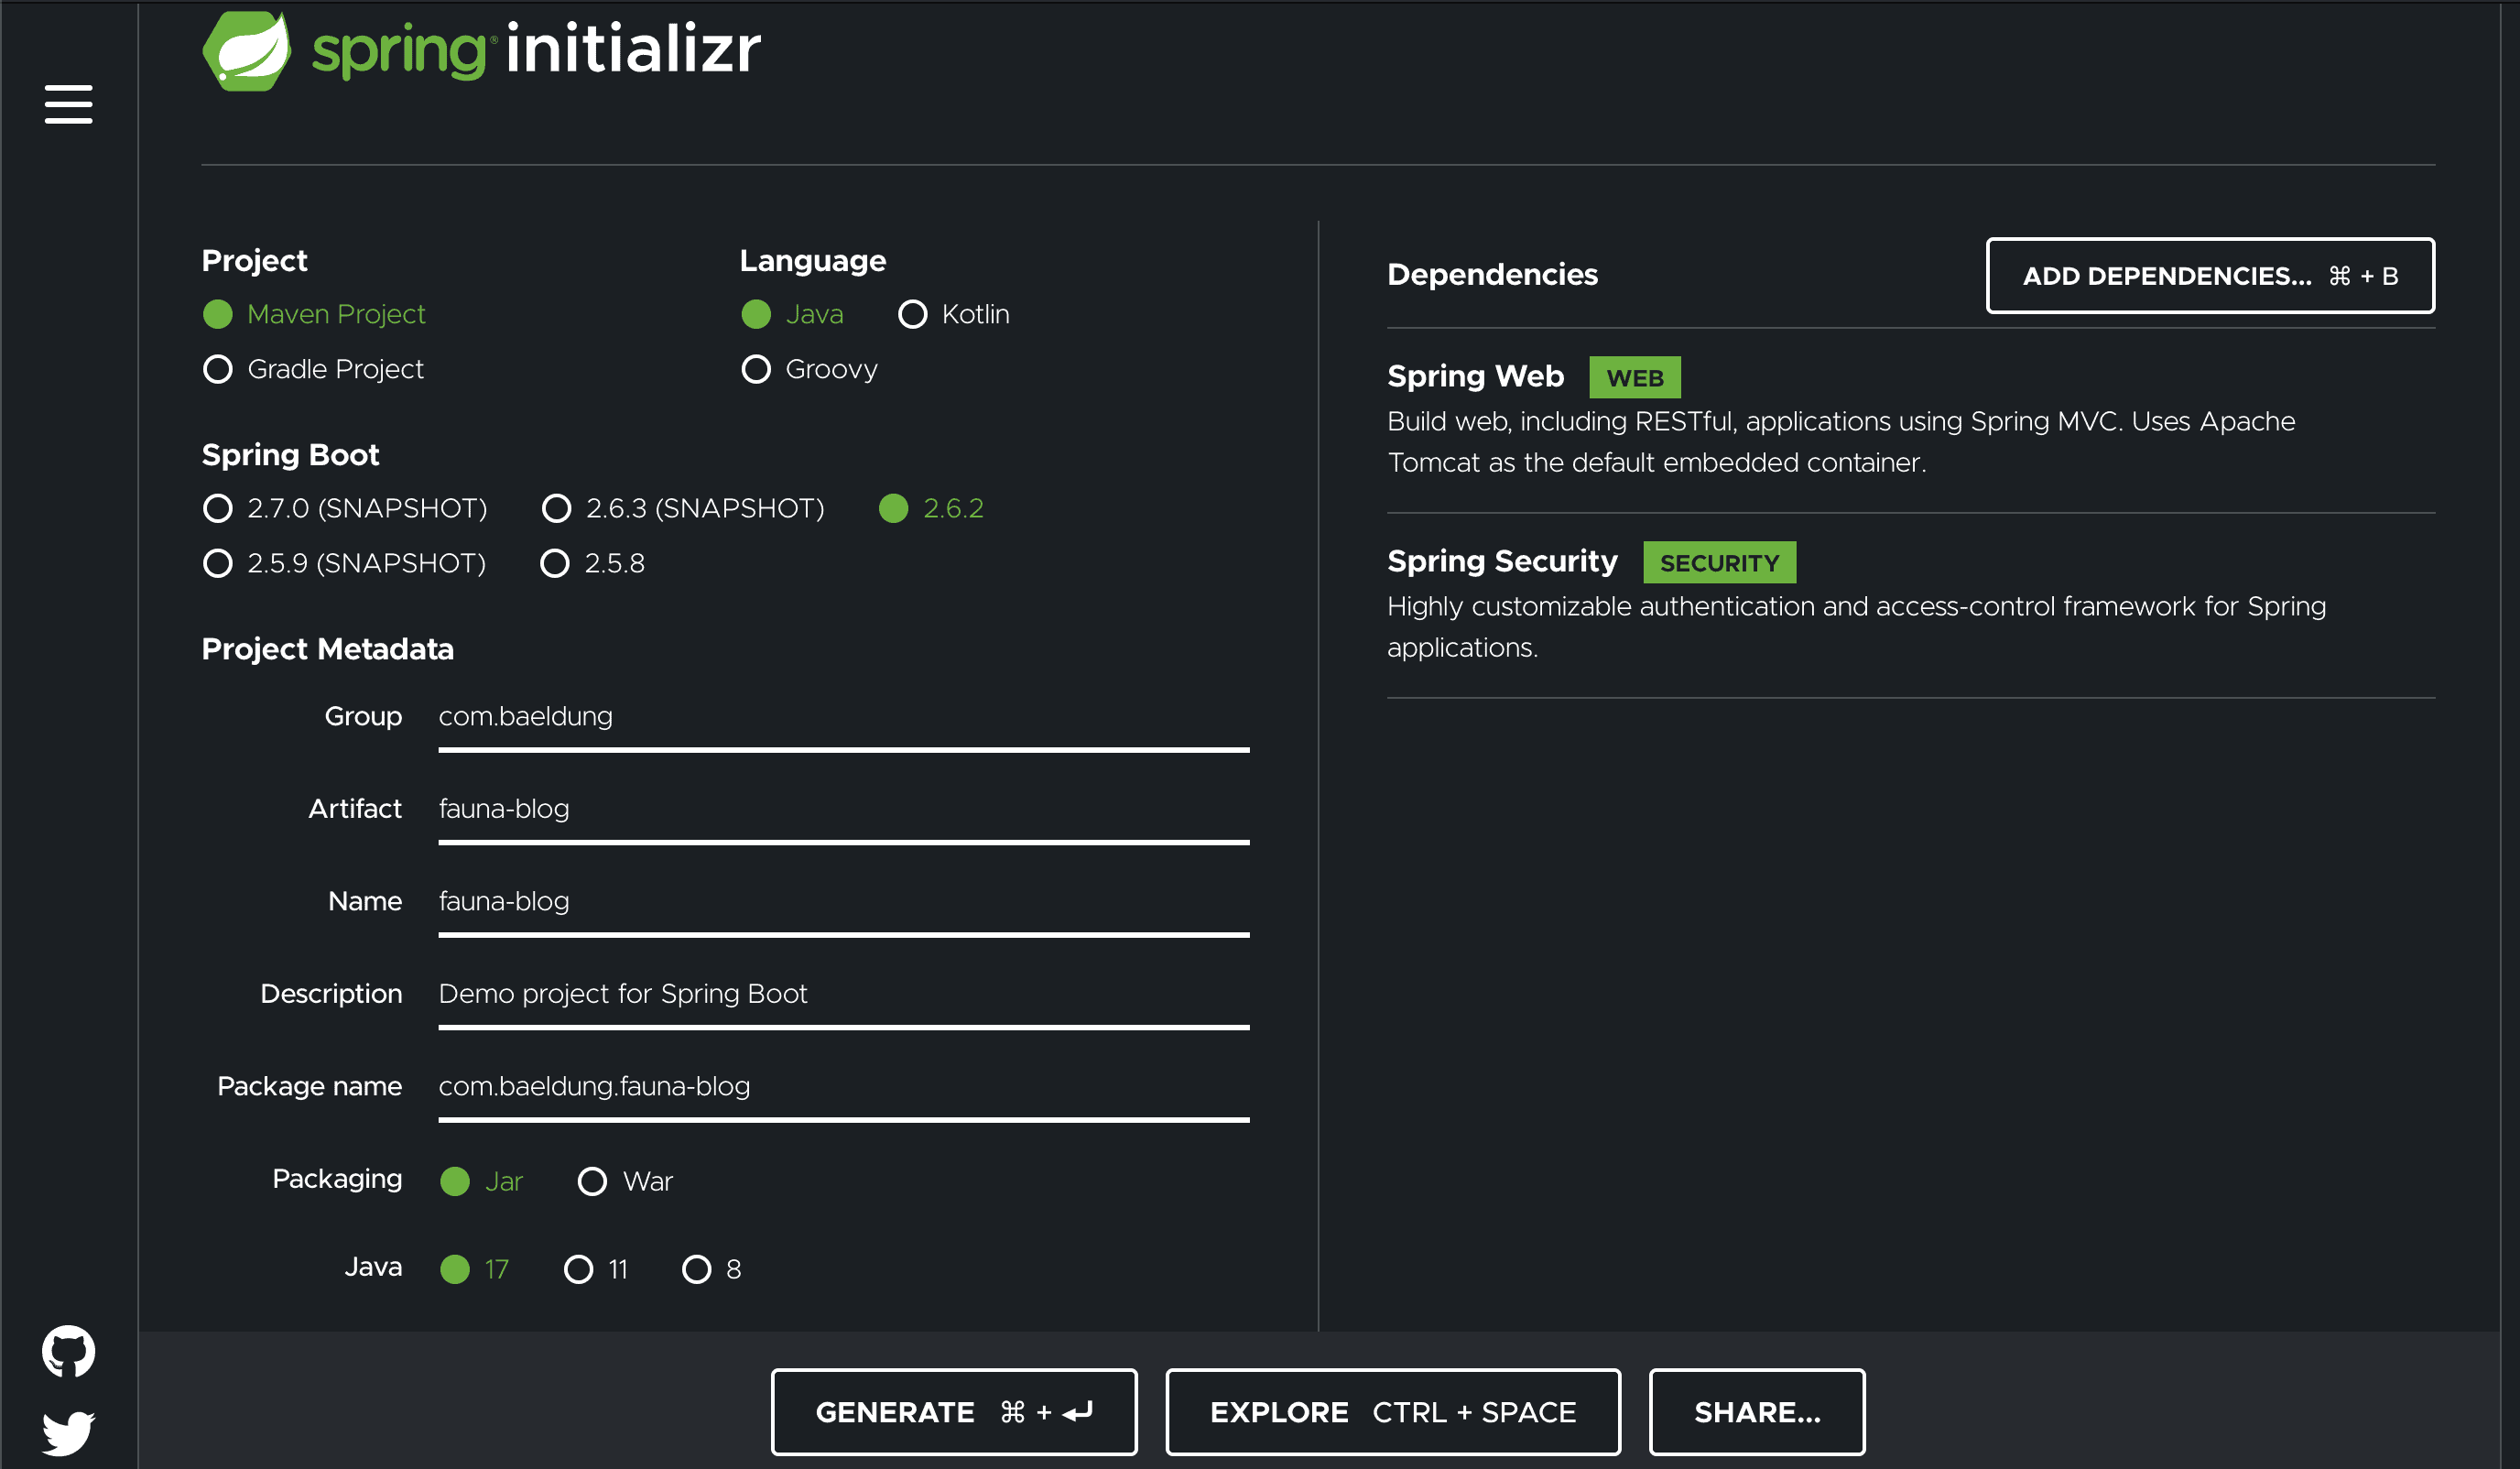
Once we’re done here, we can hit the “Generate” button to download our starter project.
Next, we need to add the Fauna drivers to our project. This is done by adding a dependency on them to the generated pom.xml file:
<dependency>
    <groupId>com.faunadb</groupId>
    <artifactId>faunadb-java</artifactId>
    <version>4.2.0</version>
    <scope>compile</scope>
</dependency>
At this point, we should be able to execute mvn install and have the build successfully download everything we need.
2.3. Configuring a Fauna Client
Once we have a Spring webapp to work with, we need a Fauna client to use the database.
First, we have some configuration to do. For this, we’ll add two properties to our application.properties file, providing the correct values for our database:
fauna.region=us
fauna.secret=<Secret>
Then, we’ll want a new Spring configuration class to construct the Fauna client:
@Configuration
class FaunaConfiguration {
    @Value("https://db.${fauna.region}.fauna.com/")
    private String faunaUrl;

    @Value("${fauna.secret}")
    private String faunaSecret;

    @Bean
    FaunaClient getFaunaClient() throws MalformedURLException {
        return FaunaClient.builder()
          .withEndpoint(faunaUrl)
          .withSecret(faunaSecret)
          .build();
    }
}
This makes an instance of FaunaClient available to the Spring context for other beans to use.
3. Adding Support for Users
Before adding support for posts to our API, we need support for the users who will author them. For this, we’ll make use of Spring Security and connect it to a Fauna collection representing the user records.
3.1. Creating a Users Collection
The first thing we want to do is to create the collection. This is done by navigating to the Collections screen in our database, using the “New Collection” button, and filling out the form. In this case, we want to create a “users” collection with the default settings:
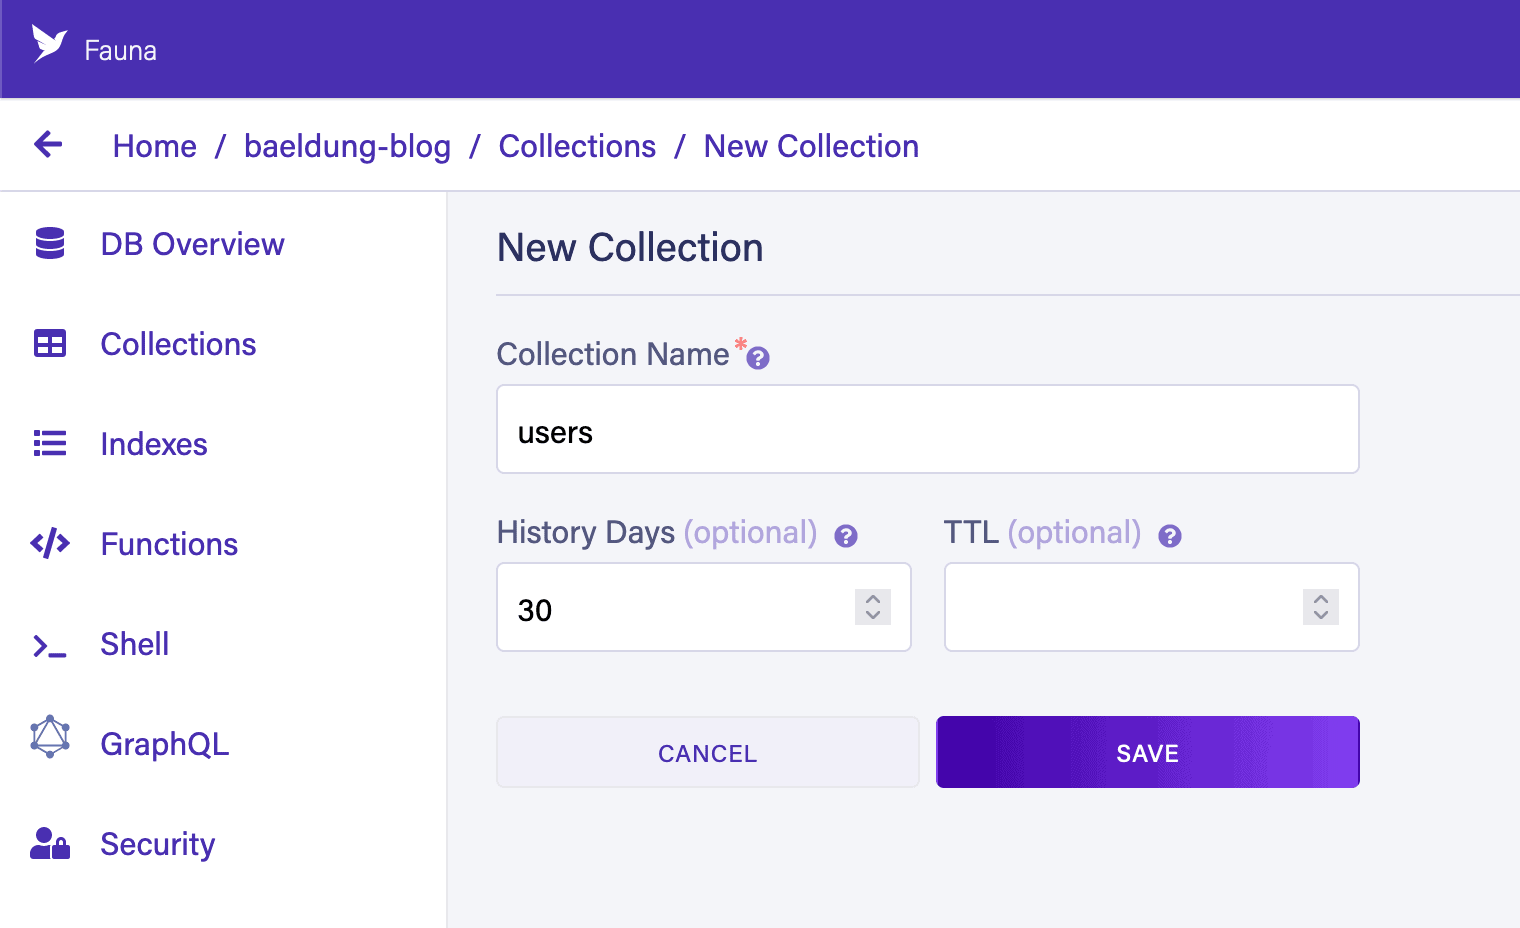
Next, we’ll add a user record. For this, we press the “New Document” button in our collection and provide the following JSON:
{
  "username": "baeldung",
  "password": "Pa55word",
  "name": "Baeldung"
}
Note that we’re storing passwords in plaintext here. Keep in mind that this is a terrible practice and is only done for the convenience of this tutorial.
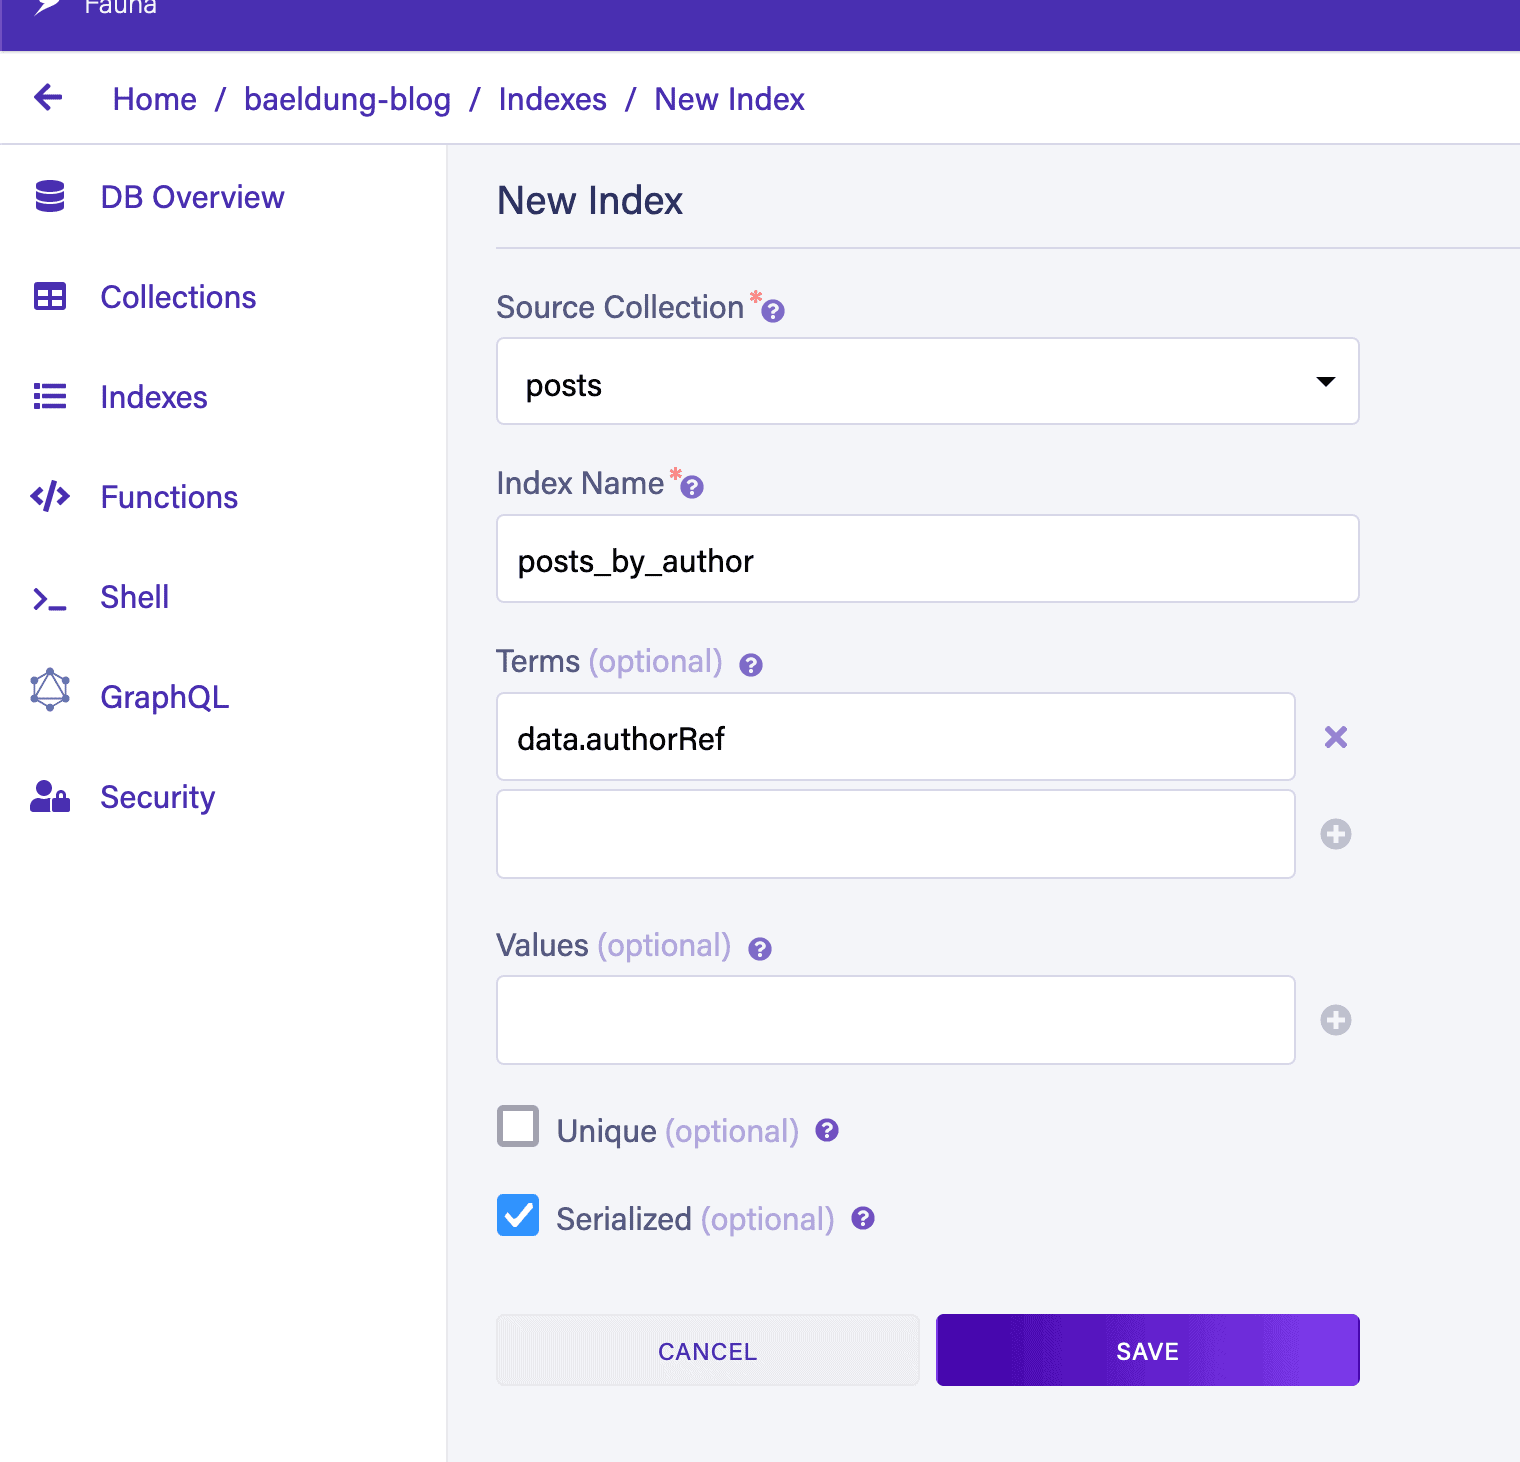
Finally, we need an index. Any time we want to access records by any field apart from the reference, we need to create an index that lets us do that. Here, we want to access records by username. This is done by pressing the “New Index” button and filling out the form:

Now, we’ll be able to write FQL queries using the “users_by_username” index to look up our users. For example:
Map(
  Paginate(Match(Index("users_by_username"), "baeldung")),
  Lambda("user", Get(Var("user")))
)
The above will return the record we created earlier.
3.2. Authenticating Against Fauna
Now that we have a collection of users in Fauna, we can configure Spring Security to authenticate against this.
To achieve this, we first need a UserDetailsService that looks users up against Fauna:
public class FaunaUserDetailsService implements UserDetailsService {
    private final FaunaClient faunaClient;

    // standard constructors

    @Override
    public UserDetails loadUserByUsername(String username) throws UsernameNotFoundException {
        try {
            Value user = faunaClient.query(Map(
              Paginate(Match(Index("users_by_username"), Value(username))),
              Lambda(Value("user"), Get(Var("user")))))
              .get();

            Value userData = user.at("data").at(0).orNull();
            if (userData == null) {
                throw new UsernameNotFoundException("User not found");
            }

            return User.withDefaultPasswordEncoder()
              .username(userData.at("data", "username").to(String.class).orNull())
              .password(userData.at("data", "password").to(String.class).orNull())
              .roles("USER")
              .build();
        } catch (ExecutionException | InterruptedException e) {
            throw new RuntimeException(e);
        }
    }
}
Next, we need some Spring configuration to set it up. This is the standard Spring Security config to wire up the above UserDetailsService:
@Configuration
@EnableWebSecurity
@EnableMethodSecurity
public class WebSecurityConfiguration {

    @Autowired
    private FaunaClient faunaClient;

    @Bean
    public SecurityFilterChain filterChain(HttpSecurity http) throws Exception {
        http.csrf(CsrfConfigurer::disable)
            .authorizeHttpRequests(requests -> requests.requestMatchers("/**")
                .permitAll())
            .httpBasic(Customizer.withDefaults());
        return http.build();
    }

    @Bean
    public UserDetailsService userDetailsService() {
        return new FaunaUserDetailsService(faunaClient);
    }
}
At this point, we can add the standard @PreAuthorize annotations to our code and accept or reject requests based on whether the authentication details exist in our “users” collection in Fauna.
4. Adding Support for Listing Posts
Our blogging service wouldn’t be outstanding if it didn’t support the concept of Posts. These are the actual blog posts that have been written and can be read by others.
4.1. Creating a Posts Collection
As before, we first need a collection to store the posts in. This is created the same, only called “posts” instead of “users”. We’re going to have four fields:
- title – The title of the post.
- content – The content of the post.
- created – The timestamp at which the post was authored.
- authorRef – The reference to the “users” record for the post’s author.
We’re also going to want two indices. The first is “posts_by_author”, which will let us search for “posts” records that have a particular author:
The second index will be “posts_sort_by_created_desc”. This will allow us to sort results by the created date, such that more recently created posts are returned first. We need to create this differently because it relies on a feature not available in the web UI – indicating that the index stores values in reverse order.
For this, we’ll need to execute a piece of FQL in the Fauna Shell:
CreateIndex({
  name: "posts_sort_by_created_desc",
  source: Collection("posts"),
  terms: [ { field: ["ref"] } ],
  values: [
    { field: ["data", "created"], reverse: true },
    { field: ["ref"] }
  ]
})
Everything that the web UI does can equally be done in this way, allowing for more control over precisely what is done.
We can then create a post in the Fauna Shell to have some starting data:
Create(
  Collection("posts"),
  {
    data: {
      title: "My First Post",
      contents: "This is my first post",
      created: Now(),
      authorRef: Select("ref", Get(Match(Index("users_by_username"), "baeldung")))
    }
  }
)
Here, we need to ensure that the value for “authorRef” is the correct value from the “users” record we created earlier. We do this by querying the “users_by_username” index to get the ref by looking up our username.
4.2. Posts Service
Now that we have support for posts within Fauna, we can build a service layer in our application to work with it.
First, we need some Java records to represent the data we’re fetching. This will consist of an Author and a Post record class:
public record Author(String username, String name) {}

public record Post(String id, String title, String content, Author author, Instant created, Long version) {}
Now, we can start our Posts Service. This will be a Spring component that wraps the FaunaClient and uses it to access the datastore:
@Component
public class PostsService {
    @Autowired
    private FaunaClient faunaClient;
}
4.3. Getting All Posts
Within our PostsService, we can now implement a method to fetch all posts. At this point, we’re not going to worry about proper pagination and instead only use the defaults – which means the first 64 documents from the resultset.
To achieve this, we’ll add the following method to our PostsService class:
List<Post> getAllPosts() throws Exception {
    var postsResult = faunaClient.query(Map(
      Paginate(
        Join(
          Documents(Collection("posts")),
          Index("posts_sort_by_created_desc")
        )
      ),
      Lambda(
        Arr(Value("extra"), Value("ref")),
        Obj(
          "post", Get(Var("ref")),
          "author", Get(Select(Arr(Value("data"), Value("authorRef")), Get(Var("ref"))))
        )
      )
    )).get();

    var posts = postsResult.at("data").asCollectionOf(Value.class).get();
    return posts.stream().map(this::parsePost).collect(Collectors.toList());
}
This executes a query to retrieve every document from the “posts” collection, sorted according to the “posts_sort_by_created_desc” index. It then applies a Lambda to build the response, consisting of two documents for each entry – the post itself and the post’s author.
Now, we need to be able to convert this response back into our Post objects:
private Post parsePost(Value entry) {
    var author = entry.at("author");
    var post = entry.at("post");

    return new Post(
      post.at("ref").to(Value.RefV.class).get().getId(),
      post.at("data", "title").to(String.class).get(),
      post.at("data", "contents").to(String.class).get(),
      new Author(
        author.at("data", "username").to(String.class).get(),
        author.at("data", "name").to(String.class).get()
      ),
      post.at("data", "created").to(Instant.class).get(),
      post.at("ts").to(Long.class).get()
    );
}
This takes a single result from our query, extracts all of its values, and constructs our richer objects.
Note that the “ts” field is a timestamp of when the record was last updated, but it isn’t the Fauna Timestamp type. Instead, it’s a Long representing the number of microseconds since the UNIX epoch. In this case, we’re treating it as an opaque version identifier instead of parsing it into a timestamp.
4.4. Gettings Posts for a Single Author
We also want to retrieve all posts authored by a specific author rather than just every post that has ever been written. This is a matter of using our “posts_by_author” index instead of just matching every document.
We’ll also link to the “users_by_username” index to query by username instead of the ref of the user record.
For this, we’ll add a new method to the PostsService class:
List<Post> getAuthorPosts(String author) throws Exception {
    var postsResult = faunaClient.query(Map(
      Paginate(
        Join(
          Match(Index("posts_by_author"), Select(Value("ref"), Get(Match(Index("users_by_username"), Value(author))))),
          Index("posts_sort_by_created_desc")
        )
      ),
      Lambda(
        Arr(Value("extra"), Value("ref")),
        Obj(
          "post", Get(Var("ref")),
          "author", Get(Select(Arr(Value("data"), Value("authorRef")), Get(Var("ref"))))
        )
      )
    )).get();

    var posts = postsResult.at("data").asCollectionOf(Value.class).get();
    return posts.stream().map(this::parsePost).collect(Collectors.toList());
}
4.5. Posts Controller
We’re now able to write our posts controller, which will allow HTTP requests to our service to retrieve posts. This will listen on the “/posts” URL and will return either all posts or else the posts for a single author, depending on whether or not an “author” parameter is provided:
@RestController
@RequestMapping("/posts")
public class PostsController {
    @Autowired
    private PostsService postsService;

    @GetMapping
    public List<Post> listPosts(@RequestParam(value = "author", required = false) String author)
        throws Exception {
        return author == null
          ? postsService.getAllPosts()
          : postsService.getAuthorPosts(author);
    }
}
At this point, we can start our application and make requests to /posts or /posts?author=baeldung and get the results:
[
    {
        "author": {
            "name": "Baeldung",
            "username": "baeldung"
        },
        "content": "Introduction to FaunaDB with Spring",
        "created": "2022-01-25T07:36:24.563534Z",
        "id": "321742264960286786",
        "title": "Introduction to FaunaDB with Spring",
        "version": 1643096184600000
    },
    {
        "author": {
            "name": "Baeldung",
            "username": "baeldung"
        },
        "content": "This is my second post",
        "created": "2022-01-25T07:34:38.303614Z",
        "id": "321742153548038210",
        "title": "My Second Post",
        "version": 1643096078350000
    },
    {
        "author": {
            "name": "Baeldung",
            "username": "baeldung"
        },
        "content": "This is my first post",
        "created": "2022-01-25T07:34:29.873590Z",
        "id": "321742144715882562",
        "title": "My First Post",
        "version": 1643096069920000
    }
]
5. Creating and Updating Posts
So far, we have an entirely read-only service that will let us fetch the most recent posts. However, to be helpful, we want to create and update posts as well.
5.1. Creating New Posts
First, we’ll support creating new posts. For this, we’ll add a new method to our PostsService:
public void createPost(String author, String title, String contents) throws Exception {
    faunaClient.query(
      Create(Collection("posts"),
        Obj(
          "data", Obj(
            "title", Value(title),
            "contents", Value(contents),
            "created", Now(),
            "authorRef", Select(Value("ref"), Get(Match(Index("users_by_username"), Value(author))))
          )
        )
      )
    ).get();
}
If this looks familiar, it’s the Java equivalent of when we created a new post in the Fauna shell earlier.
Next, we can add a controller method to let clients create posts. For this, we first need a Java record to represent the incoming request data:
public record UpdatedPost(String title, String content) {}Now, we can create a new controller method in PostsController to handle the requests:
@PostMapping
@ResponseStatus(HttpStatus.NO_CONTENT)
@PreAuthorize("isAuthenticated()")
public void createPost(@RequestBody UpdatedPost post) throws Exception {
    String name = SecurityContextHolder.getContext().getAuthentication().getName();
    postsService.createPost(name, post.title(), post.content());
}
Note that we’re using the @PreAuthorize annotation to ensure that the request is authenticated, and then we’re using the username of the authenticated user as the author of the new post.
At this point, starting the service and sending a POST to the endpoint will cause a new record to be created in our collection, which we can then retrieve with the earlier handlers.
5.2. Updating Existing Posts
It would also be helpful for us to update existing posts instead of creating new ones. We’ll manage this by accepting a PUT request with the new title and contents and updating the post to have these values.
As before, the first thing we need is a new method on the PostsService to support this:
public void updatePost(String id, String title, String contents) throws Exception {
    faunaClient.query(
      Update(Ref(Collection("posts"), id),
        Obj(
          "data", Obj(
            "title", Value(title),
            "contents", Value(contents)
          )
        )
      )
    ).get();
}
Next, we add our handler to the PostsController:
@PutMapping("/{id}")
@ResponseStatus(HttpStatus.NO_CONTENT)
@PreAuthorize("isAuthenticated()")
public void updatePost(@PathVariable("id") String id, @RequestBody UpdatedPost post)
    throws Exception {
    postsService.updatePost(id, post.title(), post.content());
}
Note that we’re using the same request body to create and update posts. This is perfectly fine since both have the same shape and meaning – the new details for the post in question.
At this point, starting the service and sending a PUT to the correct URL will cause that record to be updated. However, if we call with an unknown ID, we’ll get an error. We can fix this with an exception handler method:
@ExceptionHandler(NotFoundException.class)
@ResponseStatus(HttpStatus.NOT_FOUND)
public void postNotFound() {}
This will now cause a request to update an unknown post to return an HTTP 404.
6. Retrieving Past Versions of Posts
Now that we’re able to update posts, it can be helpful to see old versions of them.
First, we’ll add a new method to our PostsService to retrieve posts. This takes the ID of the post and, optionally, the version before which we want to get – in other words, if we provide a version of “5”, then we want to return version “4” instead:
Post getPost(String id, Long before) throws Exception {
    var query = Get(Ref(Collection("posts"), id));
    if (before != null) {
        query = At(Value(before - 1), query);
    }

    var postResult = faunaClient.query(
      Let(
        "post", query
      ).in(
        Obj(
          "post", Var("post"),
          "author", Get(Select(Arr(Value("data"), Value("authorRef")), Var("post")))
        )
      )
    ).get();

  return parsePost(postResult);
}
Here, we introduce the At method, which will make Fauna return the data at a given point in time. Our version numbers are just timestamps in microseconds, so we can get the value before a given point by simply asking for the data 1μs before the value we were given.
Again, we need a controller method to handle the incoming calls for this. We’ll add this to our PostsController:
@GetMapping("/{id}")
public Post getPost(@PathVariable("id") String id, @RequestParam(value = "before", required = false) Long before)
    throws Exception {
    return postsService.getPost(id, before);
}
And now, we can get individual versions of individual posts. A call to /posts/321742144715882562 will get the most recent version of that post, but a call to /posts/321742144715882562?before=1643183487660000 will get the version of the post that immediately preceded that version.
7. Conclusion
Here, we’ve explored some of the features of the Fauna database and how to build an application with them. There is still a lot that Fauna can do that we haven’t covered here, but why not try exploring them for your next project?
As always, all of the code shown here is available over on GitHub.
