

Mocking is an essential part of unit testing, and the Mockito library makes it easy to write clean and intuitive unit tests for your Java code.
Get started with mocking and improve your application tests using our Mockito guide:
Handling concurrency in an application can be a tricky process with many potential pitfalls. A solid grasp of the fundamentals will go a long way to help minimize these issues.
Get started with understanding multi-threaded applications with our Java Concurrency guide:
Spring 5 added support for reactive programming with the Spring WebFlux module, which has been improved upon ever since. Get started with the Reactor project basics and reactive programming in Spring Boot:
Since its introduction in Java 8, the Stream API has become a staple of Java development. The basic operations like iterating, filtering, mapping sequences of elements are deceptively simple to use.
But these can also be overused and fall into some common pitfalls.
To get a better understanding on how Streams work and how to combine them with other language features, check out our guide to Java Streams:
Explore Spring Boot 3 and Spring 6 in-depth through building a full REST API with the framework:
Yes, Spring Security can be complex, from the more advanced functionality within the Core to the deep OAuth support in the framework.
I built the security material as two full courses - Core and OAuth, to get practical with these more complex scenarios. We explore when and how to use each feature and code through it on the backing project.
You can explore the course here:
Spring Data JPA is a great way to handle the complexity of JPA with the powerful simplicity of Spring Boot.
Get started with Spring Data JPA through the guided reference course:
Refactor Java code safely — and automatically — with OpenRewrite.
Refactoring big codebases by hand is slow, risky, and easy to put off. That’s where OpenRewrite comes in. The open-source framework for large-scale, automated code transformations helps teams modernize safely and consistently.
Each month, the creators and maintainers of OpenRewrite at Moderne run live, hands-on training sessions — one for newcomers and one for experienced users. You’ll see how recipes work, how to apply them across projects, and how to modernize code with confidence.
Join the next session, bring your questions, and learn how to automate the kind of work that usually eats your sprint time.
1. Overview
In this article, we’ll focus on creating a .docx document using the docx4j library.
Docx4j is a Java library used for creating and manipulating Office OpenXML files – which means it can only work with the .docx file type, while older versions of Microsoft Word use a .doc extension (binary files).
Note that the OpenXML format is supported by Microsoft Office starting with the 2007 version.
2. Maven Setup
To start working with docx4j, we need to add the required dependency into our pom.xml:
<dependency>
    <groupId>org.docx4j</groupId>
    <artifactId>docx4j</artifactId>
    <version>6.1.2</version>
</dependency>
<dependency>
    <groupId>org.glassfish.jaxb</groupId>
    <artifactId>jaxb-runtime</artifactId>
    <version>2.3.1</version>
</dependency>
Note that we can always look up the latest dependencies versions in the Maven Central Repository.
The JAXB dependency is needed, as docx4j uses this library under the hood to marshall/unmarshall XML parts in a docx file.
3. Create a Docx File Document
3.1. Text Elements and Styling
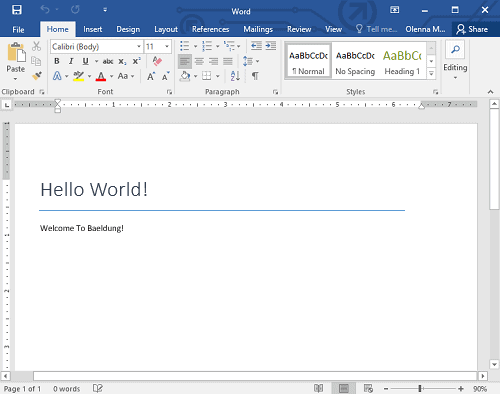
Let’s first see how to create a simple docx file – with a text paragraph:
WordprocessingMLPackage wordPackage = WordprocessingMLPackage.createPackage();
MainDocumentPart mainDocumentPart = wordPackage.getMainDocumentPart();
mainDocumentPart.addStyledParagraphOfText("Title", "Hello World!");
mainDocumentPart.addParagraphOfText("Welcome To Baeldung");
File exportFile = new File("welcome.docx");
wordPackage.save(exportFile);
Here’s the resulting welcome.docx file:
To create a new document, we have to make use of the WordprocessingMLPackage, which represents a docx file in OpenXML format, while the MainDocumentPart class holds a representation of the main document.xml part.
To clear things up, let’s unzip the welcome.docx file, and open the word/document.xml file to see what the XML representation looks like:
<w:body>
    <w:p>
        <w:pPr>
            <w:pStyle w:val="Title"/>
        </w:pPr>
        <w:r>
            <w:t>Hello World!</w:t>
        </w:r>
    </w:p>
    <w:p>
        <w:r>
            <w:t>Welcome To Baeldung!</w:t>
        </w:r>
    </w:p>
</w:body>
As we can see, each sentence is represented by a run (r) of text (t) inside a paragraph (p), and that’s what the addParagraphOfText() method is for.
The addStyledParagraphOfText() do a little more than that; it creates a paragraph properties (pPr) that holds the style to apply to the paragraph.
Simply put, paragraphs declare separate runs, and each run contain some text elements:
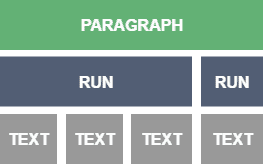
To create a nice looking document, we need to have full control of these elements (paragraph, run, and text).
So, let’s discover how to stylize our content using the runProperties (RPr) object:
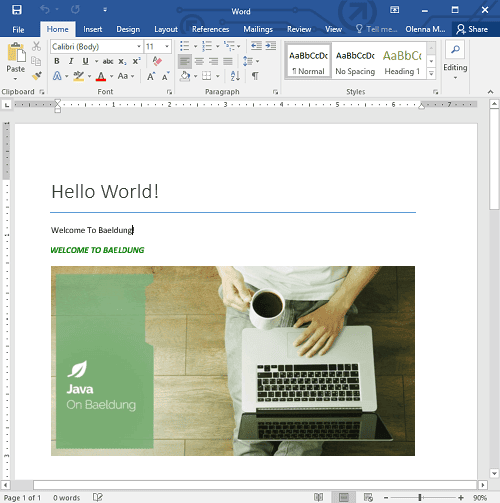
ObjectFactory factory = Context.getWmlObjectFactory();
P p = factory.createP();
R r = factory.createR();
Text t = factory.createText();
t.setValue("Welcome To Baeldung");
r.getContent().add(t);
p.getContent().add(r);
RPr rpr = factory.createRPr();
BooleanDefaultTrue b = new BooleanDefaultTrue();
rpr.setB(b);
rpr.setI(b);
rpr.setCaps(b);
Color green = factory.createColor();
green.setVal("green");
rpr.setColor(green);
r.setRPr(rpr);
mainDocumentPart.getContent().add(p);
File exportFile = new File("welcome.docx");
wordPackage.save(exportFile);
Here’s what the result looks like:

After we’ve created a paragraph, a run and a text element using createP(), createR() and createText() respectively, we’ve declared a new runProperties object (RPr) to add some styling to the text element.
The rpr object is used to set formatting properties, Bold (B), Italicized (I), and capitalized (Caps), those properties are applied to the text run using the setRPr() method.
3.2. Working With Images
Docx4j offers an easy way to add images to our Word document:
File image = new File("image.jpg" );
byte[] fileContent = Files.readAllBytes(image.toPath());
BinaryPartAbstractImage imagePart = BinaryPartAbstractImage
  .createImagePart(wordPackage, fileContent);
Inline inline = imagePart.createImageInline(
  "Baeldung Image (filename hint)", "Alt Text", 1, 2, false);
P Imageparagraph = addImageToParagraph(inline);
mainDocumentPart.getContent().add(Imageparagraph);
And here’s what the implementation of the addImageToParagraph() method looks like:
private static P addImageToParagraph(Inline inline) {
    ObjectFactory factory = new ObjectFactory();
    P p = factory.createP();
    R r = factory.createR();
    p.getContent().add(r);
    Drawing drawing = factory.createDrawing();
    r.getContent().add(drawing);
    drawing.getAnchorOrInline().add(inline);
    return p;
}
First, we’ve created the file that contains the image we want to add into our main document part, then, we’ve linked the byte array representing the image with the wordMLPackage object.
Once the image part is created, we need to create an Inline object using the createImageInline() method.
The addImageToParagraph() method embed the Inline object into a Drawing so that it can be added to a run.
Finally, like a text paragraph, the paragraph containing the image is added to the mainDocumentPart.
And here’s the resulting document:
3.3. Creating Tables
Docx4j also makes it quite easy to manipulate Tables (Tbl), rows (Tr), and columns (Tc).
Let’s see how to create a 3×3 table and add some content to it:
int writableWidthTwips = wordPackage.getDocumentModel()
  .getSections().get(0).getPageDimensions().getWritableWidthTwips();
int columnNumber = 3;
Tbl tbl = TblFactory.createTable(3, 3, writableWidthTwips/columnNumber);
List<Object> rows = tbl.getContent();
for (Object row : rows) {
    Tr tr = (Tr) row;
    List<Object> cells = tr.getContent();
    for(Object cell : cells) {
        Tc td = (Tc) cell;
        td.getContent().add(p);
    }
}
Given some rows and columns, the createTable() method creates a new Tbl object, the third argument refers to the column width in twips (which is a distance measurement – 1/1440th of an inch).
Once created, we can iterate over the content of the tbl object, and add Paragraph objects into each cell.
Let’s see what the final result looks like:

4. Reading a Docx File Document
Now that we’ve discovered how to use docx4j to create documents, let’s see how to read an existing docx file, and print its content:
File doc = new File("helloWorld.docx");
WordprocessingMLPackage wordMLPackage = WordprocessingMLPackage
  .load(doc);
MainDocumentPart mainDocumentPart = wordMLPackage
  .getMainDocumentPart();
String textNodesXPath = "//w:t";
List<Object> textNodes= mainDocumentPart
  .getJAXBNodesViaXPath(textNodesXPath, true);
for (Object obj : textNodes) {
    Text text = (Text) ((JAXBElement) obj).getValue();
    String textValue = text.getValue();
    System.out.println(textValue);
}
In this example, we’ve created a WordprocessingMLPackage object based on an existing helloWorld.docx file, using the load() method.
After that, we’ve used a XPath expression (//w:t) to get all text nodes from the main document part.
The getJAXBNodesViaXPath() method returns a list of JAXBElement objects.
As a result, all text elements inside the mainDocumentPart object are printed in the console.
Note that we can always unzip our docx files to get a better understanding of the XML structure, which helps in analyzing problems, and gives better insight into how to tackle them.
5. Conclusion
In this article, we’ve discovered how docx4j makes it easier to perform complex operations on MSWord document, such as creating paragraphs, tables, document parts, and adding images.


