

Mocking is an essential part of unit testing, and the Mockito library makes it easy to write clean and intuitive unit tests for your Java code.
Get started with mocking and improve your application tests using our Mockito guide:
Handling concurrency in an application can be a tricky process with many potential pitfalls. A solid grasp of the fundamentals will go a long way to help minimize these issues.
Get started with understanding multi-threaded applications with our Java Concurrency guide:
Spring 5 added support for reactive programming with the Spring WebFlux module, which has been improved upon ever since. Get started with the Reactor project basics and reactive programming in Spring Boot:
Since its introduction in Java 8, the Stream API has become a staple of Java development. The basic operations like iterating, filtering, mapping sequences of elements are deceptively simple to use.
But these can also be overused and fall into some common pitfalls.
To get a better understanding on how Streams work and how to combine them with other language features, check out our guide to Java Streams:
Explore Spring Boot 3 and Spring 6 in-depth through building a full REST API with the framework:
Yes, Spring Security can be complex, from the more advanced functionality within the Core to the deep OAuth support in the framework.
I built the security material as two full courses - Core and OAuth, to get practical with these more complex scenarios. We explore when and how to use each feature and code through it on the backing project.
You can explore the course here:
Spring Data JPA is a great way to handle the complexity of JPA with the powerful simplicity of Spring Boot.
Get started with Spring Data JPA through the guided reference course:
Refactor Java code safely — and automatically — with OpenRewrite.
Refactoring big codebases by hand is slow, risky, and easy to put off. That’s where OpenRewrite comes in. The open-source framework for large-scale, automated code transformations helps teams modernize safely and consistently.
Each month, the creators and maintainers of OpenRewrite at Moderne run live, hands-on training sessions — one for newcomers and one for experienced users. You’ll see how recipes work, how to apply them across projects, and how to modernize code with confidence.
Join the next session, bring your questions, and learn how to automate the kind of work that usually eats your sprint time.
1. Introduction
Thymeleaf is a Java template engine able to work directly with Spring. For an intro to Thymeleaf and Spring, have a look at this write-up.
Besides these basic functions, Thymeleaf offers us a set of utility objects that will help us perform common tasks in our application.
In this tutorial, we’ll discuss the processing and formatting of the new and old Java Date classes with a handful of features of Thymeleaf 3.0.
2. Maven Dependencies
First, let’s create the configuration to integrate Thymeleaf with Spring into our pom.xml:
<dependency>
    <groupId>org.thymeleaf</groupId>
    <artifactId>thymeleaf</artifactId>
    <version>3.1.2.RELEASE</version>
</dependency>
<dependency>
    <groupId>org.thymeleaf</groupId>
    <artifactId>thymeleaf-spring5</artifactId>
    <version>3.1.2.RELEASE</version>
</dependency>
The latest versions of thymeleaf and thymeleaf-spring5 can be found on Maven Central. Note that, for a Spring 4 project, the thymeleaf-spring4 library must be used instead of thymeleaf-spring5.
Moreover, in order to work with new Java 8 Date classes, we’ll need to add another dependency to our pom.xml:
<dependency>
    <groupId>org.thymeleaf.extras</groupId>
    <artifactId>thymeleaf-extras-java8time</artifactId>
    <version>3.0.4.RELEASE</version>
</dependency>
The thymeleaf extras is an optional module, fully supported by the official Thymeleaf team, that was created for compatibility with the Java 8 Time API. It adds a #temporals object to the Context as a utility object processor during expression evaluations. This means that it can be used to evaluate expressions in Object-Graph Navigation Language (OGNL) and Spring Expression Language (SpringEL).
3. Old and New: java.util and java.time
The Time package is a new date, time, and calendar API for the Java SE platform. The main difference between this new API and the old legacy Date API is that the new API distinguishes between machine and human views of a timeline. The machine view reveals a sequence of integral values relative to the epoch, whereas the human view reveals a set of fields (for example, year, month, and day).
To work with the new Time package, we need to configure our template engine to use the new Java8TimeDialect:
private ISpringTemplateEngine templateEngine(ITemplateResolver templateResolver) {
    SpringTemplateEngine engine = new SpringTemplateEngine();
    engine.addDialect(new Java8TimeDialect());
    engine.setTemplateResolver(templateResolver);
    return engine;
}
This will add the #temporals object similar to the ones in the Standard Dialect, allowing the formatting and creation of Temporal objects from Thymeleaf templates.
In order to test the processing of new and old classes, we’ll create the following variables and add them as model objects to our controller class:
model.addAttribute("standardDate", new Date());
model.addAttribute("localDateTime", LocalDateTime.now());
model.addAttribute("localDate", LocalDate.now());
model.addAttribute("timestamp", Instant.now());
Now, we’re ready to use Thymeleaf’s Expression and Temporals utility objects.
3.1. Format Dates
The first function that we want to cover is the formatting of a Date object (which is added to the Spring model parameters). We’ll use the ISO8601 format:
<h1>Format ISO</h1>
<p th:text="${#dates.formatISO(standardDate)}"></p>
<p th:text="${#temporals.formatISO(localDateTime)}"></p>
<p th:text="${#temporals.formatISO(localDate)}"></p>
<p th:text="${#temporals.formatISO(timestamp)}"></p>
No matter how our Date was set on the back-end side, it will be displayed in Thymeleaf according to the selected standard. The standardDate is going to be processed by the #dates utility. The new LocalDateTime, LocalDate, and Instant classes are going to be processed by the #temporals utility.
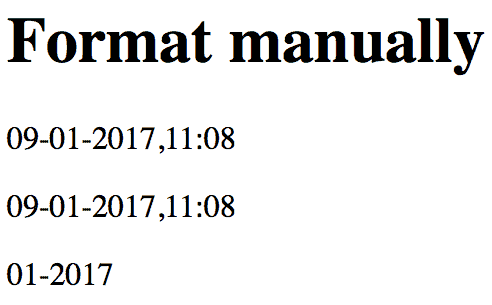
Moreover, if we want to set the format manually, we can do it by using:
<h1>Format manually</h1>
<p th:text="${#dates.format(standardDate, 'dd-MM-yyyy HH:mm')}"></p>
<p th:text="${#temporals.format(localDateTime, 'dd-MM-yyyy HH:mm')}"></p>
<p th:text="${#temporals.format(localDate, 'MM-yyyy')}"></p>
As we can observe, we cannot process the Instant class with #temporals.format(…) — it will result in UnsupportedTemporalTypeException. Moreover, formatting the LocalDate is only possible if we specify only the particular date fields, skipping the time fields.
Let’s see the final result:
3.2. Obtain Specific Date Fields
In order to obtain the specific fields of the java.util.Date class, we should use the following utility objects:
${#dates.day(date)}
${#dates.month(date)}
${#dates.monthName(date)}
${#dates.monthNameShort(date)}
${#dates.year(date)}
${#dates.dayOfWeek(date)}
${#dates.dayOfWeekName(date)}
${#dates.dayOfWeekNameShort(date)}
${#dates.hour(date)}
${#dates.minute(date)}
${#dates.second(date)}
${#dates.millisecond(date)}
For the new java.time package, we should stick with #temporals utilities:
${#temporals.day(date)}
${#temporals.month(date)}
${#temporals.monthName(date)}
${#temporals.monthNameShort(date)}
${#temporals.year(date)}
${#temporals.dayOfWeek(date)}
${#temporals.dayOfWeekName(date)}
${#temporals.dayOfWeekNameShort(date)}
${#temporals.hour(date)}
${#temporals.minute(date)}
${#temporals.second(date)}
${#temporals.millisecond(date)}
Let’s look at a few examples. First, let’s show today’s day of the week:
<h1>Show only which day of a week</h1>
<p th:text="${#dates.day(standardDate)}"></p>
<p th:text="${#temporals.day(localDateTime)}"></p>
<p th:text="${#temporals.day(localDate)}"></p>
Next, let’s show the name of the weekday:
<h1>Show the name of the week day</h1>
<p th:text="${#dates.dayOfWeekName(standardDate)}"></p>
<p th:text="${#temporals.dayOfWeekName(localDateTime)}"></p>
<p th:text="${#temporals.dayOfWeekName(localDate)}"></p>
Finally, let’s show the current second of the day:
<h1>Show the second of the day</h1>
<p th:text="${#dates.second(standardDate)}"></p>
<p th:text="${#temporals.second(localDateTime)}"></p>
Please note that in order to work with time parts, we would need to use LocalDateTime, as LocalDate will throw an error.
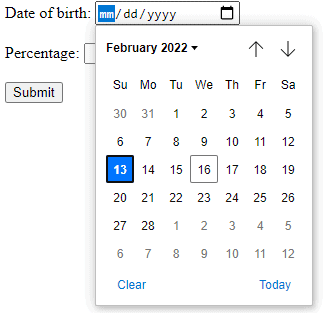
4. How to Use a Date-Picker in a Form
Let’s look at how to use a date-picker to submit a Date value from a Thymeleaf form.
First, let’s create a Student class with a Date attribute:
public class Student implements Serializable {
    @DateTimeFormat(pattern = "yyyy-MM-dd")
    private Date birthDate;
}
The @DateTimeFormat annotation declares that the birthDate field should be formatted as a Date.
Next, we’ll create a Thymeleaf form to submit a Date input:
<form th:action="@{/saveStudent}" method="post" th:object="${student}">
    <div>
        <label for="student-birth-date">Date of birth:</label>
        <input type="date" th:field="${student.birthDate}" id="student-birth-date"/>
    </div>
    <div>
        <button type="submit" class="button">Submit</button>
    </div>
</form>
When we submit the form, a controller will intercept the Student object mapped in the form with th:object attribute. Also, the th:field attribute binds the input value with the birthDate field.
Now, let’s create a controller to intercept the POST request:
@RequestMapping(value = "/saveStudent", method = RequestMethod.POST)
public String saveStudent(Model model, @ModelAttribute("student") Student student) {
model.addAttribute("student", student);
return "datePicker/displayDate.html";
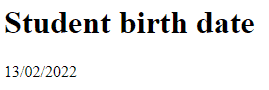
}After we submit the form, we’ll display the birthDate value on another page with the pattern dd/MM/yyyy:
<h1>Student birth date</h1>
<p th:text="${#dates.format(student.birthDate, 'dd/MM/yyyy')}"></p>
The result shows our form with a date-picker:
After submitting the form, we’ll see the selected date:
5. Conclusion
In this quick tutorial, we discussed Java Date processing features implemented in the Thymeleaf framework, version 3.0.
How to test? Our suggestion is to play with the code in a browser first, then check our existing JUnit tests as well.
Please note that our examples do not cover all available options in Thymeleaf. If you want to learn about all types of utilities, then take a look at our article covering Spring and Thymeleaf Expressions.


