A Quick Guide To Using Cloud Foundry UAA
Last updated: February 20, 2026

Mocking is an essential part of unit testing, and the Mockito library makes it easy to write clean and intuitive unit tests for your Java code.
Get started with mocking and improve your application tests using our Mockito guide:
Handling concurrency in an application can be a tricky process with many potential pitfalls. A solid grasp of the fundamentals will go a long way to help minimize these issues.
Get started with understanding multi-threaded applications with our Java Concurrency guide:
Spring 5 added support for reactive programming with the Spring WebFlux module, which has been improved upon ever since. Get started with the Reactor project basics and reactive programming in Spring Boot:
Since its introduction in Java 8, the Stream API has become a staple of Java development. The basic operations like iterating, filtering, mapping sequences of elements are deceptively simple to use.
But these can also be overused and fall into some common pitfalls.
To get a better understanding on how Streams work and how to combine them with other language features, check out our guide to Java Streams:
Explore Spring Boot 3 and Spring 6 in-depth through building a full REST API with the framework:
Yes, Spring Security can be complex, from the more advanced functionality within the Core to the deep OAuth support in the framework.
I built the security material as two full courses - Core and OAuth, to get practical with these more complex scenarios. We explore when and how to use each feature and code through it on the backing project.
You can explore the course here:
Spring Data JPA is a great way to handle the complexity of JPA with the powerful simplicity of Spring Boot.
Get started with Spring Data JPA through the guided reference course:
Refactor Java code safely — and automatically — with OpenRewrite.
Refactoring big codebases by hand is slow, risky, and easy to put off. That’s where OpenRewrite comes in. The open-source framework for large-scale, automated code transformations helps teams modernize safely and consistently.
Each month, the creators and maintainers of OpenRewrite at Moderne run live, hands-on training sessions — one for newcomers and one for experienced users. You’ll see how recipes work, how to apply them across projects, and how to modernize code with confidence.
Join the next session, bring your questions, and learn how to automate the kind of work that usually eats your sprint time.
1. Overview
Cloud Foundry User Account and Authentication (CF UAA) is an identity management and authorization service. More precisely, it’s an OAuth 2.0 provider allowing authentication and issuing tokens to Client applications.
In this tutorial, we’re going to cover the basics of setting up a CF UAA server. We’ll then look at how to use it for protecting Resource Server applications.
But before, let’s clarify the role of UAA in the OAuth 2.0 authorization framework.
2. Cloud Foundry UAA and OAuth 2.0
Let’s start by understanding how UAA relates to the OAuth 2.0 specification.
The OAuth 2.0 specification defines four participants that can connect to each other: a Resource Owner, a Resource Server, a Client, and an Authorization Server.
As an OAuth 2.0 provider, UAA plays the role of the authorization server. This means its primary goal is issuing access tokens for client applications and validating these tokens for resource servers.
To allow the interaction of these participants, we need to first to set up a UAA server and then implement two more applications: one as a client and the other as a resource server.
We’ll use the authorization_code grant flow with the client. And we’ll use Bearer token authorization with the resource server. For a more secure and efficient handshake, we’ll use signed JWTs as our access tokens.
3. Setting Up a UAA Server
First, we’ll install UAA and populate it with some demo data.
Once installed, we’ll register a client application named webappclient. Then, we’ll create a user named appuser with two roles, resource.read and resource.write.
3.1. Installation
UAA is a Java web application that can be run in any compliant servlet container. In this tutorial, we’ll use Tomcat.
Let’s go ahead and download the UAA war and deposit it into our Tomcat deployment:
wget -O $CATALINA_HOME/webapps/uaa.war \
  https://search.maven.org/remotecontent?filepath=org/cloudfoundry/identity/cloudfoundry-identity-uaa/4.27.0/cloudfoundry-identity-uaa-4.27.0.war
Before we start it up, though, we’ll need to configure its data source and JWS key pair.
3.2. Required Configuration
By default, UAA reads configuration from uaa.yml on its classpath. But, since we’ve just downloaded the war file, it’ll be better for us to tell UAA a custom location on our file system.
We can do this by setting the UAA_CONFIG_PATH property:
export UAA_CONFIG_PATH=~/.uaaAlternatively, we can set CLOUD_FOUNDRY_CONFIG_PATH. Or, we can specify a remote location with UAA_CONFIG_URL.
Then, we can copy UAA’s required configuration into our config path:
wget -qO- https://raw.githubusercontent.com/cloudfoundry/uaa/4.27.0/uaa/src/main/resources/required_configuration.yml \
  > $UAA_CONFIG_PATH/uaa.yml
Note that we are deleting the last three lines because we are going to replace them in a moment.
3.3. Configuring the Data Source
So, let’s configure the data source, where UAA is going to store information about clients.
For the purpose of this tutorial, we’re going to use HSQLDB:
export SPRING_PROFILES="default,hsqldb"Of course, since this is a Spring Boot application, we could also specify this in uaa.yml as the spring.profiles property.
3.4. Configuring the JWS Key Pair
Since we are using JWT, UAA needs to have a private key to sign each JWT that UAA issues.
OpenSSL makes this simple:
openssl genrsa -out signingkey.pem 2048
openssl rsa -in signingkey.pem -pubout -out verificationkey.pem
The authorization server will sign the JWT with the private key, and our client and resource server will verify that signature with the public key.
We’ll export them to JWT_TOKEN_SIGNING_KEY and JWT_TOKEN_VERIFICATION_KEY:
export JWT_TOKEN_SIGNING_KEY=$(cat signingkey.pem)
export JWT_TOKEN_VERIFICATION_KEY=$(cat verificationkey.pem)
Again, we could specify these in uaa.yml via the jwt.token.signing-key and jwt.token.verification-key properties.
3.5. Starting up UAA
Finally, let’s start things up:
$CATALINA_HOME/bin/catalina.sh runAt this point, we should have a working UAA server available at http://localhost:8080/uaa.
If we go to http://localhost:8080/uaa/info, then we’ll see some basic startup info
3.6. Installing the UAA Command-Line Client
The CF UAA Command-Line Client is the main tool for administering UAA, but to use it, we need to install Ruby first:
sudo apt install rubygems
gem install cf-uaac
Then, we can configure uaac to point to our running instance of UAA:
uaac target http://localhost:8080/uaaNote that if we don’t want to use command-line client, we can, of course, use UAA’s HTTP client.
3.7. Populating Clients and Users Using UAAC
Now that we have uaac installed, let’s populate UAA with some demo data. At a minimum, we’ll need: A client, a user, and resource.read and resource.write groups.
So, to do any administration, we’ll need to authentication ourselves. We’ll pick the default admin that ships with UAA, which has permissions to create other clients, users, and groups:
uaac token client get admin -s adminsecret(Of course, we definitely need to change this account – via the oauth-clients.xml file – before shipping!)
Basically, we can read this command as: “Give me a token, using client credentials with the client_id of admin and a secret of adminsecret“.
If all goes well, we’ll see a success message:
Successfully fetched token via client credentials grant.The token is stored in uaac‘s state.
Now, operating as admin, we can register a client named webappclient with client add:
uaac client add webappclient -s webappclientsecret \
--name WebAppClient \
--scope resource.read,resource.write,openid,profile,email,address,phone \
--authorized_grant_types authorization_code,refresh_token,client_credentials,password \
--authorities uaa.resource \
--redirect_uri http://localhost:8081/login/oauth2/code/uaa
And also, we can register a user named appuser with user add:
uaac user add appuser -p appusersecret --emails [email protected]Next, we’ll add two groups – resource.read and resource.write – using with group add:
uaac group add resource.read
uaac group add resource.write
And finally, we’ll assign these groups to appuser with member add:
uaac member add resource.read appuser
uaac member add resource.write appuser
Phew! So, what we’ve done so far is:
- Installed and configured UAA
- Installed uaac
- Added a demo client, users, and groups
So, let’s keep in mind these pieces of information and jump to the next step.
4. OAuth 2.0 Client
In this section, we’ll use Spring Boot to create an OAuth 2.0 Client application.
4.1. Application Setup
Let’s start by accessing Spring Initializr and generating a Spring Boot web application. We choose only the Web and OAuth2 Client components:
<dependency>
    <groupId>org.springframework.boot</groupId>
    <artifactId>spring-boot-starter-web</artifactId>
</dependency>
<dependency>
    <groupId>org.springframework.boot</groupId>
    <artifactId>spring-boot-starter-oauth2-client</artifactId>
</dependency>
In this example, we’ve used version 3.1.5 of Spring Boot.
Next, we need to register our client, webappclient.
Quite simply, we’ll need to give the app the client-id, client-secret, and UAA’s issuer-uri. We’ll also specify the OAuth 2.0 scopes that this client wants the user to grant to it:
#registration
spring.security.oauth2.client.registration.uaa.client-id=webappclient
spring.security.oauth2.client.registration.uaa.client-secret=webappclientsecret
spring.security.oauth2.client.registration.uaa.scope=resource.read,resource.write,openid,profile

#provider
spring.security.oauth2.client.provider.uaa.issuer-uri=http://localhost:8080/uaa/oauth/token
For more information about these properties, we can have a look at the Java docs for the registration and provider beans.
And since we’re already using port 8080 for UAA, let’s have this run on 8081:
server.port=80814.2. Login
Now if we access the /login path, we should have a list of all registered clients. In our case, we have only one registered client:

Clicking on the link will redirect us to the UAA login page:

Here, let’s login with appuser/appusersecret.
Submitting the form should redirect us to an approval form where the user can authorize or deny access to our client:
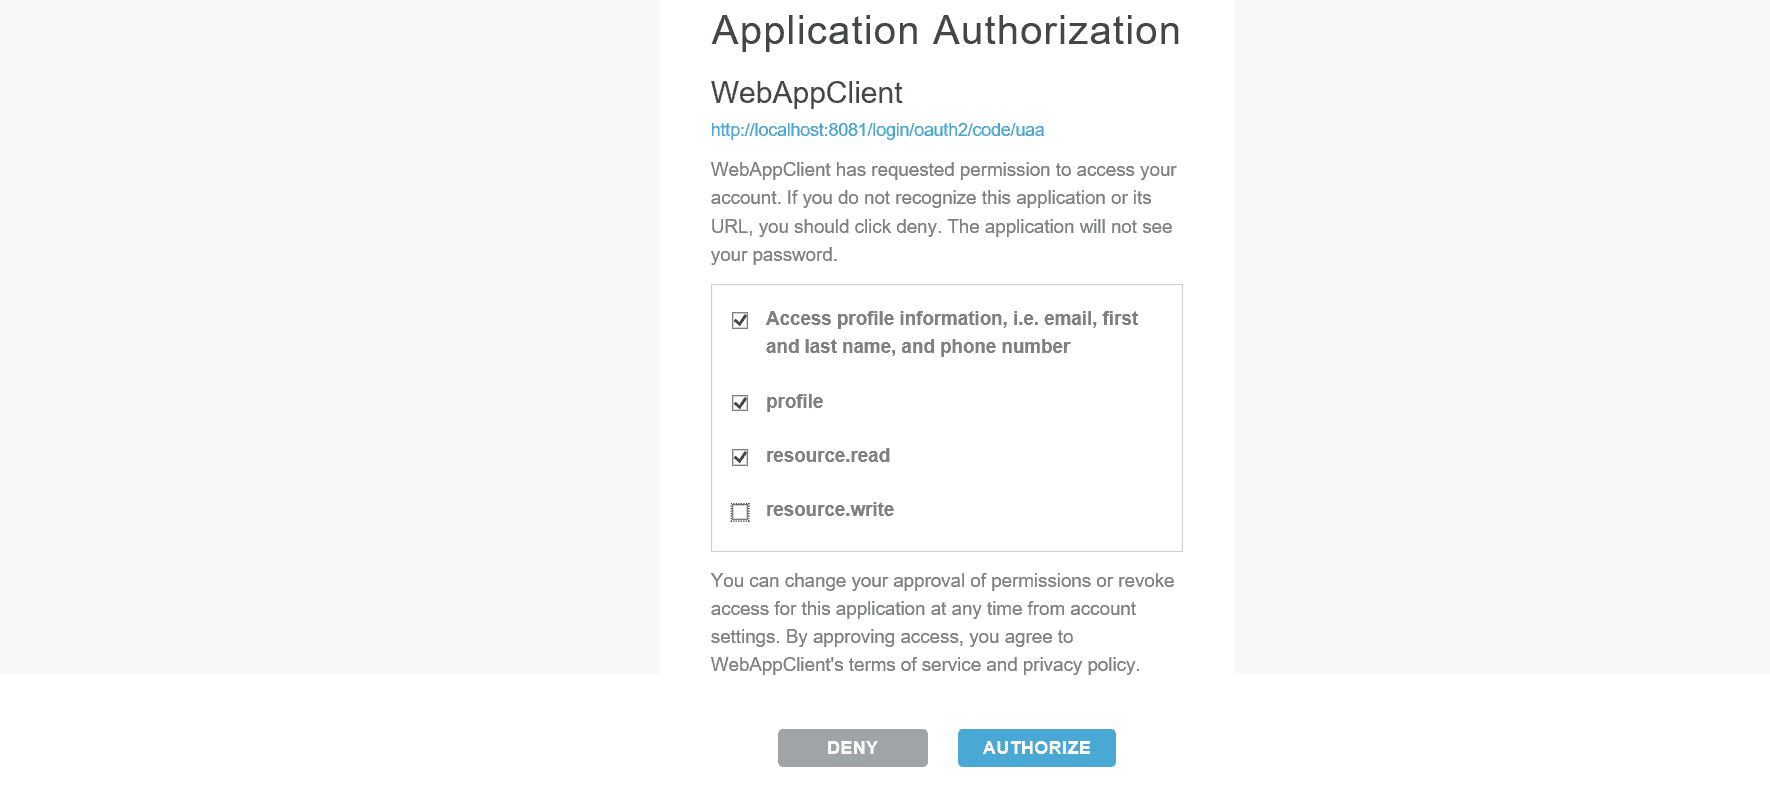
The user can then grant which privileges she wants. For our purposes, we’ll select everything except resource:write.
Whatever the user checks will be the scopes in the resulting access token.
To prove this, we can copy the token shown at the index path, http://localhost:8081, and decode it using the JWT debugger. We should see the scopes we checked on the approval page:
{
  "jti": "f228d8d7486942089ff7b892c796d3ac",
  "sub": "0e6101d8-d14b-49c5-8c33-fc12d8d1cc7d",
  "scope": [
    "resource.read",
    "openid",
    "profile"
  ],
  "client_id": "webappclient"
  // more claims
}
Once our client application receives this token, it can authenticate the user and they’ll have access to the app.
Now, an app that doesn’t show any data isn’t very useful, so our next step will be to stand up a resource server – which has the user’s data – and connect the client to it.
The completed resource server will have two protected APIs: one that requires the resource.read scope and another that requires resource.write.
What we’ll see is that the client, using the scopes we granted, will be able to call the read API but not write.
5. Resource Server
The resource server hosts the user’s protected resources.
It authenticates clients via the Authorization header and in consultation with an authorization server – in our case, that’s UAA.
5.1. Application Set Up
To create our resource server, we’ll use Spring Initializr again to generate a Spring Boot web application. This time, we’ll choose the Web and OAuth2 Resource Server components:
<dependency>
    <groupId>org.springframework.boot</groupId>
    <artifactId>spring-boot-starter-oauth2-resource-server</artifactId>
</dependency>
<dependency>
    <groupId>org.springframework.boot</groupId>
    <artifactId>spring-boot-starter-web</artifactId>
</dependency>
As with the Client application, we’re using the version 3.1.5 of Spring Boot.
The next step is to indicate the location of the running CF UAA in the application.properties file:
spring.security.oauth2.resourceserver.jwt.issuer-uri=http://localhost:8080/uaa/oauth/tokenOf course, let’s pick a new port here, too. 8082 will work fine:
server.port=8082And that’s it! We should have a working resource server and by default, all requests will require a valid access token in the Authorization header.
5.2. Protecting Resource Server APIs
Next, let’s add some endpoints worth protecting, though.
We’ll add a RestController with two endpoints, one authorized for users having the resource.read scope and the other for users having the resource.write scope:
@GetMapping("/read")
public String read(Principal principal) {
    return "Hello write: " + principal.getName();
}

@GetMapping("/write")
public String write(Principal principal) {
    return "Hello write: " + principal.getName();
}
Next, we’ll override the default Spring Boot configuration to protect the two resources:
@EnableWebSecurity
public class CFUAAOAuth2ResourceServerSecurityConfiguration {

    @Bean
    public SecurityFilterChain filterChain(HttpSecurity http) throws Exception {
        http.authorizeHttpRequests(auth -> auth
            .requestMatchers("/read/**")
            .hasAuthority("SCOPE_resource.read")
            .requestMatchers("/write/**")
            .hasAuthority("SCOPE_resource.write")
            .anyRequest()
            .authenticated())
            .oauth2ResourceServer((oauth2) -> oauth2.jwt(Customizer.withDefaults()));
        return http.build();
    }
}
Note that the scopes supplied in the access token are prefixed with SCOPE_ when they are translated to a Spring Security GrantedAuthority.
5.3. Requesting a Protected Resource From a Client
From the Client application, we’ll call the two protected resources using RestTemplate. Before making the request, we retrieve the access token from the context and add it to the Authorization header:
private String callResourceServer(OAuth2AuthenticationToken authenticationToken, String url) {
    OAuth2AuthorizedClient oAuth2AuthorizedClient = this.authorizedClientService.
      loadAuthorizedClient(authenticationToken.getAuthorizedClientRegistrationId(),
      authenticationToken.getName());
    OAuth2AccessToken oAuth2AccessToken = oAuth2AuthorizedClient.getAccessToken();

    HttpHeaders headers = new HttpHeaders();
    headers.add("Authorization", "Bearer " + oAuth2AccessToken.getTokenValue());

    // call resource endpoint

    return response;
}
Note, though, that we can remove this boilerplate if we use WebClient instead of RestTemplate.
Then, we’ll add two calls to the resource server endpoints:
@GetMapping("/read")
public String read(OAuth2AuthenticationToken authenticationToken) {
    String url = remoteResourceServer + "/read";
    return callResourceServer(authenticationToken, url);
}

@GetMapping("/write")
public String write(OAuth2AuthenticationToken authenticationToken) {
    String url = remoteResourceServer + "/write";
    return callResourceServer(authenticationToken, url);
}
As expected, the call of the /read API will succeed, but not the /write one. The HTTP status 403 tells us that the user is not authorized.
6. Conclusion
In this article, we started with a brief overview of the OAuth 2.0 as it’s the base foundation for UAA, an OAuth 2.0 Authorization Server. Then, we configured it for issuing access tokens for a client and securing a resource server application.


